

3D AI Rendering with MINIMAX H3: Clay‑to‑Cinema ComfyUI Workflow#
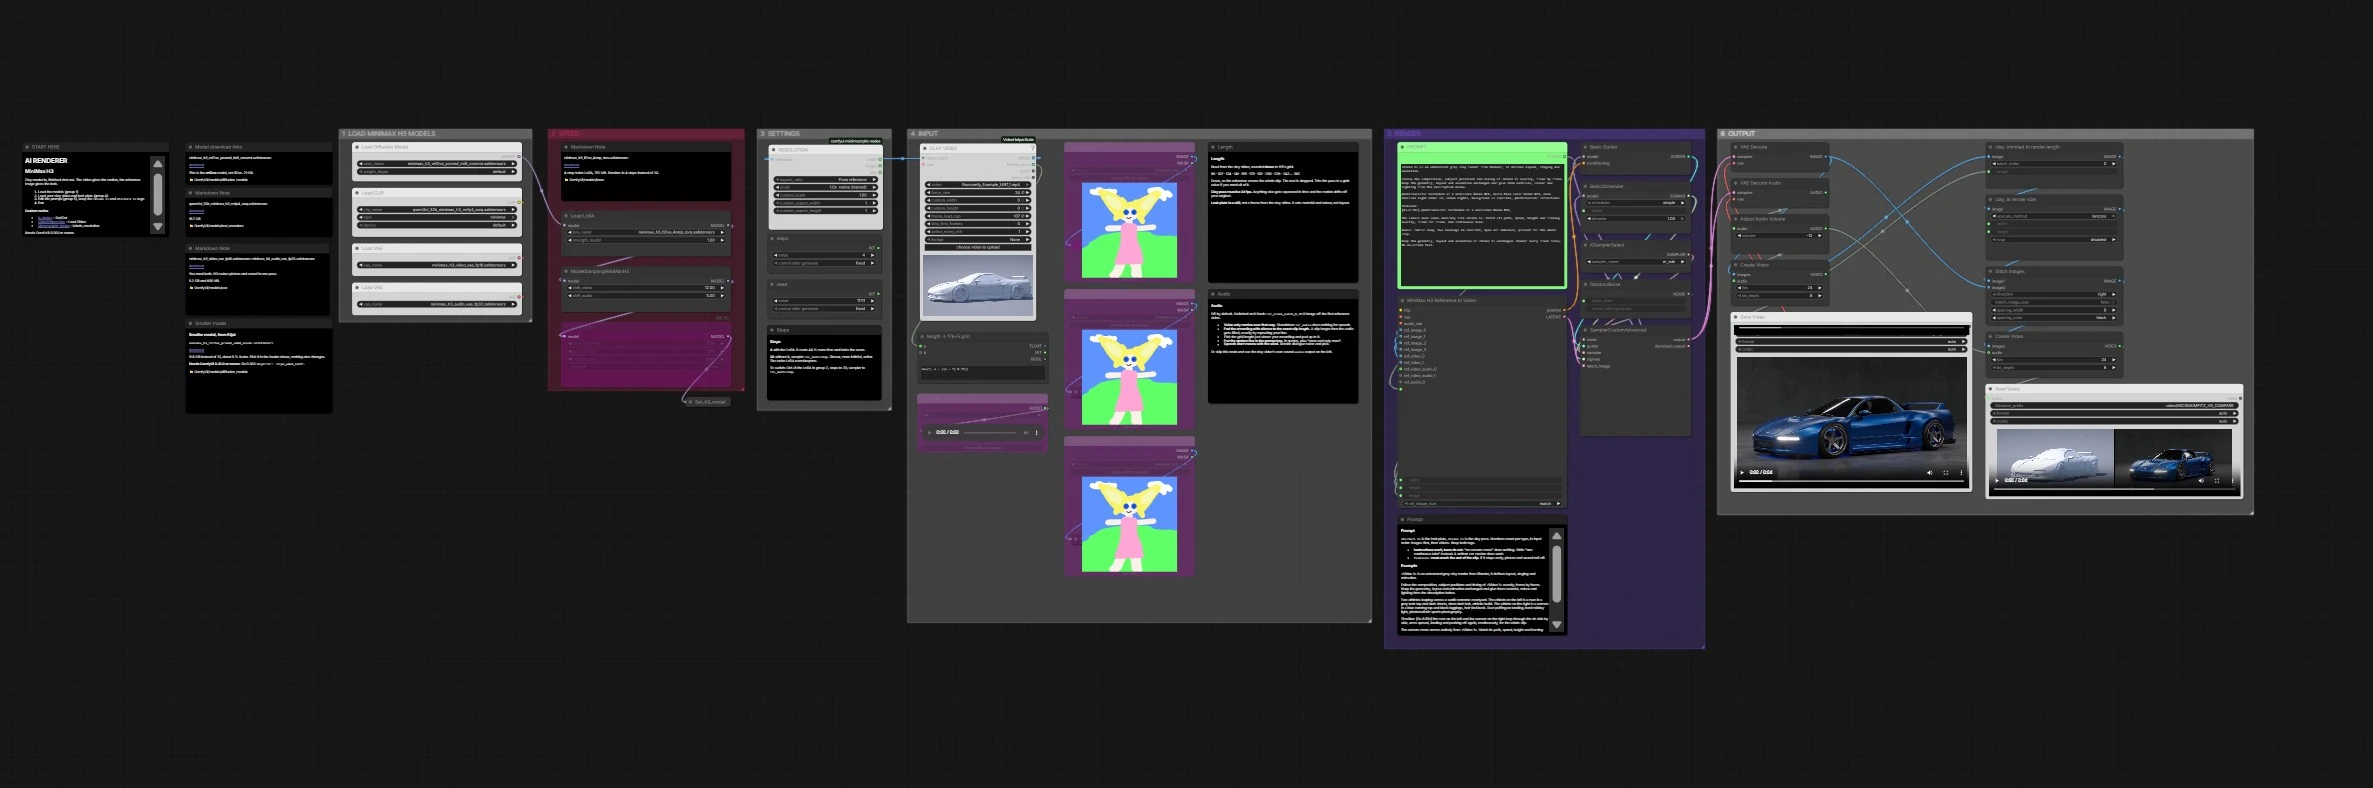
This ComfyUI graph by Mickmumpitz turns a plain grey 3D “clay” render into a cinematic, fully textured video with optional synchronized audio. It uses the original animation as structure, so composition, geometry and motion stay locked while the model adds materials, lighting, environments and photoreal detail.
Built for 3D artists, animators and filmmakers, 3D AI Rendering with MINIMAX H3 bridges DCC animation and AI video generation. Provide a 24 fps clay pass for motion, one or more still “look plates” for style, then guide the result with a concise prompt and timeline. The workflow produces a polished shot and an optional side‑by‑side comparison for quick review.
Key models in ComfyUI 3D AI Rendering with MINIMAX H3 workflow#
- MiniMax‑H3 ref2va diffusion model. The core video generator that follows a reference video for structure while synthesizing frames and audio together. Use the ref2va variant shipped for ComfyUI: minimax_h3_ref2va_pruned_int8_convrot.safetensors. Model
- Qwen‑VL 32B text encoder for MiniMax H3. Encodes the prompt, tags and timeline into conditioning understood by H3. Use the MiniMax‑tuned file qwen3vl_32b_minimax_h3_nvfp4_awq.safetensors. Encoder
- MiniMax‑H3 Video VAE (fp16). Decodes video latents to RGB frames. VAE video
- MiniMax‑H3 Audio VAE (fp32). Decodes audio latents to sound that tracks the generated visuals. VAE audio
- MiniMax‑H3 FL2VA 4‑step Turbo LoRA (optional). Speeds up inference and adds punchy detail when desired. LoRA
- MiniMax‑H3 pruned w4a8 mixed (optional smaller base). A reduced‑size alternative if you need to save VRAM. Alternative base
How to use ComfyUI 3D AI Rendering with MINIMAX H3 workflow#
At a glance, the clay video defines motion, the look plate stills define materials and lighting, and the prompt ties them together. The render group feeds these signals into MiniMax H3, then the output group decodes frames and audio and saves your results, including a side‑by‑side comparator.
Group 1 — LOAD MINIMAX H3 MODELS#
This group prepares the model stack for 3D AI Rendering with MINIMAX H3. UNETLoader (#8) loads the MiniMax‑H3 ref2va diffusion weights, CLIPLoader (#9) loads the Qwen‑VL 32B text encoder, and two VAELoader nodes (#11 for video, #13 for audio) supply decoders. Small Set_* and Get_* helpers cache these components for reuse across the graph. Keep both VAEs active because MiniMax‑H3 can produce picture and sound in a single pass. If you swap to the smaller Kijai variant, only change the diffusion model file.
Group 2 — SPEED#
This area accelerates iteration while preserving the structural lock to your clay pass. LoraLoaderModelOnly (#16) applies the 4‑step Turbo LoRA for faster, crisper previews. MiniMaxH3SigmaShift (#17) adjusts the schedule to suit the LoRA and EasyCache (#18) avoids redundant work between runs. Use the LoRA for fast look‑development; if you want maximum faithfulness or a softer finish, bypass it and render with a multi‑step schedule in Group 5.
Group 3 — SETTINGS#
Here the workflow derives the safest canvas for 3D AI Rendering with MINIMAX H3. MinimaxH3Resolution (#121) reads a reference image to propose width and height on H3’s native grid, preventing warps and temporal shimmer. Lightweight controls hold steps and seed, while PreviewAny (#122) echoes the active resolution for a quick check. Length is computed once and stored so both image and audio stay aligned across the pipeline. For reproducible retakes, keep a fixed seed.
Group 4 — INPUT#
Import your 24 fps clay render with VHS_LoadVideo (#30). The workflow snaps the shot length to H3’s internal frame grid so timing stays stable; trim or pad your source to the nearest valid length if you need every frame. Add one to three look plates with LoadImage (#36, #38, #40). A look plate is a still photo or concept image that represents the final materials, color and lighting; it is not a frame from the clay video and it does not change layout. Optionally load an external audio file with LoadAudio (#34) if you want voice or foley carried into generation. If you plan to generate speech, you will connect this audio to the render node in Group 5.
Group 5 — RENDER#
Author your intent in the PROMPT (#44). Keep the tags <Video 1> for the clay pass and <Picture 1> for the first look plate, then write clear instruction‑style text plus a Timeline: that spans the entire clip. The heart of 3D AI Rendering with MINIMAX H3 is MiniMaxH3ReferenceToVideo (#45), which fuses prompt, look plates, the clay video and optional voice into conditioning and a starting latent. That latent flows through BasicGuider (#57), BasicScheduler (#58), KSamplerSelect (#59), RandomNoise (#60) and SamplerCustomAdvanced (#61) to produce the final video latent. The width, height and length from Group 3 are passed in automatically so the generated motion and any audio remain synchronized to your reference.
Group 6 — OUTPUT#
VAEDecode (#67) turns the video latent into frames, and VAEDecodeAudio (#68) emits sound. AudioAdjustVolume (#69) provides a simple level trim, then CreateVideo (#70) muxes picture and audio for the master file that SaveVideo (#71) writes to disk. In parallel, a review branch trims and scales the clay pass with ImageFromBatch (#76) and ImageScale (#124), stitches it side‑by‑side with the AI result via ImageStitch (#77), then exports a comparison clip through CreateVideo (#78) and SaveVideo (#79). This makes it easy to validate that geometry, framing and animation stayed faithful.
Key nodes in ComfyUI 3D AI Rendering with MINIMAX H3 workflow#
MiniMaxH3Resolution (#121)#
Determines a safe, native width and height from your reference so H3 lands on its aspect grid. Change aspect ratio by changing your clay input rather than forcing custom sizes. If you must deviate, keep to grid‑aligned values to avoid flicker.
VHS_LoadVideo (#30)#
Ingests the clay pass that drives structure. For reliable motion lock, supply a 24 fps source and avoid resampling inside the node. If timing drift appears, re‑export your clay pass at 24 fps and ensure the workflow’s snapped length matches the clip.
MiniMaxH3ReferenceToVideo (#45)#
The central renderer that merges prompt, look plates, the reference video and optional voice into video and audio latents. Keep the <Video 1> and <Picture 1> tags in the prompt so the model binds to the correct inputs. For dialogue, route your voice track into the node’s reference‑video audio input so lip movements align with speech.
LoraLoaderModelOnly (#16)#
Applies the 4‑step Turbo LoRA for fast, sharp previews. Use it for exploration and dailies. When you need a gentler look or the closest match to the clay pass, disable the LoRA and render with a multi‑step schedule in BasicScheduler (#58) and KSamplerSelect (#59).
BasicScheduler (#58) and KSamplerSelect (#59)#
Control how noise is removed over time, which affects texture sharpness, motion smoothness and fidelity to the clay pass. Low‑step schedules pair well with the Turbo LoRA for speed, while multi‑step schedules without the LoRA emphasize accuracy and a softer finish. If a result looks over‑sharpened, try a different sampler strategy and more steps.
VAEDecodeAudio (#68)#
Decodes the generated audio latent. Pair it with AudioAdjustVolume (#69) if your mix needs a quick level change before muxing in CreateVideo (#70). For clean dialogue, pad your source voice to the exact clip length to avoid repeats.
Optional extras#
- Look plates: Use high‑quality stills that capture materials, lighting and color. They are style references, not layout references. Do not feed a frame from the clay pass as a look plate.
- Prompting: Write instructions, not bans. Phrases like “one continuous take” work better than “no camera move.” Include a
Timeline:that reaches the last frame so picture and sound do not trail off. - Audio tips: For speech, connect your voice to the render node’s reference‑video audio input. Pad the recording with silence to match the snapped clip length. Put the spoken line in quotes in the prompt and mention “once and only once.”
- Frame rate: Export the clay pass at 24 fps. A different rate will be squeezed in time and the motion can drift from your original animation.
- Length grid: The workflow snaps length to H3’s fixed frame grid for stability. If you need an exact duration, trim your clay pass to the next valid grid value or pad your audio accordingly.
- Faster iteration: Keep the Turbo LoRA on for look‑dev, use the built‑in side‑by‑side export to assess structure, then switch to a multi‑step schedule for finals if you prefer a softer, more faithful render.
- Useful nodes used in this workflow: ComfyUI‑KJNodes, ComfyUI‑VideoHelperSuite, and ComfyUI‑Mickmumpitz‑Nodes.
With these pieces in place, 3D AI Rendering with MINIMAX H3 gives you a fast, controllable path from untextured animation to finished, cinematic shots while preserving the staging and motion you crafted in your 3D tool.
Acknowledgements#
This workflow implements and builds upon the following works and resources. We gratefully acknowledge Mickmumpitz for the 3D AI Rendering with MINIMAX H3 workflow and guide for their contributions and maintenance. For authoritative details, please refer to the original documentation and repositories linked below.
Resources#
- Mickmumpitz/3D AI Rendering with MINIMAX H3 Workflow Source
- Hugging Face: Comfy-Org/MiniMax-H3
- Docs / Release Notes: 3D AI Rendering with MINIMAX H3 Workflow Source
Note: Use of the referenced models, datasets, and code is subject to the respective licenses and terms provided by their authors and maintainers.