
LTX 2.5 ComfyUI Image to Video with Synchronized Audio#
This RunComfy-ready LTX 2.5 ComfyUI workflow turns a single first frame and a motion prompt into a short cinematic video with coherent, in-model audio. It is powered by the Lightricks LTX-2.5 family, combining Pixel Diffusion, a Gemma-based prompt enhancer, video and audio VAEs, and latent upscaling for sharp motion and strong prompt adherence.
Use this LTX 2.5 ComfyUI graph to animate portraits, atmospheric locations, products, animals, and concept shots while staying inside ComfyUI. Provide a starting image, describe the action and camera, set duration and frame rate, and render a shot that holds character, lighting, and style across frames.
Key models in Comfyui LTX 2.5 ComfyUI workflow#
- Lightricks LTX-2.5 distilled transformer. The core image-to-video generator produces temporally consistent motion and fuses audio-visual latents. Model card: Lightricks/LTX-2.5.
- LTX-2.5 Video VAE. Decodes video latents into frames with higher fidelity and fewer smears in fast motion. Weights: ltx-2.5-video-vae-bf16.safetensors.
- LTX-2.5 Audio VAE. Generates synchronized audio to match the visual action and timing. Weights: ltx-2.5-audio-vae-bf16.safetensors.
- Gemma 4 12B text encoder with LTX projection. Interprets rich, multi-entity prompts and camera directions. Weights: gemma4-12b-with-proj-ltx-2.5-comfy-int8-convrot.safetensors.
- Gemma 4 E2B instruct variant for Prompt Enhancer. Expands short prompts into cinematic directions at low compute cost. Weights: gemma4_e2b_it_bf16.safetensors.
- LTX-2.5 Latent Spatial Upscaler x2. Sharpens details by upscaling in latent space before decoding. Weights: ltx-2.5-latent-spatial-upscaler-x2-bf16-1.0.safetensors.
- Reference implementation for pipelines and schedulers: LTX-2.5 Diffusers.
How to use Comfyui LTX 2.5 ComfyUI workflow#
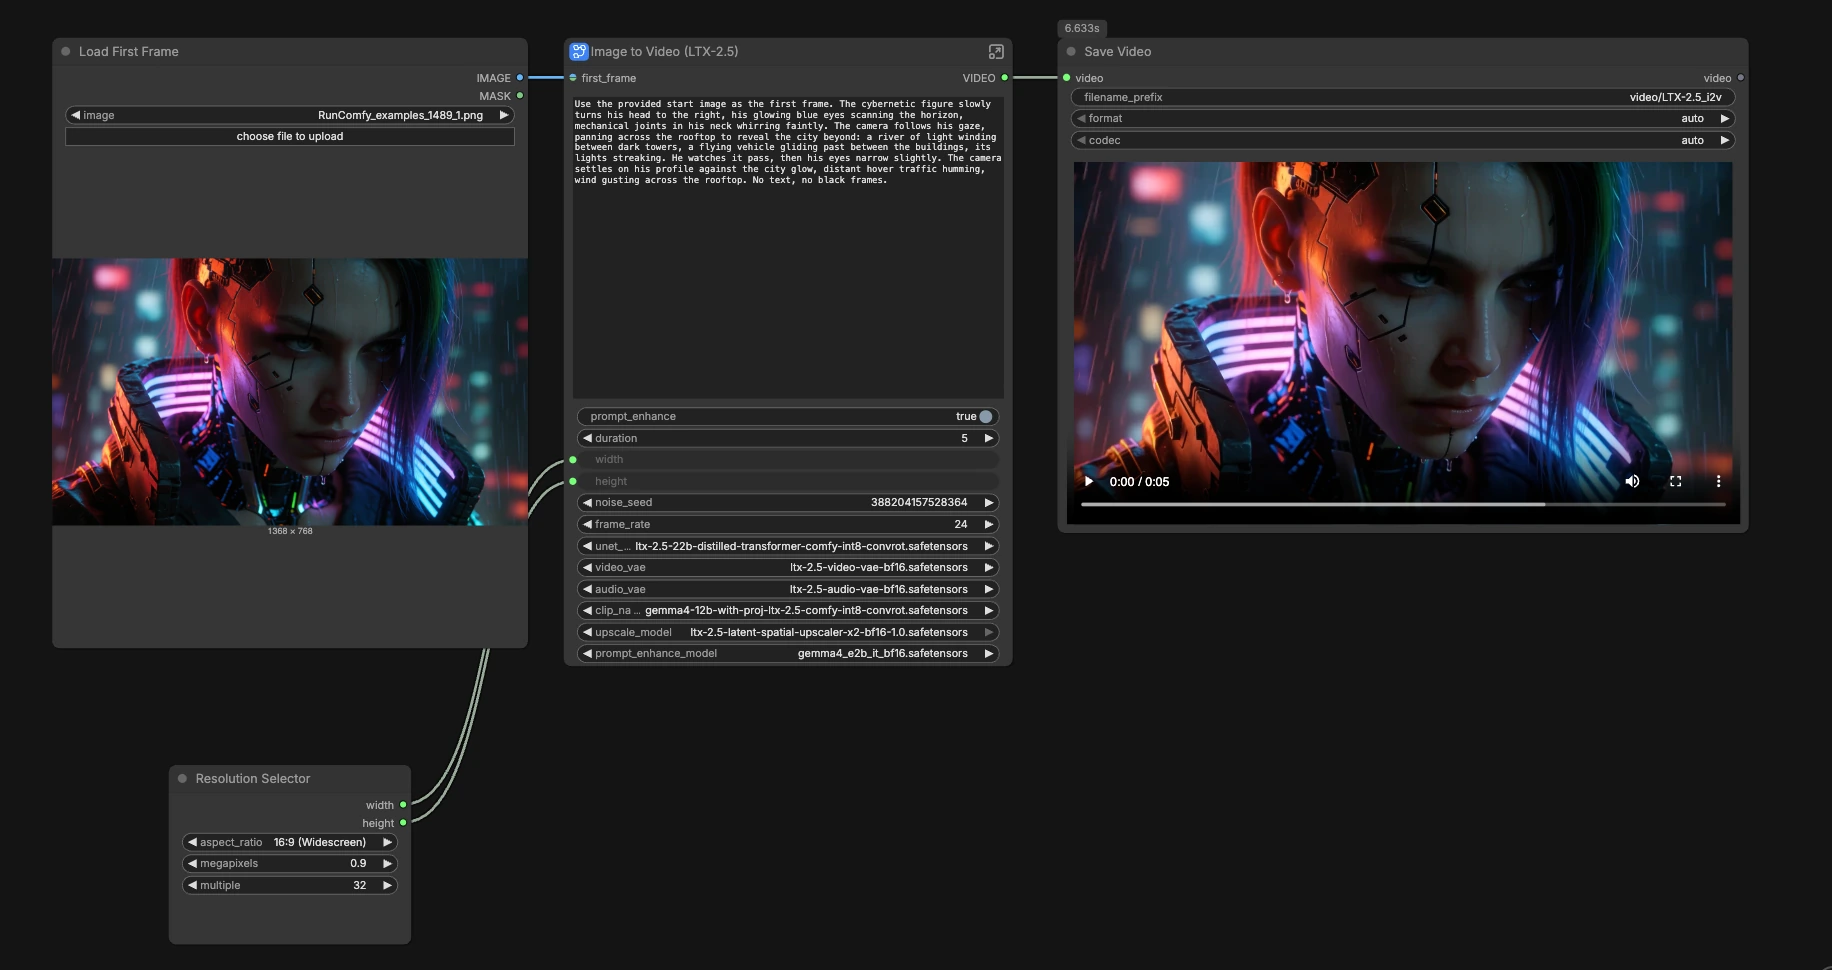
This workflow expands and conditions your prompt, constructs video and audio latents, samples a low-resolution pass, performs latent upscaling, then decodes to frames and synchronized audio for final muxing. The top-level controller is Image to Video (LTX-2.5) (#398), which takes your first frame, text prompt, and key settings, then routes into the subgraph.
Image Preprocessing#
Provide your starting image to Load First Frame (#395). The frame is standardized in LTXVPreprocess (#350) to a clean, model-friendly baseline. Use ResolutionSelector (#403) to pick aspect and scale; it outputs width and height aligned to model-friendly multiples. Good first frames are sharp, well-lit, and composed for the motion you plan to describe. The preprocessor avoids destructive changes while preparing the image for latent sampling.
Prompt Enhancement#
Write your motion and camera prompt in Prompt (#376). If you enable the built-in enhancer, TextGenerateLTX2Prompt (#380) enriches your text with details about action beats, continuity, and framing using a Gemma-based model. The switcher ComfySwitchNode (#382) lets you route either your raw text or the enhanced version to conditioning. This step improves prompt adherence for short inputs and helps maintain subjects and style across frames. You can preview the expanded text in PreviewAny (#381) before rendering.
Model#
The subgraph loads the distilled generator in UNETLoader (#384) and the decoders in VAELoader for video (#385) and audio (#386). The latent upscaler model is prepared by LatentUpscaleModelLoader (#371) for a clean x2 detail pass later. This block ensures the same family of LTX-2.5 models is used across encoding, sampling, and decoding, which preserves temporal coherence.
Prompt#
CLIPLoader (#387) and CLIPTextEncode positive (#364) turn your descriptive prompt into conditioning. A dedicated negative encoder (#373) suppresses unwanted traits like low quality or artifacts. LTXVConditioning (#365) merges text conditioning with your chosen frame rate so timing guidance flows into the audio-visual latent stream. Keeping camera and action language clear leads to more stable motion and editing latitude.
Video Settings#
Duration, width, height, frame rate, and seed are set in the Video Settings group (e.g., Duration (#362) and Frame Rate (#361)). Simple math helpers compute total frame count and feed uniform values where needed. Choose a frame rate that matches the feel you want; slower action can look better at lower fps, while fast motion benefits from higher fps. For reproducible shots, fix the seed; vary it to explore alternates.
Empty Latent#
EmptyLTXVLatentVideo (#356) creates a video latent of the right size and length, while LTXVEmptyLatentAudio (#366) constructs a time-aligned audio latent. This ensures video and audio streams share timing from the start. With length derived from duration and frame rate, the sampler receives correctly shaped tensors. The result is a synchronized base for joint audio-visual denoising.
Generate Low Resolution#
A first sampling pass builds coherent motion at a manageable resolution. LTXVDualCFGGuider (#388) applies dual-modality guidance so both text and timing shape the video and audio latents together. SamplerCustomAdvanced (#344) runs the diffusion steps with your chosen sampler and schedule, seeded by RandomNoise (#339). The first frame constraint is enforced by LTXVImgToVideoInplace (#357), which keeps identity, lighting, and composition anchored to your provided image. After sampling, LTXVConcatAVLatent and LTXVSeparateAVLatent shuffle audio and video latents as needed for the next stages.
Latent Upscale#
LTXVLatentUpsampler (#348) performs a x2 latent-space upscaling to sharpen textures and microdetails before decoding. LTXVImgToVideoInplace (#349) re-aligns the upscaled latent with the starting frame so identity and layout remain steady. Doing this in latent space preserves temporal smoothness better than pixel-space resizing. This stage is a major contributor to final crispness.
Generate High Resolution#
A refinement sampler (KSamplerSelect (#341) plus SamplerCustomAdvanced (#368)) runs on the upscaled latent with a shorter schedule, stabilizing edges and enriching detail. LTXVDualCFGGuider (#391) keeps guidance consistent with your text while preserving the motion set in the first pass. The combined latent is then split by LTXVSeparateAVLatent (#369) for decoding. VAEDecodeTiled (#374) turns the video latent into frames and LTXVAudioVAEDecode (#358) produces synchronized audio.
Render and Save#
CreateVideo (#370) muxes frames and audio at your chosen fps into a single video stream. Back on the outer graph, SaveVideo (#75) writes the result to your normal ComfyUI output. You can also audition the audio alone via a preview node in the top-level wrapper before full renders.
Key nodes in Comfyui LTX 2.5 ComfyUI workflow#
Image to Video (LTX-2.5) (#398)#
This is the one-stop controller for the whole pipeline. Provide the first frame, your prompt, duration, resolution, frame rate, and whether to enable prompt enhancement. Use it to iterate quickly; when you are ready to fine-tune, click Enter subgraph to adjust samplers, guidance, and decoding. If you need text-only video, open the subgraph and toggle the internal text-to-video bypass on the image-to-video nodes.
LTXVDualCFGGuider (#388)#
Applies classifier-free guidance across the joint audio-visual latent, balancing prompt adherence with temporal stability. Increase guidance for stronger prompt following and punchier motion; lower it to reduce flicker or to preserve more of the starting frame’s nuances. Keep video and audio guidance in the same ballpark so the soundtrack remains aligned with on-screen action.
SamplerCustomAdvanced (#344)#
Drives diffusion with your chosen sampler and a custom sigma schedule. Use this node to explore motion quality vs. stability by switching sampler variants or editing schedules. Pair it with a fixed seed to compare settings apples-to-apples, then randomize the seed to hunt for the best take.
LTXVLatentUpsampler (#348)#
Upscales in latent space with the dedicated LTX-2.5 x2 model, improving detail without introducing temporal wobble. If you plan heavy cropping or tight close-ups, keep this enabled so small features survive decoding. For extreme VRAM limits, you can bypass upscaling at the cost of some sharpness.
VAEDecodeTiled (#374)#
Decodes high-resolution video latents into frames using tiling to control memory use. On lower VRAM, prefer smaller tiles to avoid out-of-memory errors. On higher VRAM, larger tiles can reduce seams and speed up decoding.
CreateVideo (#370)#
Combines the decoded frames with the generated audio into a single video stream at your selected frame rate. Adjust fps here to match the creative intent or to meet platform requirements. The muxed output is then passed to the saver in the outer graph.
Optional extras#
- Keep prompts concise but concrete: who/what, action, camera move, lighting, mood. Let the Prompt Enhancer add cinematic phrasing.
- Avoid conflicting camera directions. One strong move (push-in, pan, dolly) tends to produce steadier results than stacking several.
- Use clean, high-contrast first frames for portraits and product shots; the model will better preserve identity and edges.
- Start with moderate durations to dial motion and framing; extend only after you like the behavior.
- If outputs look soft, verify width and height are multiples of 32 and keep the latent upscaler enabled.
- For consistent iterations, fix the seed. When exploring alts, vary the seed while keeping other settings intact.
Acknowledgements#
This workflow implements and builds upon the following works and resources. We gratefully acknowledge Comfy Org for the LTX-2.5: Image to Video ComfyUI workflow template, Lightricks for the LTX-2.5 model weights, Lightricks for the LTX-2.5 Diffusers project, and Lightricks for the Hugging Face organization resources for their contributions and maintenance. For authoritative details, please refer to the original documentation and repositories linked below.
Resources#
- Comfy.org/Source workflow template
- GitHub: Comfy-Org
- Docs / Release Notes: Source workflow template
- Lightricks/LTX-2.5 model weights
- GitHub: Lightricks/LTX-2
- Hugging Face: Lightricks/LTX-2.5
- arXiv: 2601.03233
- Lightricks/LTX-2.5 Diffusers project
- Hugging Face: Lightricks/LTX-2.5-Diffusers
- arXiv: 2601.03233
- Lightricks/Hugging Face organization
- GitHub: Lightricks
- Hugging Face: Lightricks
Note: Use of the referenced models, datasets, and code is subject to the respective licenses and terms provided by their authors and maintainers.