

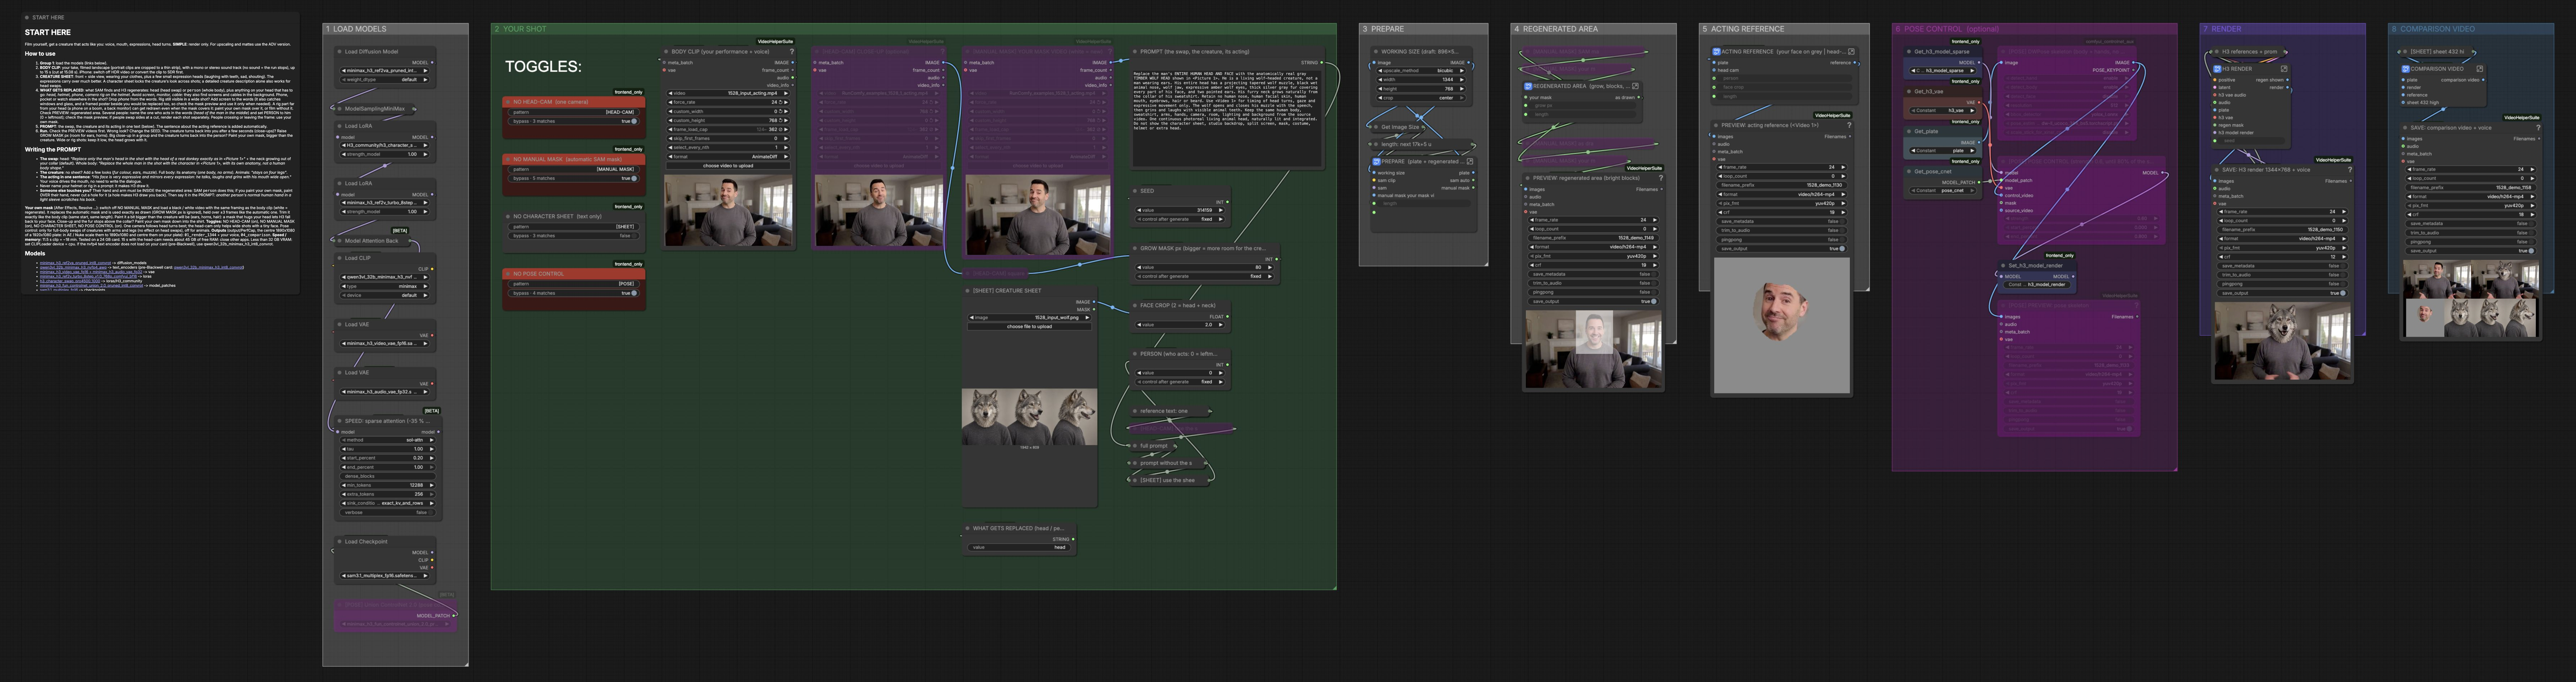
MiniMax H3 Performance Capture for ComfyUI#
MiniMax H3 Performance Capture turns your acting into a new character while keeping your original audio. The workflow transfers facial expression, mouth shapes, eye direction and head motion from a source clip to a target creature or full-body character, then composites the result back into the plate. Built around MiniMax-H3 reference‑conditioned video, automatic face masking and optional pose guidance, it has been tested on creative swaps like a wolf, a robot and an alien while preserving the scene and soundtrack. Workflow by Mickmumpitz.
This ComfyUI MiniMax H3 Performance Capture workflow is the simple “render” edition: one camera by default, optional head‑cam and manual mask, optional pose control, and two saved videos (final render with audio, plus a comparison cut).
Key models in Comfyui MiniMax H3 Performance Capture workflow#
- MiniMax-H3 Reference-to-Video diffusion UNet (minimax_h3_ref2va_pruned_int8_convrot). Core generator that fuses references, prompt and audio into video latents. Model files
- Qwen3‑VL 32B MiniMax‑H3 text encoder (qwen3vl_32b_minimax_h3_nvfp4_awq). Encodes the prompt to steer identity and acting style. Model file
- MiniMax‑H3 Video VAE FP16 and Audio VAE FP32. Video VAE decodes image latents; Audio VAE conditions lip sync and performance timing. VAEs
- MiniMax‑H3 Turbo 8‑step 768p LoRA. Speeds H3 sampling for fast, high‑quality renders. Model card
- MiniMax‑H3 Character Swap LoRA. Strengthens robust head and body swaps for stylized or creature looks. Model card
- FUN ControlNet Union 2.0 model patch for H3. Adds optional body pose guidance from skeletons. Model file
- Segment Anything Model 3.1 Multiplex. Produces automatic masks for the area to regenerate. Checkpoint
- DWPose (via ControlNet Aux). Detects body and hand skeletons for pose guidance and head crop logic. Repository
How to use Comfyui MiniMax H3 Performance Capture workflow#
The workflow runs left to right through eight labeled groups. Start by loading your performance clip and, optionally, a manual mask, a head‑cam close‑up and a character sheet. The pipeline then prepares a plate and mask, builds an acting reference from your face, optionally guides body pose, renders with MiniMax H3, and saves a comparison cut.
1 LOAD MODELS#
This group loads the MiniMax‑H3 UNet, text encoder and VAEs, then applies the Turbo and Character‑Swap LoRAs. UNETLoader (#1001) and CLIPLoader (#1006) provide the core generator and prompt encoder. LoraLoaderModelOnly (#1003, #1004) attaches the speed and swap adapters. BlockSparseAttention (#1009) and MiniMaxH3SigmaShift (#1002) are wired in to accelerate sampling and balance audio‑video guidance.
2 YOUR SHOT#
Use BODY CLIP (your performance + voice) (#1012) to load the main take with embedded mono or stereo audio. You can add a CREATURE SHEET via LoadImage (#1016) to lock appearance across shots, and set the prompt in PROMPT (the swap, the creature, its acting) (#1018). Optional inputs include a HEAD‑CAM close‑up VHS_LoadVideo (#1013) for tiny faces in wide shots and a MANUAL MASK video VHS_LoadVideo (#1014) if you want to override automatic masking. Quick controls live here: WHAT GETS REPLACED (head / person) (#1017), SEED (#1019), GROW MASK px (#1020), FACE CROP (#1021) and PERSON (#1022). Toggling nodes (NO HEAD‑CAM #1227, NO MANUAL MASK #1228, NO CHARACTER SHEET #1229, NO POSE CONTROL #1230) make common setups one‑click.
3 PREPARE#
WORKING SIZE (draft: 896x512) (#1028) normalizes the input to a stable resolution, and length: next 17k+5 up (#1030) caps the run to a short, snappy preview length. PREPARE (plate + regenerated area) (#1231) builds a clean plate, tracks what to replace with SAM 3 using your text from WHAT GETS REPLACED, and, if present, ingests your manual mask. The result is a video plate plus one or two masks ready for controlled regeneration.
4 REGENERATED AREA#
REGENERATED AREA (grow, blocks, hold) (#1233) is the mask logic that decides where MiniMax H3 may paint. It expands the mask so features like ears or horns have space, converts it to temporal blocks to stabilize motion, and holds changes a few frames so details do not flicker. If you supplied a manual mask, the [MANUAL MASK] composites (#1074 to #1105) pass it through as drawn.
5 ACTING REFERENCE#
ACTING REFERENCE (your face on grey | head‑cam) (#1232) finds the selected person, crops a face region with DWPose and produces the reference video that carries your expressions, eye lines and head rotations. With head‑cam enabled, it builds a split‑screen so head direction follows the wide camera while fine facial motion follows the head‑cam. The preview PREVIEW: acting reference (<Video 1>) (#1130) lets you confirm the tracking before you render.
6 POSE CONTROL (optional)#
For full‑body creature swaps, [POSE] DWPose skeleton (#1131) extracts body and hand keypoints from your plate. MiniMaxH3FunControlNetApply (#1132) feeds that motion into H3 as a patch so limbs and torso follow your performance while the face remains reference‑driven. Use it when arms and legs must stay consistent between frames; leave it off for pure head swaps and for four‑legged animals.
7 RENDER#
H3 references + prompt MiniMaxH3ReferenceToVideo (#1134) combines the prompt, character sheet, acting reference, audio, and working size to produce H3 conditioning and a starting latent. H3 RENDER (#1234) then injects the plate latent, applies the regen mask so only the masked area changes, and samples with the Turbo schedule. The output is a clean render and a “regen shown” preview; SAVE: H3 render 1344x768 + voice (#1150) writes an MP4 with your original audio.
8 COMPARISON VIDEO#
COMPARISON VIDEO (#1235) stacks the plate, render, acting reference and (if used) the creature sheet into a single frame for review. SAVE: comparison video + voice (#1158) exports an MP4 with the same soundtrack so you can A/B the result against your performance.
Key nodes in Comfyui MiniMax H3 Performance Capture workflow#
BODY CLIP (your performance + voice) (#1012)#
Loads your acting and audio, which drive lip sync and timing. Keep landscape framing for best composition and ensure the file has audio. If the face is tiny in frame, add the head‑cam input for sharper expression tracking.
WHAT GETS REPLACED (head / person) (#1017)#
This short text steers SAM 3.1 to the region H3 will regenerate. Use head for head swaps or person for full‑body replacements. If a helmet or on‑head rig should vanish, include words like head, helmet or camera rig; avoid generic words like screen, monitor or cable unless you intend to remove similar objects in the background.
REGENERATED AREA (grow, blocks, hold) (#1233)#
Defines how much of the image H3 may repaint and how that area evolves over time. Increase growth to give space for ears, horns or fur; lower it for wide shots to avoid expanding into the background. The block and hold stages stabilize motion so details do not shimmer between frames.
ACTING REFERENCE (your face on grey | head‑cam) (#1232)#
Creates the performance track that MiniMax H3 will mimic. FACE CROP controls how much of the head and neck are analyzed, and PERSON selects the actor when multiple people are visible. Enable head‑cam only when the wide shot face is very small; one camera usually follows head turns best.
MiniMaxH3ReferenceToVideo (#1134)#
The hub that merges the prompt, references and audio to produce conditioning and an initial latent. Keep width and height aligned with the working size and let the workflow auto‑limit the length for previews. The prompt already includes a sentence that tells H3 how to use the acting reference.
MiniMaxH3FunControlNetApply (#1132)#
Adds optional body pose guidance from DWPose. Useful for full‑body creatures so torso and limbs track convincingly while the face follows the acting reference. Leave it off for head‑only swaps or four‑legged motion that does not match human skeletons.
H3 RENDER (#1234)#
Applies the mask so only the selected region changes, then samples the video with the Turbo schedule and decodes with tiled VAE for VRAM efficiency. Use SEED to nudge look and micro‑motions; change it when the character’s appearance drifts from the sheet or description.
Optional extras#
- Shooting tips for MiniMax H3 Performance Capture: film in landscape, keep exposure stable, include clean production audio; if you shot HDR on iPhone, convert to SDR before running.
- Character sheet guidance: include front and side views plus a few small expression heads; this locks identity across shots better than text alone.
- Multi‑person scenes: set
PERSONto the correct index and describe the subject in the SAM text, then verify the mask preview before rendering. - Manual mask: supply a black‑white video that matches the body clip timing; paint it slightly larger than the intended creature so H3 does not fall back to the original face.
- When to enable pose control: use for full‑body humanoids or creatures with arms and legs; turn it off for head‑only swaps and quadrupeds.
- Performance notes: sparse attention is enabled to speed up renders and reduce memory; if VRAM is tight, run the text encoder on CPU in
CLIPLoader. Custom nodes used include ComfyUI‑VideoHelperSuite, ComfyUI‑KJNodes, comfyui_controlnet_aux, ComfyUI‑H3‑FaceRefine and ComfyUI‑Mickmumpitz‑Nodes.
Acknowledgements#
This workflow implements and builds upon the following works and resources. We gratefully acknowledge Mickmumpitz for the ComfyUI performance-capture workflow and Comfy-Org for the MiniMax H3 models for their contributions and maintenance. For authoritative details, please refer to the original documentation and repositories linked below.
Resources#
- Workflow by Mickmumpitz
- GitHub: mickmumpitz/ComfyUI-Mickmumpitz-Nodes
- Docs / Release Notes: NEW VIDEO & FREE WORKFLOW — Turn yourself into ANY creature (MiniMax H3)
- MiniMax H3 models
- Hugging Face: Comfy-Org/MiniMax-H3
Note: Use of the referenced models, datasets, and code is subject to the respective licenses and terms provided by their authors and maintainers.