



ComfyUI-PhotoDeblur Introduction
ComfyUI-PhotoDeblur brings two photo-restoration models—HI-Diff and MISCFilter—into ComfyUI. It helps reduce camera shake and motion blur, making it easier to prepare photographs for further editing, color grading, or cropping.
Instead of simply sharpening every edge, these models use patterns learned from blurred and sharp images to estimate a clearer result. Depending on your photograph, this can improve lettering, architectural lines, object outlines, and other details affected by movement.
The extension includes:
- Two deblurring models, each with three pretrained variants.
- Original-resolution processing, so you can restore large photographs without first resizing them.
- Tiled processing and overlap blending to process smaller sections and combine them into one image.
- Optional test-time augmentation (TTA), which combines several predictions of the same image.
- Optional tone matching to reduce broad color changes introduced during restoration.
- Official model downloads with file verification.
Which photographs are worth trying?
| Photograph type | Details to inspect |
|---|---|
| Handheld night and indoor photographs | Light trails, sign lettering, window frames, and furniture edges |
| Architecture, storefronts, and street scenes | Straight lines, text outlines, and repeating textures |
| Portraits and event photographs | Mild to moderate shake around facial features, hair, and clothing |
| Animals and moving subjects | Motion trails around the subject, as well as nearby areas that were already sharp |
| High-resolution photographs | Fine details at the original dimensions before cropping or downsizing |
Restoration has limits. Strong defocus, clipped highlights, very small faces, and severe blur can leave too little information for a convincing recovery. A clearer-looking result is not proof that every reconstructed detail is accurate.
The author reports noticeable improvements in signage and some structural edges in a bookstore night photograph. Results on night portraits varied, while a small, heavily blurred stage face and a cat’s face showed limited improvement in some tests. These observations come from a small photo set, not a guarantee for every image.
How ComfyUI-PhotoDeblur Works
1. A model estimates a sharper image
Both supported models restore a photograph without requiring you to describe the camera movement that caused the blur.
HI-Diff combines two approaches:
- A diffusion model creates a compact set of guidance features—a kind of learned set of clues about how the restored image might look.
- A deblurring network uses those clues at several image scales to estimate the clearer photograph.
An analogy is an artist first working out the overall structure, then using that structure to guide finer corrections. HI-Diff performs its diffusion process in a compact internal representation rather than repeatedly generating the entire full-resolution image from noise.
MISCFilter uses motion-adaptive filtering. It estimates filtering behavior suited to the blur in the image and combines this with learned reconstruction. Think of it as adjusting the corrective treatment to different patterns of movement rather than applying one uniform sharpening filter everywhere.
MISCFilter uses a direct network pass and does not have a sampling-step setting.
2. Large images are processed in tiles
A high-resolution photograph can require more GPU memory than is available. The extension divides it into smaller sections called tiles, restores those sections, and combines them at the original image size.
Imagine restoring a large mural one section at a time:
- Tile size determines how much of the mural is handled at once.
- Overlap lets neighboring sections share some of the same image area.
- Blending combines those shared areas to soften transitions.
Tiling preserves the image dimensions; it is not an upscaling feature.
3. Optional TTA combines multiple views
Test-time augmentation, or TTA, processes eight flipped or rotated versions of the image and averages their predictions after returning them to the original orientation.
This gives the model several views of the same content. It can produce a different result worth comparing, but it requires roughly eight times the model computation. It does not guarantee a better restoration.
4. Optional tone matching limits broad color shifts
Restoration can change an image’s overall tone or color. The optional tone-matching node compares the restored image with the original and corrects broad differences.
More specifically, it subtracts a Gaussian-blurred version of the difference between the two images. In everyday terms, it aims to bring large-scale color and brightness back toward the original while retaining the restored detail.
ComfyUI-PhotoDeblur Quick Start
The supplied workflows are the simplest way to begin:
- Open example_workflows.
- Drag ComfyUI-PhotoDeblur.json onto the ComfyUI canvas. It includes English and Chinese notes.
- Select your photograph in Load Image.
- Choose a model and variant in the matching model loader.
- If using the download node, select the same model and variant there.
- Run the workflow and compare the restored image with the original.
The basic connections are:
Download Deblur Models.ready → Model Loader.download_ready
Load Image → Deblur Image (Tiled).image
Model Loader → Deblur Image (Tiled).deblur_model
Deblur Image (Tiled) IMAGE → Save Image
The download connection is optional when the required model weights are already available.
To switch from MISCFilter to HI-Diff, connect the HI-Diff Model Loader instead. If you use the downloader, switch its model selection to HI-Diff too.
Recommended first comparison
Start with:
| Setting | Starting value |
|---|---|
| Variant | RealBlur_J |
| Tile size | 768 |
| Overlap | 96 |
| Blend | comfy_linear |
| TTA | Off |
| HI-Diff steps | 0 |
| HI-Diff seed | 100 |
Try both models on the same original image before adjusting other settings. Compare the results at matching zoom levels, especially around text, faces, and high-contrast edges.
If GPU memory is limited, start with tile size 512, overlap 64, and TTA off.
ComfyUI-PhotoDeblur Features and Controls
Available nodes
Search for Photo Deblur on the ComfyUI canvas.
| Node | What it does |
|---|---|
| Download Deblur Models | Downloads official model weights and verifies the downloaded files |
| HI-Diff Model Loader | Selects HI-Diff weights and sampling steps |
| MISCFilter Model Loader | Selects MISCFilter weights |
| Deblur Image (Tiled) | Restores the image using tiles, overlap blending, and optional TTA |
| Match Input Tone (Optional) | Uses the original image to reduce broad tone and color changes in the restored result |
Tile size and overlap
tile_size controls the size of each processed section.
- Start at
768. - Try
512if you encounter a GPU-memory error. - Larger tiles are an option to compare, not an automatic quality upgrade.
overlap controls how much neighboring tiles share.
- Use
96as a starting point with tiles of768. - Use
64as a starting point with tiles of512. - Overlap must be smaller than tile size.
Overlapping areas give the extension room to transition between restored sections.
Blend mode
blend selects how overlapping tile predictions are combined.
Available modes are:
comfy_linear— the recommended starting choice.cosinegaussianaverage
These are different weighting strategies for the shared areas between tiles. If transitions look distracting, compare the alternatives while keeping the rest of your settings unchanged. There is no single documented best mode for every photograph.
TTA
tta enables the eight-view prediction averaging described above.
Leave it off while choosing your model and variant. Once you have a promising result, save a separate TTA version and decide whether the difference is worth the additional processing time.
HI-Diff seed
seed controls HI-Diff’s random prior—the guidance generated by its diffusion component.
Start at 100. Keep the seed unchanged when comparing tile sizes or other settings so that you are not also changing the random guidance.
HI-Diff sampling steps
steps applies only to HI-Diff.
A value of 0 selects the variant’s default:
RealBlur_J: 16 stepsRealBlur_R: 16 stepsGoPro: 8 steps
Here, 0 does not mean “skip restoration.” More steps are an option to test, but they are not a guarantee of a better image.
MISCFilter has no equivalent sampling-step control.
Download verification and repair
The download node uses official Google Drive archives and checks them using SHA256 verification, a file-integrity check. Verified local files are reused rather than downloaded again.
repair_invalid is normally off. When enabled, it backs up mismatched files before replacing them. Use it when you need to repair a file that fails verification, rather than as a routine quality setting.
Tone-matching sigma
sigma belongs to the optional tone-matching node.
- Start with
16. - Set it to
0to bypass correction.
Sigma controls the blur scale used to identify broad differences between the original and restored images. It is not a deblurring-strength slider.
Compare tone matching on and off, particularly when the restored result is sharper but its overall color no longer matches the source.
ComfyUI-PhotoDeblur Models
The extension supports two model families, each with three pretrained variants. A pretrained model contains the learned information used to perform restoration; its variant reflects the dataset used during training.
Model families
| Model | Approach | When to try it |
|---|---|---|
| HI-Diff | Combines compact diffusion-generated guidance with a deblurring network | When you want to compare diffusion-guided restoration and its seed or step options |
| MISCFilter | Uses motion-adaptive collaborative filtering and learned reconstruction | When you want a direct restoration pass without sampling-step choices |
Neither model is documented as the best choice for all photographs. One may produce more pleasing lettering while the other gives a better overall appearance on the same image. Judge both local detail and the whole photograph.
All available variants
| Model | Variant | Training basis and suggested use |
|---|---|---|
| HI-Diff | RealBlur_J | Trained on RealBlur-J; the recommended starting variant for ordinary real-photo comparisons |
| HI-Diff | RealBlur_R | Trained on RealBlur-R; an alternative to compare on the same photograph |
| HI-Diff | GoPro | Trained on the GoPro blur dataset; another option when the RealBlur variants are not satisfactory |
| MISCFilter | RealBlur_J | Trained on RealBlur-J; the recommended starting variant for a first comparison |
| MISCFilter | RealBlur_R | Trained on RealBlur-R; useful as an alternative restoration |
| MISCFilter | GoPro | Trained on the GoPro blur dataset; useful for comparing behavior learned from a different dataset |
RealBlur_R is a checkpoint variant, not a camera RAW input mode. Develop RAW photographs before loading them, regardless of which variant you select.
Different training datasets can change how a model handles edges and textures. The variant name alone does not tell you which will work best on your photograph.
Official model downloads
The workflow’s download node can retrieve and verify these weights. The official archives are also available here:
| Model | Variant | Official archive |
|---|---|---|
| HI-Diff | RealBlur-J | HI_Diff_RealBlur_J.zip |
| HI-Diff | RealBlur-R | HI_Diff_RealBlur_R.zip |
| HI-Diff | GoPro | HI_Diff_GoPro.zip |
| MISCFilter | All three variants | checkpoints.zip |
ComfyUI-PhotoDeblur Before-and-After Examples
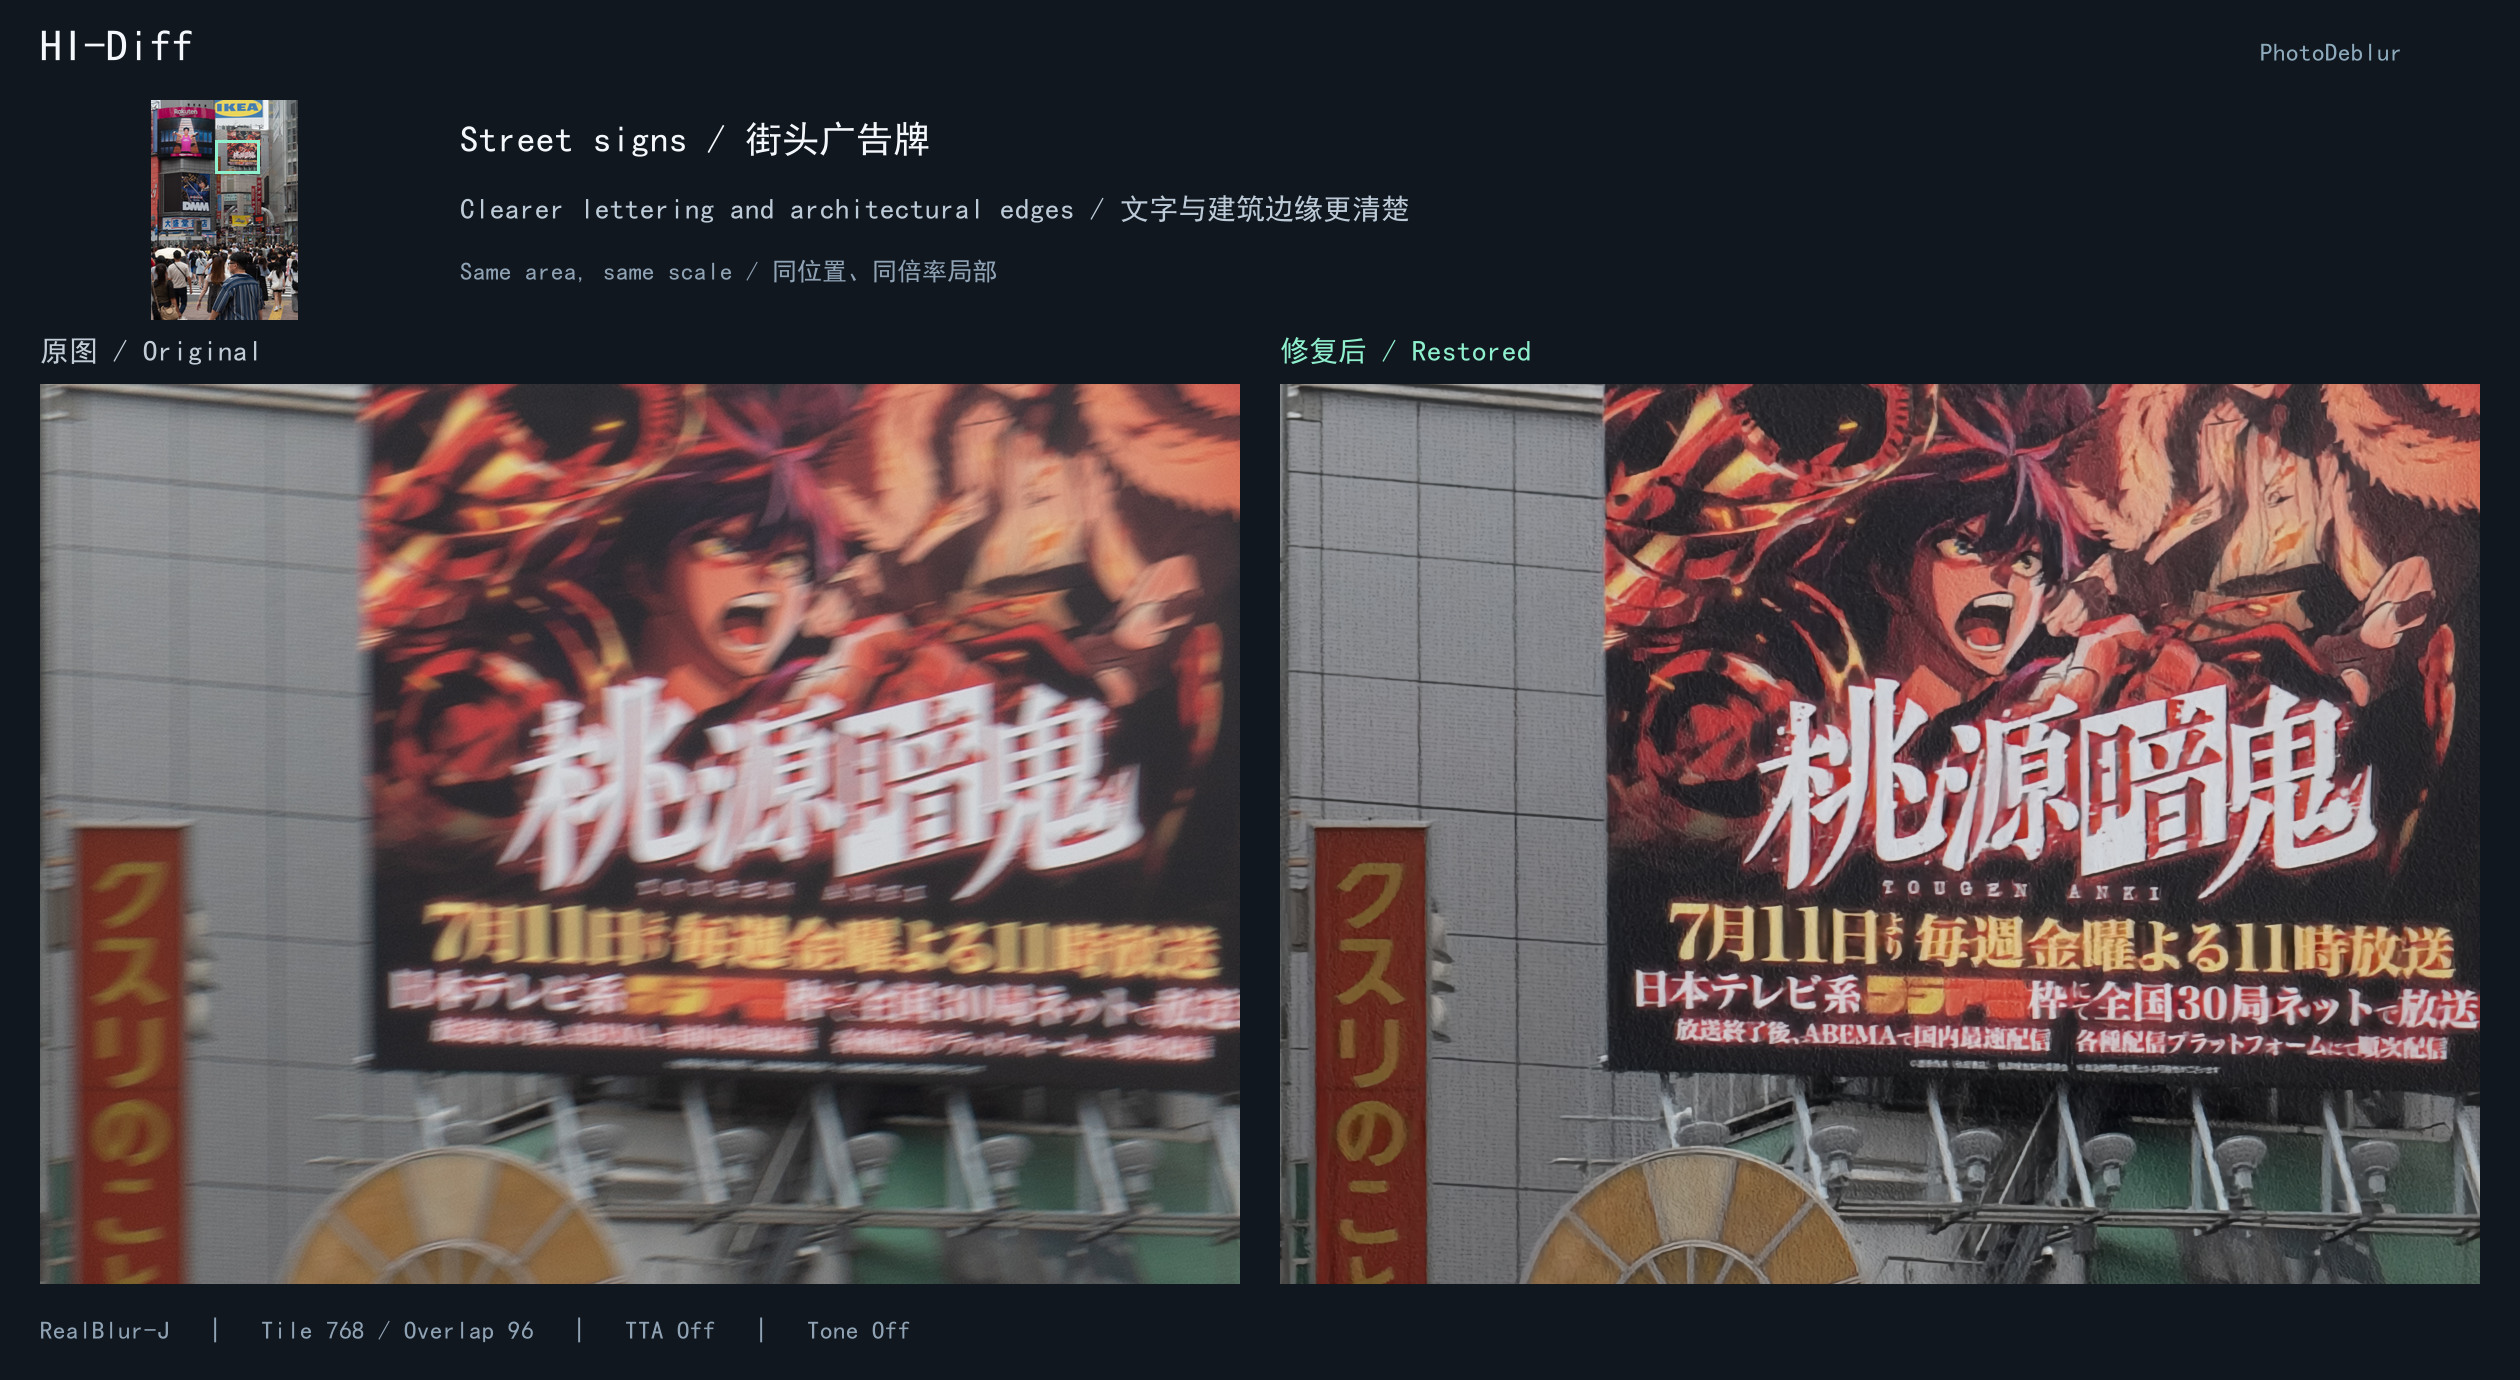
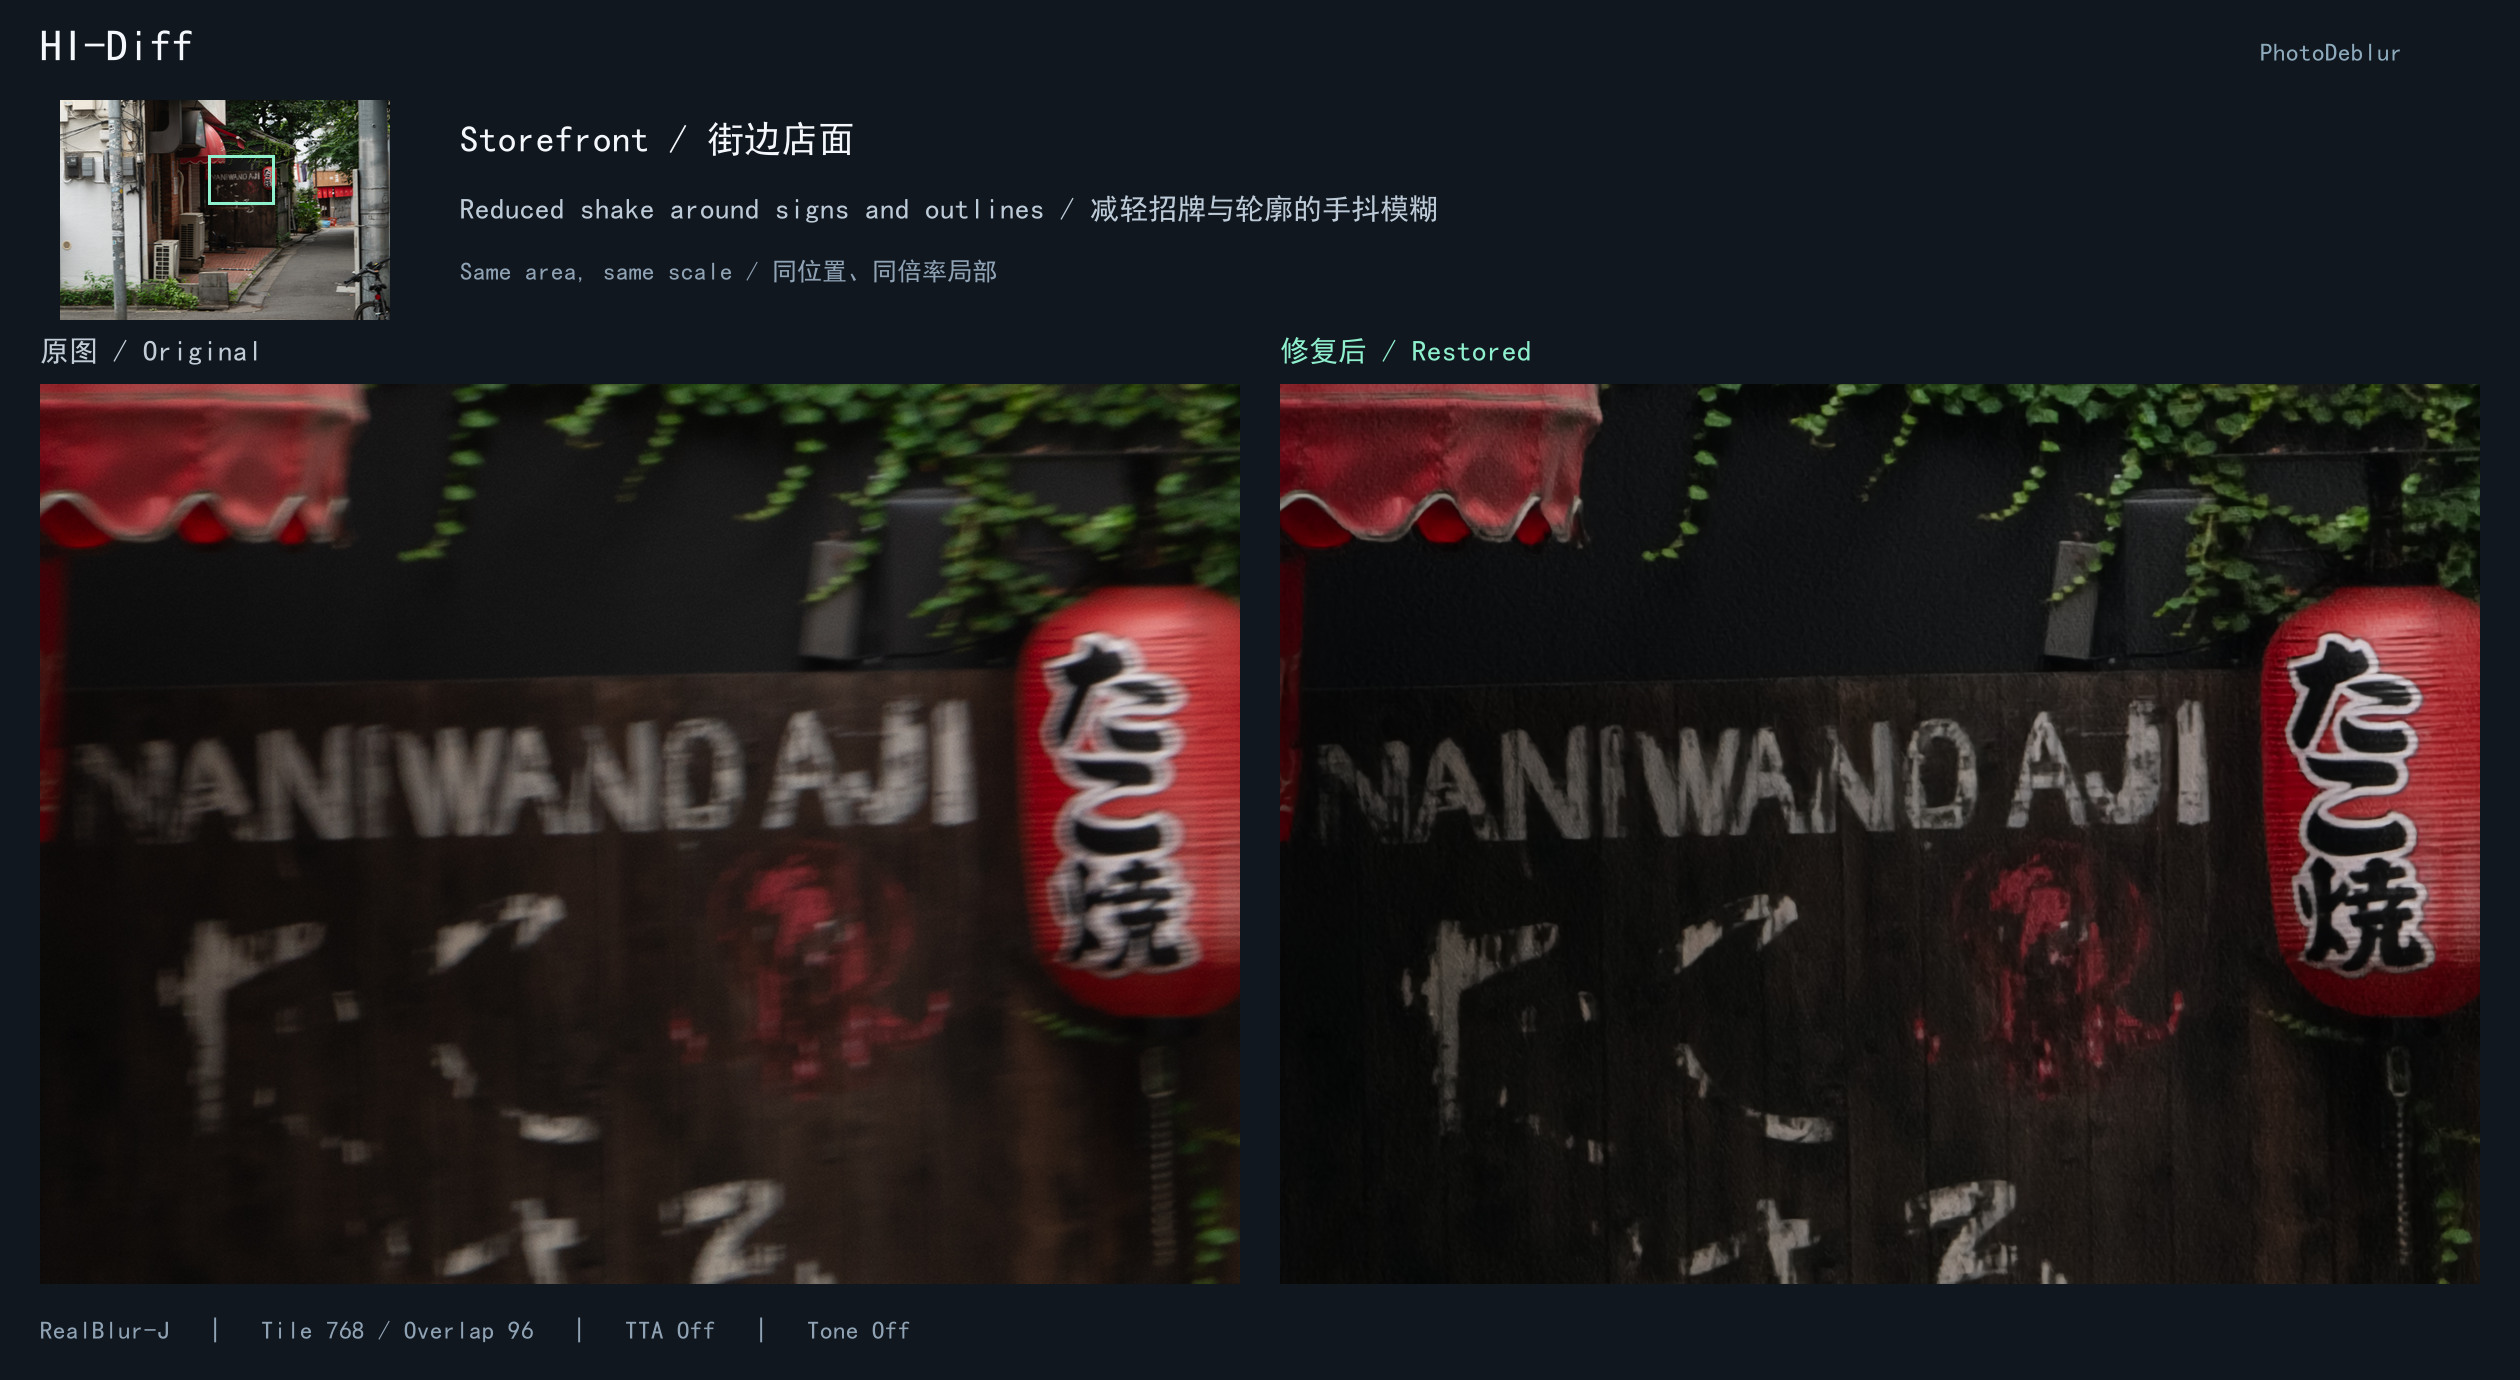
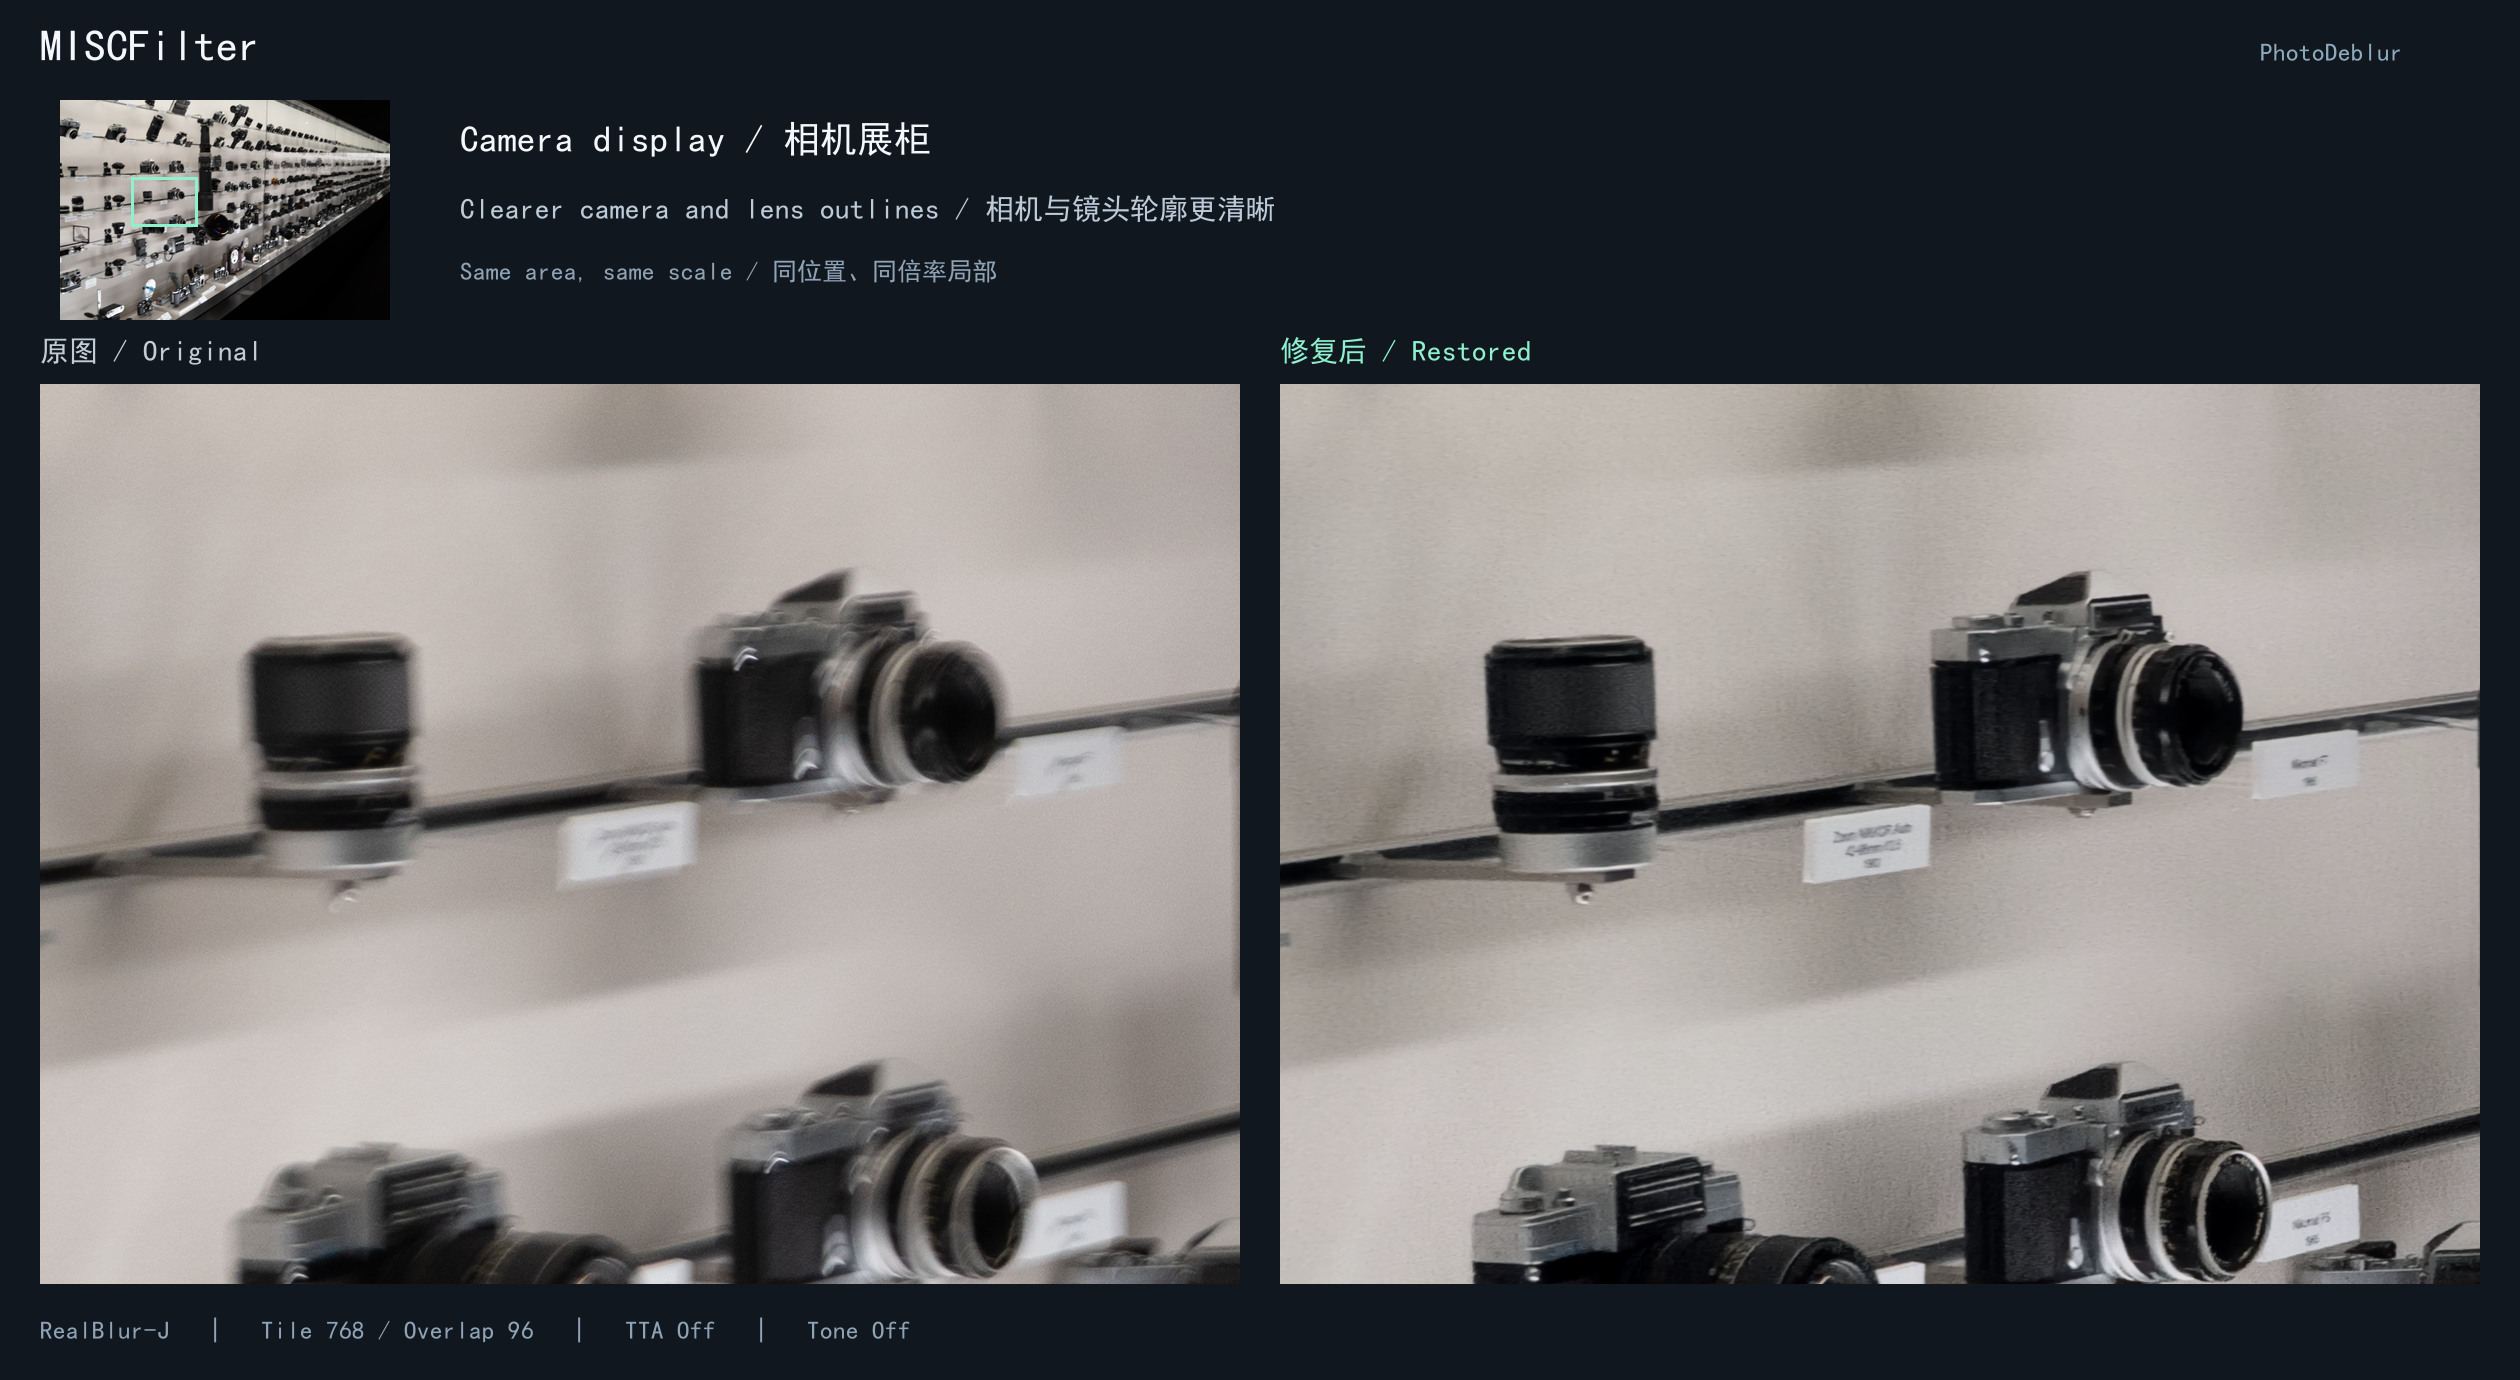
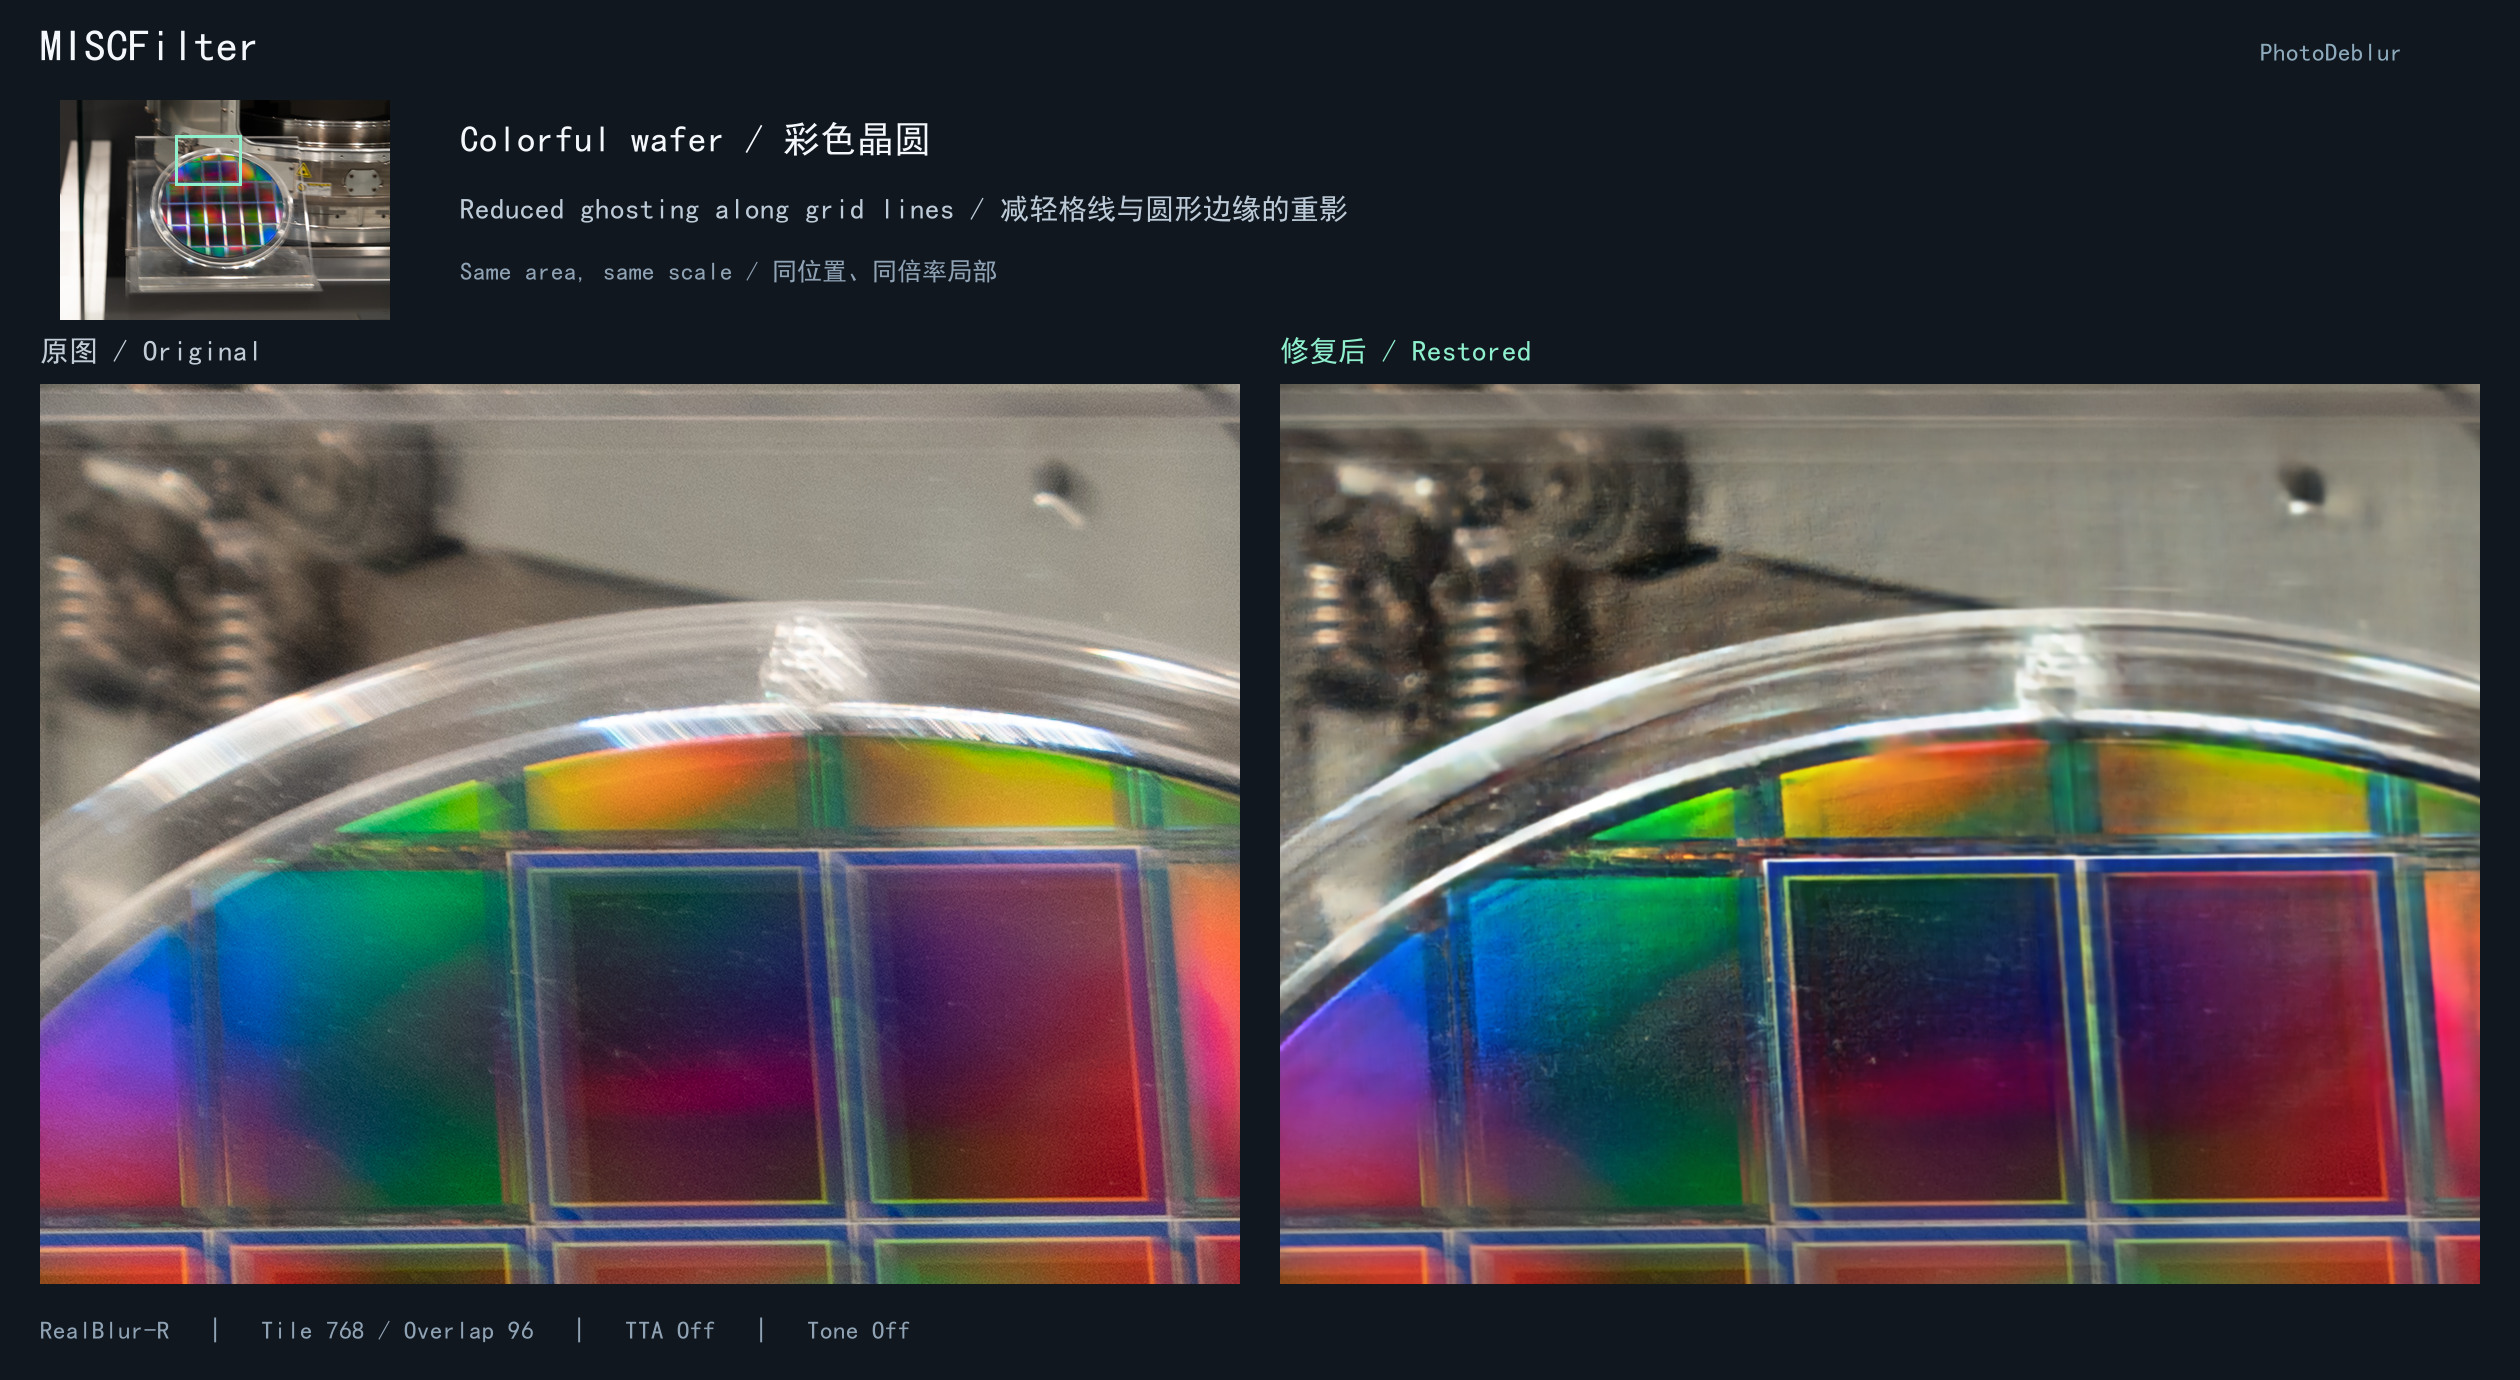
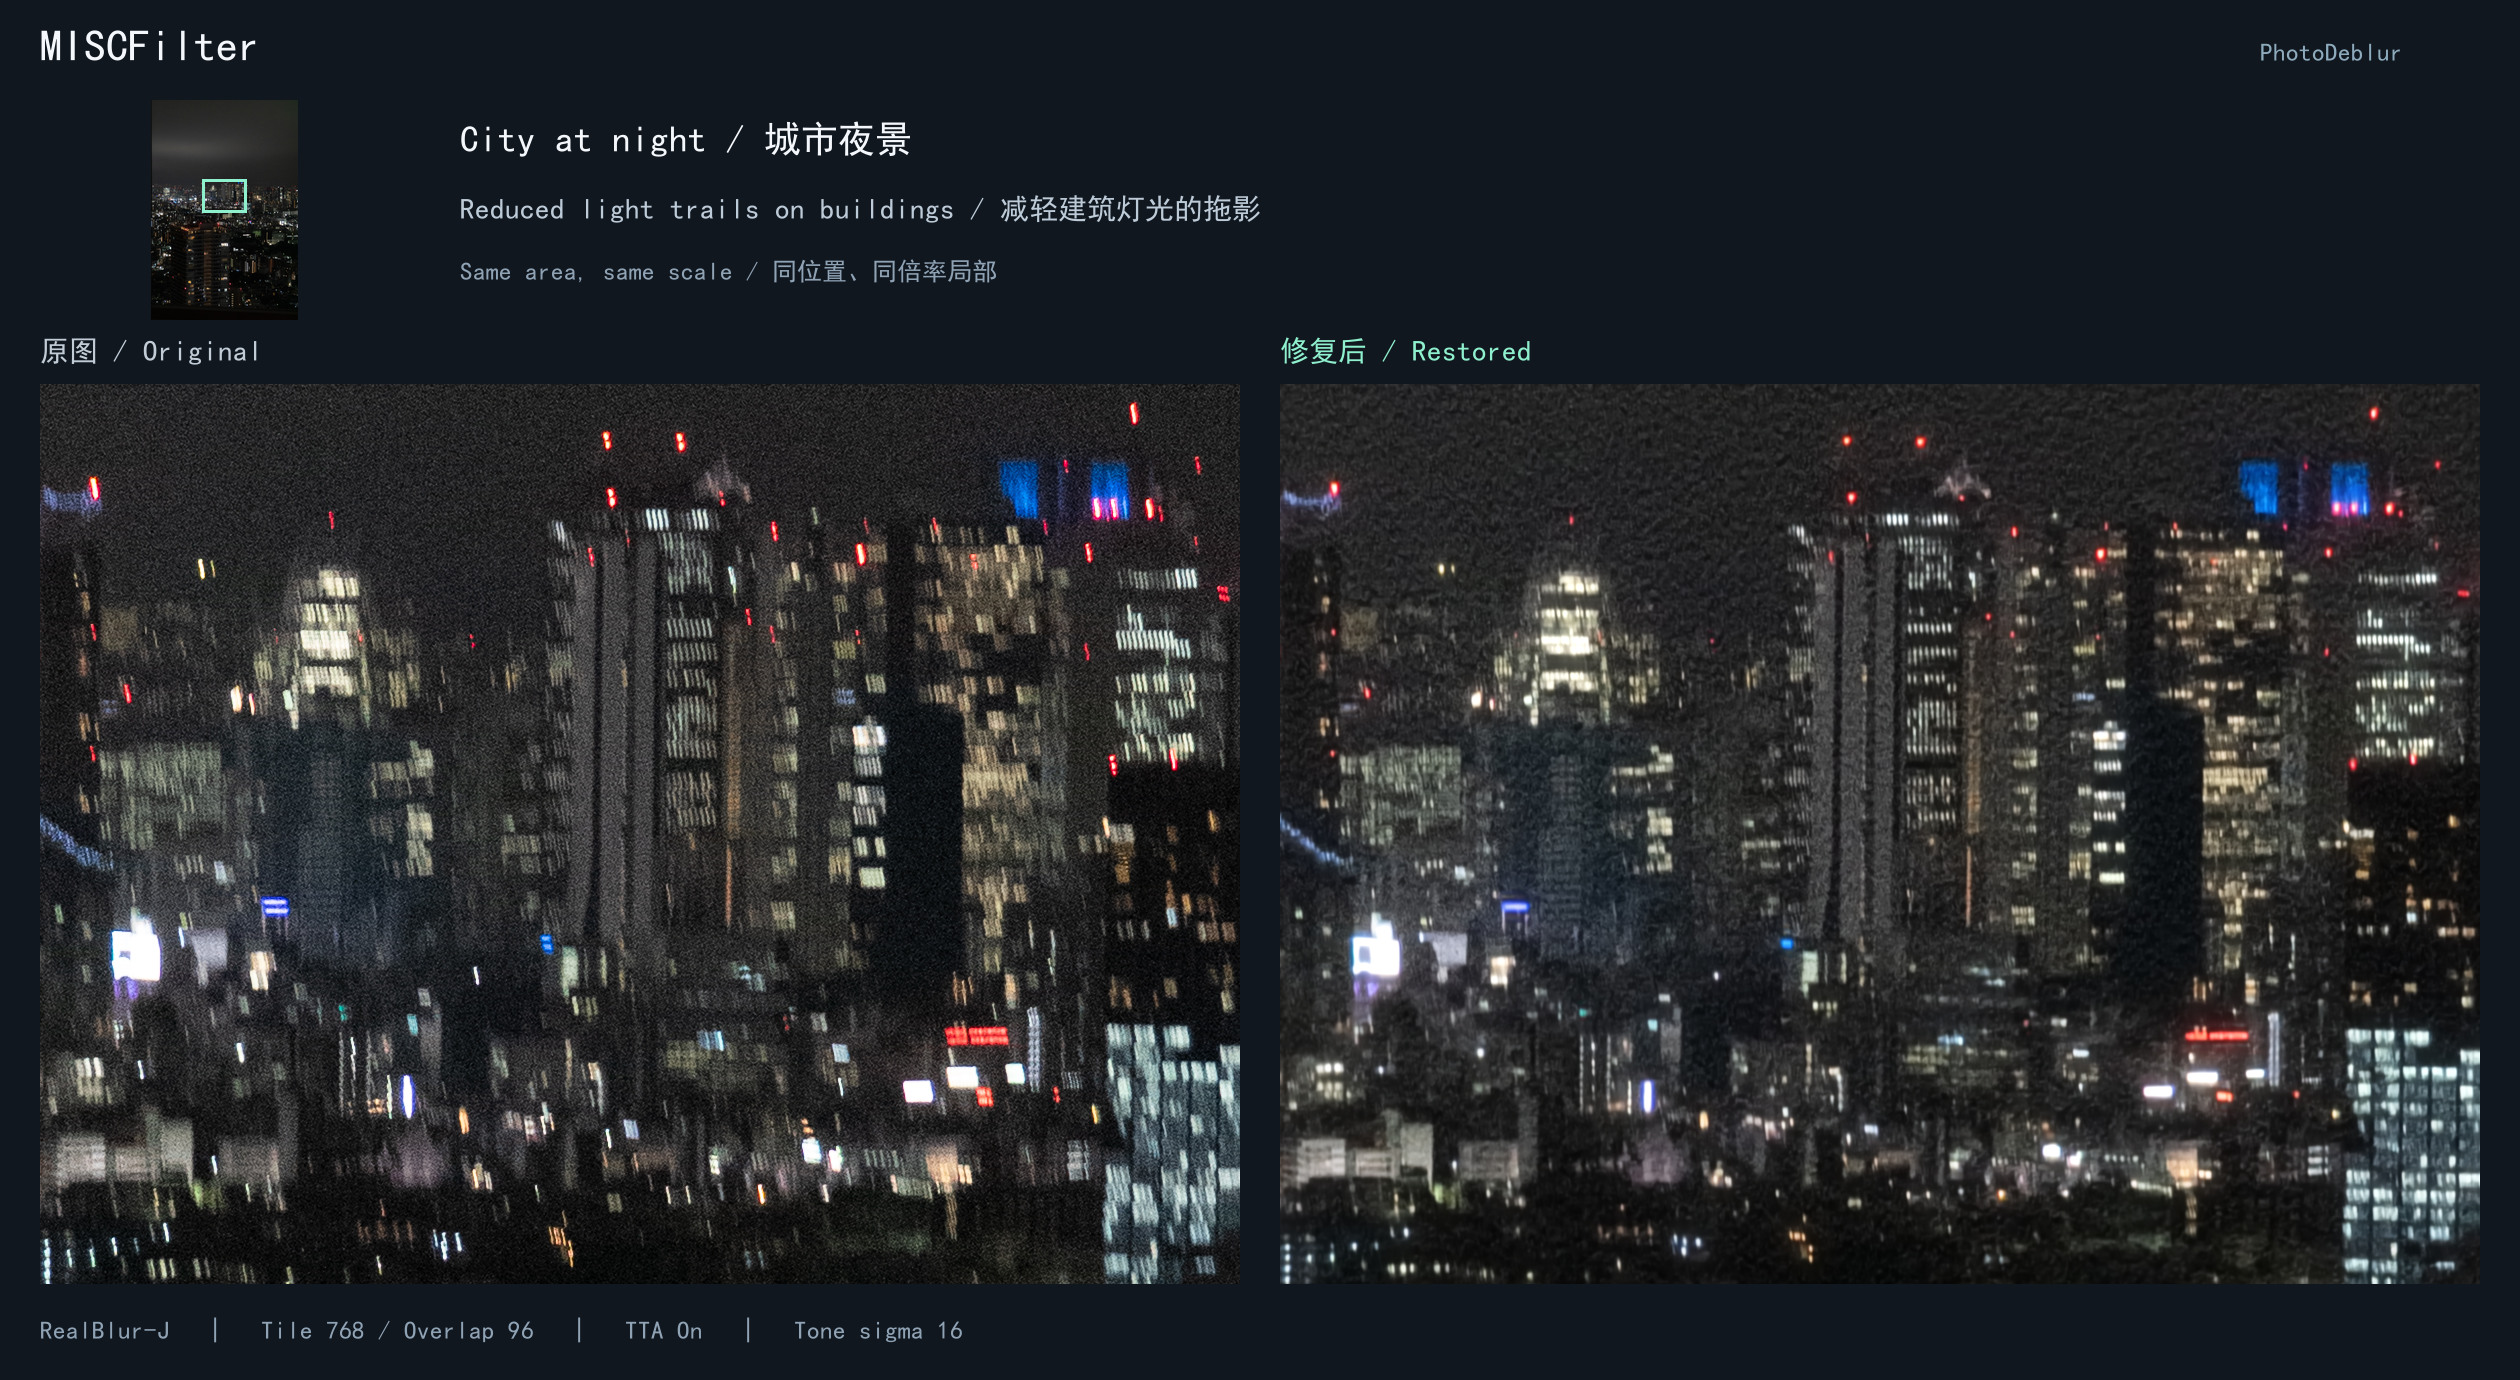
Each comparison shows the original on the left and the restored result on the right, cropped from the same area at the same scale. Click an image to open the full-size comparison.
HI-Diff: street signs
Look for clearer lettering and architectural edges.
HI-Diff: storefront
Look for reduced camera shake around signs and outlines.
MISCFilter: camera display
Look for clearer camera and lens outlines.
MISCFilter: colorful wafer
Look for reduced ghosting along grid lines and circular edges.
MISCFilter: city at night
Look for reduced light trails on buildings. This example uses TTA and tone matching with sigma 16.
ComfyUI-PhotoDeblur Color and Output Quality
Prepare your image
Use display-referred sRGB images. For camera RAW files, complete RAW development first, then load an sRGB TIFF or PNG.
A practical editing order is:
- Develop the RAW file, if applicable.
- Restore blur in ComfyUI.
- Compare the result with the original.
- Continue color grading, cropping, or downsizing.
Internal precision versus saved precision
Inference and blending use FP32 RGB/RGBA tensors at the original image dimensions. Output values are in the 0–1 range.
This internal precision does not mean every saved file is automatically high-bit-depth:
- Input precision for 16-bit TIFF and PNG depends on the image loader.
- Standard Save Image writes 8-bit PNG.
- For further color grading, use Save Image (Advanced) → PNG → 16-bit → sRGB, when available.
Preserve intentional blur
Background blur may be part of your composition, especially in panning shots or shallow-depth-of-field portraits.
If you only want to restore the subject, blend the restored image with the original using a mask in your photo editor. This lets you retain intentional background softness.
Troubleshooting ComfyUI-PhotoDeblur
The workflow reports missing model weights
- Check which model loader is connected to Deblur Image (Tiled).
- Confirm that the downloader uses the same model family and variant.
- Connect
Download Deblur Models.readyto the loader’sdownload_readyinput. - Run the workflow again.
If you use manually managed weights, check the expected structure in ComfyUI’s configured model directory:
models/
├── HI-Diff/
│   ├── HI_Diff_RealBlur_J/
│   │   ├── net_g.pth
│   │   ├── net_le_dm.pth
│   │   └── net_d.pth
│   ├── HI_Diff_RealBlur_R/
│   │   └── [the same three filenames]
│   └── HI_Diff_GoPro/
│       └── [the same three filenames]
└── MISCFilter/
    ├── RealBlur_J.pth
    ├── RealBlur_R.pth
    └── GoPro.pth
Each HI-Diff variant requires its own matching set of three files. Avoid an extra archive-folder level in the final paths. ComfyUI Desktop may use a model directory inside your chosen data directory.
When loading manually managed weights, disconnect or remove the download node.
A model file fails verification
- Confirm that you selected the intended model and variant.
- Enable
repair_invalidin the download node. - Run the download again.
The repair option backs up mismatched files before replacing them.
The workflow runs out of GPU memory
- Reduce
tile_sizeto512. - Set
overlapto64. - Turn TTA off.
- Run the same photograph again.
These are the author’s suggested lower-memory starting settings.
Processing is much slower with TTA
- Check whether TTA is enabled.
- Turn it off for your initial comparisons.
- Re-enable it only for a separate final test.
TTA performs roughly eight times the model computation. HI-Diff sampling steps also affect how much processing is performed; begin with steps = 0.
MISCFilter reports a missing CuPy dependency
- Check whether the error specifically mentions CuPy.
- Verify that the MISCFilter dependency requirements were applied to ComfyUI’s own Python environment, not another Python installation.
- For the documented NVIDIA/CUDA 12 setup, the relevant dependency file is
requirements-misc-cu12.txt.
A CUDA or NVRTC error appears
- Check that the CuPy package matches the CUDA setup.
- Check the local CUDA Toolkit and
CUDA_PATH. - Refer to the extension repository for the project’s setup guidance.
These are environment issues rather than image-quality settings.
Tone matching reports that cv2 is missing
- Confirm that the error comes from the optional tone-matching stage.
- Check that OpenCV is available in ComfyUI’s Python environment; the project provides
requirements-tone.txtfor this dependency. - Bypass the optional tone-matching stage if you want to continue testing deblurring without it.
A TIFF thumbnail appears blank
- Connect the image to Preview Image.
- Check the actual image there before assuming that the TIFF failed to load.
A blank thumbnail alone is not sufficient to judge the loaded image.
The result looks different in color
- Confirm that your input is a developed sRGB image.
- Compare the restored image with the original.
- Try Match Input Tone (Optional) with sigma
16. - Compare against sigma
0, which bypasses correction.
The result is sharper, but faces or textures look worse
- Compare both models using the original photograph as input.
- Keep the zoom level consistent.
- Try another variant before adding TTA or more HI-Diff steps.
- Inspect areas that were already sharp, not just the blurred subject.
- For noisy inputs, check whether shadow texture has been smoothed away or amplified.
Very small faces, severe blur, and defocus may remain difficult even after changing settings.
Frequently asked questions
Does this extension upscale images?
No. Its tiled processing restores images at their original dimensions.
Does steps = 0 disable HI-Diff?
No. It selects 16 steps for RealBlur-J/R and 8 steps for GoPro.
Can I load a RAW file by selecting RealBlur-R?
No. RealBlur-R identifies the pretrained weights. Develop RAW files first.
Are larger tiles, more steps, or TTA always better?
No. Treat them as comparison options and choose by the result on your photograph.
Will restored text always be correct?
Do not assume so. Better-looking lettering is not proof that missing characters have been recovered accurately. Verify important text against a reliable source.
How do I keep background bokeh or panning blur?
Blend the restored subject with the original using a mask in your photo editor.
Why is my saved PNG only 8-bit?
Standard Save Image writes 8-bit PNG. Use an available advanced saver configured for 16-bit sRGB PNG when you need that output.
Learn More about ComfyUI-PhotoDeblur
Practical resources
- ComfyUI-PhotoDeblur repository — the extension’s source documentation and project files.
- Example workflows — ready-made starting points for image restoration.
- Bilingual example workflow — includes English and Chinese usage notes.
- HI-Diff visual results — additional examples from the upstream research project.
Model background
- Official HI-Diff repository — model information and research documentation.
- HI-Diff paper on arXiv — the explanation of its diffusion-guided approach.
- HI-Diff NeurIPS paper — the published research paper.
- Official MISCFilter repository — background on motion-adaptive filtering and pretrained models.
- RealBlur dataset and GoPro dataset — background on the datasets behind the available variants.
The upstream repositories also contain research training and testing instructions. Those are separate from using the ComfyUI nodes; you do not need to train a model to use the supplied pretrained weights.
ComfyUI-PhotoDeblur Credits and License
ComfyUI-PhotoDeblur integrates these upstream projects:
- HI-Diff — NeurIPS 2023; Apache-2.0 license.
- MISCFilter — CVPR 2024; MIT license.
The extension’s node integration code is provided under the MIT license. See THIRD_PARTY.md for upstream notices and port changes.
Model weights are downloaded separately from upstream sources.