

JoyAI Image Edit ComfyUI: instruction‑guided image editing that preserves structure#
This workflow delivers fast, instruction‑guided edits to a single reference image directly inside ComfyUI. Built on the JoyAI‑Image‑Edit stack, it performs prompt‑driven changes such as object and color swaps, spatial tweaks, and clean text rendering while keeping the source composition intact. JoyAI Image Edit ComfyUI is ideal for designers, product teams, and creators who need controlled edits without manual masking.
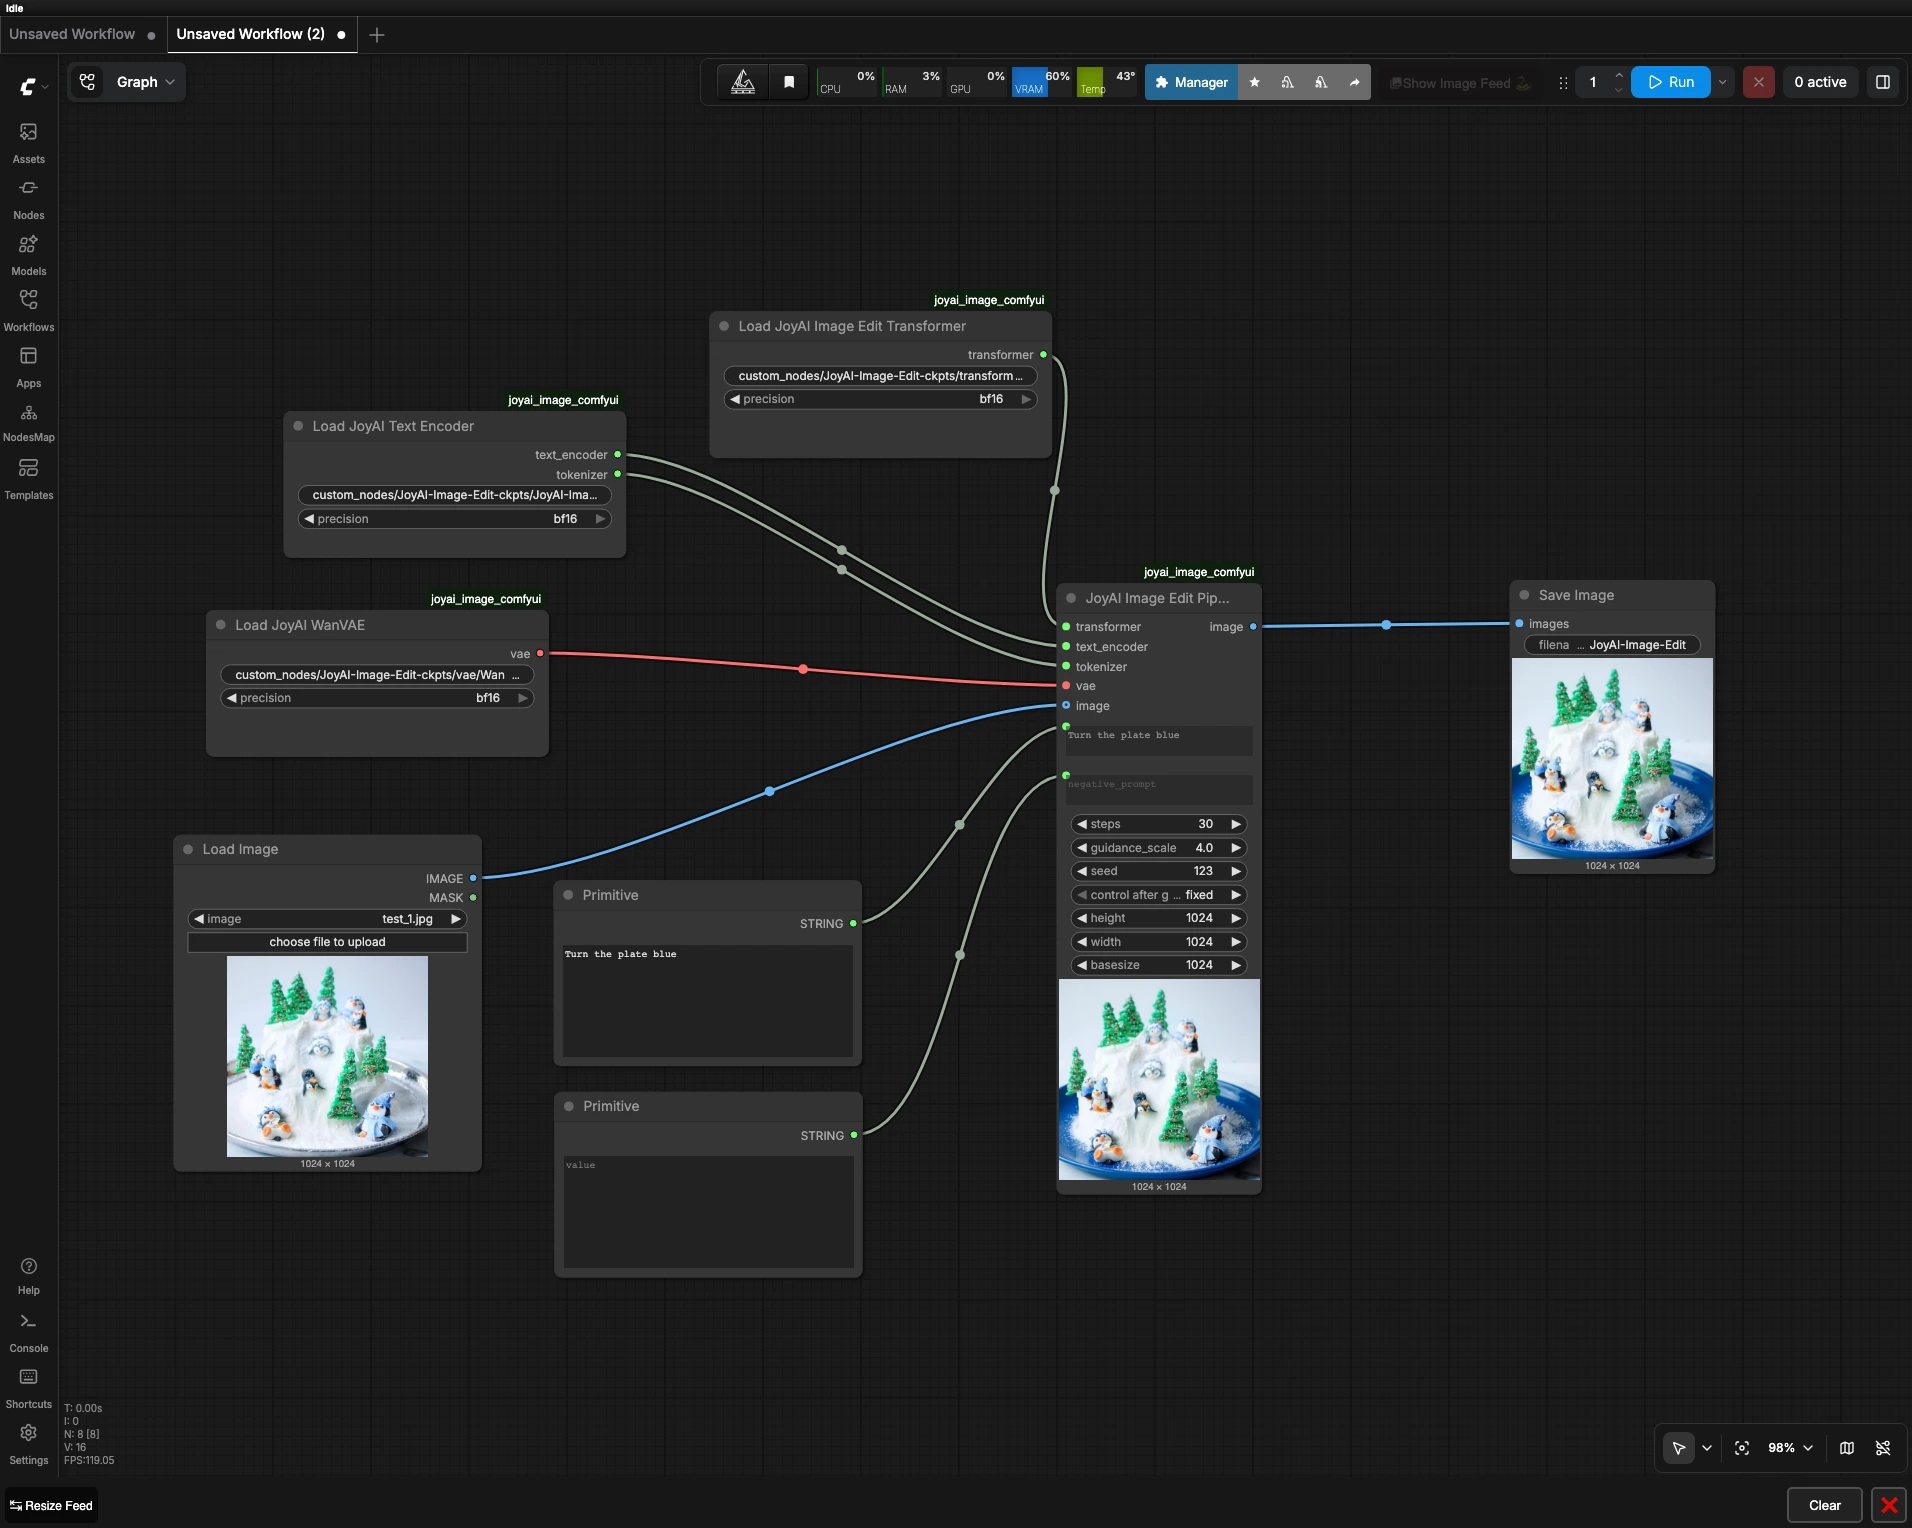
You provide one image and a short instruction like “Turn the plate blue.” The workflow routes that request through the JoyAI Image Edit transformer, text encoder, and VAE, then returns an edited image that respects layout and content boundaries. It is a compact, model‑specific ComfyUI setup focused on predictable results and reproducibility.
Key models in Comfyui JoyAI Image Edit ComfyUI workflow#
- JoyAI‑Image‑Edit transformer. Core edit model that conditions on your instruction and the reference image to produce structure‑preserving changes. Model card: jdopensource/JoyAI-Image-Edit.
- JoyAI‑Image‑Edit text encoder and tokenizer. Encodes the editing instruction into embeddings that the transformer can follow. Implementation and usage live in the JoyAI Image codebase: jd-opensource/JoyAI-Image.
- VAE for JoyAI Image Edit. Compresses and reconstructs images for editing and decoding, contributing to color fidelity and detail retention. The workflow references a Wan 2.1 VAE checkpoint bundled with the JoyAI stack.
How to use Comfyui JoyAI Image Edit ComfyUI workflow#
The pipeline flows left to right: load a source image, write an instruction, load the JoyAI stack, run the edit, then save. You do not need a mask for typical edits, and the workflow is designed for reproducible results.
- Prepare the source image
- Load your reference with
LoadImage(#6). Use a clean, well‑lit image for best outcomes and keep the subject reasonably centered. If you want to preserve framing exactly, crop the source beforehand rather than changing canvas size later. The workflow passes this image directly to the editing stage so its structure anchors the result.
- Load your reference with
- Write the edit instruction
- Enter your request in
Prompt(#4) and optionally define exclusions inNegative Prompt(#5). Keep instructions short, specific, and actionable, for example “make the mug red,” “replace the sky with sunset,” or “add text JOYAI on the notebook.” Negative prompts help avoid unwanted colors, objects, or styles. JoyAI Image Edit ComfyUI honors the instruction while keeping layout consistency with the original.
- Enter your request in
- Load the JoyAI stack
- The model components are loaded by
JoyAIImageEditTransformerLoader(#1),JoyAIImageEditTextEncoderLoader(#2), andJoyAIImageEditVAELoader(#3). These nodes fetch the transformer weights, text encoder plus tokenizer, and the VAE that governs image encoding and decoding. You normally do not need to change these unless you are swapping checkpoints for a different look or behavior. Keeping this trio consistent ensures the instruction semantics, geometry, and color space remain stable.
- The model components are loaded by
- Run the edit
JoyAIImageEditPipeline(#7) fuses your source image with the instruction embeddings to generate the edited result. The pipeline balances instruction strength against structural fidelity so objects stay where they belong while their attributes change as requested. Use a fixed seed for reproducibility or switch seeds to explore variations. If you need crisper lettering or fine edges, increase quality settings in the sampler while keeping the image size reasonable relative to your source.
- Save and review
SaveImage(#8) writes the edited output. Use versioned names to compare runs side by side and keep the seed in your filename or notes so you can reproduce a favorite result. When iterating, adjust only one control at a time to see clear cause and effect.
Key nodes in Comfyui JoyAI Image Edit ComfyUI workflow#
JoyAIImageEditPipeline(#7)- Central orchestrator that applies the instruction to the reference image using the JoyAI transformer, text encoder, and VAE. Tune
promptandnegative_promptfirst. Use a fixedseedfor deterministic reruns, then vary it to explore alternatives. Balance instruction strength and sampling quality to trade speed for fidelity, and keep output dimensions close to the source aspect ratio to preserve layout.
- Central orchestrator that applies the instruction to the reference image using the JoyAI transformer, text encoder, and VAE. Tune
JoyAIImageEditTransformerLoader(#1)- Loads the JoyAI‑Image‑Edit transformer checkpoint that determines how strongly and cleanly edits follow your text. Swapping this weight can meaningfully change style and responsiveness. Pair transformer and text‑encoder from the same release family to avoid embedding mismatches.
JoyAIImageEditTextEncoderLoader(#2)- Provides the text encoder and tokenizer that translate your instruction into model‑readable embeddings. Clear, concise phrasing improves embedding quality. Precision settings can influence VRAM usage and speed, so choose the mode that fits your hardware and batch size.
JoyAIImageEditVAELoader(#3)- Loads the VAE that governs how images are encoded and decoded around the edit. Different VAEs can shift color and contrast subtly, so keep this consistent across experiments when you are evaluating prompts. If you change the VAE, revisit your prompts to re‑balance color wording.
Optional extras#
- Prompt craft
- Prefer single, clear actions like “make the plate blue” over multi‑step paragraphs. Name visible objects precisely and use singular nouns when editing attributes. For spatial edits, ground the request with prepositions such as “on the table,” “in the background,” or “on the wall.”
- Resolution and composition
- Preserve the source aspect ratio to maintain geometry. Upscale after editing if you need larger deliverables rather than pushing extreme edit resolutions.
- Reproducibility
- Keep a fixed seed when comparing prompt variations, then unlock the seed to sample alternatives once you are satisfied.
- References and sources
- Model card and weights: jdopensource/JoyAI-Image-Edit
- Implementation details and updates: jd-opensource/JoyAI-Image
- ComfyUI graph template used by this project: joyai_image_comfyui
Acknowledgements#
This workflow implements and builds upon the following works and resources. We gratefully acknowledge jd-opensource for the JoyAI-Image repository, jd-opensource for the JoyAI-Image ComfyUI workflow, and jdopensource for the JoyAI-Image-Edit model for their contributions and maintenance. For authoritative details, please refer to the original documentation and repositories linked below.
Resources#
- jd-opensource/JoyAI-Image
- GitHub: jd-opensource/JoyAI-Image
- jd-opensource/joyai_image_comfyui
- GitHub: jd-opensource/JoyAI-Image
- jdopensource/JoyAI-Image-Edit
- Hugging Face: jdopensource/JoyAI-Image-Edit
Note: Use of the referenced models, datasets, and code is subject to the respective licenses and terms provided by their authors and maintainers.

