



MiniMaxH3-Studio Introduction
MiniMaxH3-Studio brings video prompting, generation, planning, and editing into one ComfyUI sidebar. You can describe a scene, inspect the prompt that will be sent to MiniMax H3, generate clips through ComfyUI’s official H3 workflows, and arrange the results into a finished video.
For an AI artist, this means fewer interruptions between developing an idea and finishing a sequence. You can:
- Turn a creative brief into an inspectable prompt, rather than relying on an unseen rewrite.
- Generate from text, frame images, or reference media, depending on your creative starting point.
- Keep important wording exact, including dialogue, on-screen text, and required or forbidden content.
- Collect multiple takes in Production, then choose which clips to use.
- Plan a longer video as individual shots, generate its segments, and assemble them.
- Edit inside ComfyUI, including trimming, overlays, titles, transitions, colour adjustments, and main-track audio.
- Optionally ask an AI writing assistant for suggestions, while keeping approval in your hands.
The sidebar is backed by 28 canvas nodes, which use the same prompt-building process. You can use the guided interface, inspect the underlying workflow, or work directly with the nodes.
MiniMaxH3-Studio is an independent custom-node project. It is not MiniMax’s official Context-IR implementation and is not affiliated with or endorsed by MiniMax. Prompt validation does not guarantee a particular visual result.
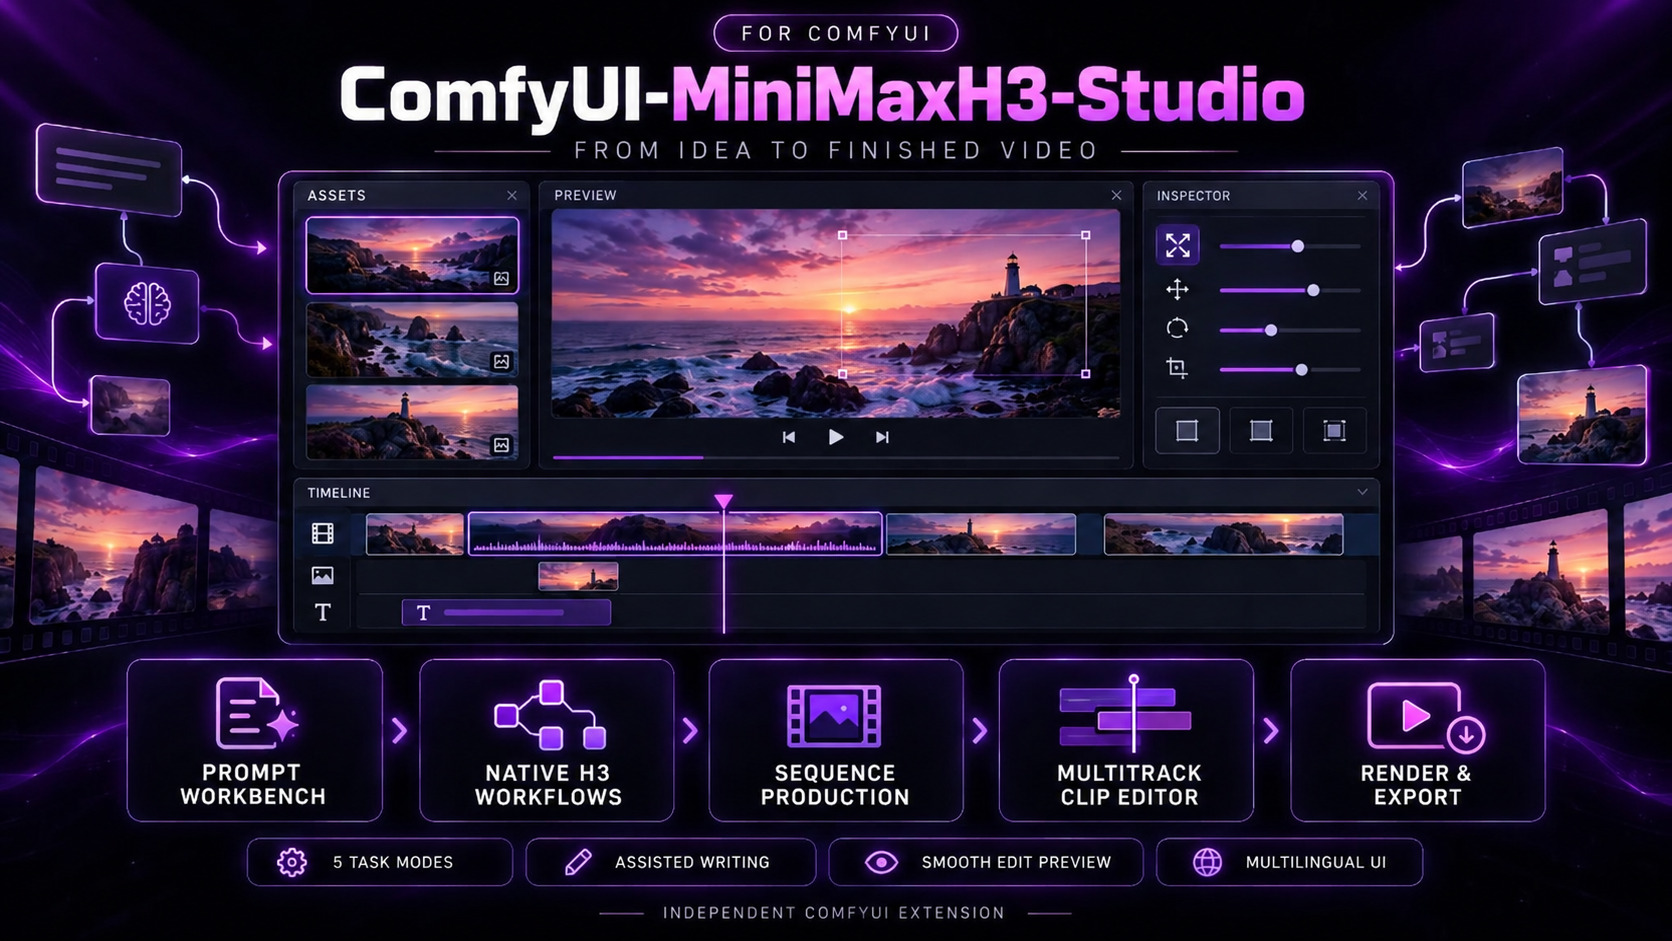
Watch the workflow demonstration
How MiniMaxH3-Studio Works
Think of MiniMaxH3-Studio as a small production desk:
- Context is where you write and review the creative brief.
- App Mode prepares or connects the video-generation workflow.
- Production keeps your generated takes and segment plans together.
- Clip editor is where you arrange and finish the selected material.
1. Describe what you want
On the Context page, you choose a task mode, enter your description, set the clip duration, and select any reference sources.
For example:
A courier walks across a rain-soaked bridge at dawn. The camera follows from behind. Cool blue light, soft reflections, distant traffic.
Your description can contain up to 4,096 characters.
2. Build a plan before generating
The prompt pipeline follows this basic route:
Request → Plan → Compiler → Validator → Preview
In everyday terms:
| Stage | What happens |
|---|---|
| Request | Collects your description, mode, duration, references, and constraints. |
| Plan | Organizes the information into a structured creative plan. |
| Compiler | Turns that plan into the final prompt. |
| Validator | Checks for missing information, conflicts, and other reported problems without rewriting the prompt. |
| Preview | Shows the result so you can inspect it. |
This is similar to checking a shot list before filming. Missing details stay visible rather than being silently invented.
3. Review two different checks
The interface separates validation from Guide readiness:
- Validation checks the request and prompt for reported errors or conflicts.
- Guide readiness checks whether the known requirements of the official H3 prompt guide are covered.
A prompt can therefore be valid but still show Incomplete guide readiness. Neither check predicts whether the generated scene will look good.
4. Prepare a normal ComfyUI workflow
Start H3 App Mode places the official workflow for your selected task in the active workflow tab. It does not immediately queue generation.
The resulting graph remains a normal, editable ComfyUI workflow. You can inspect its loaders, model choices, sampler settings, and connections before running it.
Alternatively, Connect and queue current canvas connects the prompt to a compatible H3 workflow you already use and queues it once.
5. Generate, verify, and collect the result
Generation runs through ComfyUI’s normal queue. MiniMaxH3-Studio checks that the saved output belongs to that run before reporting it as finished.
Verified results appear as segments in Production. Repeated runs from the same workflow add segments to the same project unless you choose New project.
6. Assemble or edit
You have two distinct finishing routes:
- Sequence assembly joins generated segments using the selected assembly format.
- Editor rendering applies your timeline edits, titles, overlays, effects, and audio settings.
Assembly does not apply editor effects. Use the editor when you want a designed final cut rather than a straightforward joined sequence.
MiniMaxH3-Studio Compatibility and Workspace Basics
What needs to be available
Video generation requires:
- ComfyUI with native MiniMax H3 nodes and the official
video_minimax_h3_*workflow templates. - A frontend that supports sidebar extensions.
- Python 3.10 or newer.
- Suitable MiniMax H3 weights and hardware.
Building and checking prompts does not require model weights.
The prompt pipeline runs on Windows, Linux, and WSL. However, the documented media features—clip editing, Production import, sequence assembly, and final rendering—require Windows x64 with 64-bit Python and the supported media tools.
The author lists Linux support for those media features as planned, not currently available.
Compatibility is checked by capability
The sidebar checks which nodes, templates, inputs, and frontend functions your host actually provides. When something is missing, the message identifies it.
The author tested the clip editor, image crop, and App Mode with ComfyUI 0.42.0 using frontend 1.55.18 and 1.57.1. These are tested combinations, not minimum-version requirements.
The three sidebar pages
| Page | Use it for |
|---|---|
| Context | Describe a clip, choose references, review prompts, and prepare generation. |
| Production | Manage generated clips, plan sequences, and enter the editor. |
| Settings | Choose language, check media tools, manage optional storage, and configure assisted authoring. |
The interface supports English, Traditional Chinese, and Simplified Chinese, plus automatic selection from the ComfyUI locale.
MiniMaxH3-Studio Features
Five creative task modes
These are different ways to guide H3, not five separate models.
| Mode | Your starting material | Example use |
|---|---|---|
| T2VA | Text description only | Explore a scene without preparing source artwork. |
| I2VA | An opening image | Animate a composition you already like. |
| FL2VA | Separate first-frame and last-frame images | Guide the clip between two visual endpoints. |
| L2VA | An ending image | Build a clip toward a planned final composition. |
| Ref2VA | Images, videos, and/or audio with explicit roles | Give the prompt an ordered reference set. |
Sources come from Load Image, Load Video, and Load Audio nodes on the main canvas, outside subgraphs. The sidebar does not upload files.
If you start App Mode before choosing sources, the official template can supply its loader nodes. Replace their sample images with your own before queueing. In Ref2VA, also select the references in the sidebar pickers.
For FL2VA, the first and last images must come from two different Load Image nodes.
Ordered references and soundtrack control
Ref2VA supports:
- Up to 9 images.
- Up to 3 videos.
- Up to 3 standalone audio files.
- A maximum of 12 files overall.
- A maximum of 3 audio tracks overall, including submitted video soundtracks.
At least one image or video is required; audio-only reference sets are not offered.
You can reorder or remove individual references and inspect their final labels before applying the graph. Missing or conflicting roles are reported rather than guessed.
For reference videos, choose whether to submit their soundtracks. Excluding soundtracks can help keep the reference set within its audio limits.
Each video or audio clip should be 2–15 seconds, with no more than 15 seconds per kind in total. The live counter includes submitted video soundtracks.
Image cropping before generation
Use Crop image beside a first frame, last frame, or reference image to concentrate on the part of your artwork that matters.
You can:
- Drag the crop rectangle or its handles.
- Choose Free, Original, or a fixed aspect ratio.
- Use arrow keys for precise adjustments; hold Shift for larger steps.
- Choose Reset, then Apply, to restore the full image.
For example, you could crop a wide illustration into a portrait-oriented composition before animating its central character.
Important differences:
- I2VA: output follows the crop’s aspect ratio.
- FL2VA and L2VA: output size comes from the canvas resolution setting, so match the crop ratio to that setting.
App Mode inserts a native Crop Image node when preparing the canvas. Once the graph is prepared, edit that visible node directly.
Cropping supports source images from 32 to 16,384 pixels per side. The crop must remain at least 32 × 32 pixels. Video and audio sources do not have this crop action.
Exact dialogue, visible text, and creative constraints
Use the canvas H3 Hard Constraint Producer node for details that must remain exact. Connect its hard_constraints output to H3 Context Request.
| Input | What it protects |
|---|---|
dialogue | Exact spoken wording. |
visible_text | Exact text intended to appear on screen. |
required_content | Content that must be included. |
forbidden_content | Content that must not be introduced. |
These controls are on the canvas, not separate sidebar fields.
Dialogue settings also include:
- Language:
autoor a supported language. - Speaker: a short identity phrase, such as
the guide. - Delivery:
on_screenorvoiceover.
Supported explicit languages are Arabic, Chinese, English, French, German, Italian, Japanese, Korean, Portuguese, Russian, and Spanish. Automatic detection recognizes Korean, Japanese, and Chinese scripts; other scripts remain untagged with a warning.
For voiceover, the instruction keeps the speaker’s lips closed. These are prompt constraints, not a guarantee that generation will reproduce every detail successfully.
Clip duration and prompt review
Set Clip duration to a whole number from 4 to 15 seconds; the default is 5.
The extension resolves the request to a length H3 can produce and shows the delivered seconds and frame count. The graph uses that resolved duration consistently.
The Context page has five numbered stages:
- Intent / Mode
- Media / Roles
- Understand / Plan
- Audit / Validate
- Execute / Export
You can inspect the plan, read diagnostics, copy the prompt, and import or export JSON. To revise manually:
- Edit the prompt.
- Enter a Revision reason.
- Choose Stage revision.
- Choose Validate revision.
Typing @ in the prompt lets you insert a reference.
App Mode without losing control of your workflow
Before starting, save your current workflow. To experiment safely, make a new empty workflow tab active.
If the active canvas already contains nodes, App Mode offers:
| Action | Effect |
|---|---|
| Replace canvas and start H3 App Mode | Replaces the active graph with the official workflow. |
| Connect and queue current canvas | Keeps your graph, connects the prompt to the selected native H3 node, and queues once. |
| Keep canvas and exit H3 App Mode | Leaves the graph untouched and does not queue. |
Connecting preserves your existing model, LoRA, sampler, and other workflow settings. The selected mode must match the H3 node’s frame connections.
If the graph already contains H3 Context nodes, use Apply and queue current H3 graph rather than Connect.
After generation is queued, cancel it with ComfyUI’s queue controls. Cancel App Mode applies only while App Mode is still preparing the graph and Context.
Production projects and alternate takes
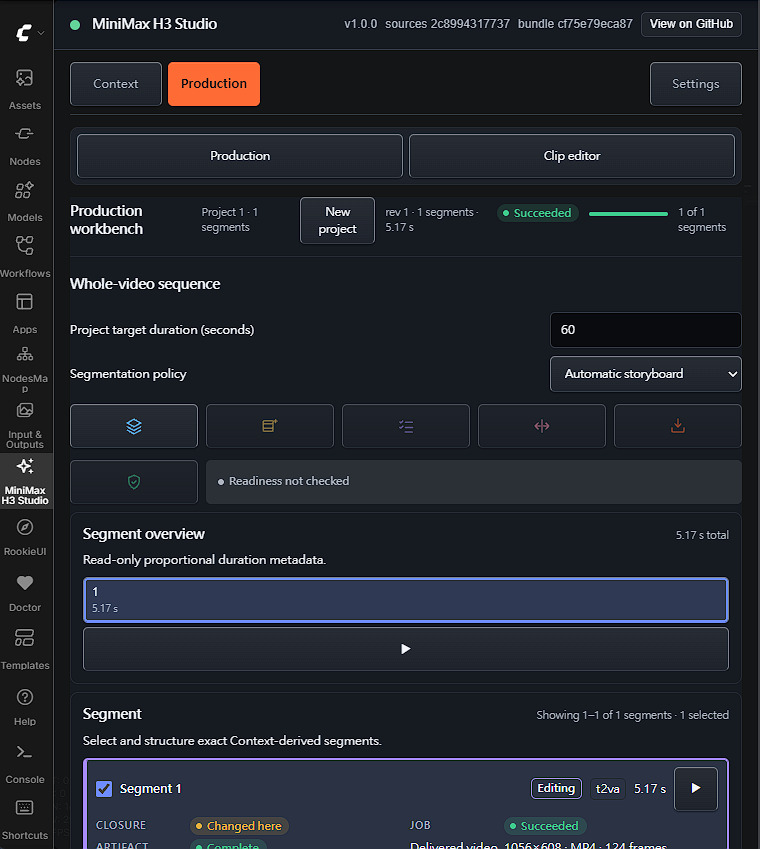
Production organizes clips as project segments. You can:
- Reorder segments by dragging, using arrows, or entering a position.
- Add the current Context as a segment.
- Replace a selected segment with the current Context.
- Generate a ready segment or inspect its blockers.
- Preview individual or aggregate outputs.
- Review preserved intent proposals when available.
A project can contain up to 64 segments, displayed 32 per page.
Segment relationships include Independent, Predecessor, Adjacent pair, Cut, and Reset. Predecessor and Adjacent pair require an earlier segment. Changing a segment reruns only what depends on it.
The Project target duration, from 4 to 60 seconds, is for sequence planning. It is separate from the next individual clip’s duration and does not start generation when changed.
Built-in clip editor
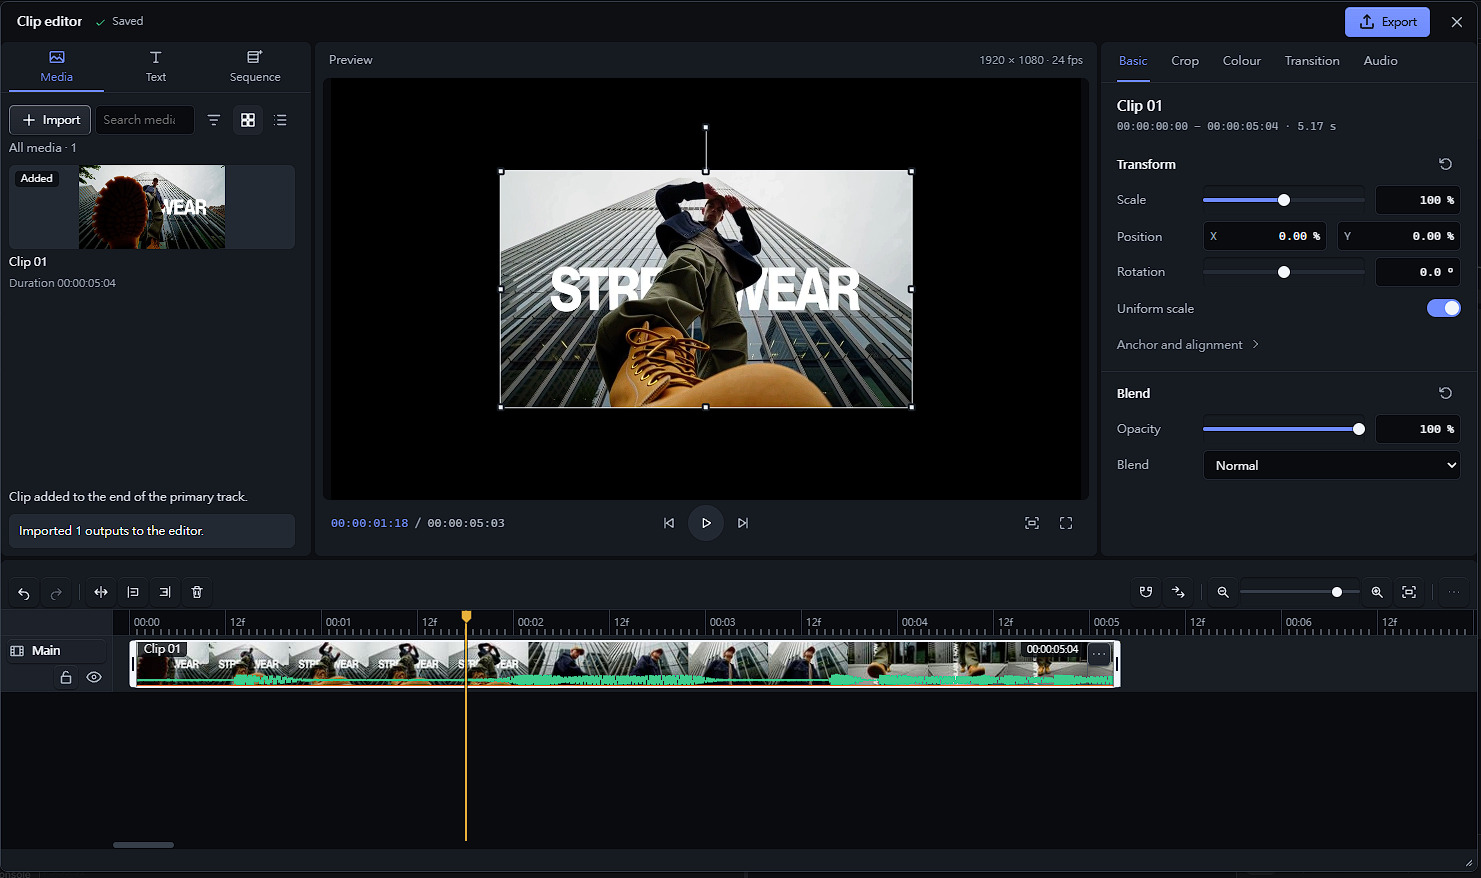
To begin:
- Select up to three finished segments in Production.
- Switch to Clip editor.
- If necessary, choose Start authoring from this context.
- Choose Open full editor.
- Use Import in the media bin.
- Click or drag media onto the timeline.
Import adds sources to the bin; it does not place them on the timeline.
The editor supports:
- Up to 8 tracks.
- Up to 128 timeline clips.
- Up to 2.5 minutes of timeline content.
- Up to 128 items in the media bin.
A video card goes to the end of the Main track when clicked. A picture goes to a picture-overlay track at the playhead; create that track first if needed. Clips cannot overlap on the same track.
Timeline editing
Available tools include moving, trimming, splitting, deleting, roll edits, slip and slide edits, asset replacement, snapping, and numeric positioning.
Ripple edits shift later clips on the same edited track after trims or deletes. They do not automatically move every track together.
Useful shortcuts:
| Action | Shortcut |
|---|---|
| Undo / Redo | Ctrl+Z / Ctrl+Shift+Z |
| Split at playhead | Ctrl+B |
| Trim start / end to playhead | Q / W |
| Delete / Ripple delete | Delete / Shift+Delete |
| Select all | Ctrl+A |
| Fit timeline | Shift+Z |
| Play / Pause | Space |
| Step one frame | , / . |
Cmd can replace Ctrl. Text fields, menus, and focused buttons retain their own keyboard behaviour.
Each completed edit is one undo step. An edit or group move can cover at most 32 clips.
Position, colour, titles, and transitions
Select a clip to use the Inspector:
| Inspector tab | Controls and creative uses |
|---|---|
| Basic | Scale, position, rotation, anchor, alignment, opacity, and blend mode—for example, a smaller picture-in-picture overlay. |
| Crop | Remove unwanted edges from the selected clip. |
| Colour | Brightness, contrast, and saturation through Color adjustment. |
| Text | Font styling, alignment, colour, line height, stroke, sharp shadow, and background. |
| Transition | Cross dissolve or directional wipes, with duration measured in frames. |
| Audio | Volume, mute, fade in, and fade out for videos with sound. |
Number fields apply on Enter or the group’s apply button. Moving focus away does not apply them.
Titles support 1–2,048 characters across at most 32 lines, with sizes from 8–512 px. A new title lasts one second; trim it to change its duration. Literal line breaks are preserved.
The bundled fonts cover Latin, Greek, and Cyrillic characters only. Chinese, Japanese, Korean, emoji, and other unsupported title characters are refused. This title limitation is separate from dialogue-language support.
Transitions include:
- Cross dissolve
- Wipe from left
- Wipe from right
- Wipe from top
- Wipe from bottom
A transition belongs to the start of the incoming clip. That clip must be on an upper track, above a visible, enabled clip covering the transition’s full duration. Two clips placed consecutively on Main cannot transition directly into one another.
For example, place an incoming shot on a video-overlay track above the outgoing Main-track shot, then add a dissolve to its beginning.
Audio and preview behaviour
The editor plays sound from Main-track video only. Overlay videos are silent, and there are no separate audio tracks.
Audio controls include:
- Volume from −60 to +12 dB.
- Mute.
- Fades up to 10 seconds each, without their combined length exceeding the clip.
Picture transitions do not blend sound. Raising already loud audio can cause distortion.
The browser monitor is an approximate preview. Waveforms show source sound and do not change to reflect volume, mute, or fades. Render the video to check the final result.
Final rendering
Choose Export → Render final video.
The editor outputs:
- 1920 × 1080
- 24 fps
- MP4 with H.264 video
- 48 kHz mono AAC audio, when Main has audio
The high-quality H.264 setting is fixed. Rendered files may be larger than in earlier versions.
Preview output plays a smaller 640 × 360 copy. Download original retrieves the full-size result.
Final renders are temporary: approximately one hour, with at most 16 retained at a time. Download the files you want to keep.
MiniMaxH3-Studio Longer Videos
Longer-video planning covers 4–60 seconds. Each generated segment must fit H3’s 4–15 second clip range.
Plan the shots
- Set Project target duration in Production.
- Choose Automatic storyboard or fixed 5, 10, 12, or 15 second segmentation.
- Choose Prepare planning context.
- Review storyboard rows or enter a script and choose Split script into shots.
- Edit the rows and choose Use reviewed rows.
- Choose Propose segments.
- Review the result, then choose Approve and import to Production.
Approval creates the segment plan; it does not generate video yet.
Example for a 30-second target:
[Shot 1] The courier leaves the depot at dawn.
[Shot 2] At 00:10.000, the courier crosses a rain-soaked bridge.
[Shot 3] At 00:20.000, the courier delivers the parcel.
If you give start times, give them to every shot after the first. Without times, shots share the target duration evenly.
Scripts support up to 32 shots. Shots shorter than four seconds are grouped, and shots longer than fifteen seconds are split. A Hard boundary shot cannot be split and must therefore fit within fifteen seconds.
Exact dialogue, visible text, and timing constraints from Context stay in the opening part of the video. The planner does not place a cut inside a shot containing exact text.
Reference-based plans can be proposed and reviewed, but longer-sequence generation currently accepts text-to-video plans only.
Generate and assemble
In the editor’s Sequence tab:
- Choose Check readiness.
- Choose Generate approved sequence.
- Retry failed segments individually if needed.
- Choose an output format.
- Choose Assemble sequence.
Readiness lasts about a minute. Segments generate one after another.
| Assembly format | Picture | Audio |
|---|---|---|
| Original size, default | Common original segment size, 24 fps | 32 kHz stereo |
| 512 × 512 | 512 × 512, 30 fps | 48 kHz stereo |
Original-size assembly requires a supported size shared by all segments. Incompatible sizes are refused rather than resized.
The cut report labels boundaries smooth, visible change, or not measured. These are limited measurements, not guarantees of visual or audio continuity.
For titles, overlays, colour changes, or other edits, place the segments on the editor timeline and render there instead of relying on assembly alone.
MiniMaxH3-Studio Models and Optional AI Assistance
H3 video models
MiniMaxH3-Studio does not provide its own separate video-model collection. It uses installed official H3 weights through ComfyUI’s native workflows:
| Task | Official workflow |
|---|---|
| T2VA | video_minimax_h3_t2v |
| I2VA, FL2VA, L2VA | video_minimax_h3_i2v family |
| Ref2VA | video_minimax_h3_r2v |
App Mode prefers the template’s own installed model choice, including recognized video VAE and precision variants. If that choice is unavailable, it can select another installed official variant for the same role.
Unmatched roles remain visible as warnings for you to resolve on the canvas. The supplied documentation does not give a complete weight list or performance comparison between variants.
Optional prompt-writing models
Assisted authoring is off by default. Normal prompt building does not need an external provider.
| Provider profile | Where it runs | Supported use in this release |
|---|---|---|
ollama.local | Your Ollama on the ComfyUI host | Prompt optimization and refinement. |
gemini.remote | Google Gemini | Prompt optimization and refinement. |
openai.remote | OpenAI | Connection, model discovery, and readiness checks only. |
anthropic.remote | Anthropic | Connection, model discovery, and readiness checks only. |
In Settings → Assisted authoring provider, choose a provider, reload its available models, and select an Exact model. Remote connections require permission for text-only requests.
- Optimize prompt proposes improvements.
- Refine prompt follows your revision instruction, such as requesting a camera move or different wording.
- Every proposal remains yours to edit, accept, or reject.
Protected dialogue, visible text, reference labels, roles, and timing remain exact. Existing static-camera, no-cuts, and single-shot restrictions take priority over conflicting suggestions.
Only prompt text, instructions, and derived text are sent—not media. Provider billing, quota, and retention policies still apply.
MiniMaxH3-Studio Project Files, Privacy, and Recovery
Save editable work separately from videos
A downloaded MP4 is a finished result, not an editable project backup.
Use Project file to save or open an .h3proj document. These files contain editable project information, but do not embed media. Preserve the source media separately and explicitly relink it when necessary.
Also distinguish:
- ComfyUI workflow save: preserves the canvas workflow.
- Editor “Saved” status: confirms the host accepted an edit.
.h3projsave: preserves editable project data in a file.- Downloaded video: preserves the rendered or generated result.
Optional recovery is not automatic backup
Three separate options are off by default:
- Keep recovery metadata
- Keep verified media
- Save draft recovery
Durable storage requires a qualified, trusted single-user Windows host using local loopback and fixed local NTFS storage. It is not available through a shared or proxied host.
Draft recovery protects acknowledged host revisions, not edits still waiting in the browser. Restore recovery explicitly after a restart.
Live workspaces can expire after about 15 minutes without activity, and restarting ComfyUI ends the live workspace.
Processing and privacy
Prompt building, previews, and rendering run on the ComfyUI host and in your browser. If the host is another computer, your material is processed there.
Credentials are not saved into workflows, reports, or diagnostics. Assisted authoring never receives media.
The optional H3 Official Context-IR node is different: it requires a host-supplied connection and can send its prompt and connected media as public HTTPS URLs to MiniMax.
Review screenshots before sharing them: thumbnails, filmstrips, waveforms, prompts, and titles can reveal private content.
What’s New with MiniMaxH3-Studio
The following release notes cover the versions listed in the author’s documentation.
1.4.1 — Newer frontend compatibility and interface fixes
- Fixed App Mode compilation with frontend 1.56.1 and later.
- Restored clip editor and image-crop opening with frontend 1.57.1 and later, while keeping editor shortcuts isolated from the canvas.
- Improved light/dark palette matching and sidebar sizing.
- Made editor button descriptions easier to read.
- Corrected empty-editor instructions to tell you to click a Media thumbnail.
- Renamed the Traditional Chinese language option to 正體中文.
1.4.0 — Directional wipes, image cropping, and easier setup
- Added four directional wipe transitions.
- Improved final H.264 quality, especially for flat colours; files can be larger.
- Added editor compatibility with frontend 1.55.11 and later.
- Added early rejection of unsupported title characters instead of failing only at render time.
- Added first-frame, last-frame, and reference-image cropping through native Crop Image nodes.
- Allowed image-based App Mode setup before selecting sources, with clearer missing-source messages.
- Improved recognition of official weight variants and preference for template choices.
- Improved Refine prompt support for camera moves and cuts while protecting exact content.
- Strengthened required/forbidden-content handling for Optimize and Refine.
- Renamed the repository to MiniMaxH3-Studio; old GitHub links redirect. The Registry name remains ComfyUI-MiniMaxH3-Studio.
Projects using directional wipes require 1.4.0 or later.
1.3.2 — Reliable completion detection
- Fixed runs that could remain at “Verifying the exact saved output” after generation finished.
- Added a ComfyUI-history lookup lasting up to about sixteen seconds when the output message cannot be recognized.
- Added a clear exit to native nodes if verification still fails.
- Enforced the three-audio-track limit in Reference Registry, including video soundtracks.
1.3.0 — Ordered references and improved assembly
- Enabled linked Ref2VA references from the sidebar and bundled graphs.
- Added ordered reference selection, removal, and visible final labels.
- Added original-size assembly at 24 fps / 32 kHz stereo, with one final encode.
- Kept the older 512 × 512 / 30 fps / 48 kHz stereo format selectable.
- Added cut reports.
- Allowed assembly to become available after media tools become ready, without restarting ComfyUI.
1.2.1 — Explicit media-tool selection
- Removed automatic FFmpeg downloading and installation.
- Added a media-tools card with the exact supported download, archive information, and verification guidance.
- Preserved previously configured compatible tools.
- Made leftover-file cleanup explicit.
- Fixed assembly of locally generated clips affected by colour tags and rounded durations.
1.2.0 — Title styling and editor responsiveness
- Added title strokes, sharp shadows, background padding, and preserved line breaks.
- Saved accepted title decorations in projects and acknowledged recovery drafts.
- Added local-perception readiness inspection for operator-configured analysis.
- Renamed the timeline toggle to Ripple edits.
- Reduced unnecessary redraws and improved synchronization while editing.
Older 1.1.0 readers refuse the newer optional decoration settings rather than silently discarding them.
1.1.0 — Editable projects and recovery
- Added
.h3projsaving/opening and explicit media relinking. - Added optional verified-video retention and acknowledged draft recovery with data-only undo/redo.
- Added clip volume, mute, and fades in preview and final rendering.
- Improved playback, shortcuts, and title-insertion feedback.
- Added Linux host-path handling for generated-output verification; editor media and durable recovery still require supported Windows.
- Included complete public development inputs in source and Registry distributions while excluding private records and caches.
1.0.2 — Assisted writing and model selection
- Added provider setup, model discovery, exact-model selection, and automatic readiness checks.
- Added provider-reported model information and filtering.
- Added Refine prompt with protection for exact dialogue, text, roles, and timing.
- Improved prompt reading and comparison without losing local edits or selection.
- Added structured semantic proposals with a limited repair attempt for invalid responses.
Troubleshooting MiniMaxH3-Studio
App Mode will not start
- Read the notice above Start H3 App Mode.
- Confirm the requested duration is a whole number from 4 to 15.
- If duration resolution failed, choose Retry duration resolution.
- Check reference limits.
- For Ref2VA, ensure an image or video reference is selected before queueing.
- Resolve any named missing node, template, or model role.
The sidebar or editor is missing
- Check whether the host provides the native H3 nodes and sidebar-capable frontend.
- Ask the host operator to check the named compatibility issue.
- If the interface appears outdated, restart ComfyUI and hard-refresh the browser after confirming one complete extension version is loaded.
- For editor problems, also check the supported Windows environment and Settings → Media tools.
A ! beside sidebar build identifiers can indicate that browser files do not match their build record. Canvas nodes can still work when the sidebar cannot load.
A media feature says it is unavailable
- Open Settings → Media tools.
- Read the specific reason shown.
- Use Use folder for an available supported tool pair, or Check again after the host environment changes.
- Retry the action you originally wanted.
The documented supported build is the gyan.dev full build 2026-02-26-git-6695528af6. A different FFmpeg build is not interchangeable for these checks.
Generation finished, but verification is still pending
- Allow the history lookup up to about 16 seconds.
- Read the final verification message.
- Use Retry output verification if offered.
- Otherwise choose Continue with native nodes and inspect the saved output in ComfyUI.
The extension leaves the saved file unchanged and does not automatically queue the generation again.
A clip imports but does not appear in the preview
- Confirm you selected up to three finished Production segments.
- Use Import.
- Open the Media tab and click the imported thumbnail or drag it onto a compatible track.
- Move the playhead inside the placed clip.
- Check that the clip and track are enabled.
If its Production source was released or replaced, the imported clip can become unavailable. Reimport a current output or explicitly relink compatible media.
A title is refused or prevents rendering
- Read the explanation beside Add title or in the Inspector.
- Check the length, line count, font selection, and available text-track space.
- Replace unsupported characters with Latin, Greek, or Cyrillic characters.
- For an older project containing unsupported title text, edit or delete that title before rendering.
Changing the interface language does not expand bundled font coverage.
An Inspector adjustment has no effect
- Press Enter in a number field or use the group’s apply button.
- Confirm the intended clip is selected.
- For on-picture handles, place the playhead inside one selected, enabled clip on an enabled, unlocked track.
- For audio, verify the video has sound and is on Main.
A transition does not appear
- Put the incoming clip on an upper video-overlay track.
- Ensure a visible, enabled lower clip covers the full transition.
- Select the incoming clip and open Transition.
- Choose the effect and a valid frame length.
- Remember that the transition changes the picture, not the sound.
The final video is longer than expected
- Check Content extent.
- Inspect the timeline’s end for distant clips.
- Include disabled clips and clips on hidden tracks in that check.
- Move or remove unwanted trailing content, then render again.
The export includes gaps up to the end of the content extent.
Longer-sequence generation is blocked
- Run Check readiness again if its approximately one-minute result expired.
- Confirm the approved generation plan is text-to-video.
- If native H3 workflows are reported missing, ask the host operator to provide a complete compatible ComfyUI environment. Media tools alone cannot fix that issue.
- After a page reload, cancel and restart a sequence that cannot be resumed.
Assisted authoring is connected but does not generate
- Check the selected provider and exact model.
- Confirm that prompt execution is supported: this release enables it for Ollama and Gemini, not OpenAI or Anthropic.
- Check readiness, permission, credentials, and provider quota.
- Stage any unstaged manual prompt edit.
- Accept or reject an active proposal before requesting another.
Frequently asked questions
Can I use it without an AI writing provider?
Yes. Normal prompt building and validation do not require assisted authoring.
Can I inspect prompts without H3 weights?
Yes. Weights and suitable hardware are needed for video generation, not prompt building.
Does “Ready” mean the generated video will be accurate?
No. It means known prompt-guide requirements are covered. It is not a visual-quality guarantee.
Can I preserve my existing workflow?
Yes. Save it first, use a separate tab for an official template, or choose Connect to use a compatible existing H3 graph.
Can I generate a full 60-second clip in one H3 run?
The longer-video route plans and generates multiple 4–15 second segments, then joins them.
Does saving .h3proj save all my videos too?
No. Keep the media separately and relink it when required.
Does “Saved” in the editor mean I have a project-file backup?
No. It confirms host acceptance of an edit. Save a project file for an editable file-based copy.
Can local perception be unavailable without breaking prompt writing?
Yes. You can describe the relevant fact yourself or supply a hard constraint. Refreshing status does not launch or configure a perception model.
When sharing diagnostics, include the node name and diagnostic code where available. Copy diagnostics omits prompts, workflows, paths, and credentials. Remove private details from any additional screenshots or logs.
Learn More about MiniMaxH3-Studio
Artist-focused documentation
- Project files and recovery — Understand editable saves, acknowledgements, media relinking, and recovery limits.
- Security and providers — Review what is processed, sent, stored, and checked.
- Assisted-authoring provider details — Learn about permissions and text-only requests.
- Opening ComfyUI from another address — Relevant when using a proxy, port mapping, or non-localhost address.
Workflow and host resources
- MiniMaxH3-Studio repository — Project source, bundled workflows, and documentation.
- Host integration — Operator-facing information for optional services.
- Local visual and audio perception — Requirements for optional host-configured media analysis.
- Development and testing — Technical validation details for readers inspecting the implementation.
The repository also includes reusable graphs in subgraphs/ and API-format examples in workflows/. These illustrate prompt-building routes; they do not load model weights or promise a particular generation result.
Media background
- Gyan FFmpeg builds — Background on the media tools used by the supported Windows workflow.
- FFmpeg codec reference — Optional reading about video and audio formats.
For extension compatibility, follow the exact build identified in Settings → Media tools, rather than assuming the newest FFmpeg build is supported.
MiniMaxH3-Studio License
MiniMaxH3-Studio is licensed under Apache-2.0. See LICENSE and NOTICE.
Additional components have separate terms:
- Bundled Noto Sans fonts: SIL Open Font License 1.1.
- React, ReactDOM, and Scheduler in the compiled sidebar: MIT.
- FFmpeg: supplied separately and licensed under GPL-3.0-or-later.
- Official workflow templates: served by the ComfyUI frontend, not redistributed here.
- Model weights and provider services: governed by their respective terms.