

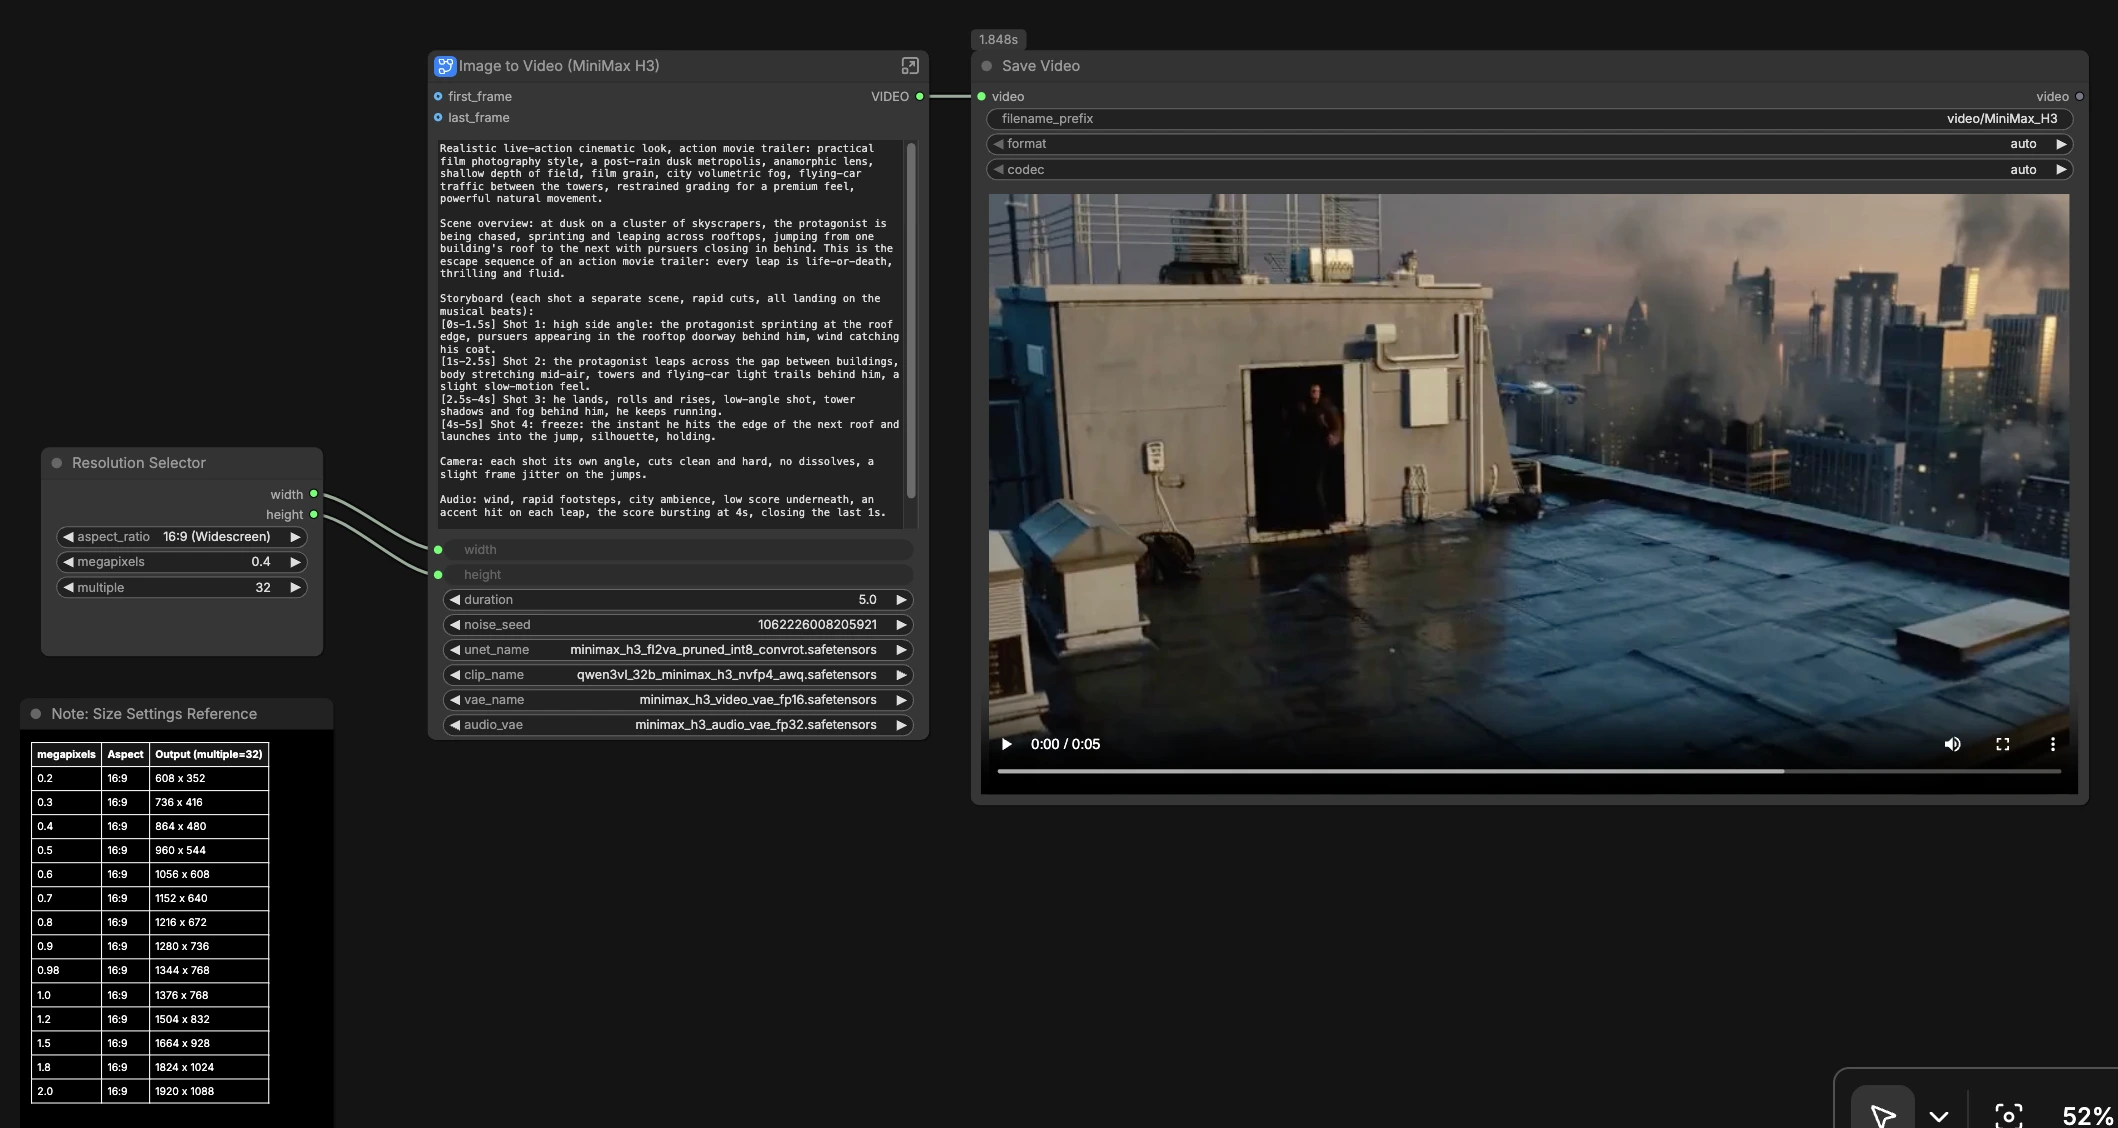
MiniMax H3 T2V ComfyUI: prompt-to-video with native stereo audio#
MiniMax H3 T2V ComfyUI turns a single prompt into a short cinematic video with synchronized stereo audio. Built from the official Comfy.org template and the open Comfy-Org MiniMax-H3 weights, it follows the FL2VA path so motion and sound are generated together, not stitched after the fact. It is ideal for quick explorations of prompt-only scenes, dialogue or singing clips, and concept shots that need both visuals and sound in one pass.
Describe the shots, camera, performance, and audio cues in one block, choose size and duration, then queue the graph. The workflow loads the correct MiniMax-H3 components, samples joint audio-visual latents, decodes them to frames and stereo audio, muxes the result, and saves a finished video file.
Key models in Comfyui MiniMax H3 T2V ComfyUI workflow#
- MiniMax-H3 FL2VA diffusion model. The core UNet that performs joint audio-video denoising so motion and sound stay phase aligned. Weights provided by Comfy-Org under diffusion_models. Model files
- MiniMax-H3 Video VAE. Encodes and decodes visual latents to RGB frames, preserving cinematic detail and motion continuity. minimax_h3_video_vae_fp16.safetensors
- MiniMax-H3 Audio VAE. Encodes and decodes audio latents to a time-aligned stereo waveform for each clip. minimax_h3_audio_vae_fp32.safetensors
- Qwen3-VL 32B text encoder (AWQ for MiniMax-H3). Interprets the prompt into conditioning that covers scene semantics, timing, and audio intent. qwen3vl_32b_minimax_h3_nvfp4_awq.safetensors
If you want to compare the original template this graph builds on, see the Comfy.org reference. Template JSON
How to use Comfyui MiniMax H3 T2V ComfyUI workflow#
At a high level, you set the target resolution and duration, write a single prompt that includes both visuals and audio, optionally add first and last frames, then run. Inside the subgraph, MiniMax-H3 creates synchronized video and audio latents, which are decoded, joined into a 24 fps movie, and saved.
ResolutionSelector (#115)#
Pick an aspect ratio and scale to set width and height. The selector rounds to efficient multiples of 32 and feeds those values to the MiniMax-H3 subgraph, so you do not need to hand-calc dimensions. Start with moderate sizes for faster iteration, then scale up once your prompt reads correctly. Changing aspect ratio is a powerful creative lever for trailers, vertical clips, and square previews.
Image to Video (MiniMax H3) (#105)#
This subgraph orchestrates the MiniMax H3 T2V ComfyUI pipeline. Paste one coherent prompt that describes shots, edits, and the soundtrack together, and optionally provide first_frame and last_frame images to anchor entrance and exit. Set a human-friendly duration and the graph converts it to a valid frame count for the model. The subgraph returns synchronized audio-visual latents that proceed to decoding and muxing.
Models group#
The models group loads the exact MiniMax-H3 components for this workflow. UNETLoader (#6) pulls the FL2VA diffusion model, CLIPLoader (#13) loads the Qwen3-VL encoder, and two VAELoader nodes (#11 video, #24 audio) prepare decoders. These are pointed at the Comfy-Org MiniMax-H3 files so you can run without manual wiring. Keeping models centralized here makes future swaps or upgrades straightforward.
Conditioning group#
MiniMaxH3ImageToVideo (#104) turns your prompt, optional first_frame and last_frame, and the selected width, height, and length into MiniMax-H3 conditioning plus an initial latent. The idea is to let the model read both scene content and audio intent at once, which leads to tighter sync. If you provide reference frames, the entry and exit are guided for continuity; if you leave them empty, generation starts cold.
Sampling group#
Sampling is handled by RandomNoise (#15), KSamplerSelect (#17), BasicScheduler (#9), BasicGuider (#16), and the main SamplerCustomAdvanced (#14). Together they denoise the joint latent so picture motion and sound events develop in lockstep. You can rerun with a new seed for alternate takes while keeping the same creative direction. Once comfortable, experimenting with sampler choice or schedule can slightly change motion energy and sonic texture.
Decoding and create video group#
VAEDecode (#10) reconstructs the frame sequence from the video latent, and VAEDecodeAudio (#23) reconstructs a stereo waveform from the audio latent. CreateVideo (#91) multiplexes frames and audio into a finished clip at 24 fps. This is where clean cuts and beats specified in the prompt come together in the timeline. The output proceeds to saving.
SaveVideo (#92)#
Writes the final video to your ComfyUI output under video/MiniMax_H3. The node uses automatic naming so you can iterate quickly, and you can change the path to keep different projects separated. The output contains both the generated picture and stereo audio.
Key nodes in Comfyui MiniMax H3 T2V ComfyUI workflow#
MiniMaxH3ImageToVideo (#104)#
Core conditioning node for MiniMax-H3 that accepts prompt, optional first_frame and last_frame, plus width, height, and length. Keep prompts concise but cinematic, and include audio cues like ambience, SFX, dialog, and musical hits in the same text block. Use reference frames when you need a specific entrance or exit; omit them for freer staging.
ComfyMathExpression (#107)#
Maps a human-readable duration in seconds to the integer length the model expects, snapping to the model’s frame grid for clean timing. Set the float to your intended clip length and let the node handle the conversion. Slightly shorter clips tend to preserve crisp motion and sound sync at higher resolutions.
SamplerCustomAdvanced (#14)#
Drives the denoising process based on the selected sampler and schedule. Use a fixed noise_seed to lock a take for comparison, then change only the seed to explore new variations. If the motion feels too chaotic or too stiff, try a different sampler in KSamplerSelect (#17) or adjust the schedule in BasicScheduler (#9).
CreateVideo (#91)#
Combines decoded frames and stereo audio into a single video stream at your chosen frame rate. For rhythm-driven edits, set fps to match the cadence you described in the prompt. The node is also where you would change fps if you want a slower or snappier feel.
ResolutionSelector (#115)#
One control for both aspect ratio and overall pixel count, with automatic rounding to model-friendly sizes. Choose aspect first, then nudge scale to balance speed and fidelity. Larger canvases reward careful prompting and shorter durations.
SaveVideo (#92)#
Finalizes the clip on disk. Point it at a project subfolder to keep experiments organized and rename wisely when you hit a keeper.
Optional extras#
- Write prompts as mini storyboards with time cues and explicit audio beats for reliable sync.
- Include audio intent words like wind, footsteps, crowd, reverb, or specific instruments to steer the soundtrack.
- Add lines for dialogue or singing directly in the prompt and note the speaker’s tone.
- Lock a
noise_seedwhen comparing prompt tweaks, change only the seed when exploring alternate takes. - Use
first_frameandlast_frameto bracket motion when you need continuity across cuts or a precise final pose.
Acknowledgements#
This workflow implements and builds upon the following works and resources. We gratefully acknowledge Comfy-Org for the MiniMax H3 T2V workflow template and MiniMax-H3 model weights, Comfy.org for the MiniMax H3 tutorial, and MiniMax for the official MiniMax H3 announcement for their contributions and maintenance. For authoritative details, please refer to the original documentation and repositories linked below.
Resources#
- Comfy-Org/MiniMax H3 T2V workflow template
- GitHub: video_minimax_h3_t2v.json
- Comfy.org/MiniMax H3 tutorial
- Docs / Release Notes: MiniMax H3 tutorial
- MiniMax/MiniMax H3 official announcement
- Docs / Release Notes: MiniMax H3 official announcement
- Comfy-Org/MiniMax-H3 model weights
- Hugging Face: Comfy-Org/MiniMax-H3
Note: Use of the referenced models, datasets, and code is subject to the respective licenses and terms provided by their authors and maintainers.