

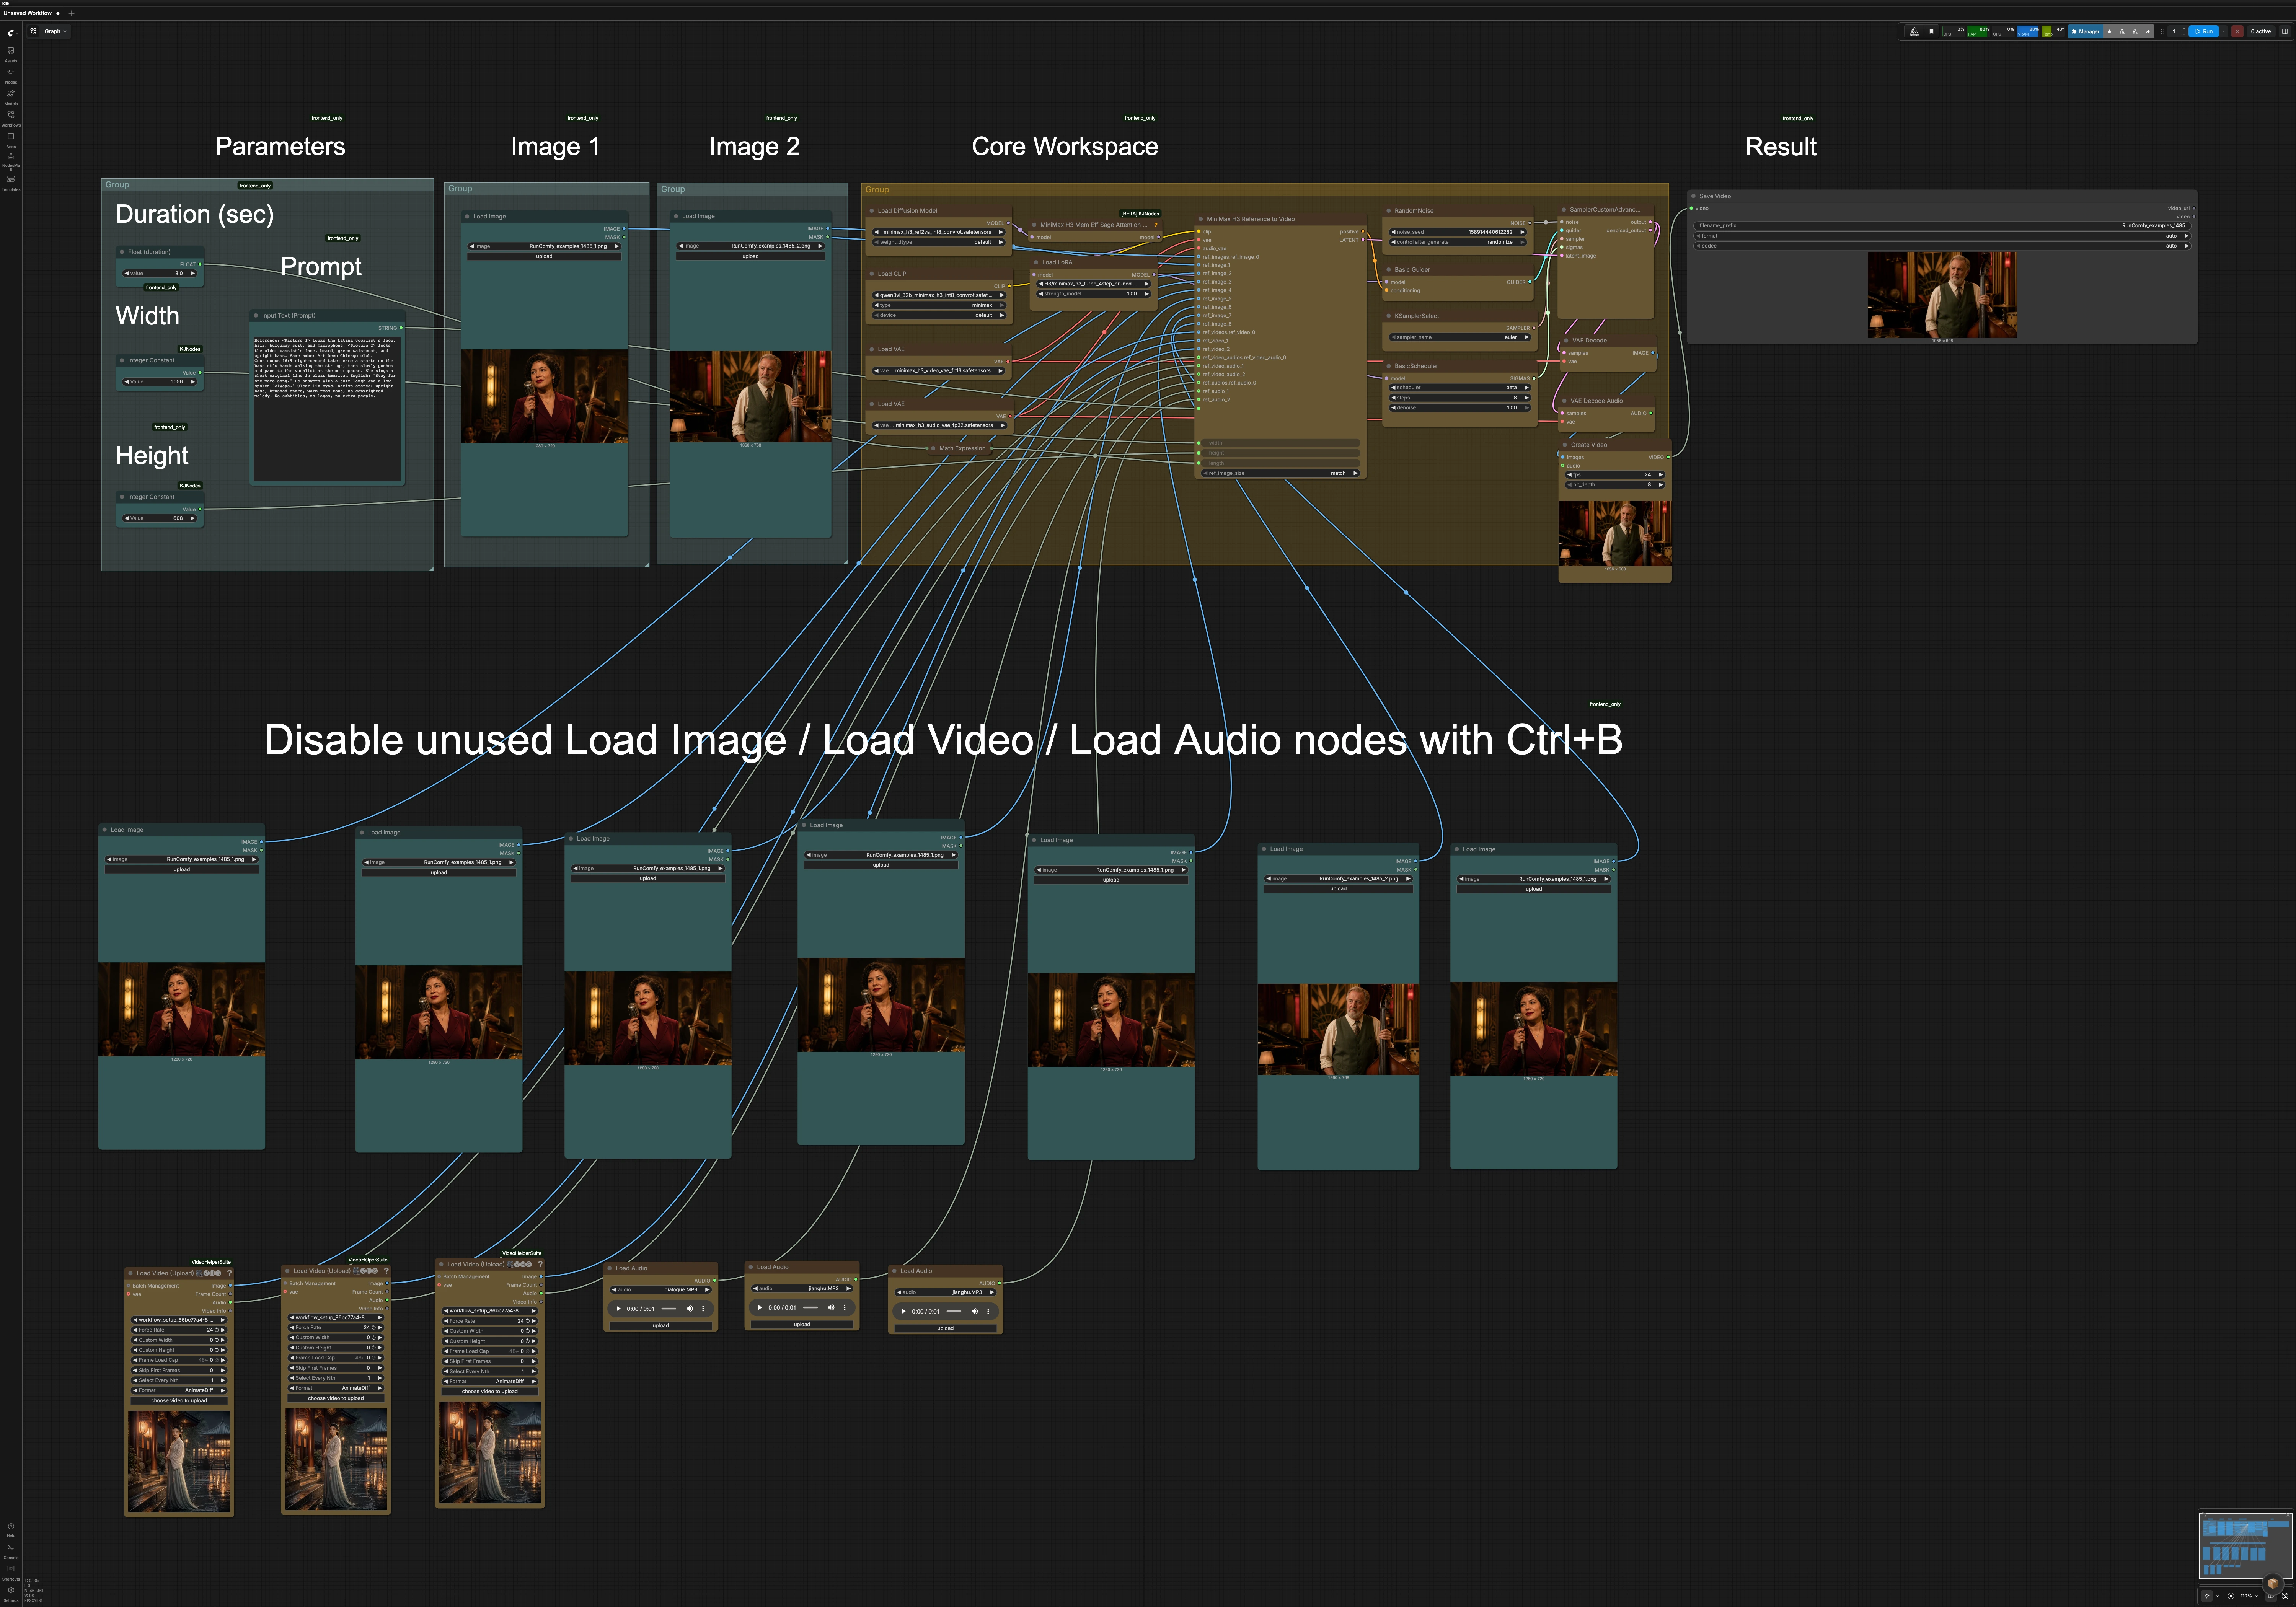
MiniMax H3 ComfyUI Reference to Video 4-step Turbo#
MiniMax H3 ComfyUI Reference to Video 4-step Turbo is a RunComfy-ready reference-to-video workflow that locks one or more character identities from still images and generates a short clip with native stereo audio in a single accelerated pass. It is designed for creators who need consistent faces, wardrobe, and staging across a scene while keeping camera motion, dialogue, and lip sync coherent.
This graph uses MiniMax H3’s ref2va pipeline plus a Turbo LoRA so multi-subject identity, movement, and speech stay unified without the longer default schedule. Tag your stills with <Picture N> inside the prompt, optionally bring reference video and audio, and render a clean clip directly in ComfyUI on RunComfy.
Key models in Comfyui MiniMax H3 ComfyUI Reference to Video 4-step Turbo workflow#
- MiniMax-H3 Reference-to-Video diffusion model (ref2va). Provides the core generative backbone for conditioning on stills, optional video, and text to synthesize coherent shots. Weights are available in the Comfy-Org packaging of MiniMax-H3 on Hugging Face. Comfy-Org/MiniMax-H3
- MiniMax-H3 Video VAE. Encodes and decodes video latents that the sampler operates on, preserving temporal smoothness and detail. Distributed with the same package. Comfy-Org/MiniMax-H3
- MiniMax-H3 Audio VAE. Handles the native stereo audio track jointly with video so speech and ambience are authored with the shot. Included alongside the video components. Comfy-Org/MiniMax-H3
- Qwen-VL 32B text encoder tuned for MiniMax-H3. Translates the prompt, including <Picture N> markers and stage directions, into conditioning signals used by H3. Packaged in the Comfy-Org release. Comfy-Org/MiniMax-H3
- MiniMax-H3 Turbo 4-step LoRA. An acceleration LoRA that compresses the schedule so the shot can be generated in a fast pass while maintaining identity and motion consistency. larryvrh/MiniMax-H3-Turbo-Lora
How to use Comfyui MiniMax H3 ComfyUI Reference to Video 4-step Turbo workflow#
The workflow moves from references and timing to model setup, conditioning, sampling, and final mux. You can run it with stills only, or combine stills with optional reference video and audio.
Stage 1 — References, prompt, and timing#
Load one or more stills via the LoadImage nodes and plan to reference them as <Picture 1>, <Picture 2>, and so on in your prompt. If you have a guiding clip, feed it through the VHS_LoadVideo nodes; their audio can also be passed along to guide rhythm and energy. To supply bespoke dialogue or ambience, use the LoadAudio nodes in addition to or instead of reference video audio. Enter your full shot description in Input Text (Prompt) with any character locks, camera moves, and dialogue. The workflow converts your desired duration to a stable frame count automatically, aligning the timeline to MiniMax H3’s internal stride.
Stage 2 — Model setup and turbo acceleration#
The core H3 ref2va UNet, text encoder, and the video and audio VAEs are loaded in the “Core Workspace.” The memory-efficient attention patch enables larger shots or higher resolution on typical GPUs without changing your usage. The Turbo 4-step LoRA is applied by LoraLoaderModelOnly (#164) so you can keep step counts low while preserving identity lock and motion. No manual wiring is required; the graph is preconnected for RunComfy. If you are not using some inputs, toggle unused Load Image / Load Video / Load Audio nodes off with Ctrl+B to keep the run lean.
Stage 3 — Conditioning and latent assembly#
MiniMaxH3ReferenceToVideo (#136) ingests your prompt, stills, and any optional video or audio references to build the conditioning and an initial latent timeline. Use <Picture N> tags to clearly bind each person or object to a specific still; order follows the reference slots you filled. You can direct camera behavior, lip sync, and ambience in natural language. Width, height, and duration flow into this node so framing and timing match your intent. If you have many stills, keep only the ones that truly define identity and wardrobe for the current beat.
Stage 4 — Sampling#
The graph routes the latent through a minimal schedule and a fast sampler selected by KSamplerSelect (#123), guided by BasicGuider (#126). BasicScheduler (#124) provides the step pattern that the Turbo LoRA expects, balancing speed and fidelity. SamplerCustomAdvanced (#125) resolves the timeline in one efficient pass using seeded noise for reproducibility. In most cases you can leave these components as configured and focus on prompt, references, and framing.
Stage 5 — Decode, mux, and save#
After sampling, VAEDecode restores the video frames and VAEDecodeAudio restores the stereo track. CreateVideo (#130) multiplexes the images and audio into a playable file with your chosen rate and bit depth. Finally, SaveVideo (#92) writes the result to disk using the selected container and codec. The output is a short clip with identity-locked characters, camera motion, and native stereo audio authored by MiniMax H3 ComfyUI Reference to Video 4-step Turbo.
Key nodes in Comfyui MiniMax H3 ComfyUI Reference to Video 4-step Turbo workflow#
MiniMaxH3ReferenceToVideo (#136)#
This is the heart of the workflow that fuses prompt text, still references, and optional video/audio into conditioning and an initialized latent. Adjust prompt to include <Picture N> markers and clear stage directions for camera, dialogue, and ambience. Tune width, height, and length to set framing and duration for the shot. If you need to balance detail versus speed on stills, switch ref_image_size between modes such as matching the render size versus resizing for lighter runs. Keep your reference set focused to the identities you actually need in the scene.
LoraLoaderModelOnly (#164)#
Applies the MiniMax-H3 Turbo 4-step LoRA to the ref2va model so the schedule can be compressed for rapid inference. The strength controls how strongly the LoRA influences the backbone; higher favors speed and the turbo look while lower blends back toward base H3. If you notice loss of fine detail with extreme acceleration, slightly reduce LoRA strength or lengthen the schedule in the scheduler to recover fidelity. See the LoRA model card for version notes and intended usage. MiniMax-H3 Turbo LoRA
MiniMaxH3MemoryEfficientSageAttentionPatch (#163)#
Enables a memory-efficient attention implementation compatible with MiniMax H3 so you can run higher resolutions or longer shots on limited VRAM. It is parameterless in this graph; simply keep it enabled for best capacity. The node is part of KJNodes for ComfyUI. kijai/ComfyUI-KJNodes
BasicScheduler (#124)#
Defines the diffusion schedule used during sampling. With the Turbo LoRA active, keep the step count compact for speed, nudging it only when you need additional sharpness or stability. denoise lets you push stronger reinterpretation of references if your prompt calls for larger changes. Changes here interact with LoRA strength and the chosen sampler, so adjust in small increments.
KSamplerSelect (#123)#
Selects the sampling algorithm for the pass. A simple, stable sampler pairs well with turbo schedules and helps preserve identity across frames. If you emphasize stylization or very fast camera motion, try alternative samplers that may add motion texture at the cost of slight variability.
CreateVideo (#130) and SaveVideo (#92)#
CreateVideo assembles decoded frames and audio into a final stream, where you can set fps and bit_depth to match your delivery needs. SaveVideo selects the container and codec for export; use a widely supported combination for general sharing or a high-quality variant for post work. If you are iterating quickly, keep settings lightweight and then switch to production settings for the final render.
Optional extras#
- For multiple characters, place the clearest face-forward stills first and reference them as <Picture 1>, <Picture 2>, etc. Use one or two additional stills per subject for angle or wardrobe coverage.
- If you bring a reference video, include a short description of the desired camera behavior in the prompt so H3 knows what to preserve and what to reinterpret.
- The duration control snaps internally to a safe frame count for H3; if you change your target frame rate in
CreateVideo, recheck timing notes in your prompt. - The video and audio helper nodes come from Video Helper Suite; they provide robust media I/O inside ComfyUI. Kosinkadink/ComfyUI-VideoHelperSuite
- Looking for a baseline comparison workflow for MiniMax H3 reference-to-video in ComfyUI? Review the official template and adapt ideas as needed. Comfy-Org workflow template
Acknowledgements#
This workflow implements and builds upon the following works and resources. We gratefully acknowledge MiniMax Research for the MiniMax H3 model, Comfy.org for the MiniMax H3 ComfyUI workflow examples, Comfy-Org for the MiniMax-H3 model weights, and larryvrh for the MiniMax-H3 Turbo LoRA for their contributions and maintenance. For authoritative details, please refer to the original documentation and repositories linked below.
Resources#
- MiniMax Research/MiniMax H3 official announcement
- Docs / Release Notes: MiniMax H3 official announcement
- Comfy.org/MiniMax H3 tutorial
- GitHub: comfy-org/docs
- Docs / Release Notes: MiniMax H3: ComfyUI Workflow Examples
- Comfy-Org/MiniMax-H3 model weights
- Hugging Face: Comfy-Org/MiniMax-H3
- larryvrh/MiniMax-H3 Turbo LoRA
- GitHub: Larryvrh/ComfyUI-MiniMax-H3-Turbo
- Hugging Face: larryvrh/MiniMax-H3-Turbo-Lora
Note: Use of the referenced models, datasets, and code is subject to the respective licenses and terms provided by their authors and maintainers.