

MiniMax H3 Camera Control ComfyUI: turn a single image into a trajectory‑guided video#
This MiniMax H3 Camera Control ComfyUI workflow converts a reference image into a clean, one‑shot image‑to‑video clip with physically guided camera motion. You draw the move as azimuth, elevation, distance and timing, the H3 Camera Editor translates it into a natural‑language MiniMax prompt, and a Camera Motion LoRA enforces stable orbit, dolly and tilt behavior with natural parallax. The subject and scene stay consistent while only the camera appears to move.
Built for product, character and environment beauty shots, the MiniMax H3 Camera Control ComfyUI workflow is ideal when you need repeatable moves like side‑arc or push‑in without reconstructing a 3D scene. It controls the camera path in the generated video; it does not create a navigable 3D space.
Key models in Comfyui MiniMax H3 Camera Control ComfyUI workflow#
- MiniMax H3 image‑to‑video backbone. The core diffusion model that turns the prompt plus your reference frame into coherent video frames. See the official model card for details: MiniMaxAI/MiniMax-H3.
- MiniMax H3 Video VAE and Audio VAE from the Comfy‑Org distribution. These decode latent video (and, when present, audio) produced by the model into frames and an optional track: Comfy-Org/MiniMax-H3.
- MiniMax H3 Camera Motion LoRA. A lightweight adapter that biases generation toward physically plausible orbit, dolly and elevation changes while preserving subject identity: Jojocodex/minimax-h3-Camera-Motion-lora.
- MiniMax H3 Turbo LoRA. An optional speed‑oriented adapter that pairs with reduced sampling steps for quicker previews while maintaining trajectory adherence: see the LoRAs in Comfy-Org/MiniMax-H3.
How to use Comfyui MiniMax H3 Camera Control ComfyUI workflow#
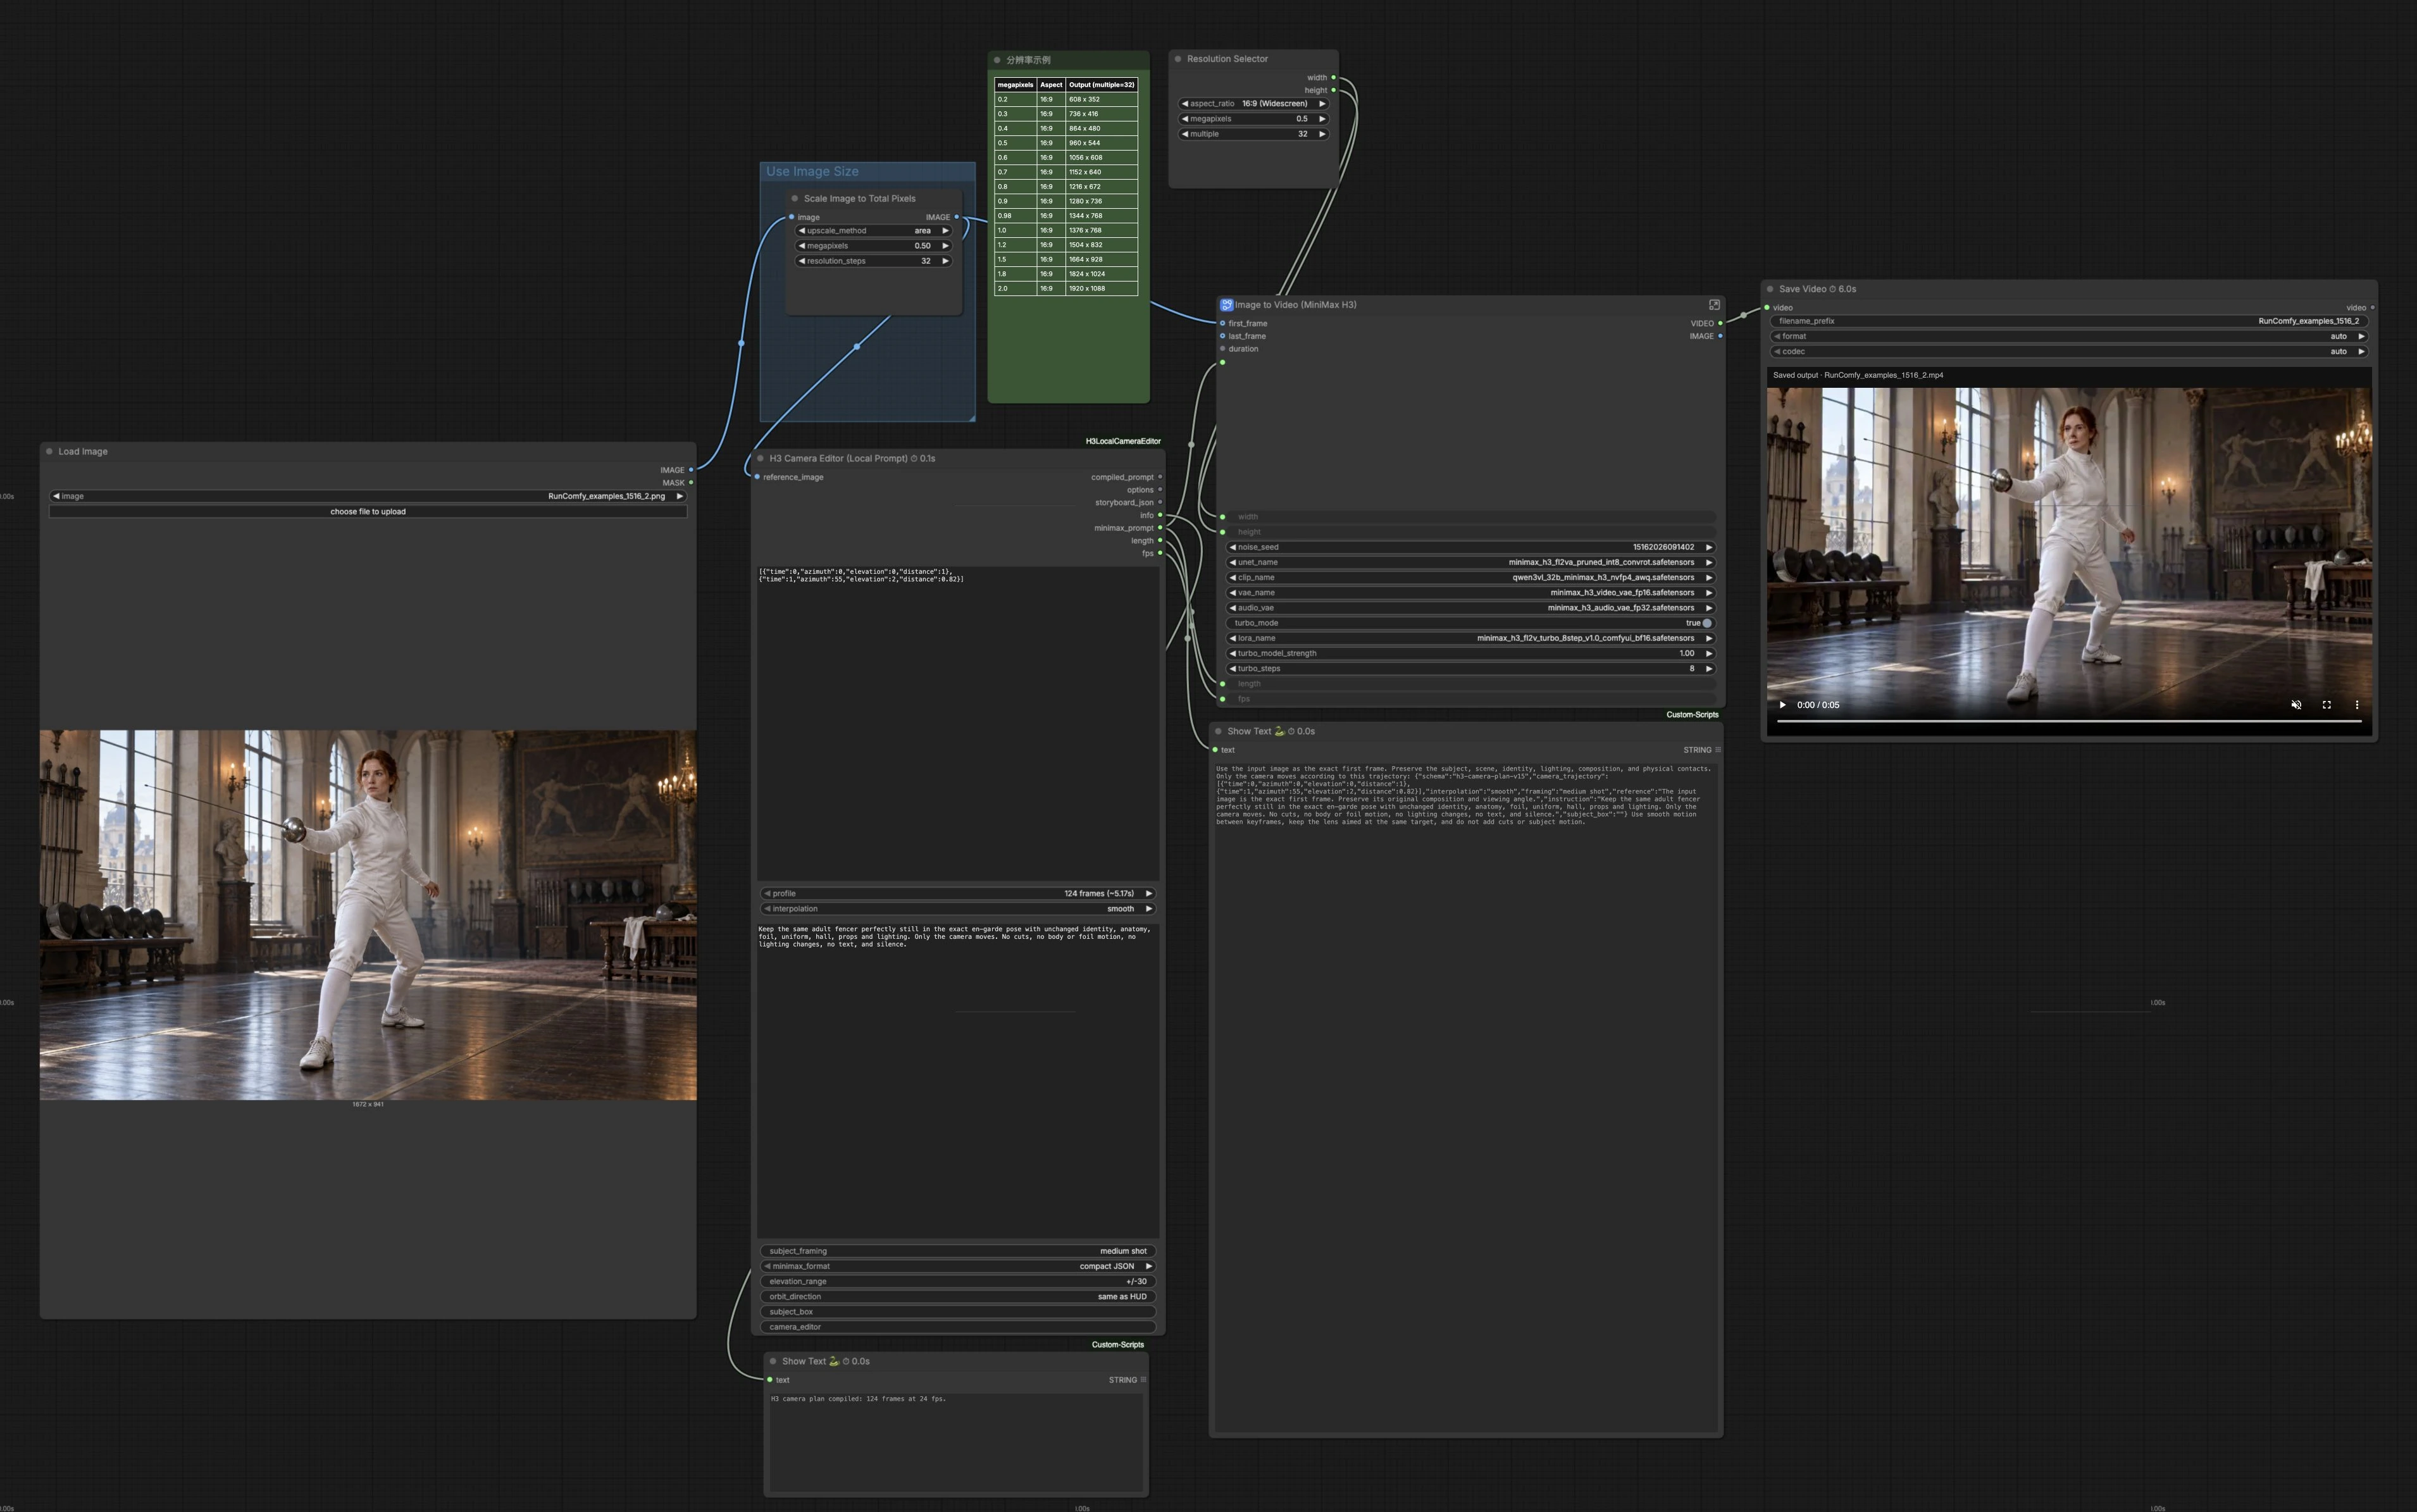
The workflow flows from a single reference image to a natural‑language camera plan, then to MiniMax H3 for generation, and finally to video assembly.
Load and size your reference image#
Import your source still with LoadImage (#114). The image is automatically resized by ImageScaleToTotalPixels (#119) to a pixel budget that balances fidelity and VRAM. Use high‑quality, well‑lit inputs for best identity and lighting preservation. If you are matching a deliverable aspect ratio, keep that in mind here so framing stays predictable downstream.
Author the camera path in H3 Camera Editor#
Use H3LocalCameraEditor - Natural Language (#127) to define the move as a short timeline of keyframes with azimuth, elevation and distance relative to the starting view. The editor compiles this into a MiniMax‑ready natural‑language prompt that describes a physical camera arc, tilt and dolly, plus the intended length and fps. Keep subject instructions explicit, for example “only the camera moves” and “preserve pose, lighting and contacts.” The editor returns the compiled prompt, duration in frames and fps to drive generation.
Choose resolution and duration#
Pick your output size with ResolutionSelector (#157). Frames and fps together determine runtime; for instance, total_seconds = frames ÷ fps. If you need to preview quickly, choose a lower megapixel setting; you can raise resolution later for the final pass with the same camera plan.
Generate with MiniMax H3#
The Image to Video (MiniMax H3) subgraph (#105) hands your plan to MiniMaxH3ImageToVideo (#104), loads the proper UNet, CLIP and VAEs, and applies LoRAs. The Camera Motion LoRA promotes clear parallax and stable subject preservation. Optionally enable Turbo mode for quicker drafts; it swaps in a Turbo LoRA and a reduced step schedule via internal switches so you can iterate on the move before final quality renders.
Assemble and export#
CreateVideo (#91) packages decoded frames and, when present, a generated audio track; otherwise it writes a silent clip. The result is saved by SaveVideo (#92) with your chosen filename prefix. Because the MiniMax H3 Camera Control ComfyUI workflow is deterministic when the seed is fixed, you can rerender the exact shot at higher resolution or different fps without changing the motion.
Key nodes in Comfyui MiniMax H3 Camera Control ComfyUI workflow#
H3LocalCameraEditor - Natural Language (#127)#
Defines the camera trajectory as a compact set of time‑normalized keyframes and compiles it into a MiniMax natural‑language plan. Tune the trajectory by adjusting azimuth for orbit direction and span, elevation for tilt, and distance for push‑in or pull‑back. Use smooth interpolation for beauty moves; switch to linear for mechanical timing. Keep the subject constraints strict if identity and pose must remain unchanged.
MiniMaxH3ImageToVideo (#104)#
Consumes the compiled prompt plus your reference frame to create conditioning and an initial latent sequence for denoising. Width, height and length control spatial and temporal canvas; match these to the editor’s fps and your delivery spec. Set a fixed noise seed for reproducible results, or randomize while exploring looks. Leave the optional last_frame detached unless you are experimenting with two‑frame transitions.
LoraLoaderModelOnly (#156) Camera Motion#
Loads the MiniMax H3 Camera Motion LoRA that enforces the orbit, dolly and elevation semantics implied by your camera plan. Increase strength_model when the camera move needs more authority over ambiguous prompts; reduce it if you notice artifacts or over‑constraint. Strong camera moves combined with small distances can squeeze composition, so balance strength with framing.
ComfySwitchNode (#122) If/Else Switch (Model)#
Toggles between the base model path and a Turbo LoRA path for fast previews. When enabled, the switch pairs the Turbo LoRA with a reduced denoise step count via the companion steps switch, trading some detail for speed. Use this to lock the camera move and framing first, then turn it off for final‑quality renders.
ResolutionSelector (#157)#
Provides aspect‑aware sizing that snaps to multiples friendly to the model while honoring a megapixel target. Start low for block‑in animation and bump up for delivery. If you change resolution mid‑project, keep the seed, fps and trajectory the same to preserve the shot’s motion.
Optional extras#
- Keep the subject truly stationary in your instructions. Write “only the camera moves” and avoid adding actions that fight the camera plan.
- Combine orbit and dolly for the most convincing parallax. Moderate azimuth spans with a gentle push‑in produce clear depth without losing framing.
- For performance on limited VRAM, preview at smaller megapixels and enable Turbo mode, then switch back to full quality for the final pass.
- Use a fixed seed for reproducibility across resolution or fps changes.
- The workflow controls apparent camera motion only; it does not reconstruct a 3D scene. Expect natural occlusion changes from the move, not free navigation.
Acknowledgements#
This workflow implements and builds upon the following works and resources. We gratefully acknowledge MiniMaxAI for MiniMax H3, Comfy-Org for the MiniMax H3 model files, and Jojocodex for the MiniMax H3 Camera Motion LoRA for their contributions and maintenance. For authoritative details, please refer to the original documentation and repositories linked below.
Resources#
- MiniMaxAI/MiniMax-H3
- Hugging Face: MiniMaxAI/MiniMax-H3
- Comfy-Org/MiniMax-H3
- Hugging Face: Comfy-Org/MiniMax-H3
- Jojocodex/minimax-h3-Camera-Motion-lora
- Hugging Face: Jojocodex/minimax-h3-Camera-Motion-lora
Note: Use of the referenced models, datasets, and code is subject to the respective licenses and terms provided by their authors and maintainers.