
Qwen Image LoRA Inference: training-matched AI Toolkit inference in ComfyUI#
Qwen Image LoRA Inference is a production-ready RunComfy workflow for applying an AI Toolkit–trained LoRA to Qwen Image in ComfyUI with training-matched behavior. It’s centered on RC Qwen Image (RCQwenImage)—a RunComfy-built, open-sourced custom node (source) that runs a Qwen Image–specific inference pipeline (not a generic sampler graph) and injects your adapter via lora_path and lora_scale.
Why Qwen Image LoRA Inference often looks different in ComfyUI#
AI Toolkit previews are produced by a model-specific inference pipeline, with Qwen Image’s own conditioning and guidance implementation. If you rebuild Qwen Image sampling as a generic ComfyUI graph, you often change pipeline defaults (and the exact route where the LoRA is applied), so the same prompt/steps/seed can still drift. When outputs don’t match, it’s usually a pipeline-level mismatch—not a single “wrong knob”.
What the RCQwenImage custom node does#
RCQwenImage wraps Qwen Image inference in a preview-aligned pipeline and applies your AI Toolkit LoRA inside that pipeline via lora_path / lora_scale, so sampling behavior stays consistent for this model family. Reference implementation: `src/pipelines/qwen_image.py`.
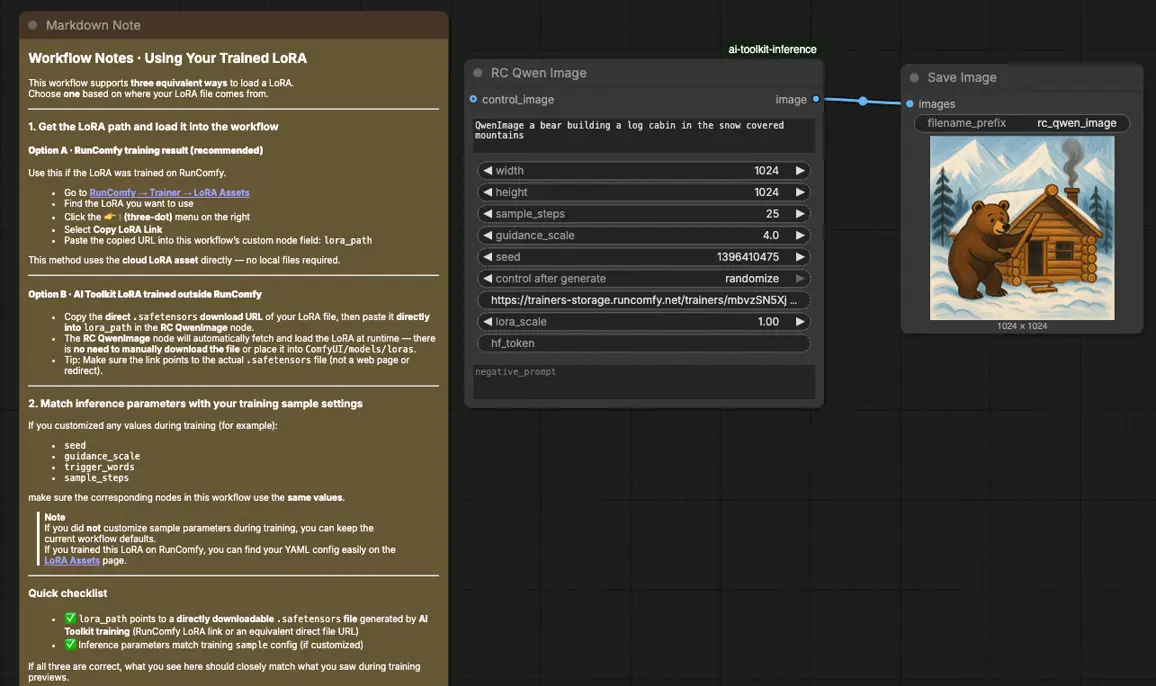
How to use the Qwen Image LoRA Inference workflow#
Step 1: Open the workflow#
Open the cloud-saved workflow in ComfyUI
Step 2: Import your LoRA (2 options)#
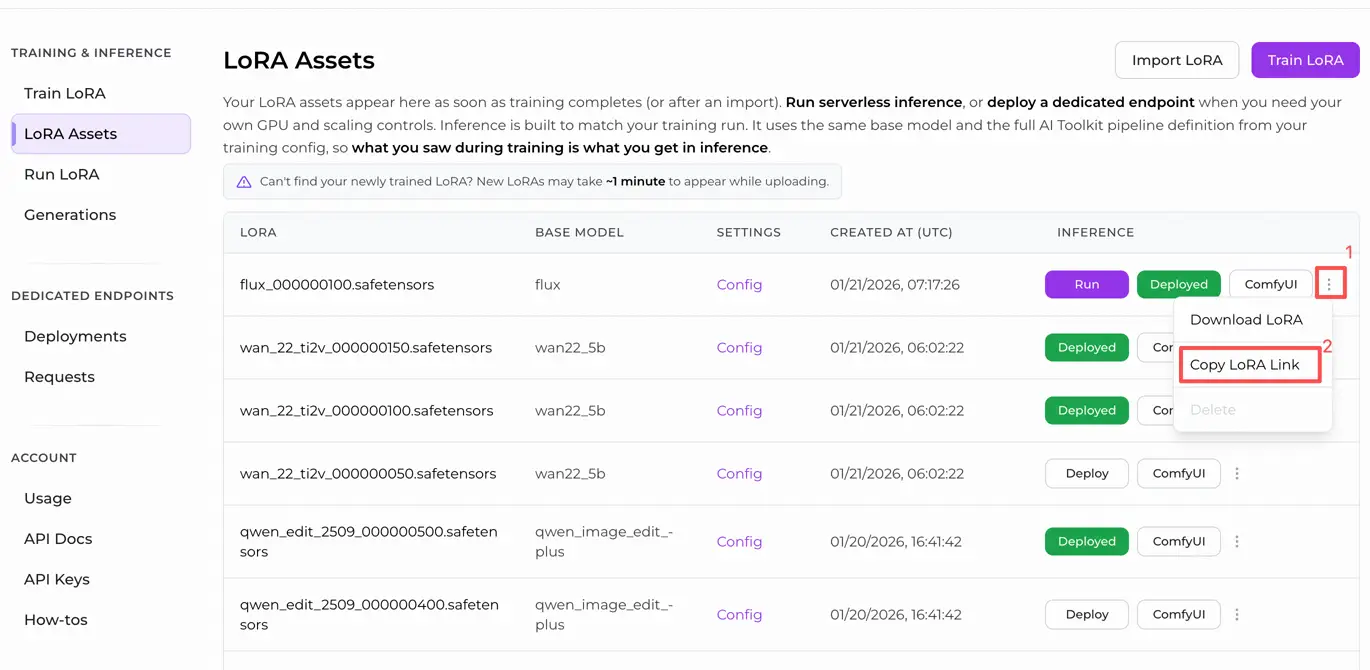
- Option A (RunComfy training result): RunComfy → Trainer → LoRA Assets → find your LoRA → ⋮ → Copy LoRA Link
- Option B (AI Toolkit LoRA trained outside RunComfy): Copy a direct
.safetensorsdownload link for your LoRA and paste that URL intolora_path(no need to download intoComfyUI/models/loras)
Step 3: Configure the RCQwenImage custom node for Qwen Image LoRA Inference#
Set the rest of the node parameters (these must match what you used for AI Toolkit preview sampling when you’re comparing results):
prompt: your text prompt (include the same trigger tokens you used during training, if any)negative_prompt: optional; keep it empty if you didn’t use negatives in your training previewswidth/height: output resolution (multiples of 32 are recommended for Qwen Image)sample_steps: number of inference steps used by the Qwen Image pipelineguidance_scale: guidance strength (Qwen Image uses a “true CFG” scale; start by mirroring your preview value before tuning)seed: fixed seed for repeatability; change it only after you’ve validated the baselinelora_scale: LoRA strength (begin at your preview strength, then adjust in small increments)
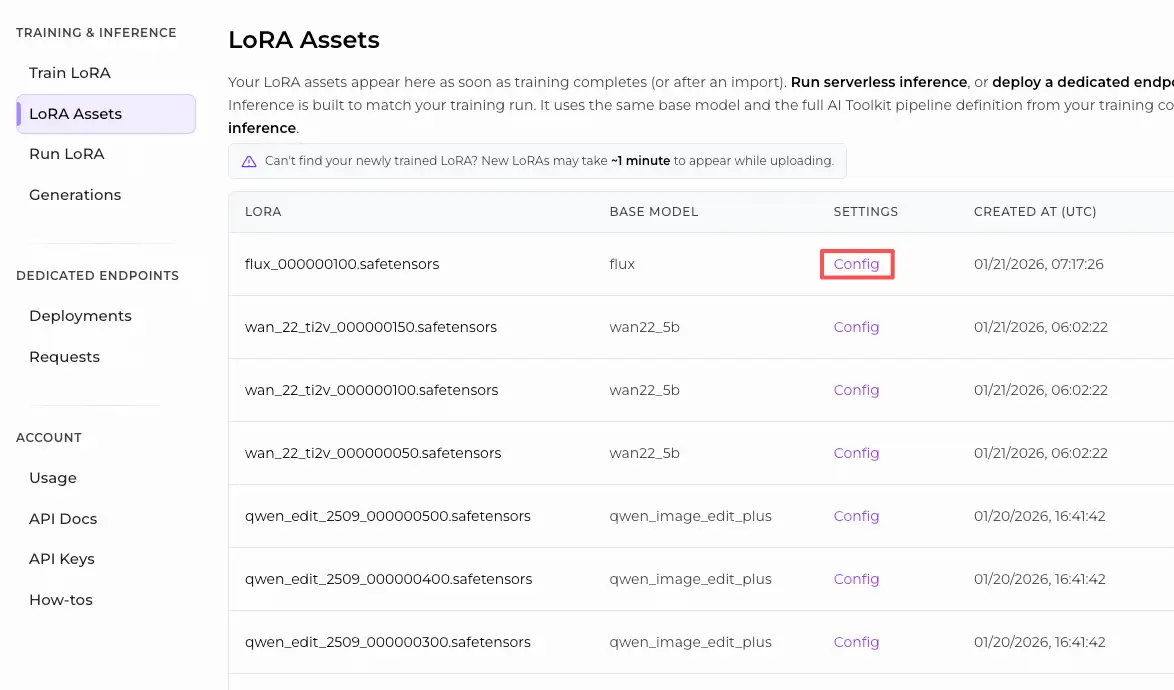
Training alignment note: if you tweaked your training sample settings, open your AI Toolkit training YAML and mirror width, height, sample_steps, guidance_scale, and seed. If you trained on RunComfy, use Trainer → LoRA Assets → Config to copy the same preview values into RCQwenImage.
Step 4: Run Qwen Image LoRA Inference#
Queue the workflow, then run it. The SaveImage node writes the generated image to your standard ComfyUI output directory.
Troubleshooting Qwen Image LoRA Inference#
Most issues people hit after training a Qwen Image LoRA in Ostris AI Toolkit and then trying to run it in ComfyUI come down to pipeline + LoRA‑injection mismatch .
RunComfy’s RC Qwen Image (RCQwenImage) custom node is built to keep inference pipeline‑aligned with AI Toolkit preview sampling by running a Qwen Image–specific inference pipeline (not a generic sampler graph) and injecting your adapter via lora_path / lora_scale inside that pipeline.
(1)Qwen-Image Loras not working in comfyui#
Why this happens
This is commonly reported as either:
- lots of
lora key not loadedwarnings, and/or - the LoRA “runs” but the output doesn’t change the way it did in AI Toolkit sampling.
In practice, users have found this often comes from ComfyUI not being on a build that includes the newest Qwen LoRA key mapping yet, or from loading the LoRA through a generic path that doesn’t match the Qwen Image module names used by the workflow.
How to fix
- Switch ComfyUI to the “nightly / development” channel and update, then re-run the same workflow. Multiple users reported this removes
lora key not loadedspam and makes Qwen‑Image LoRAs apply correctly. - Use RCQwenImage and pass the LoRA only via
lora_path/lora_scale(avoid stacking extra LoRA loader nodes on top of it). RCQwenImage keeps the pipeline-level LoRA injection point consistent with AI Toolkit‑style inference. - When comparing to AI Toolkit previews, mirror the preview sampler values exactly:
width,height,sample_steps,guidance_scale,seed, andlora_scale.
(2)Qwen image generation and quality output issue using the Qwen lighting 8 steps Lora#
Why this happens
People report that after updating ComfyUI, Qwen Image outputs become distorted or “weird,” and the console shows lora key not loaded for the Lightning 8‑step LoRA—meaning the speed/quality LoRA is likely not actually being applied, even though an image is still produced.
How to fix (user‑verified + training‑matched)
- Switch to ComfyUI nightly and update. This is the most consistently reported fix for
lora key not loadedwith Qwen‑Image Lightning LoRAs. - If you are using the native Comfy workflow, users reported success by inserting
LoraLoaderModelOnlybetween the model loader and model sampling nodes on the latest nightly. - For training-preview matching (AI Toolkit), validate through RCQwenImage first (pipeline-aligned), then tune only
lora_scaleafter the baseline matches.
(3)Qwen Image Characer LoRA looks different from traning samples#
Why this happens
A common report is: AI Toolkit training samples look fine, but in ComfyUI the LoRA has “little to no impact.” For Qwen Image, this usually means either:
- the LoRA isn’t truly being applied (often accompanied by
lora key not loaded/ outdated Qwen support), or - the LoRA is being loaded through a graph/loader route that doesn’t match how Qwen Image expects modules to be patched.
How to fix (user‑verified + training‑matched)
- Validate the LoRA via RCQwenImage (single-node, pipeline-aligned injection via
lora_path/lora_scale). If the LoRA effect shows up here but not in your manual graph, you’ve confirmed a pipeline/loader mismatch rather than a training failure. - When matching AI Toolkit preview samples, don’t change resolution/steps/guidance/seed while diagnosing. Match preview sampler values first, then adjust
lora_scalein small increments.
Run Qwen Image LoRA Inference now#
Open the RunComfy workflow, set lora_path, and run RCQwenImage to keep Qwen Image LoRA inference in ComfyUI aligned with your AI Toolkit training previews.

