

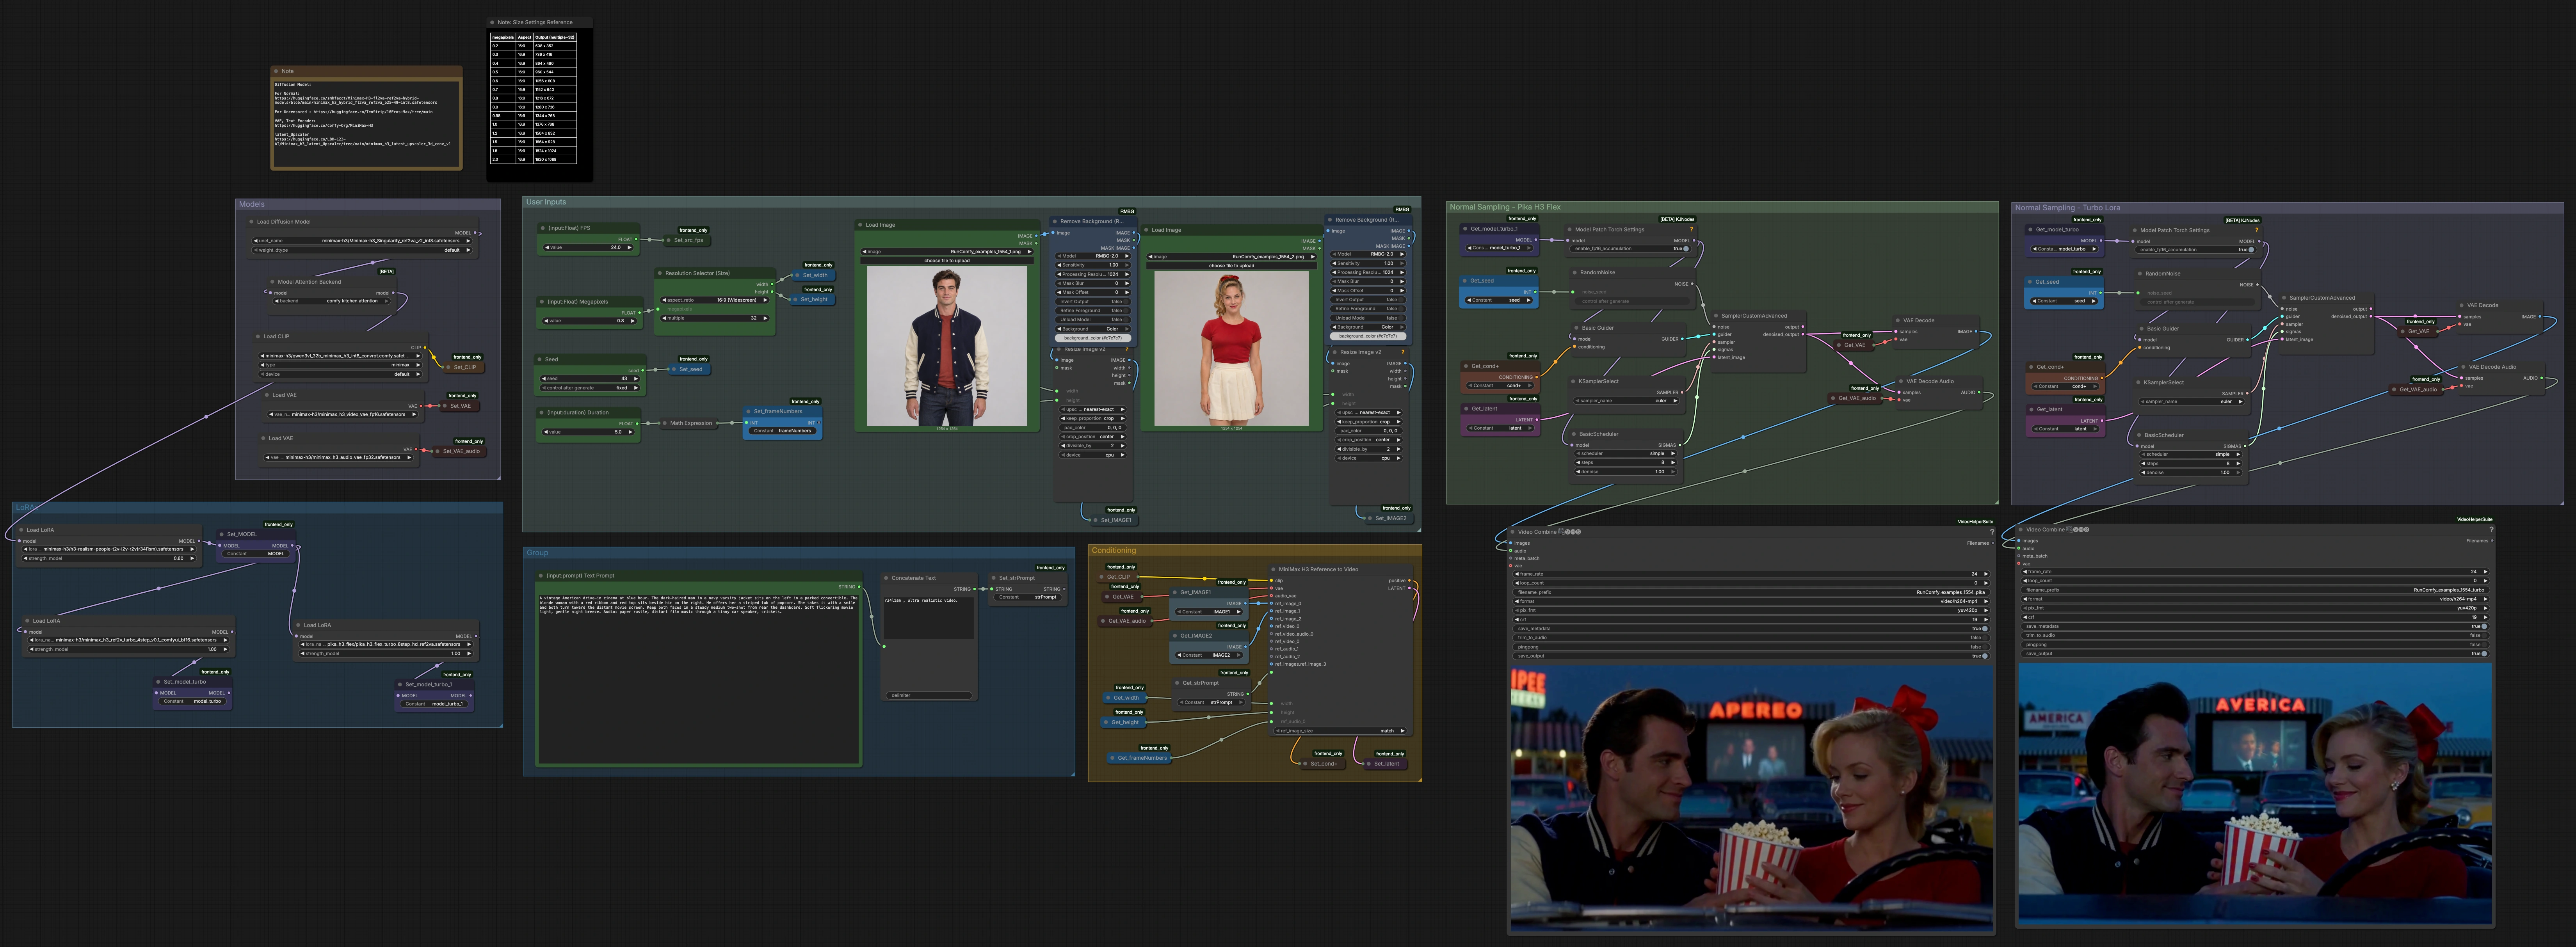
Pika H3 Flex ComfyUI Workflow: two reference images to video with stereo audio and A/B Turbo comparison#
This Pika H3 Flex ComfyUI Workflow turns two reference images plus a scene prompt into a short video with synchronized stereo audio. It is designed for artists and researchers who want fast, high‑quality reference‑to‑video results and a fair A/B comparison between the Pika H3 Flex Turbo Ref2VA path and a MiniMax H3 Turbo path using the same subjects, prompt, dimensions, and seed.
Under the hood, the workflow builds a single conditioning and latent from your references, then runs two parallel eight‑step sampling branches. Each branch decodes video and audio and writes its own MP4, which makes it easy to judge style, motion fidelity, and audio plausibility while holding everything else constant.
Key models in Comfyui Pika H3 Flex ComfyUI Workflow#
- Pika-Labs Pika H3 Flex. Foundation video model and assets that inform the Pika branch’s look and motion priors. See the model card for capabilities and recommended usage notes. Pika-Labs/Pika-H3-Flex
- Pika H3 Flex Turbo LoRA. A lightweight adapter optimized for fast, high‑quality Ref2VA on H3 Flex with strong identity carryover and crisp motion in few steps. Pika-Labs/Pika-H3-Flex-Turbo-LoRA
- MiniMax H3 Singularity Ref2VA. The diffusion backbone used here for reference‑to‑video conditioning, paired with VAEs and text encoder from the MiniMax H3 bundle. WarmBloodAban/Minimax-h3_Singularity
- MiniMax H3 Video VAE and Audio VAE. Decoders for frames and stereo waveforms used by both branches to reconstruct visuals and sound. Comfy-Org/MiniMax-H3
How to use Comfyui Pika H3 Flex ComfyUI Workflow#
The graph is organized into groups that hand off one coherent state. Both branches share the same references, prompt, dimensions, and seed, then diverge only at the LoRA stage to produce two comparable outputs.
Models#
This group loads the MiniMax H3 UNet, text encoder, and the paired video and audio VAEs, then registers them for reuse. You do not need to change anything here unless you are swapping model variants from their model cards. The attention backend is set to favor efficient, stable attention suitable for video workloads. All model objects are stored via get/set nodes so every downstream stage can reference a single source of truth.
User Inputs#
Use the two image loaders to bring in your subjects. Backgrounds are automatically removed to emphasize identity and pose, which increases appearance consistency when the subjects are placed into a new scene. Enter your scene description in the Text Prompt; you can optionally include an “Audio:” line to steer foley and ambience. Choose aspect ratio and megapixels; the Resolution Selector computes a multiple‑of‑32 width and height, and duration is converted into a frame count that aligns with the sampler for smooth motion. Set FPS and seed to control playback feel and reproducibility across both outputs.
Prompt and settings assembly#
A short style primer is prepended to your prompt via a string concatenation stage to nudge realism and temporal coherence. You can keep it, edit it, or replace it entirely to match your project’s tone. The final prompt is stored and retrieved consistently so both branches receive identical text. Width, height, frame count, and seed are likewise centralized to guarantee an apples‑to‑apples comparison.
Conditioning#
MiniMaxH3ReferenceToVideo (#6617) ingests the two background‑cleaned references, the packed prompt, and the shared dimensions to build positive conditioning plus an initialized latent for video and audio. The node fuses identity cues from both images with your scene intent, producing a base motion plan and an audio sketch. That single conditioning object is exported for both samplers, ensuring the Pika and Turbo branches differ only by their LoRA stack and internal sampler path.
LoRAs#
Two LoRA stacks are prepared from the same base model. One applies the Pika H3 Flex Turbo Ref2VA LoRA to emphasize the Pika look while preserving identity in very few steps. The other applies a MiniMax H3 Turbo Ref2V LoRA tuned for speed and crispness. Because the same seed, prompt, and conditioning are used, any differences you see reflect each LoRA’s style and dynamics rather than changes in inputs.
Normal Sampling - Pika H3 Flex#
This branch selects the registered Pika‑tuned model, seeds a noise field, and runs an eight‑step sampler with the shared conditioning. After denoising, the video latent and audio latent are decoded by the MiniMax H3 VAEs. VHS_VideoCombine muxes frames and stereo audio into an MP4 and saves it with a Pika‑specific filename prefix. Use this output to judge identity stability, facial integrity, motion smoothness, and how the synthesized foley matches your “Audio:” guidance.
Normal Sampling - Turbo LoRA#
This branch mirrors the Pika path but swaps in the MiniMax H3 Turbo LoRA. The same eight‑step sampler, seed, prompt, and frame math are applied to keep the test fair. Decoding uses the same VAEs, then VHS_VideoCombine writes a second MP4 with a Turbo prefix. Comparing the two files side by side reveals the tradeoffs in texture, motion aggressiveness, and audio detail between the Pika H3 Flex Turbo and MiniMax H3 Turbo routes.
Key nodes in Comfyui Pika H3 Flex ComfyUI Workflow#
MiniMaxH3ReferenceToVideo (#6617)#
Centralizes Ref2VA by combining your two references, prompt, and target dimensions into a single positive conditioning and an initial latent. Adjust only the essentials here: scene prompt, choice and order of reference images, and the duration/size that fit your shot. Keep the same settings when comparing branches so differences reflect the LoRA, not the conditioning. The node is designed to drive both video and stereo audio that get decoded downstream using the MiniMax H3 VAEs described in their model card.
Resolution Selector (Size) (#6345)#
Picks aspect ratio and megapixels, then returns width and height aligned to multiples of 32 for efficient decoding. Use it as the one place to size both branches, which minimizes resample artifacts and keeps per‑frame detail consistent. Increasing resolution raises compute cost and reduces step‑time headroom, so scale gradually when fine‑tuning look and motion.
StringConcatenate (#6346)#
Applies a compact realism primer before your prompt. If you prefer a different tone or stylization, replace or remove the primer to let your own wording dominate. Keeping this node consistent across runs helps preserve A/B integrity when testing nuanced phrasing changes.
BasicScheduler (#6742, #6767)#
Provides an eight‑step schedule optimized for quick, stable results in this Ref2VA setup. Fewer steps trade detail for speed, while more steps add refinement at the cost of time. For clean A/Bs across branches, keep steps identical.
VHS_VideoCombine (#6758, #6776)#
Muxes decoded frames and stereo audio into final MP4 files. Control format and frame rate here, and keep both branches synchronized. If you change duration upstream, confirm the writer’s settings so the audio and video remain aligned.
Optional extras#
- Prep both reference images with similar pose, lighting, and crop to improve identity stability and reduce face drift.
- If a busy background leaks into the subject, try stronger matting or supply cleaner cutouts; you can also bypass background removal if your references are already well‑isolated.
- Keep the same seed when doing Pika vs Turbo comparisons; change only one factor at a time.
- Start at a moderate megapixel setting, confirm motion and audio feel, then scale resolution once you like the composition.
- For dialogue or specific foley, phrase your “Audio:” line succinctly; ambient cues and simple actions tend to synthesize most reliably.
Resources for the models used in this Pika H3 Flex ComfyUI Workflow:
- Pika-Labs/Pika-H3-Flex
- Pika-Labs/Pika-H3-Flex-Turbo-LoRA
- WarmBloodAban/Minimax-h3_Singularity
- Comfy-Org/MiniMax-H3
- kijai/ComfyUI-KJNodes
- kosinkadink/ComfyUI-VideoHelperSuite
Acknowledgements#
This workflow implements and builds upon the following works and resources. We gratefully acknowledge Pika-Labs for Pika-H3-Flex and Pika-H3-Flex-Turbo-LoRA, WarmBloodAban for Minimax-h3_Singularity, and Innovate Futures @ Benji for “Pika H3 Flex: Pika's Own Fine-Tune of MiniMax H3, Tested in ComfyUI” for their contributions and maintenance. For authoritative details, please refer to the original documentation and repositories linked below.
Resources#
- Innovate Futures @ Benji/Pika H3 Flex: Pika's Own Fine-Tune of MiniMax H3, Tested in ComfyUI
- Docs / Release Notes: Pika H3 Flex: Pika's Own Fine-Tune of MiniMax H3, Tested in ComfyUI
- Pika-Labs/Pika-H3-Flex-Turbo-LoRA
- WarmBloodAban/Minimax-h3_Singularity
- Hugging Face: WarmBloodAban/Minimax-h3_Singularity
- Pika-Labs/Pika-H3-Flex
- GitHub: Pika-Labs/Pika-H3-Flex
- Hugging Face: Pika-Labs/Pika-H3-Flex
Note: Use of the referenced models, datasets, and code is subject to the respective licenses and terms provided by their authors and maintainers.