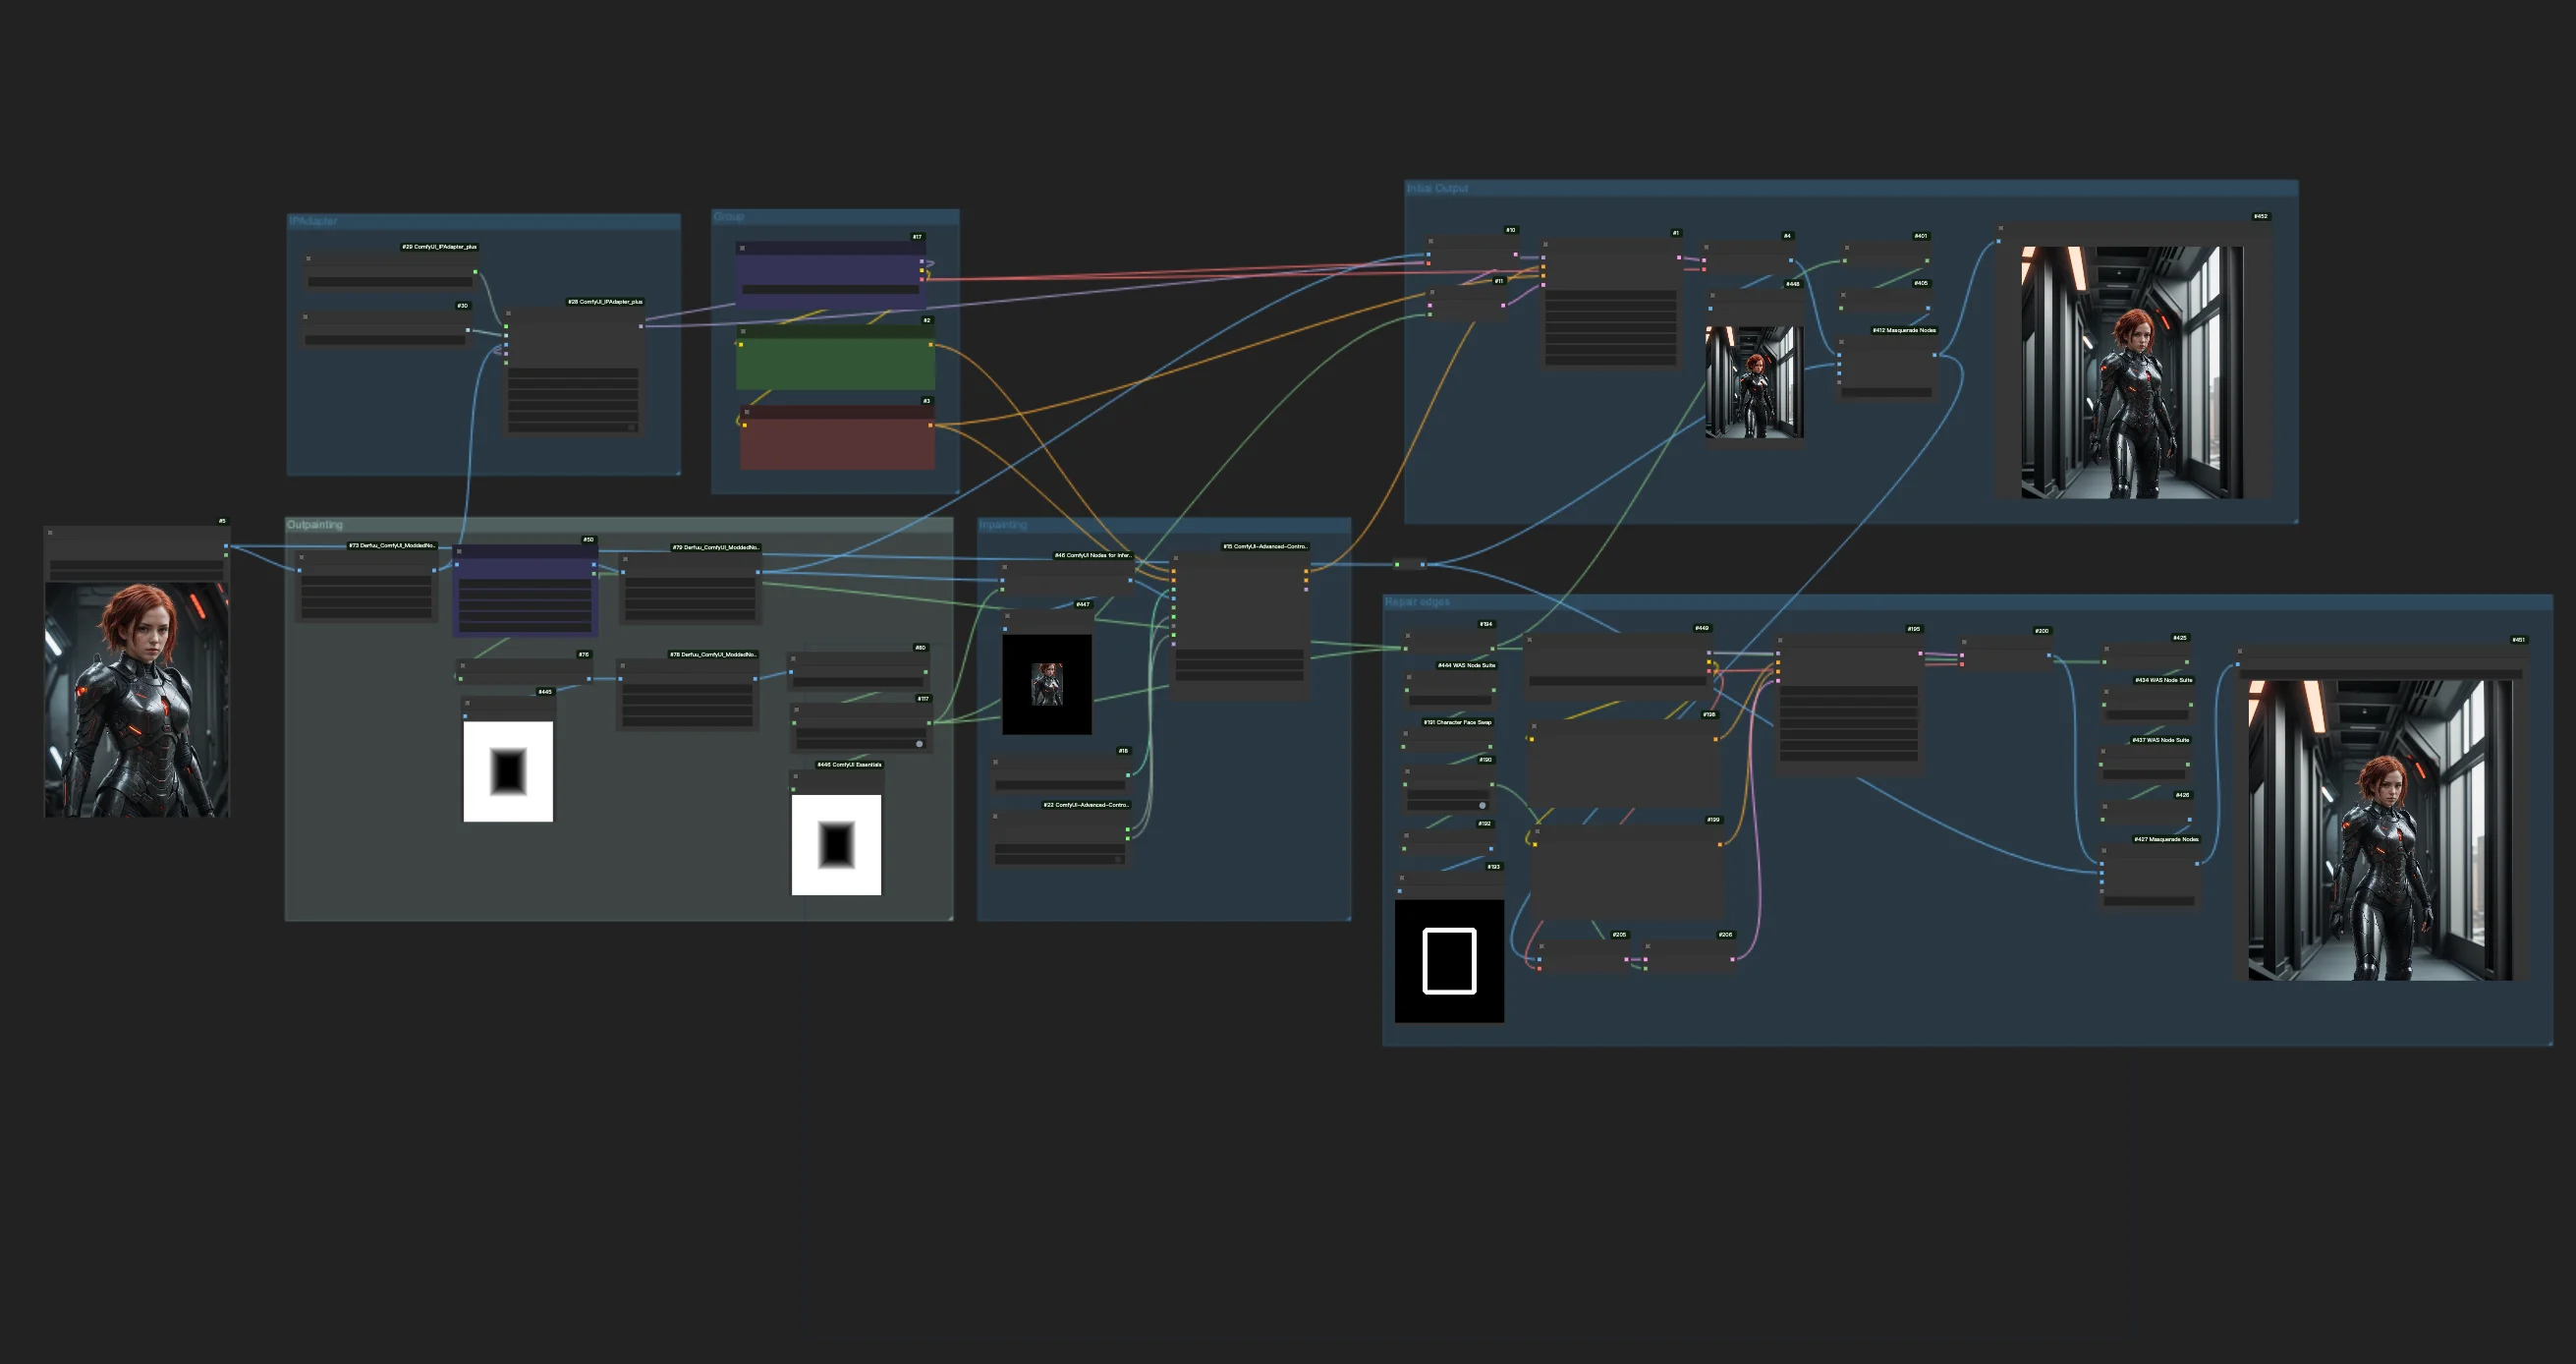
1. ComfyUI Outpainting Workflow#
This image outpainting workflow is designed for extending the boundaries of an image, incorporating four crucial steps:
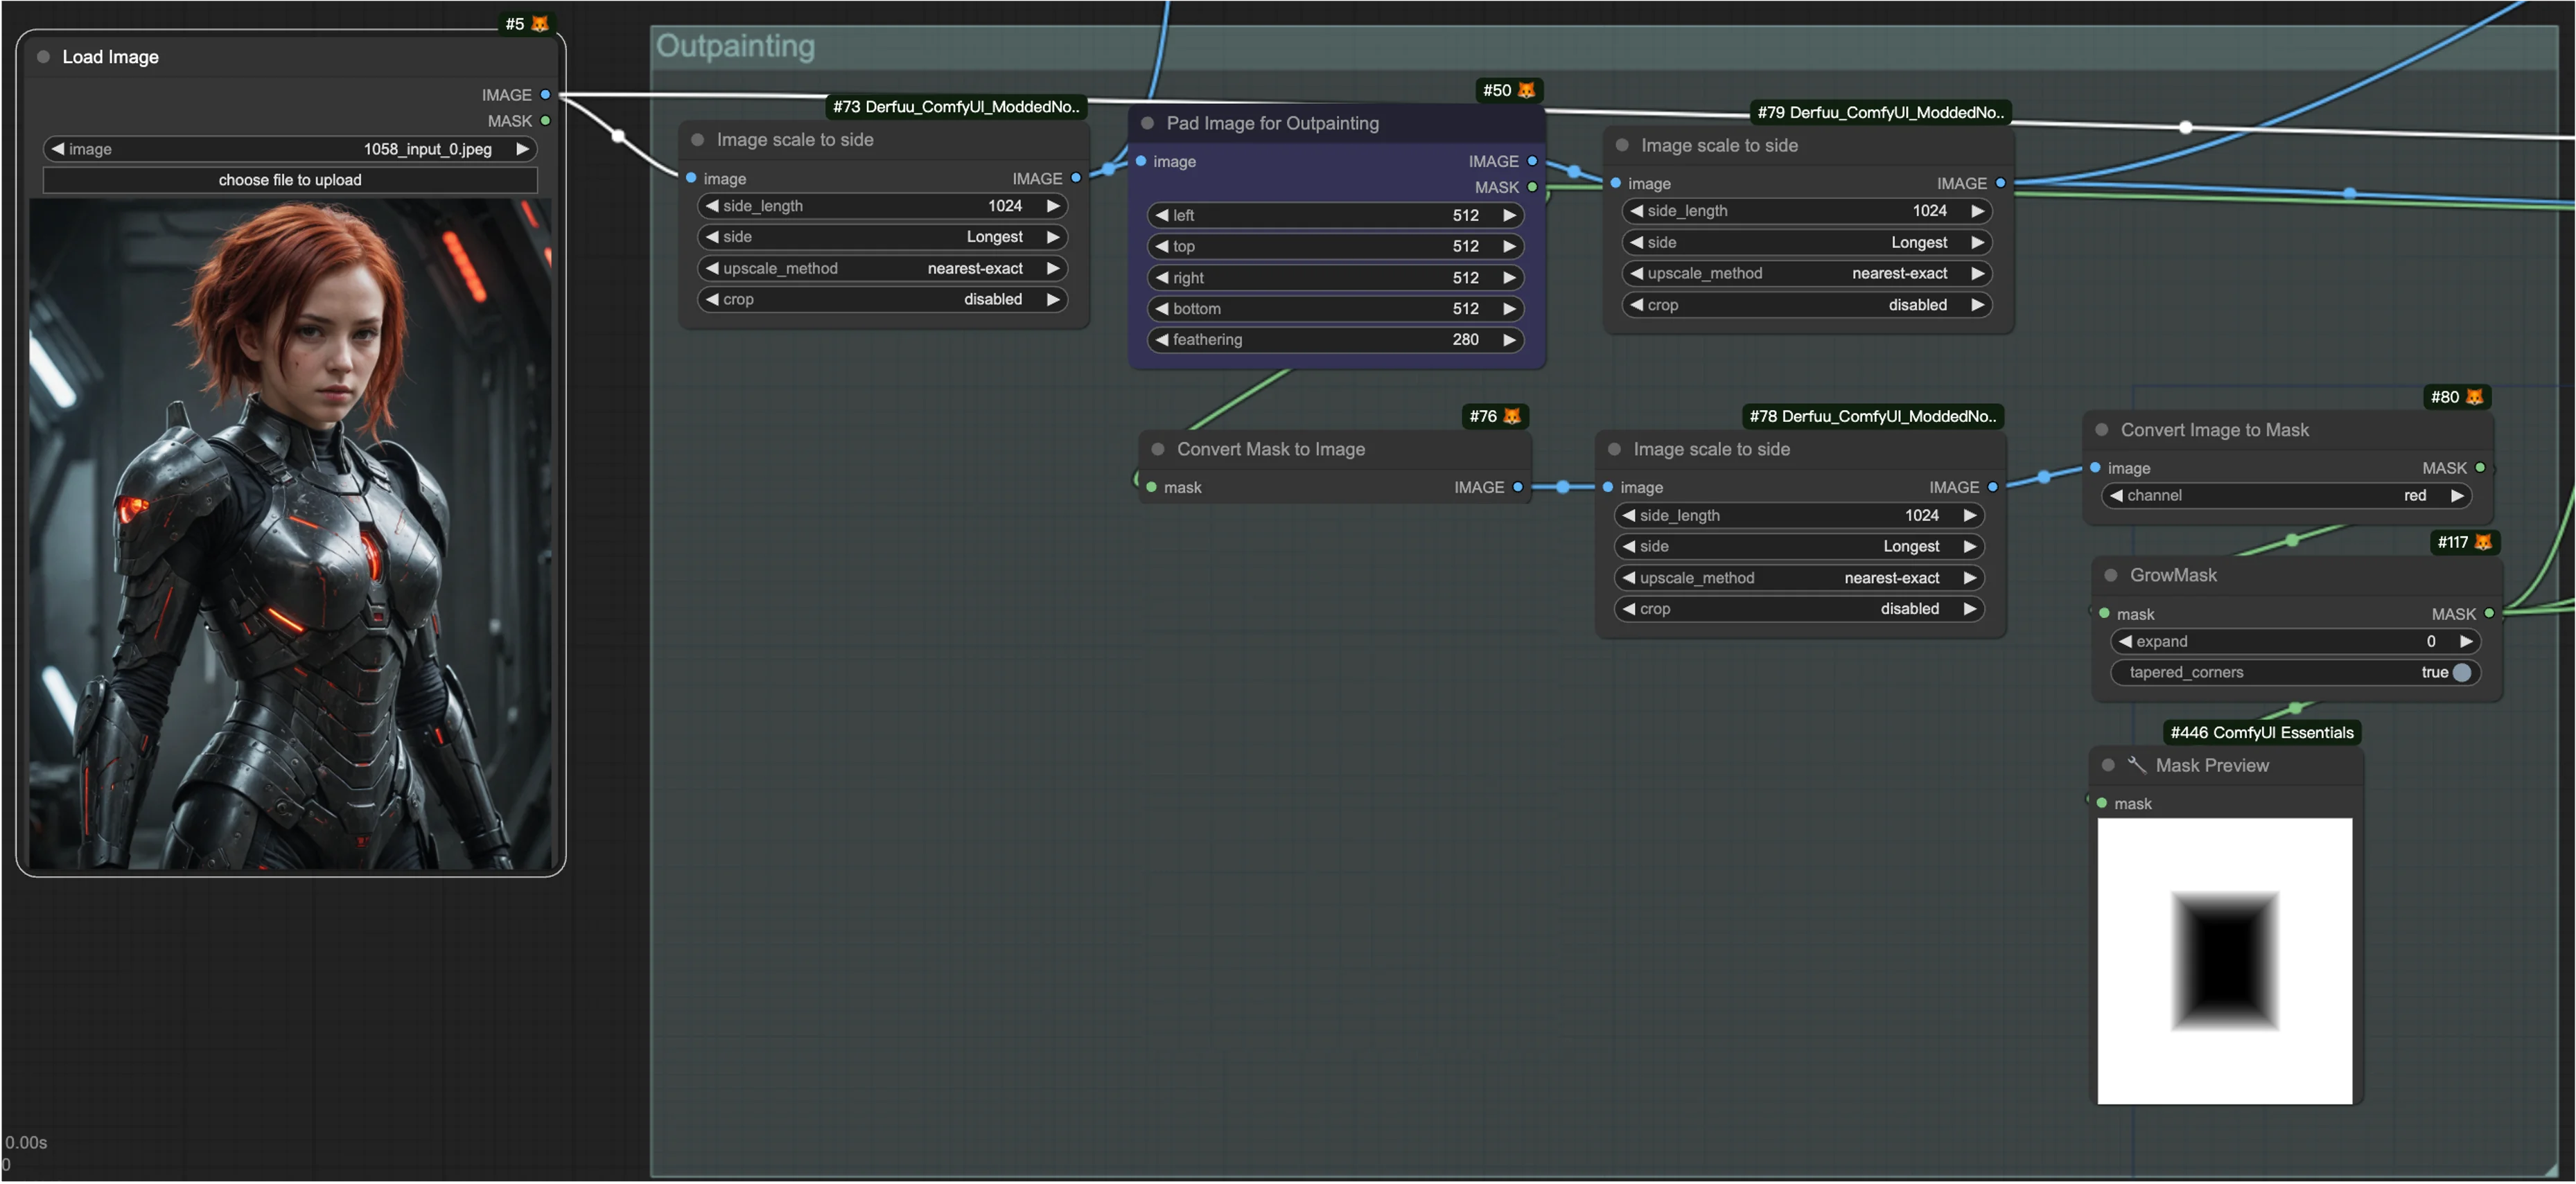
1.1. ComfyUI Outpainting Preparation:#
This step involves setting the dimensions for the area to be outpainted and creating a mask for the outpainting area. It's the preparatory phase where the groundwork for extending the image is laid out.
1.2. ComfyUI Outpainting Process (Use Inpainting ControlNet model):#
The actual outpainting process is executed through the inpainting model, specifically using ControlNet's inpainting module. In this phase, only the region designated by the previously created mask is addressed. This approach utilizes the inpainting model to generate the additional content required for the outpainting area. It’s crucial to understand that although we are extending the image (outpainting), the technique applied is derived from inpainting methodologies, governed by the ControlNet module that intelligently fills in the designated area based on the context provided by the surrounding image.
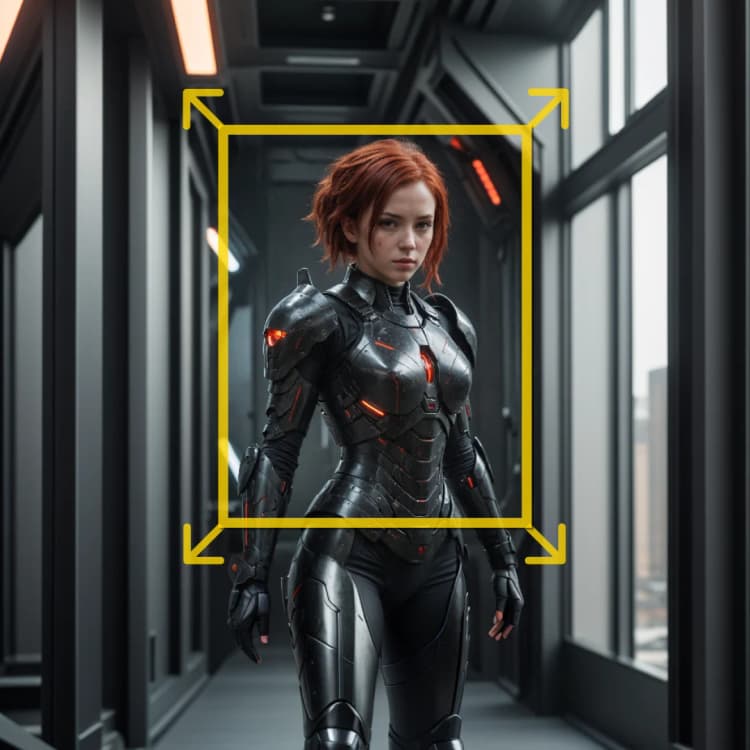
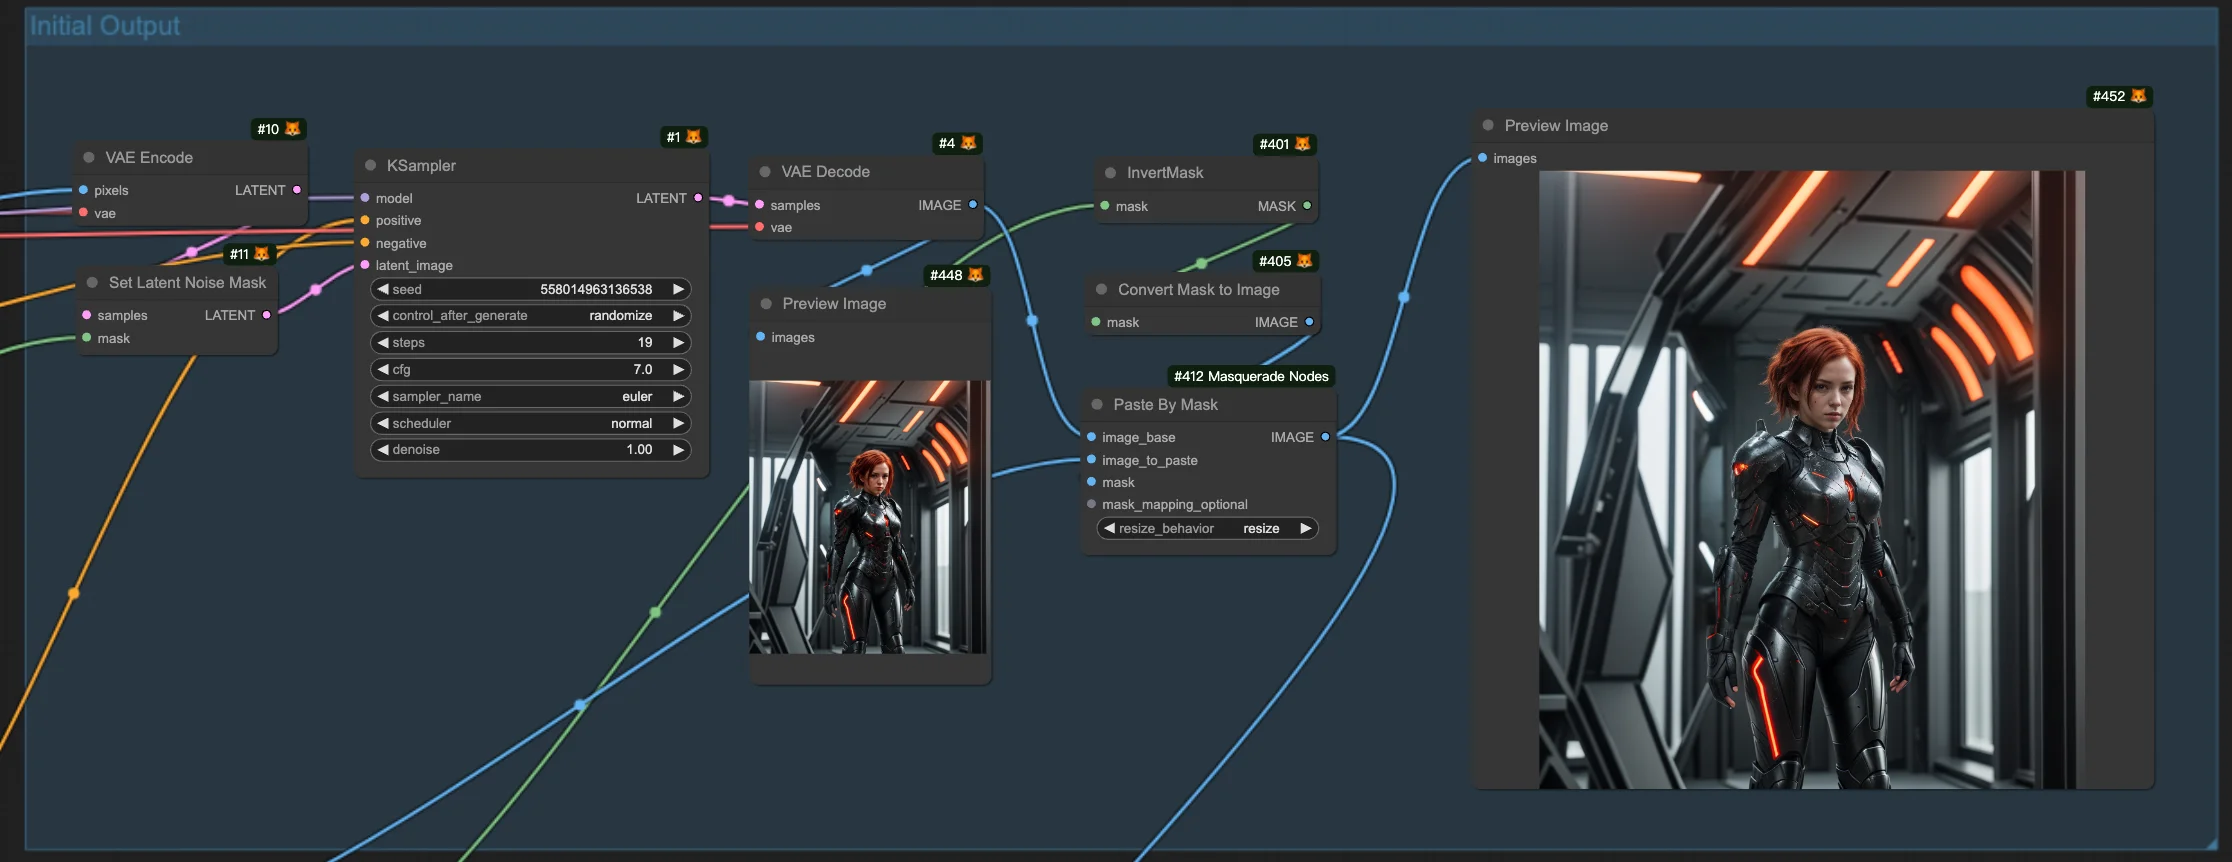
1.3. ComfyUI Outpainting Initial Output:#
Here we obtain the initial version of the image with the newly outpainted area. This stage showcases how the inpainting model has extended the image boundaries. However, at this point, there may be noticeable distinctions between the edges of the original image and the newly extended parts. So the subsequent step is crucial for repair it.
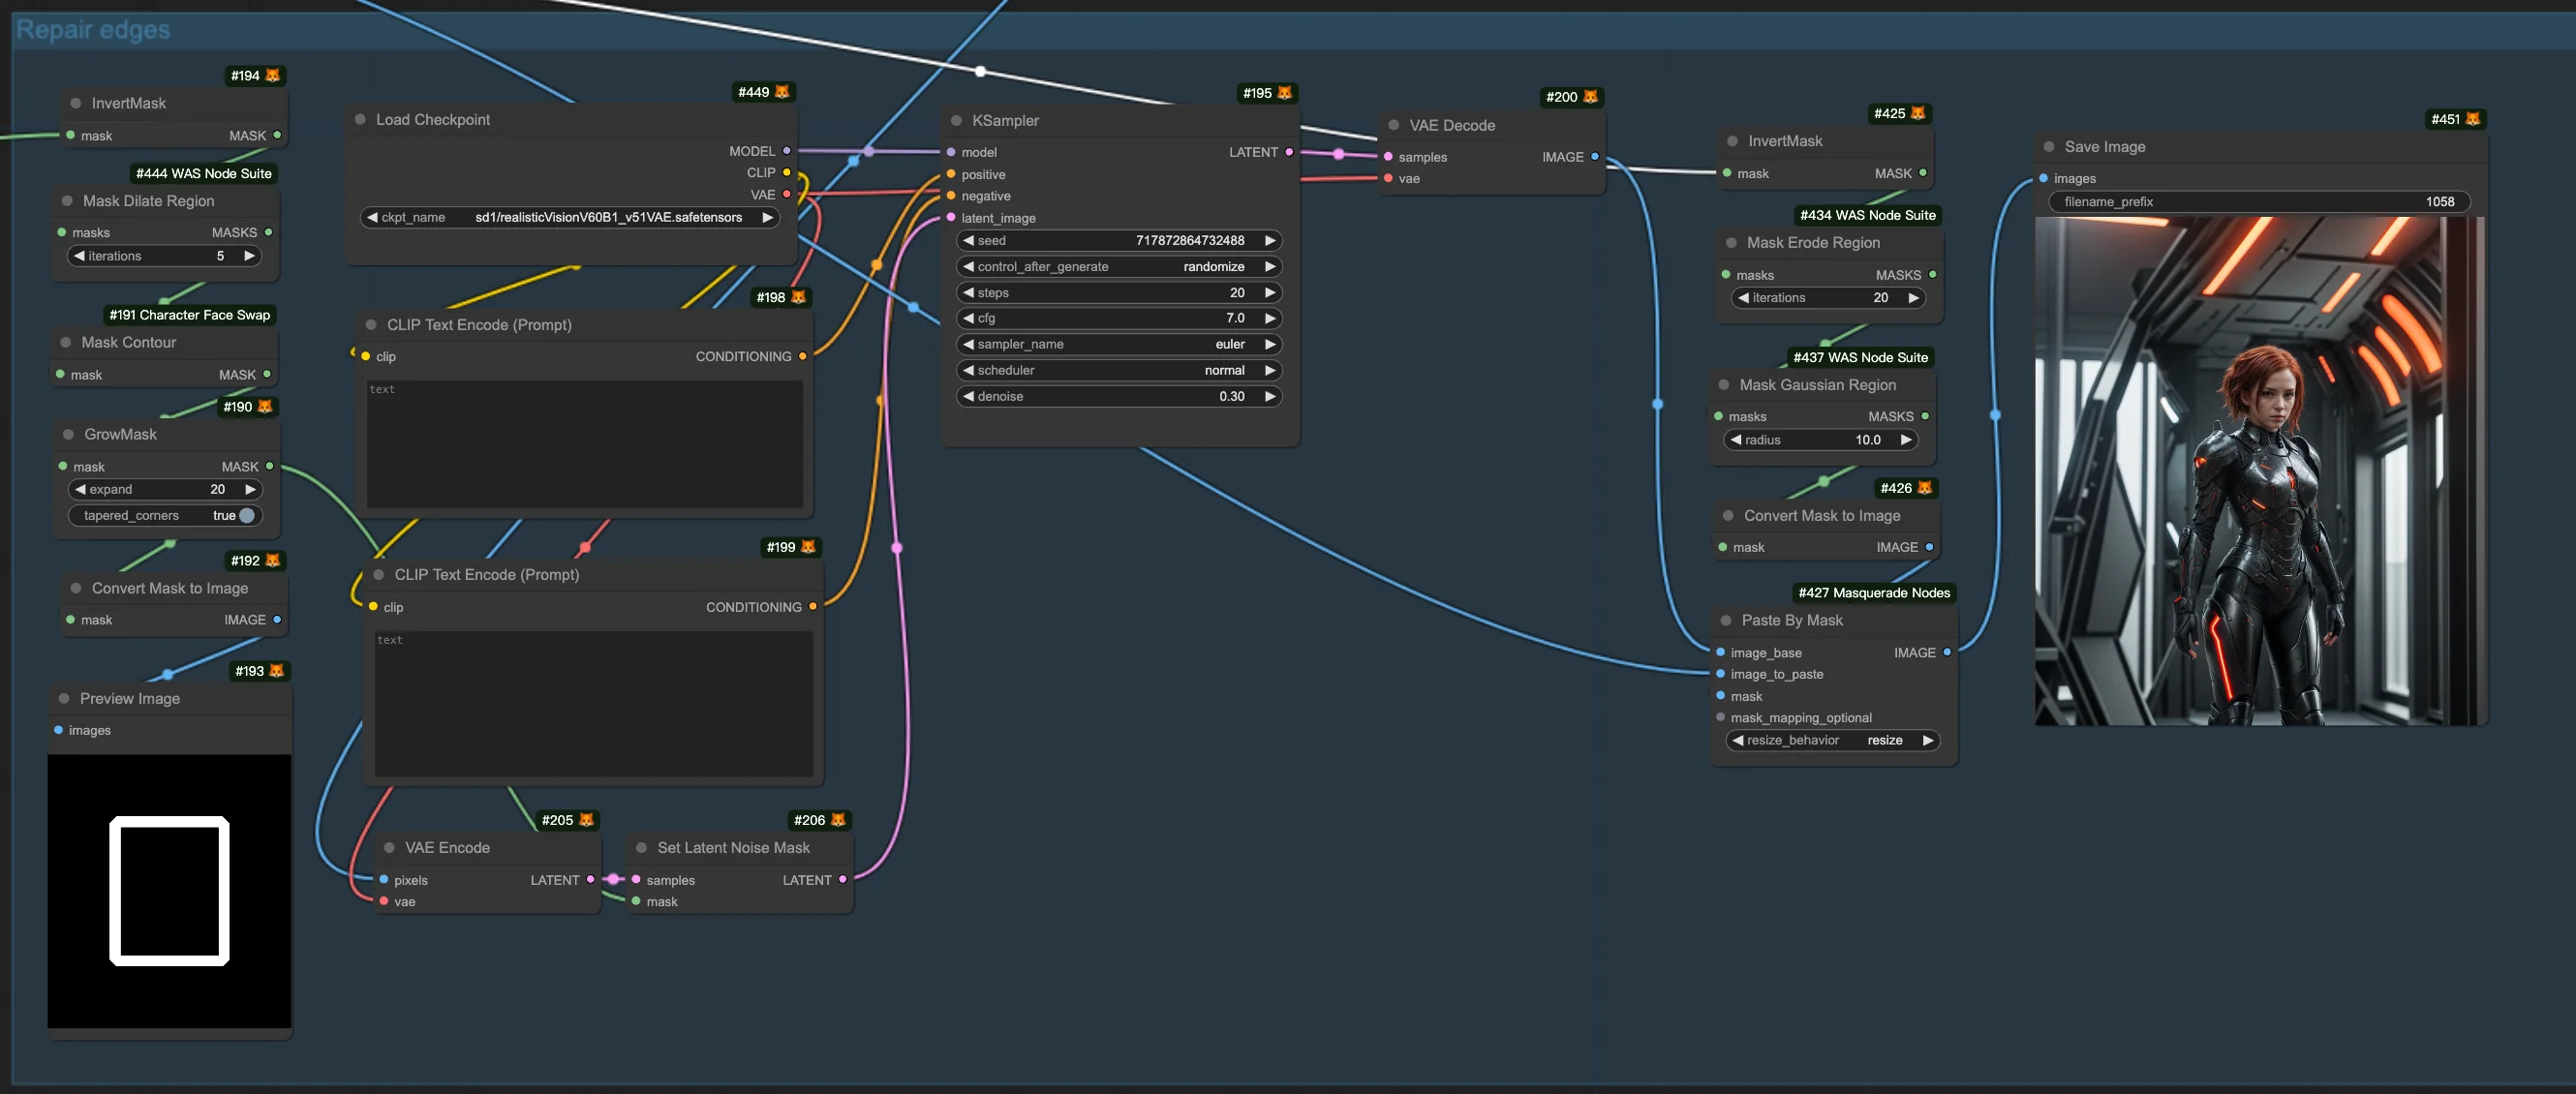
1.4. ComfyUI Outpainting Edge Repair:#
The final step focuses on refining the integration between the original image and the newly added sections. This involves specifically targeting and enhancing the edges to ensure a seamless transition between the original and extended parts of the image.
2. Detailed Introduction to ComfyUI Outpainting/Inpainting Process#
2.1. ComfyUI Outpainting Preparation#
Here are the key nodes involved in this step:
2.1.1. Image Scale to Side: Scale images based on specified parameters. You can set a target side length and choose which side (longest, width, or height) to scale. It offers several scaling methods (nearest-exact, bilinear, area) and an optional crop feature for maintaining aspect ratio.
- Side Length: Define the target side length for scaling
- Side: Choose the side of the image to scale (longest, width, or height)
- Upscale Method: Select the preferred method for scaling
- Crop: Enable cropping to maintain the original image's aspect ratio during scaling
2.1.2. Pad Image for Outpainting: Prepares images for outpainting by adding padding around the borders. This node allows specification of padding amounts for each side of the image and includes a "feathering" option to seamlessly blend the original image into the padded area.
2.1.3. Convert Image to Mask: Transforms a selected channel (red, green, blue, alpha) of an image into a mask, isolating a portion of the image for processing.
In this phase, the padded and masked images are prepared.
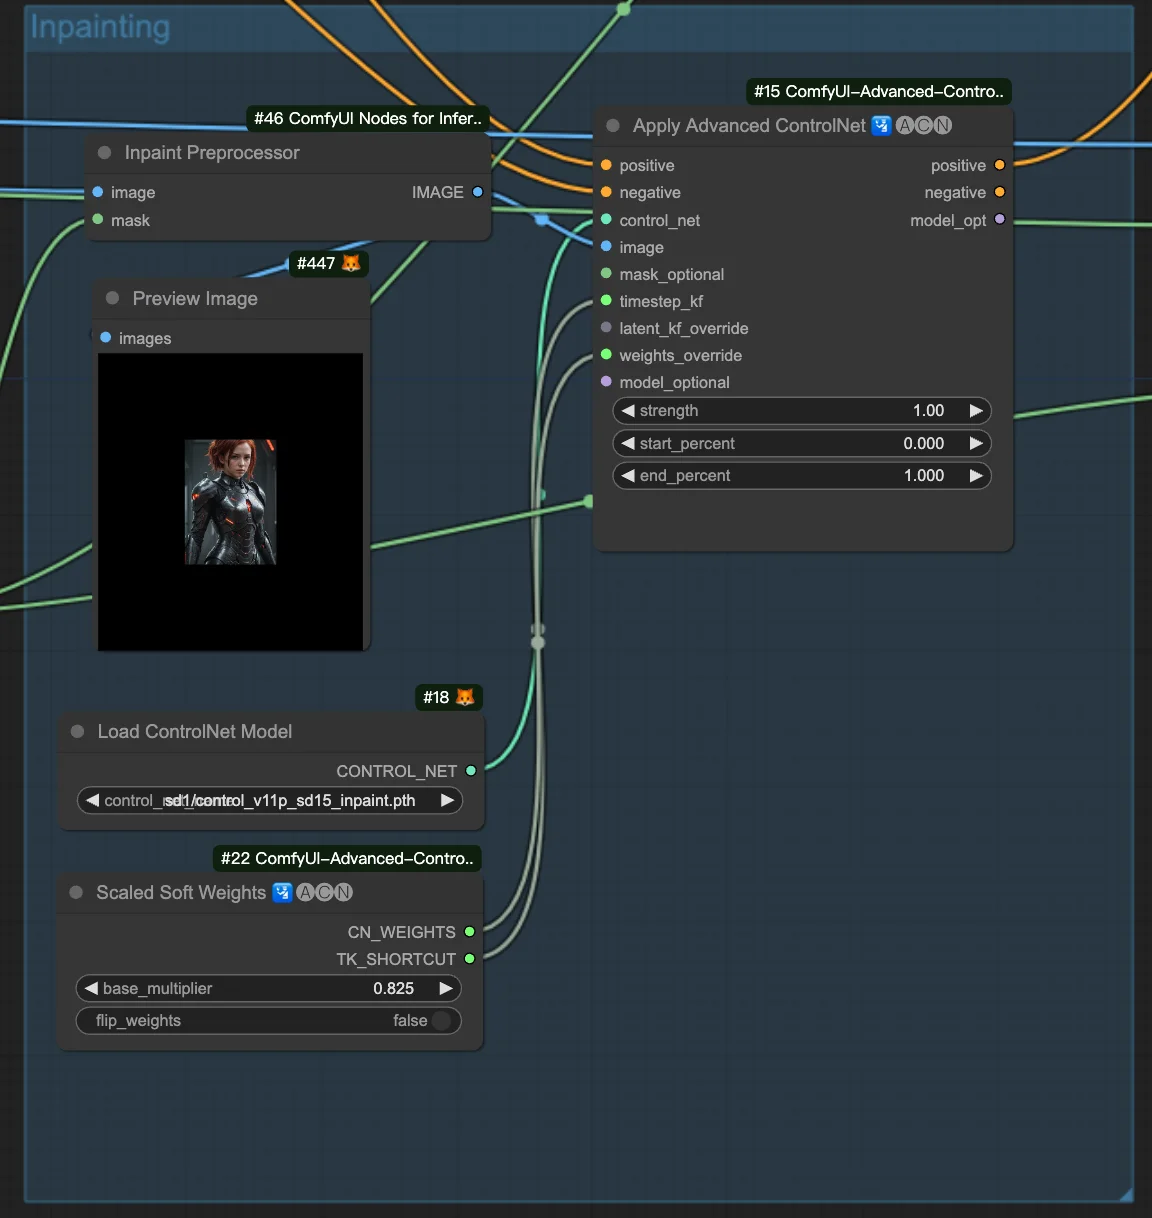
2.2. ComfyUI Outpainting Process (Use Inpainting ControlNet model)#
Here are the key nodes involved in this step:
2.2.1. Apply Advanced ControlNet: Apply the ControlNet node to meticulously guide the inpainting process, targeting the area outlined by the mask prepared in the first step.
2.2.2. Load ControlNet Model: Selects and loads the inpainting ControlNet model.
2.2.3. Inpainting Preprocessor: Send the padded and masked images, which were prepared in the first step, to the inpainting preprocessor.
2.2.4. Scaled Soft Weights: Adjusts the weights in the inpainting process for nuanced control, featuring parameters like base_multiplier for adjusting weight strength and flip_weights to inverse the effect of weights.
2.3. ComfyUI Outpainting Initial Output#
At this stage, the initial outpainted image is generated. However, noticeable edges around the original image may be visible.
2.4. ComfyUI Outpainting Repair Edge#
This final step involves masking the edge area for regeneration, which improves the overall look of the outpainted area.
Here are the essential nodes involved in incorporating noticeable edges into the mask:
2.4.1. Mask Dilate Region: Expands the mask's boundaries within an image, useful for ensuring complete coverage or creating a larger boundary for processing effects.
2.4.2. Mask Contour: Involves identifying and outlining the edges within a mask, aiding in the distinction between different elements in an image.
This workflow is inspired by <a href="https://openart.ai/workflows/hornet_splendid_53/extended-image-no-prompts-needed/jA3L4h2zsZaaZ4qaG4jA" target="_blank" rel="nofollow noopener noreferrer">Ning</a>