

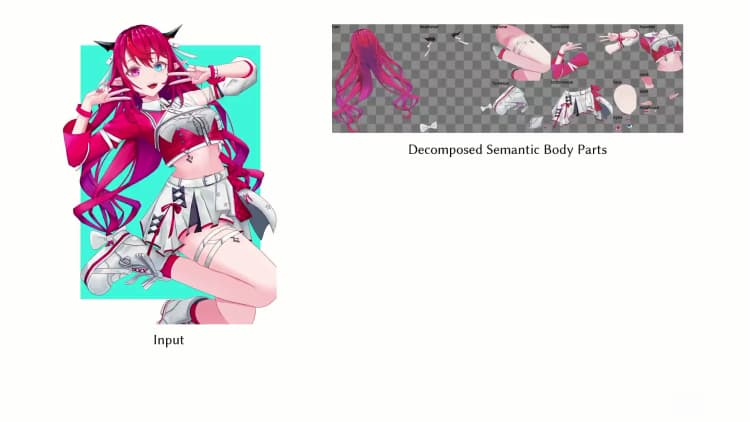

See-through Anime Character Layer Decomposition for Editable PSDs#
This ComfyUI workflow converts a single anime character illustration into semantically separated transparent layers with inferred depth order, then packages everything into a PSD for immediate editing. Built on the See-through research and custom nodes, it helps illustrators, Live2D artists, VTubers, and motion designers turn static art into layered assets ready for rigging, parallax, and quick variations. The workflow uses a two-model pipeline to generate clean, inpainted parts and a consistent draw order, with a live preview to verify results before export.
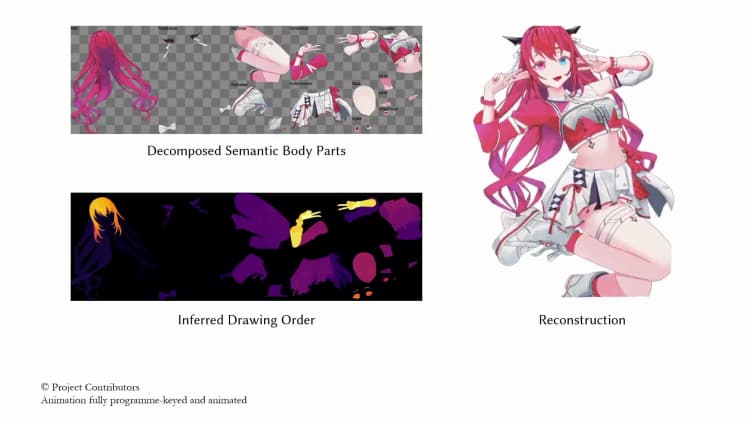
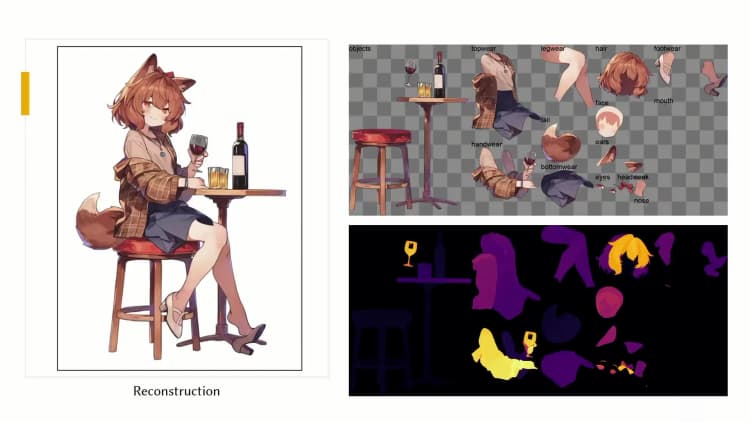
Under the hood, the See-through method reconstructs occluded content and predicts pixel-wise depth so layers stack correctly. This ComfyUI implementation is maintained in the open source plugin ComfyUI-See-through and follows the paper See-through: Single-image Layer Decomposition for Anime Characters.
Key models in Comfyui See-through workflow#
- LayerDiff 3D (SDXL-based). Role: synthesizes transparent, inpainted parts from a single anime image and assigns them to semantic groups (hair, eyes, face, clothing, accessories, etc.). This is the layer generator used to create up to a few dozen editable parts. Model card: layerdifforg/seethroughv0.0.2_layerdiff3d.
- Marigold Depth (fine-tuned for See-through). Role: diffusion-based monocular depth estimation used to infer relative depth and guide draw-ordering and hair front/back separation. See the See-through checkpoint 24yearsold/seethroughv0.0.1_marigold and the original Marigold pipeline docs for background: Marigold Depth.
How to use Comfyui See-through workflow#
This graph runs in three stages: generate semantic layers, compute depth for those layers, then post-process into named parts with a preview and PSD export.
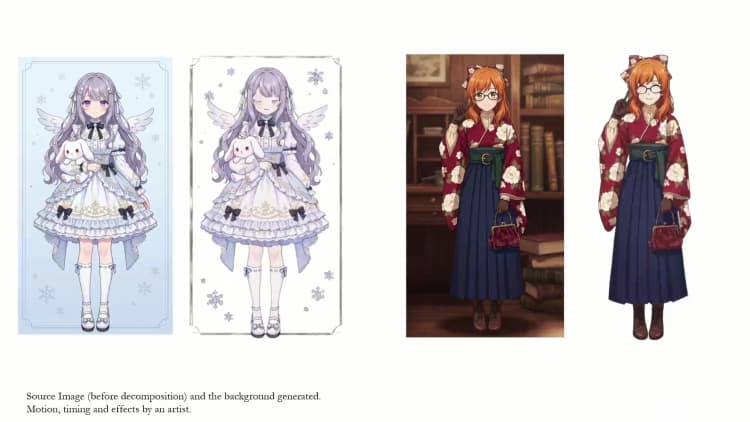
LoadImage(#27) Load a single, front-facing anime character illustration. Clear subject boundaries and minimal overlapping clutter generally yield cleaner separations. The image is passed forward untouched so you can quickly swap inputs and rerun. Use this as your one input for each pass.SeeThrough_LoadLayerDiffModel(#26) Loads the LayerDiff 3D generator used for transparent part synthesis. The workflow is configured to auto-fetch the recommended checkpoint from Hugging Face on first run. Keep this as-is unless you are experimenting with alternative LayerDiff builds. Once loaded, the model feeds the layer generation stage.SeeThrough_LoadDepthModel(#25) Loads the See-through fine-tuned Marigold depth estimator. It predicts relative depth for the generated parts and enables correct draw ordering. Like the layer model, it is auto-downloaded on first use. Leave this node unchanged unless testing different depth variants.SeeThrough_GenerateLayers(#24) Creates semantically grouped, alpha-matted parts from your input image using the LayerDiff 3D model. The node can infer and inpaint occluded content so hidden facial features and overlapping hair become editable. Quality relates to processing resolution and denoising steps; higher settings emphasize crisp edges and fine details. A seed is available for repeatable results.SeeThrough_GenerateDepth(#23) Runs the Marigold-based estimator to predict a depth map aligned to the generated parts. The depth result helps split long structures into front/back and determines the correct stacking order. You can trade speed for fidelity by adjusting the depth processing resolution. Reseeding is optional and usually unnecessary once the layer result is satisfactory.SeeThrough_PostProcess(#20) Combines the layers and depth into finalized, named parts and builds a composited preview. This step sorts layers by depth, applies smart splitting where helpful, and outputs a clean parts object for export. Use the preview to verify hair ordering, facial feature visibility, and clothing overlaps. If something looks off, return to the layer or depth stages, adjust, and rerun.SeeThrough_SavePSD(#21) Exports the result as a layered PSD ready for Photoshop or Live2D. Click the “Download PSD” control on the node to save the file locally. There is also an optional “Download Depth PSD” export that includes per-layer depth for parallax or 2.5D motion setups. The PSD preserves layer names and transparency for straightforward rigging.PreviewImage(#22) Displays the blended reconstruction so you can confirm that See-through separation and ordering match expectations. Use this as a quick QA step before downloading the PSD. If artifacts appear, refine earlier stages and check again.
Key nodes in Comfyui See-through workflow#
SeeThrough_GenerateLayers(#24) Core part generator that determines how well edges, hair strands, and occluded features are reconstructed. Increaseresolutionfor sharper silhouettes and micro-details, and raisenum_inference_stepswhen you see incomplete inpainting or frayed edges. Set a fixedseedto lock in a look once you are happy with the separation. Model reference: layerdifforg/seethroughv0.0.2_layerdiff3d.SeeThrough_GenerateDepth(#23) Controls relative ordering and front/back splits via the Marigold-based predictor. If VRAM is tight or you only need coarse ordering, lowerresolution_depth. For hair-heavy art or accessories that interleave with the face, keep depth resolution higher to avoid mis-ordering. Background on the depth pipeline: Marigold Depth and the See-through tuned model 24yearsold/seethroughv0.0.1_marigold.SeeThrough_PostProcess(#20) Finalizes the parts object and preview according to inferred depth and semantic grouping. Use this stage when you need ordering corrections without regenerating everything. If the preview shows minor stacking issues, rerun depth or layers, then post-process again to update the parts.SeeThrough_SavePSD(#21) Produces production-friendly PSDs with consistent naming and alpha. Use “Download PSD” for standard workflows or “Download Depth PSD” when planning depth-aware parallax or 2.5D camera moves. For browser-side PSD assembly, the plugin uses ag-psd.
Optional extras#
- For consistent results with See-through, start with a single subject framed clearly and avoid multiple overlapping characters.
- If you hit VRAM limits, reduce
resolutioninSeeThrough_GenerateLayersor lowerresolution_depthinSeeThrough_GenerateDepth. As a last resort, try the NF4 quantized layer model 24yearsold/seethroughv0.0.2_layerdiff3d_nf4. - Keep a fixed
seedonce you like the separation so further tweaks don’t unexpectedly reshuffle details. - Read the plugin’s repository for updates and additional workflows: ComfyUI-See-through.
Acknowledgements#
This workflow implements and builds upon the following works and resources. We gratefully acknowledge jtydhr88 for ComfyUI-See-through and Lin et al. for See-through: Single-image Layer Decomposition for Anime Characters for their contributions and maintenance. For authoritative details, please refer to the original documentation and repositories linked below.
Resources#
- jtydhr88/ComfyUI-See-through
- GitHub: jtydhr88/ComfyUI-See-through
- Docs / Release Notes: ComfyUI-See-through GitHub Repository
- Lin et al./See-through: Single-image Layer Decomposition for Anime Characters
- GitHub: shitagaki-lab/see-through
- Hugging Face: 24yearsold/see-through-demo
- arXiv: 2602.03749
- Docs / Release Notes: See-through arXiv Paper
Note: Use of the referenced models, datasets, and code is subject to the respective licenses and terms provided by their authors and maintainers.
