
Blender to ComfyUI AI Renderer 2.0#
Blender to ComfyUI AI Renderer 2.0 turns Blender outputs into cinematic, prompt‑guided AI video while preserving motion and scene layout. It reads structure from depth, outline, or pose passes and uses that to drive Wan VACE video generation so your final footage stays aligned with the original animation intent. The workflow also includes a fast still‑image path for look development and keyframe checks, making it ideal for animators, VFX artists, previs teams, and content creators.
At its core, Blender to ComfyUI AI Renderer 2.0 builds or ingests control videos, merges them with start or reference frames, and renders a coherent sequence with strong temporal stability. You get creative control through prompts and reference images while depth and edges keep composition and motion intact.
Key models in Comfyui Blender to ComfyUI AI Renderer 2.0 workflow#
- Wan 2.1 VACE 14B (SkyReels V3 R2V merge). Foundation video diffusion used for structure‑aware generation and motion alignment. Checkpoint hosted as a merge for VACE and SkyReels R2V, suitable for start‑to‑end frame control and reference‑guided consistency. Model
- uMT5‑XXL text encoder for Wan 2.1. Provides high‑capacity text conditioning packaged for ComfyUI. Files
- Wan 2.1 VAE. Used to encode and decode video latents cleanly for the Wan pipeline. Files
- Depth Anything 3 DA3‑BASE. Monocular depth estimator used to derive high‑quality, temporally consistent depth control from footage. Model
- Z‑Image Turbo. A fast image diffusion backbone for single‑frame exploration with multi‑control conditioning. Model
- Z‑Image‑Fun ControlNet Union 2.1. Multi‑control weights for canny, depth, pose, and more when using the Z‑Image Turbo path. Model
- OpenPose (algorithm). Classic 2D keypoint detector used to derive pose lines as an optional control signal. Paper • GitHub
How to use Comfyui Blender to ComfyUI AI Renderer 2.0 workflow#
The workflow has two tracks that you can run independently or together. First, a Preprocess track builds a control video from your footage (depth, edges, or pose). Second, AI Renderer 2.0 fuses start or reference images with that control video to synthesize the final sequence. A separate Z‑IMAGE TURBO CN 1.0 path lets you iterate fast on stills that mirror your control strategy.
- VIDEO INPUT & SIZE SELECTION (Preprocess)
- This group imports a video and standardizes dimensions and frame budgeting for the control pass builder. The
VHS_LoadVideo(#32) node reads your clip and exposes info like fps and frame count to downstream nodes. A compact settings block wires width, height, and frame caps so every downstream preprocessor operates at the same resolution. Use this first to align all Preprocess outputs before choosing a control type.
- This group imports a video and standardizes dimensions and frame budgeting for the control pass builder. The
- DEPTH (Preprocess)
- This group converts the input frames into a depth map sequence using
DepthAnything_V3(#37). The goal is to preserve scene geometry so the later video generation respects scale, occlusion, and parallax. An internal resize node adapts maps to the working size, and a save block can preview the control clip. Choose this when you want strong layout and camera motion fidelity.
- This group converts the input frames into a depth map sequence using
- CANNY (Preprocess)
- This group extracts clean edge lines with
CannyEdgePreprocessor(#39) to provide structure without shading. Edges are resized to match the project settings and can be saved as a preview. Use this when you want crisp silhouettes, architectural lines, or toon‑like control that keeps composition but allows style flexibility.
- This group extracts clean edge lines with
- POSE (Preprocess)
- This group computes human skeletons with
OpenposePreprocessor(#42), producing lightweight line figures for motion transfer. It is helpful when character motion is the priority and you want generative detail to stay consistent with acting and timing. As with other control types, the output is resized and can be previewed as a short video.
- This group computes human skeletons with
- Z‑IMAGE TURBO CN 1.0
- This path is for rapid still‑image exploration from either a single frame or a loaded image.
QwenImageDiffsynthControlnet(#3) applies Z‑Image Turbo with the multi‑control patch, guided by a prompt fromCLIPTextEncode(#23). Use theUSE VIDEO?switch (#20) to feed a frame from video or an image from disk; then sample and save a quick frame to validate your prompt, art direction, or control strength before running the full sequence.
- This path is for rapid still‑image exploration from either a single frame or a loaded image.
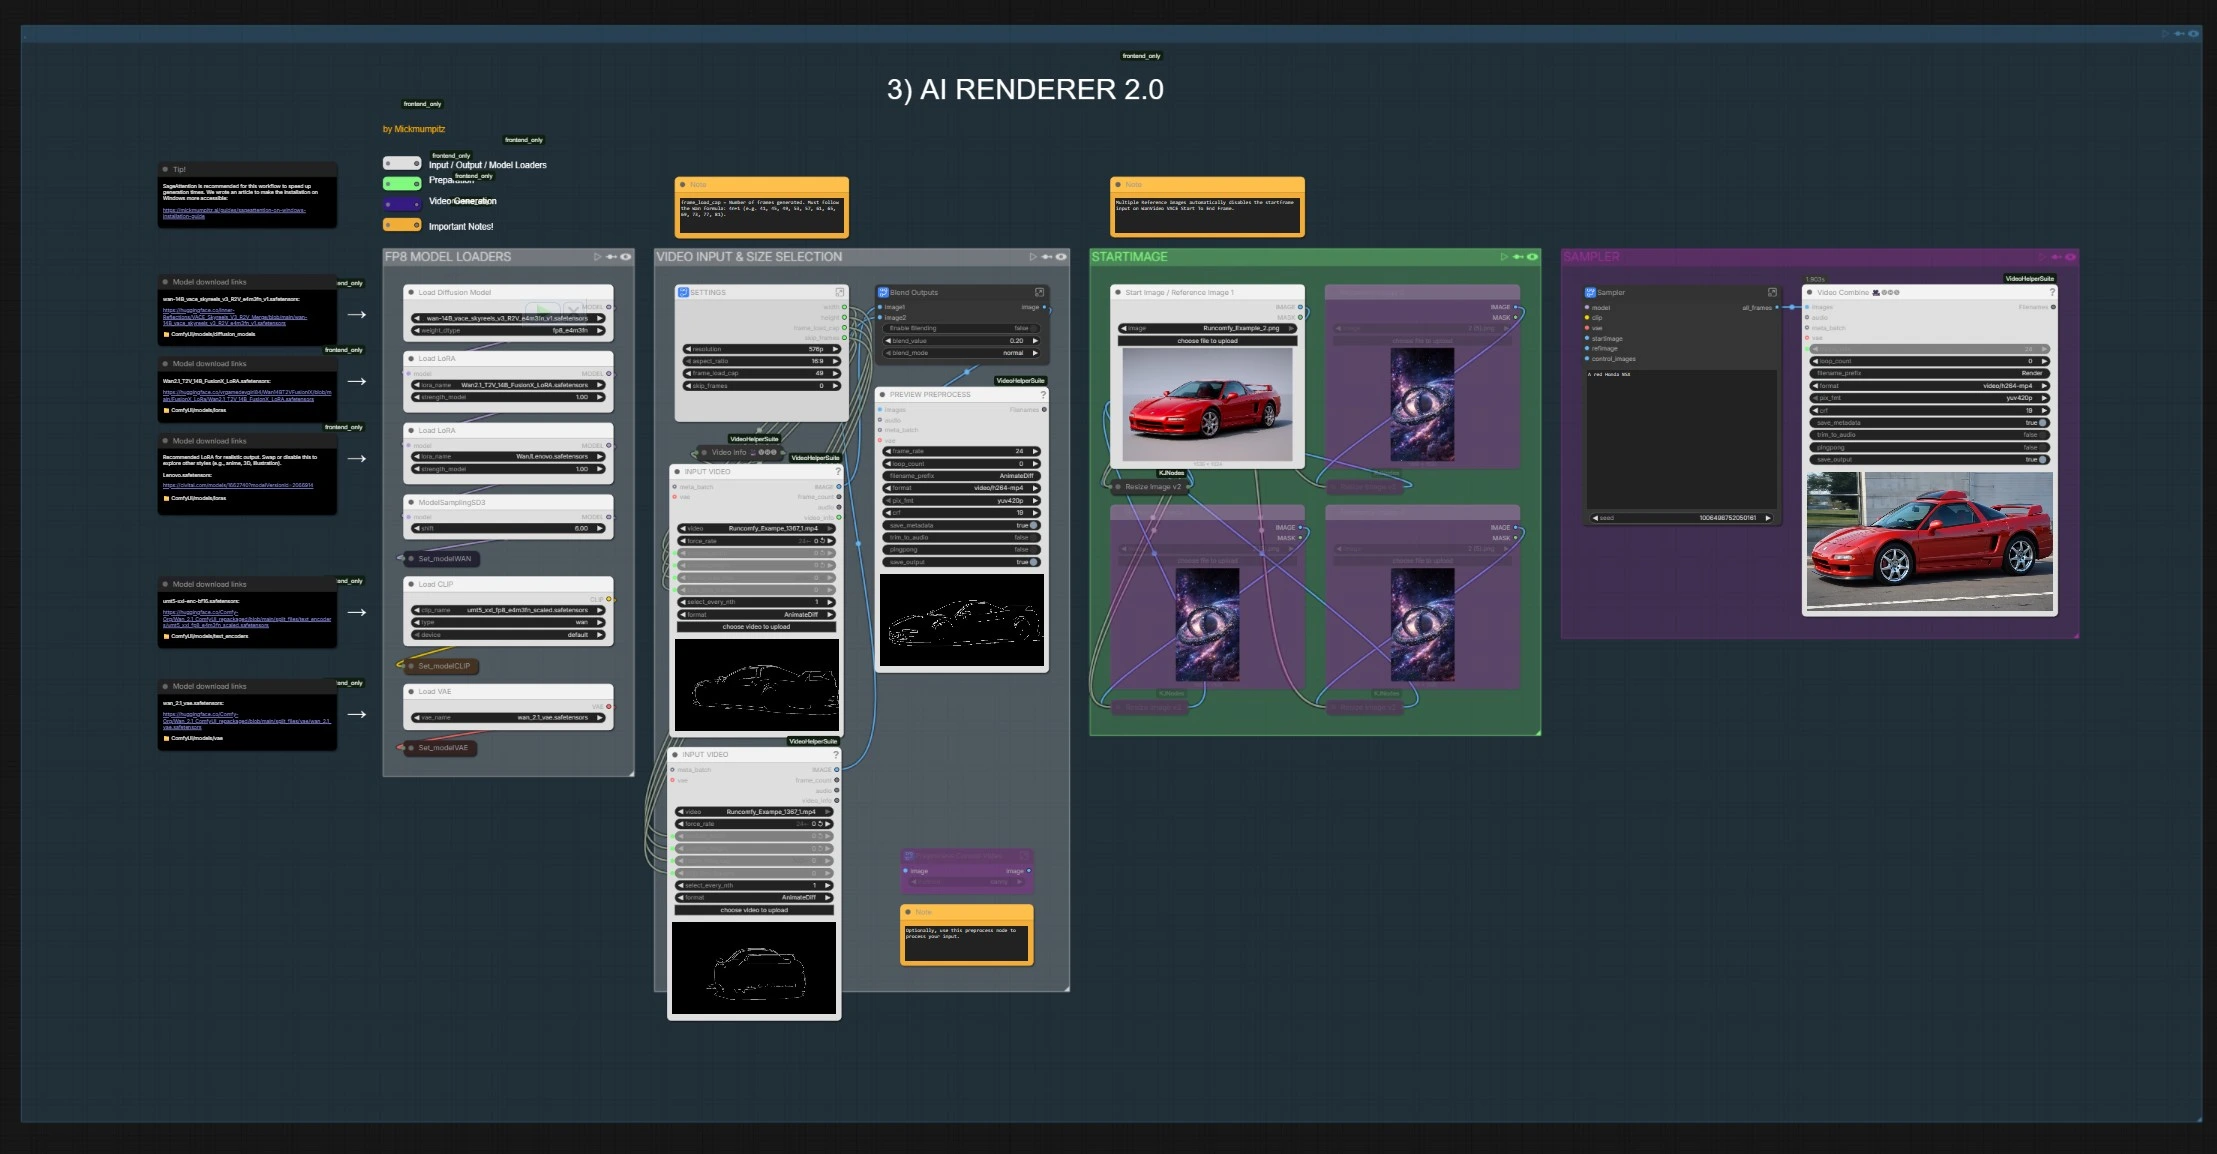
- STARTIMAGE (AI Renderer 2.0)
- This group accepts a start image and up to three additional reference images. The workflow automatically resizes them, optionally blends them, and builds a reference stack that seeds the video for better identity and style consistency. If multiple references are present, a small logic block disables the start‑frame input in the VACE start‑to‑end builder so references take precedence.
- VIDEO INPUT & SIZE SELECTION (AI Renderer 2.0)
- This second sizing group drives the final render. It sets width, height, fps, and frame length that are read by downstream Wan nodes.
VHS_LoadVideo(#93 and #105) can also import an auxiliary clip whose properties are used to mirror fps in the final output writer. Keep this group in sync with your Blender export to avoid unintended resampling.
- This second sizing group drives the final render. It sets width, height, fps, and frame length that are read by downstream Wan nodes.
- FP8 MODEL LOADERS
- Here the primary Wan 2.1 VACE UNet, the uMT5‑XXL text encoder, and the Wan VAE are loaded, along with optional LoRA weights. These loaders ensure the AI Renderer 2.0 path runs with consistent precision, tokenizer, and latent codec. Swap models here to change style families or checkpoints without touching the rest of the graph.
- SAMPLER
- The heart of Blender to ComfyUI AI Renderer 2.0.
WanVideoVACEStartToEndFrame(#3261) forms a control video from start and reference images plus the chosen control pass, thenWanVacePhantomSimpleV2(#3255) wires the Wan model, conditioning, references, and generated control together. AKSampler(#3253) renders coherent frames, thenVAEDecodeandVHS_VideoCombine(#109) save the MP4 at your target fps. Enter your positive and negative prompts once; the same text drives the entire sequence.
- The heart of Blender to ComfyUI AI Renderer 2.0.
Key nodes in Comfyui Blender to ComfyUI AI Renderer 2.0 workflow#
WanVacePhantomSimpleV2(#3255)- Orchestrates the Wan 2.1 VACE generation by routing model, VAE, prompts, control video, and reference frames. Adjust only the essentials: working width and height to match your control, and sequence length to match the target shot. If you use several strong references, keep prompts descriptive rather than over‑specific to avoid fighting the reference guidance.
WanVideoVACEStartToEndFrame(#3261)- Builds the control video that VACE follows. Provide a start image, optional end or reference stack, and the preprocessed control video. Set the number of frames using the Wan rule of 4n+1 so trimming stays consistent through the sampler; this avoids off‑by‑one artifacts at the tail.
PreprocessSwitch(#3239)- Selects which control feed reaches the sampler. Toggle between original frames, depth, canny, or pose depending on what you exported from Blender or built in Preprocess. Use depth when you need spatial fidelity, canny for clean composition control, and pose for character‑focused motion.
VHS_LoadVideo(#93)- Handles video ingest and exposes frame properties used across the graph. It is the reliable way to keep fps and sizing consistent from Blender through to render. If you need to trim or skip heads and tails, do it here so all downstream paths remain aligned.
KSampler(#3253)- Produces the final latent sequence given the Wan model and conditioning. If you change guidance strength or the sampler method, recheck the first and last 10 frames for stability, then render the full shot.
Optional extras#
- You can replace the generated control pass with Blender’s own render passes. Plug your depth, outline, or pose pass into the control input used by
WanVideoVACEStartToEndFrame(#3261) to drive VACE directly from Blender outputs. - Keep aspect ratio and fps identical between Blender and the workflow. The output writer mirrors fps from the input settings so editorial timing stays locked.
- For identity or style preservation, supply multiple clean reference images in STARTIMAGE. The workflow will prioritize the reference set and handle the start‑frame toggle automatically.
This Blender to ComfyUI AI Renderer 2.0 workflow lets you stay faithful to layout and motion while using prompts and references to raise production value. Use Preprocess to decide how much structure you want to preserve, validate direction quickly with Z‑IMAGE TURBO CN 1.0, then render confident, coherent sequences with AI Renderer 2.0.
Acknowledgements#
This workflow implements and builds upon the following works and resources. We gratefully acknowledge @Mickmumpitz the creators of “Blender to ComfyUI AI Renderer 2.0 Source” for their workflow and guidance. For authoritative details, please refer to the original documentation and repositories linked below.
Resources#
- Blender to ComfyUI AI Renderer 2.0 Source
- Docs / Release Notes: YouTube @ Mickmumpitz
Note: Use of the referenced models, datasets, and code is subject to the respective licenses and terms provided by their authors and maintainers.