
FLUX.2 LoRA ComfyUI Inference: training-matched AI Toolkit LoRA output with the FLUX.2 Dev pipeline#
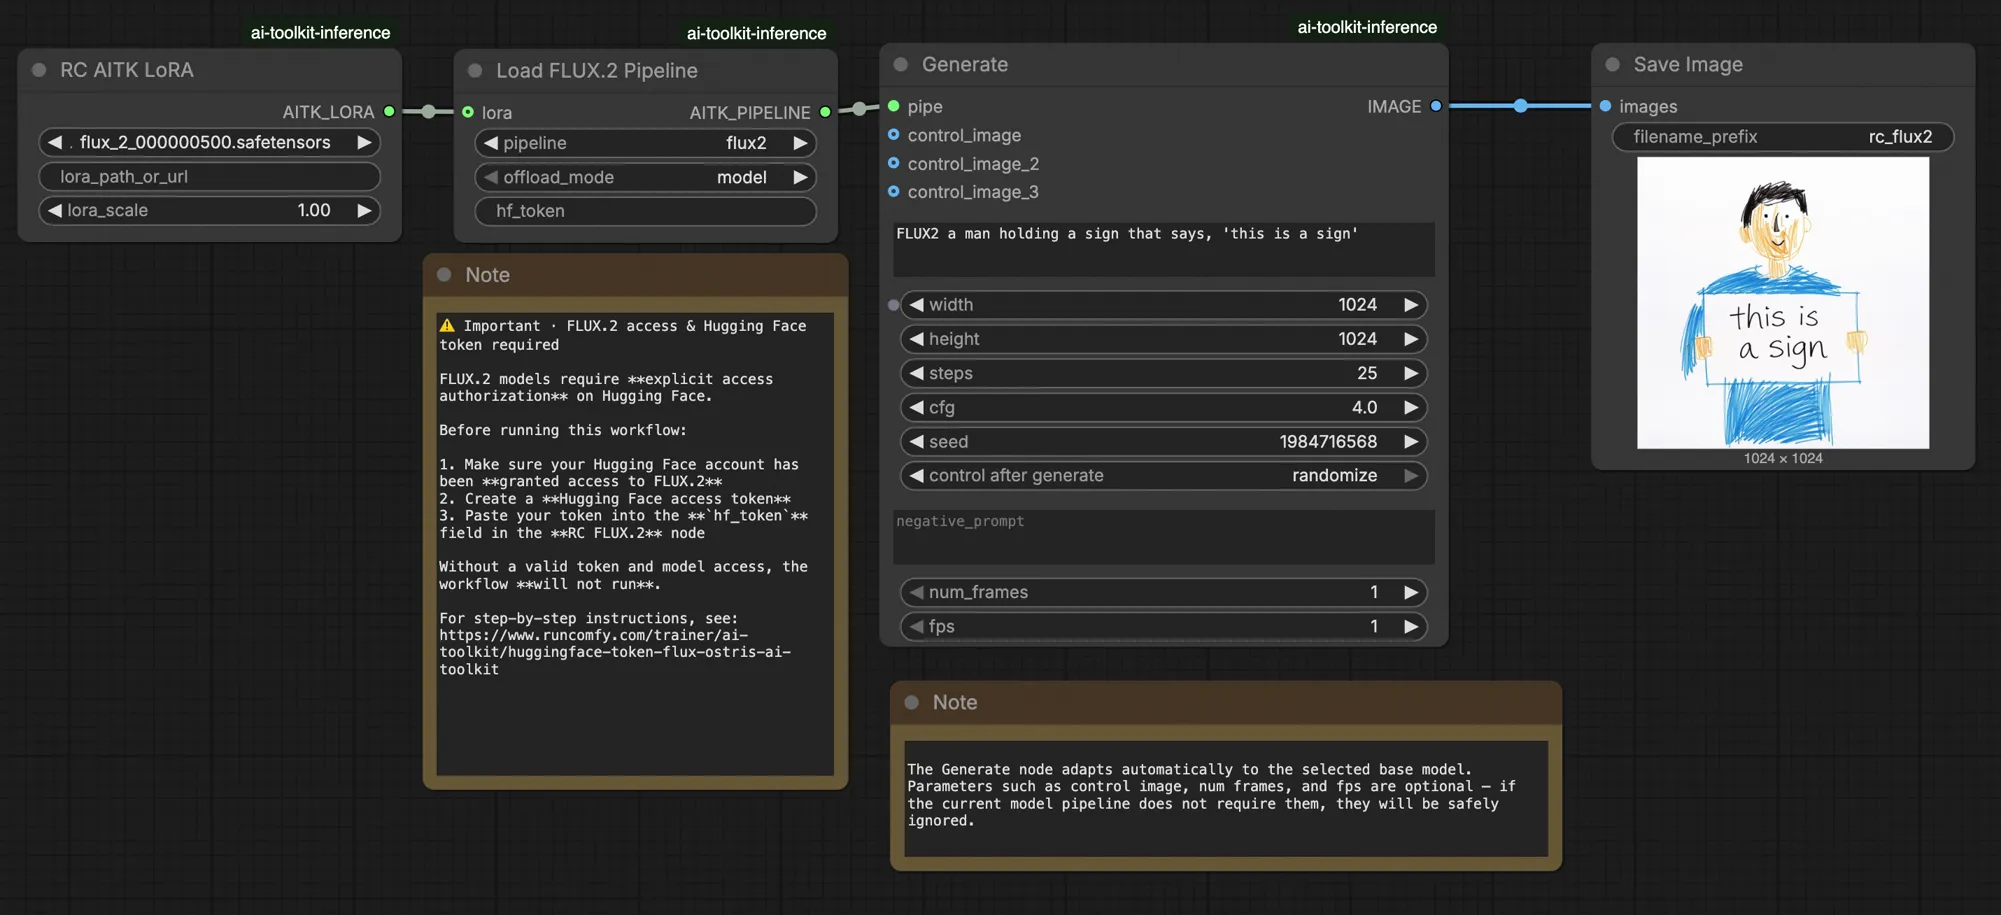
This production-ready RunComfy workflow runs FLUX.2 Dev LoRA inference in ComfyUI through RC FLUX.2 Dev (Flux2Pipeline) (pipeline-level alignment, not a generic sampler graph). RunComfy built and open-sourced this custom node—see the runcomfy-com repositories—and you control adapter application with lora_path and lora_scale.
Note: This workflow requires 3XL machine to run.
Why FLUX.2 LoRA ComfyUI Inference often looks different in ComfyUI#
AI Toolkit training previews are rendered through a model-specific FLUX.2 pipeline, where text encoding, scheduling, and LoRA injection are designed to work together. In ComfyUI, rebuilding FLUX.2 with a different graph (or a different LoRA loader path) can change those interactions, so copying the same prompt, steps, CFG, and seed still produces visible drift. The RunComfy RC pipeline nodes close that gap by executing FLUX.2 end-to-end in Flux2Pipeline and applying your LoRA inside that pipeline, keeping inference aligned with preview behavior. Source: RunComfy open-source repositories.
How to use the FLUX.2 LoRA ComfyUI Inference workflow#
Step 1: Get the LoRA path and load it into the workflow (2 options)#
⚠️ Important · FLUX.2 access & Hugging Face token required#
FLUX.2 Dev models require explicit access authorization on Hugging Face.
Before running this workflow:
- Make sure your Hugging Face account has been granted access to FLUX.2 (Dev)
- Create a Hugging Face access token
- Paste your token into the
hf_tokenfield on the Load Pipeline node
Without a valid token and proper model access, the workflow will not run. For step-by-step instructions, see Hugging Face token for FLUX.2.
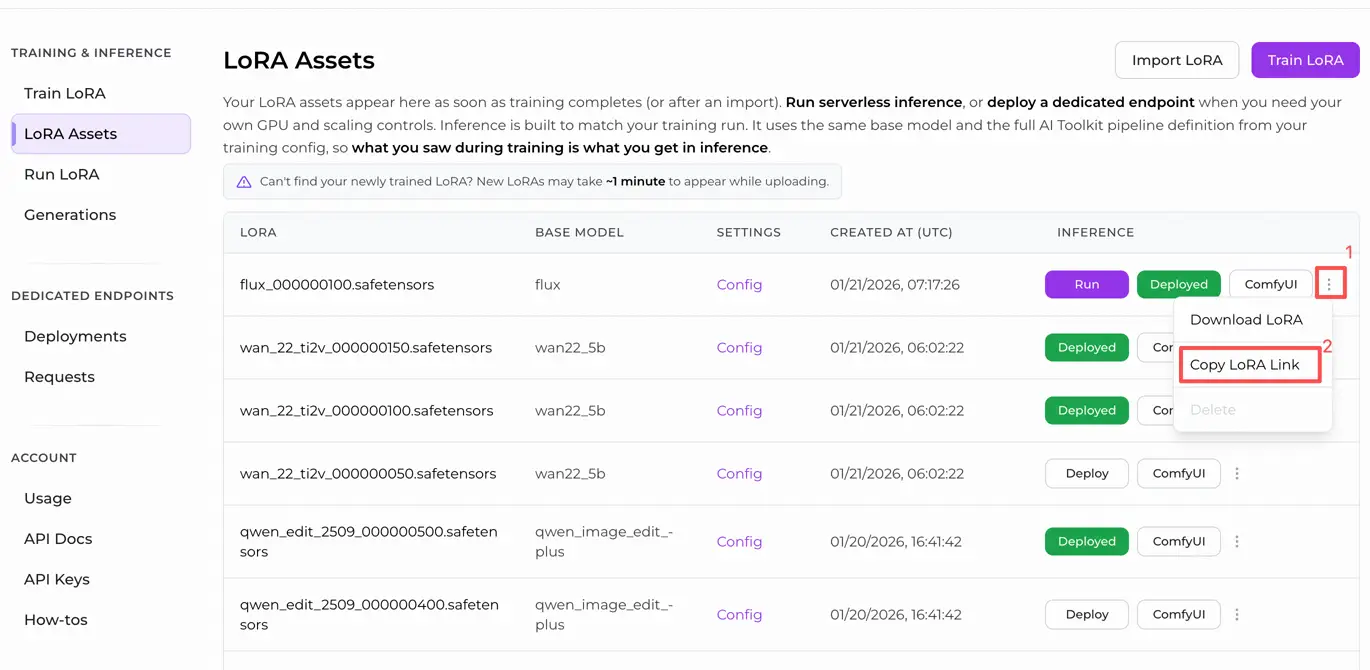
Option A — RunComfy training result → download to local ComfyUI:
- Go to Trainer → LoRA Assets
- Find the LoRA you want to use
- Click the ⋮ (three-dot) menu on the right → select Copy LoRA Link
- In the ComfyUI workflow page, paste the copied link into the Download input field at the top-right corner of the UI
- Before clicking Download, make sure the target folder is set to ComfyUI > models > loras (this folder must be selected as the download target)
- Click Download — this ensures the LoRA file is saved into the correct
models/lorasdirectory - After the download finishes, refresh the page
- The LoRA now appears in the LoRA select dropdown in the workflow — select it
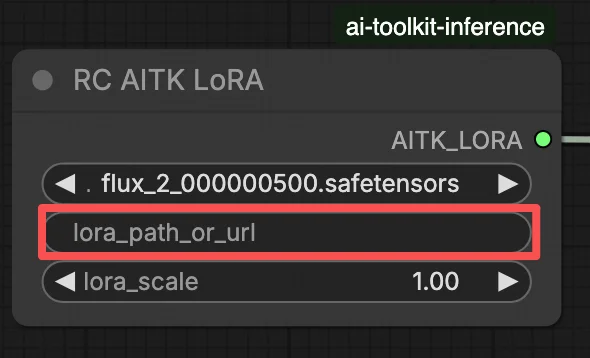
Option B — Direct LoRA URL (overrides Option A):
- Paste the direct
.safetensorsdownload URL into thepath / urlinput field of the LoRA node - When a URL is provided here, it overrides Option A — the workflow loads the LoRA directly from the URL at runtime
- No local download or file placement is required
Tip: confirm the URL resolves to the actual .safetensors file (not a landing page or redirect).
Step 2: Match inference parameters with your training sample settings#
In the LoRA node, select your adapter in lora_path (Option A), or paste a direct .safetensors link into path / url (Option B overrides the dropdown). Then set lora_scale to the same strength you used during training previews and adjust from there.
Remaining parameters are on the Generate node (and, depending on the graph, the Load Pipeline node):
prompt: your text prompt (include trigger words if you trained with them)width/height: output resolution; match your training preview size for the cleanest comparison (multiples of 16 are recommended for FLUX.2)sample_steps: number of inference steps (25 is a common default)guidance_scale: CFG/guidance value (4.0 is a common default)seed: fixed seed to reproduce; change it to explore variationsseed_mode(only if present): choosefixedorrandomizenegative_prompt(only if present): FLUX.2 is guidance-distilled in this workflow, so negative prompts are ignoredhf_token: Hugging Face access token; required for FLUX.2 Dev model download (paste it on the Load Pipeline node)
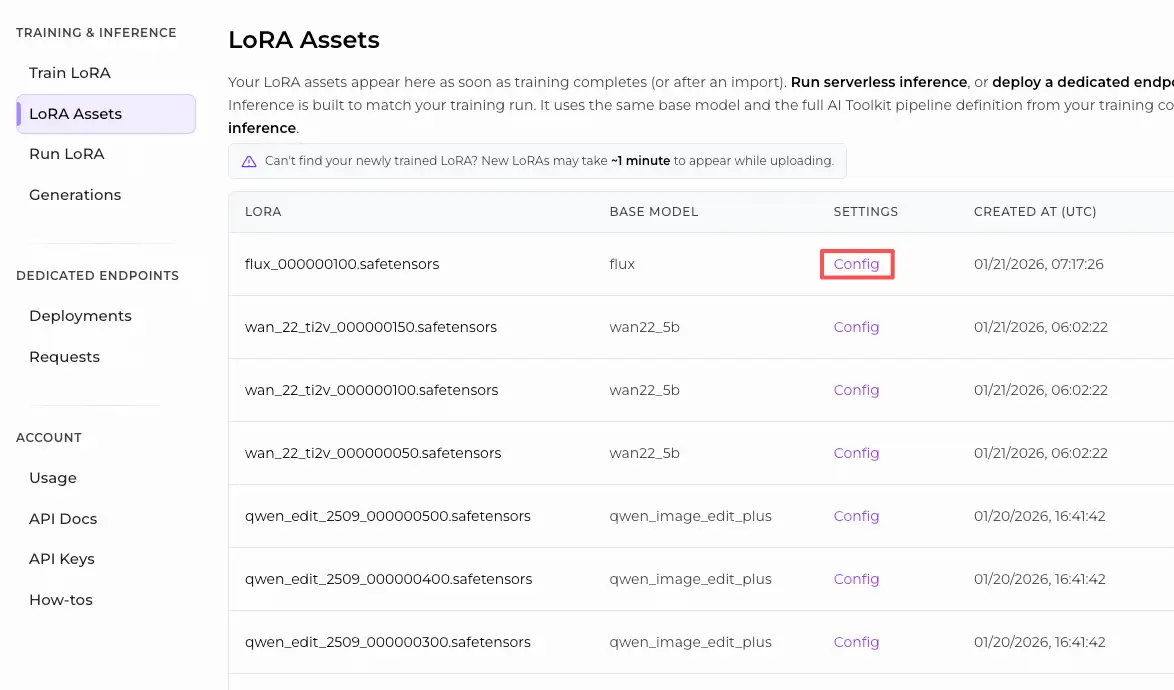
Training alignment tip: if you customized sampling values during training (seed, guidance_scale, sample_steps, trigger words, resolution), mirror those exact values here. If you trained on RunComfy, open Trainer → LoRA Assets > Config to view the resolved YAML and copy preview/sample settings into the workflow nodes.
Step 3: Run FLUX.2 LoRA ComfyUI Inference#
Click Queue/Run — the SaveImage node writes results to your ComfyUI output folder.
Quick checklist:
- ✓ LoRA is either: downloaded into
ComfyUI/models/loras(Option A), or loaded via a direct.safetensorsURL (Option B) - ✓ Page refreshed after local download (Option A only)
- ✓ Inference parameters match training
sampleconfig (if customized)
If everything above is correct, the inference results here should closely match your training previews.
Troubleshooting FLUX.2 LoRA ComfyUI Inference#
Most FLUX.2 “training preview vs ComfyUI inference” gaps come from pipeline-level differences (how the model is loaded, scheduled, and how the LoRA is merged), not from a single wrong knob. This RunComfy workflow restores the closest “training-matched” baseline by running inference through RC FLUX.2 Dev (Flux2Pipeline) end-to-end and applying your LoRA inside that pipeline via lora_path / lora_scale (instead of stacking generic loader/sampler nodes).
(1) Flux.2 with Lora error: "mul_cuda" not implemented for 'Float8_e4m3fn'#
Why this happens This typically occurs when FLUX.2 is loaded with Float8/FP8 weights (or mixed-precision quantization) and the LoRA is applied through a generic ComfyUI LoRA path. The LoRA merge can force unsupported Float8 ops (or mixed Float8 + BF16 promotions), which triggers the mul_cuda Float8 runtime error.
How to fix (recommended)
- Run inference through RC FLUX.2 Dev (Flux2Pipeline) and load the adapter only via
lora_path/lora_scaleso the LoRA merge happens in the AI Toolkit–aligned pipeline, not via a generic LoRA loader stacked on top. - If you are debugging in a non-RC graph: avoid applying a LoRA on top of Float8/FP8 diffusion weights. Use a BF16/FP16-compatible loading path for FLUX.2 before adding the LoRA.
(2) LoRA shape mismatches should fail fast instead of corrupting GPU state and causing OOM/system instability#
Why this happens This is almost always a base mismatch: the LoRA was trained for a different model family (for example FLUX.1) but is being applied to FLUX.2 Dev. You’ll often see many lora key not loaded lines and then shape mismatches; in the worst case the session can become unstable and end in OOMs.
How to fix (recommended)
- Make sure the LoRA was trained specifically for
black-forest-labs/FLUX.2-devwith AI Toolkit (FLUX.1 / FLUX.2 / Klein variants are not interchangeable). - Keep the graph “single-path” for LoRA: load the adapter only through the workflow’s
lora_pathinput and let Flux2Pipeline handle the merge. Don’t stack an additional generic LoRA loader in parallel. - If you already hit a mismatch and ComfyUI starts producing unrelated CUDA/OOM errors afterward, restart the ComfyUI process to fully reset the GPU + model state, then retry with a compatible LoRA.
(3) Flux.2 Dev - Using LoRAs more than doubles inference time#
Why this happens A LoRA can make FLUX.2 Dev much slower when the LoRA path forces extra patching/dequantization work or applies weights in a slower code path than the base model alone.
How to fix (recommended)
- Use this workflow’s RC FLUX.2 Dev (Flux2Pipeline) path and pass your adapter through
lora_path/lora_scale. In this setup, the LoRA is merged once during pipeline load (AI Toolkit-style), so the per-step sampling cost stays close to the base model. - When you’re chasing preview-matching behavior, avoid stacking multiple LoRA loaders or mixing loader paths. Keep it to one
lora_path+ onelora_scaleuntil the baseline matches.
Note In this FLUX.2 Dev workflow, FLUX.2 is guidance-distilled, so negative_prompt may be ignored by the pipeline even if a UI field exists—match previews using prompt wording + guidance_scale + lora_scale first.
Run FLUX.2 LoRA ComfyUI Inference now#
Open the workflow, set lora_path, and click Queue/Run to get FLUX.2 Dev LoRA results that stay close to your AI Toolkit training previews.