
Hey there! In this guide, we're going to dive into the exciting world of ControlNet in ComfyUI. Let's explore together what it brings to the table and how it can spice up your projects!
We will cover:
- 3.1. Loading the “Apply ControlNet” Node in ComfyUI
- 3.2. Inputs of “Apply ControlNet” Node
- 3.3. Outputs of “Apply ControlNet” Node
- 3.4. Parameters for fine-tuning “Apply ControlNet”
- 5.1. ControlNet Openpose
- 5.2. ControlNet Tile
- 5.3. ControlNet Canny
- 5.4. ControlNet Depth
- 5.5. ControlNet Lineart
- 5.6. ControlNet Scribbles
- 5.7. ControlNet Segmentation
- 5.8. ControlNet Shuffle
- 5.9. ControlNet Inpainting
- 5.10. ControlNet MLSD
- 5.11. ControlNet Normalmaps
- 5.12. ControlNet Soft Edge
- 5.13. ControlNet IP2P (Instruct Pix2Pix)
- 5.14. T2I Adapter
- 5.15. Other Popular ControlNet: QRCode Monster and IP-Adapter
6. How to Use Multiple ControlNets#
7. Experience ComfyUI ControlNet Now!#
🌟🌟🌟 ComfyUI Online - Experience the ControlNet Workflow Now 🌟🌟🌟#
If you're interested in exploring the ControlNet workflow, use the following ComfyUI web. It comes fully equipped with all the essential customer nodes and models, enabling seamless creativity without the need for manual setups. Start gaining hands-on experience by experimenting with ControlNet's features immediately, or continue with this tutorial to learn how to use ControlNet effectively.
For more advanced and premium ComfyUI workflows, visit our 🌟ComfyUI Workflow List🌟#
1. What is ControlNet?#
ControlNet is a transformative technology that significantly enhances the capabilities of text-to-image diffusion models, allowing for unprecedented spatial control in image generation. As a neural network architecture, ControlNet seamlessly integrates with large-scale, pre-trained models such as Stable Diffusion. It leverages the extensive training of these models—built on billions of images to introduce spatial conditions into the image creation process. These conditions can range from edges and human poses to depth and segmentation maps, enabling users to guide the image generation in ways not previously possible with text prompts alone.
2. The Technical Aspects Behind ControlNet#
The genius of ControlNet lies in its distinctive methodology. Initially, it secures the original model's parameters, ensuring that the foundational training remains unaltered. Subsequently, ControlNet introduces a clone of the model's encoding layers for training, utilizing "zero convolutions." These specially designed convolutional layers start with zero weights, carefully integrating new spatial conditions. This approach prevents any disruptive noise from intervening, preserving the model's original proficiency while initiating new learning trajectories.
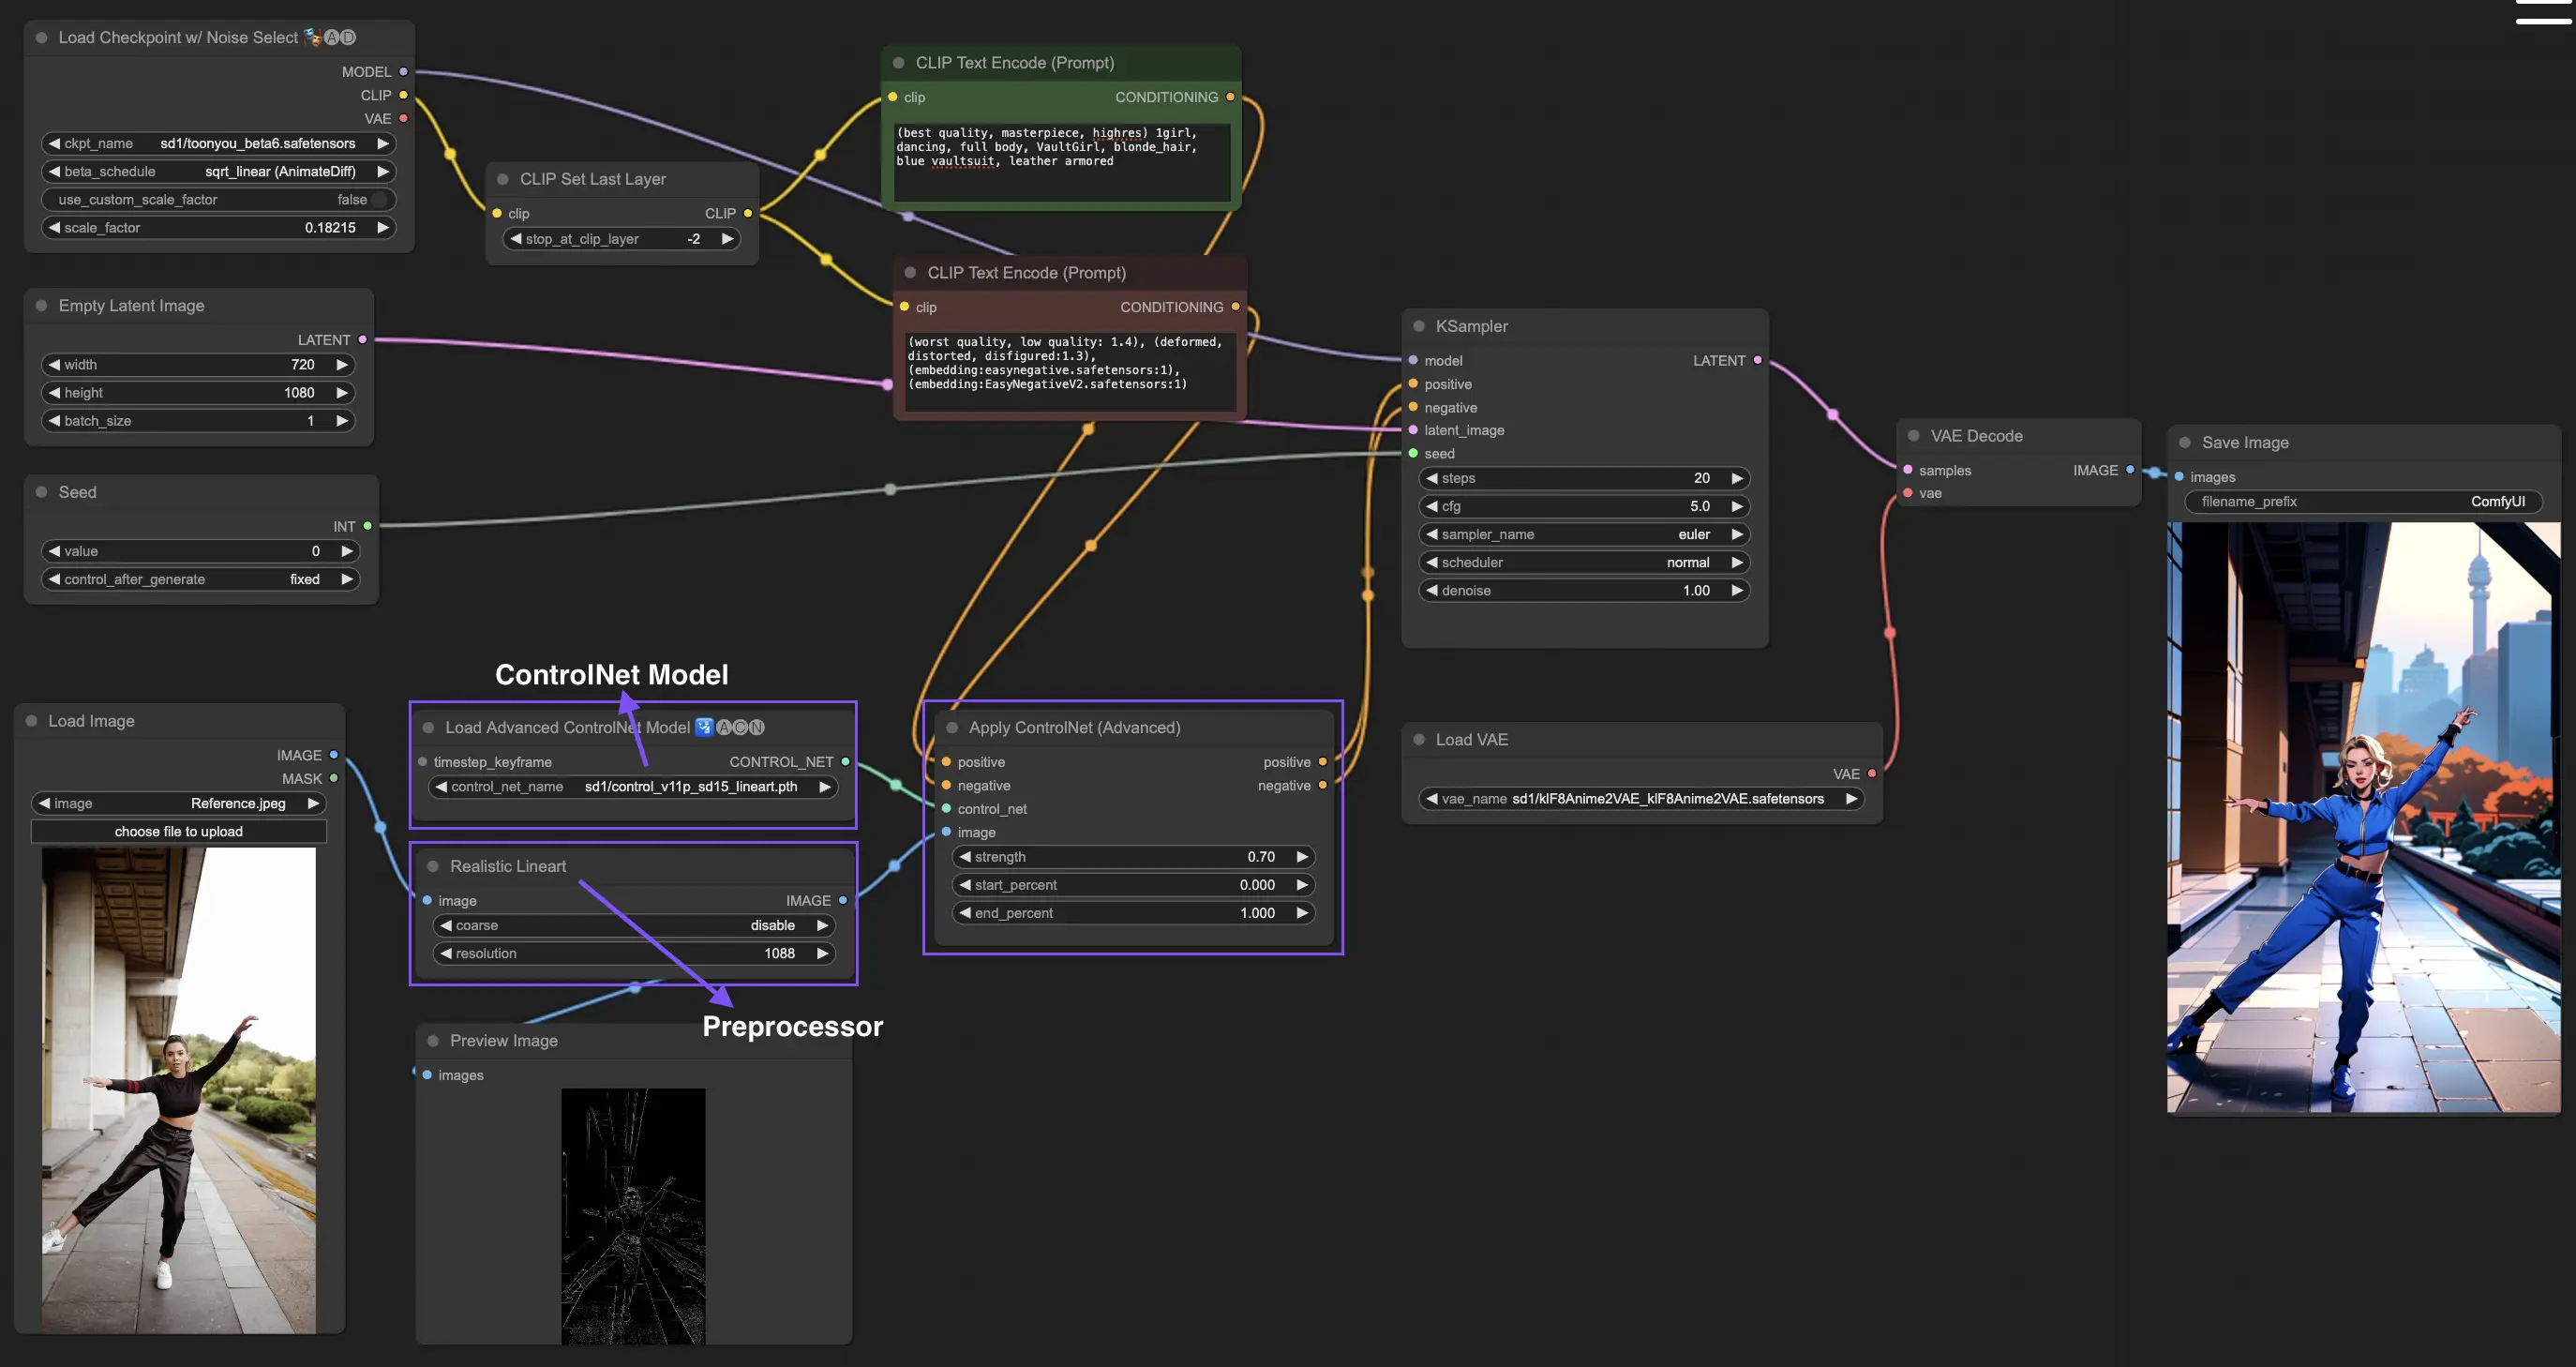
3. How to Use ComfyUI ControlNet: Basic Steps#
Traditionally, stable diffusion models employ text prompts as the conditioning mechanism to guide the generation of images, aligning the output with the specifics of the text prompt. ControlNet introduces an additional form of conditioning to this process, enhancing the capability of steering the generated imagery more precisely according to both textual and visual inputs.
3.1. Loading the “Apply ControlNet” Node in ComfyUI#
This step integrates ControlNet into your ComfyUI workflow, enabling the application of additional conditioning to your image generation process. It lays the foundation for applying visual guidance alongside text prompts.
3.2. Inputs of “Apply ControlNet” Node#
Positive and Negative Conditioning: These inputs are crucial for defining the desired outcomes and the aspects to avoid in the generated image. They should be linked to "Positive prompt" and "Negative prompt" respectively, aligning with the textual conditioning part of the process.
ControlNet Model: This input should be connected to the output of the "Load ControlNet Model" node. This step is essential for selecting and incorporating either a ControlNet or a T2IAdaptor model into your workflow, thereby ensuring that the diffusion model benefits from the specific guidance provided by your chosen model. Each model, whether a ControlNet or a T2IAdaptor, is rigorously trained to influence the image generation process according to certain data types or stylistic preferences. Given that the functionalities of many T2IAdaptor models closely align with those of ControlNet models, our focus will predominantly be on ControlNet models in our subsequent discussion. However, we will also highlight some of the more popular T2IAdaptors for completeness.
Preprocessor: The "image" input must be connected to a “ControlNet Preprocessor” node, which is crucial for adapting your image to meet the specific requirements of the ControlNet model you are utilizing. It is imperative to use the correct preprocessor tailored to your selected ControlNet model. This step ensures that the original image undergoes necessary modifications — such as adjustments in format, size, color, or the application of specific filters — to optimize it for the ControlNet's guidelines. After this preprocessing phase, the original image is replaced with the modified version, which ControlNet then utilizes. This process guarantees that your input images are precisely prepared for the ControlNet process.
3.3. Outputs of “Apply ControlNet” Node#
The "Apply ControlNet" node generates two crucial outputs: Positive and Negative Conditioning. These outputs, imbued with the nuanced effects of ControlNet and visual guidance, play a pivotal role in steering the diffusion model's behavior in ComfyUI. Following this, you're presented with a choice: proceed to the KSampler for the sampling phase to further polish the generated image, or, for those pursuing an even higher level of detail and customization in their creation, continue to layer additional ControlNets. This advanced technique of integrating more ControlNets allows for a more granular manipulation of the image's attributes, offering an enhanced toolkit for creators aiming to achieve unmatched precision and control in their visual outputs.
3.4. Parameters for fine-tuning “Apply ControlNet”#
Strength: This parameter determines the intensity of ControlNet's effect on the generated image in ComfyUI. A value of 1.0 implies full strength, meaning the ControlNet's guidance will have maximum influence on the diffusion model's output. Conversely, a value of 0.0 indicates no influence, essentially disabling the effect of ControlNet on the image generation process.
Start Percent: This parameter specifies the starting point, as a percentage of the diffusion process, where ControlNet begins to influence the generation. For example, setting a start percent of 20% means the ControlNet's guidance will start affecting the image generation from the 20% mark of the diffusion process onwards.
End Percent: Analogous to the "Start Percent," the "End Percent" parameter defines the point at which ControlNet's influence ceases. For instance, an end percent of 80% would mean that ControlNet's guidance stops influencing the image generation at the 80% completion mark of the diffusion process, leaving the final phases unaffected.
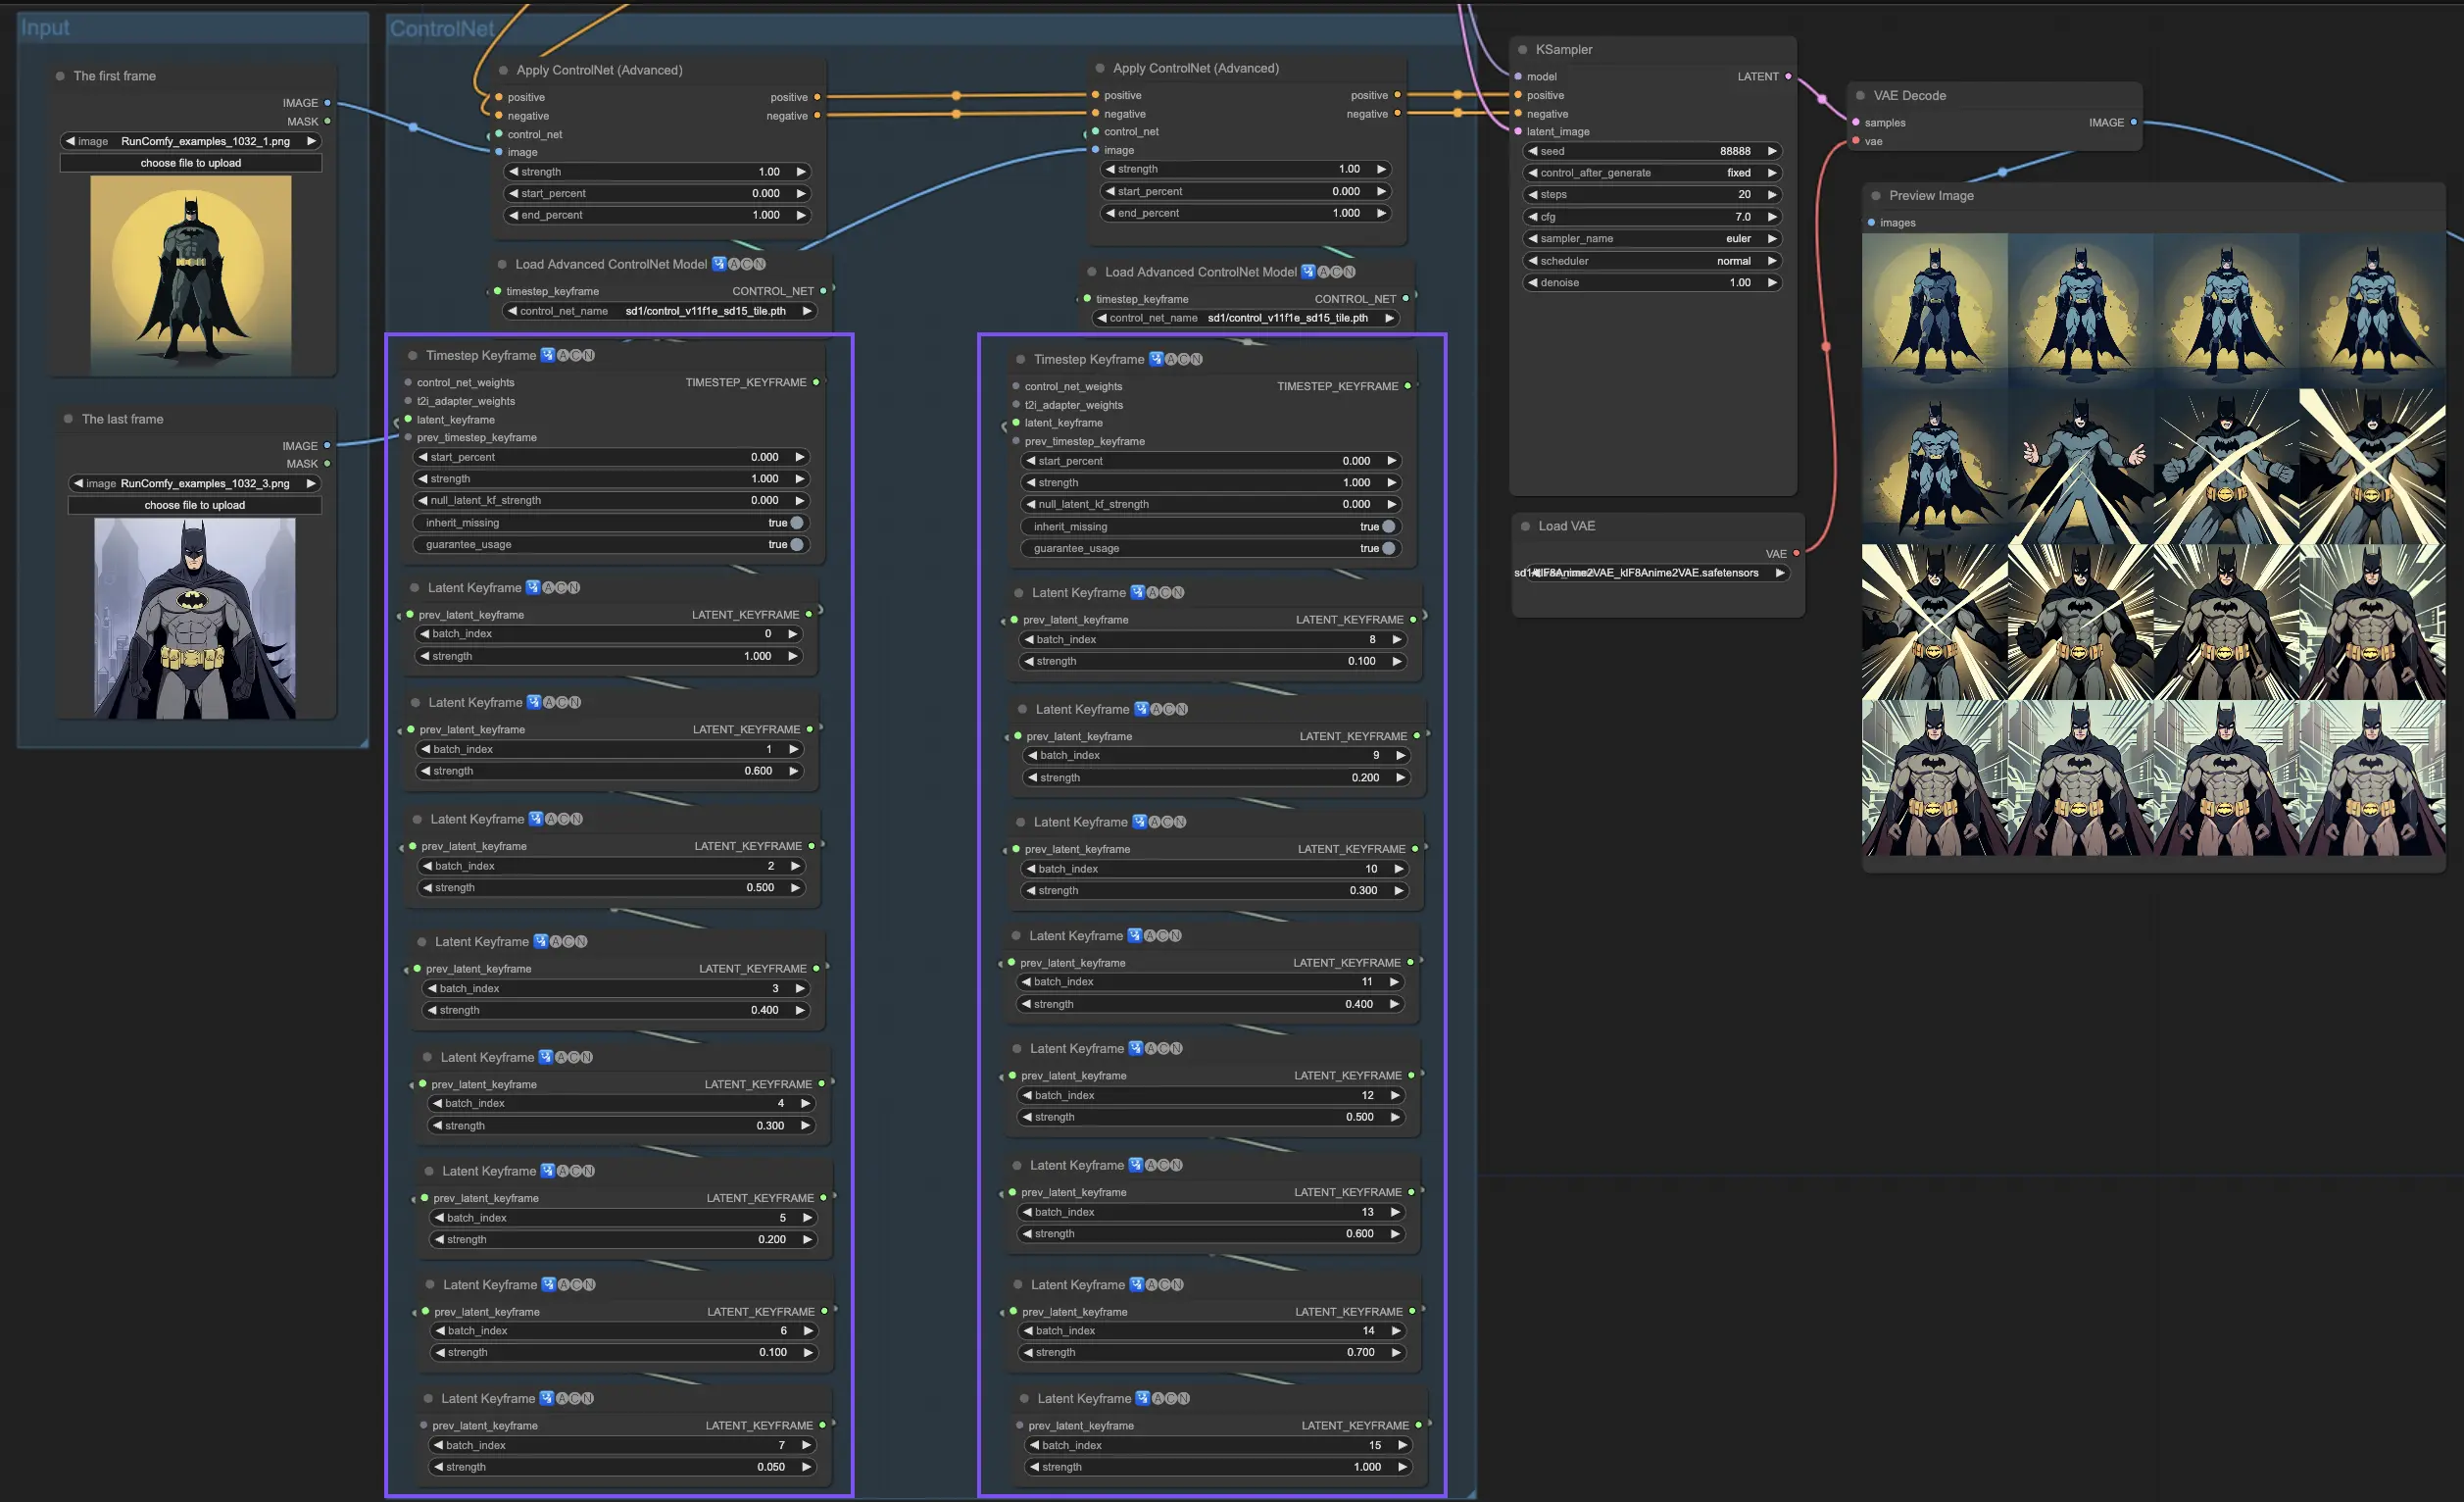
4. How to Use ComfyUI ControlNet: Advanced Features - Timestep Keyframes#
Timestep Keyframes in ControlNet offer sophisticated control over the behavior of AI-generated content, especially when timing and progression are crucial, such as in animations or evolving visuals. Here's a detailed breakdown of the key parameters to help you utilize them effectively and intuitively:
prev_timestep_kf: Think of prev_timestep_kf as linking hands with the keyframe that comes before in a sequence. By connecting keyframes, you create a smooth transition or a storyboard that guides the AI through the generation process, step by step, ensuring that each phase flows logically into the next.
cn_weights: cn_weights are useful for fine-tuning the output by adjusting specific features within the ControlNet during different phases of the generation process.
latent_keyframe: latent_keyframe allows you to adjust how strongly each part of the AI model influences the final outcome during a particular phase of the generation process. For example, if you're generating an image where the foreground should become more detailed as the process evolves, you can increase the strength for the aspects (latents) of the model responsible for foreground details in later keyframes. Conversely, if certain features should fade into the background over time, you can reduce their strength in subsequent keyframes. This level of control is particularly useful in creating dynamic, evolving visuals or in projects where precise timing and progression are crucial.
mask_optional: Use attention masks as spotlights, focusing the ControlNet's influence on specific areas of your image. Whether it's highlighting a character in a scene or emphasizing a background element, these masks can either apply uniformly or vary in intensity, directing the AI's attention precisely where you want it.
start_percent: start_percent marks the cue for when your keyframe comes into play, measured as a percentage of the overall generation process. Setting this is like scheduling an actor's entrance on stage, ensuring they appear at just the right moment in the performance.
strength: strength provides a high-level control over the overall influence of the ControlNet.
null_latent_kf_strength: For any actors (latents) you haven't explicitly directed in this scene (keyframe), null_latent_kf_strength acts as a default instruction, telling them how to perform in the background. It ensures no part of the generation is left without guidance, maintaining a coherent output even in areas you haven't specifically addressed.
inherit_missing: Activating inherit_missing allows your current keyframe to adopt any unspecified settings from its predecessor, like a younger sibling inheriting clothes. It's a useful shortcut that ensures continuity and coherence without needing to repeat instructions.
guarantee_usage: guarantee_usage is your guarantee that, no matter what, the current keyframe will have its moment to shine in the process, even if it's just for a brief instance. It ensures that every keyframe you've set up has an impact, honoring your detailed planning in guiding the AI's creative process.
Timestep Keyframes offer the precision needed to meticulously guide the AI's creative process, enabling you to craft the narrative or visual journey exactly as you envision it. They serve as a powerful tool to orchestrate the evolution of visuals, particularly in animation, from the opening scene right through to the conclusion. Here's a closer look at how Timestep Keyframes can be strategically applied to manage the progression of an animation, ensuring a seamless transition from the initial frame to the final one, perfectly aligning with your artistic goals.
5. Various ControlNet/T2IAdaptor Models: Detailed Overview#
Given that the functionalities of many T2IAdaptor models closely align with those of ControlNet models, our focus will predominantly be on ControlNet models in our subsequent discussion. However, we will also highlight some of the more popular T2IAdaptors for completeness.
5.1. ComfyUI ControlNet Openpose#
- Openpose (=Openpose body): The foundational model within ControlNet that identifies basic body keypoints such as eyes, nose, neck, shoulders, elbows, wrists, knees, and ankles. It is ideal for basic human pose replication.
- Openpose_face: Extends the OpenPose model by adding facial keypoints detection, offering a more detailed analysis of facial expressions and orientation. This ControlNet model is essential for projects focusing on facial expressions.
- Openpose_hand: Augments the OpenPose model with the capability to capture intricate details of hands and fingers, focusing on detailed hand gestures and positions. This addition enhances the versatility of OpenPose within ControlNet.
- Openpose_faceonly: A specialized model for facial details only, omitting body keypoints to concentrate on capturing expressions and facial orientations. This model within ControlNet focuses exclusively on facial features.
- Openpose_full: A comprehensive amalgamation of OpenPose, OpenPose_face, and OpenPose_hand models, offering complete detection of the full body, face, and hands for total human pose replication within ControlNet.
- DW_Openpose_full: An enhanced version of the OpenPose_full model, incorporating additional refinements for even more detailed and accurate pose detection. This version represents the pinnacle of pose detection accuracy within the ControlNet framework.
Preprocessor: Openpose or DWpose

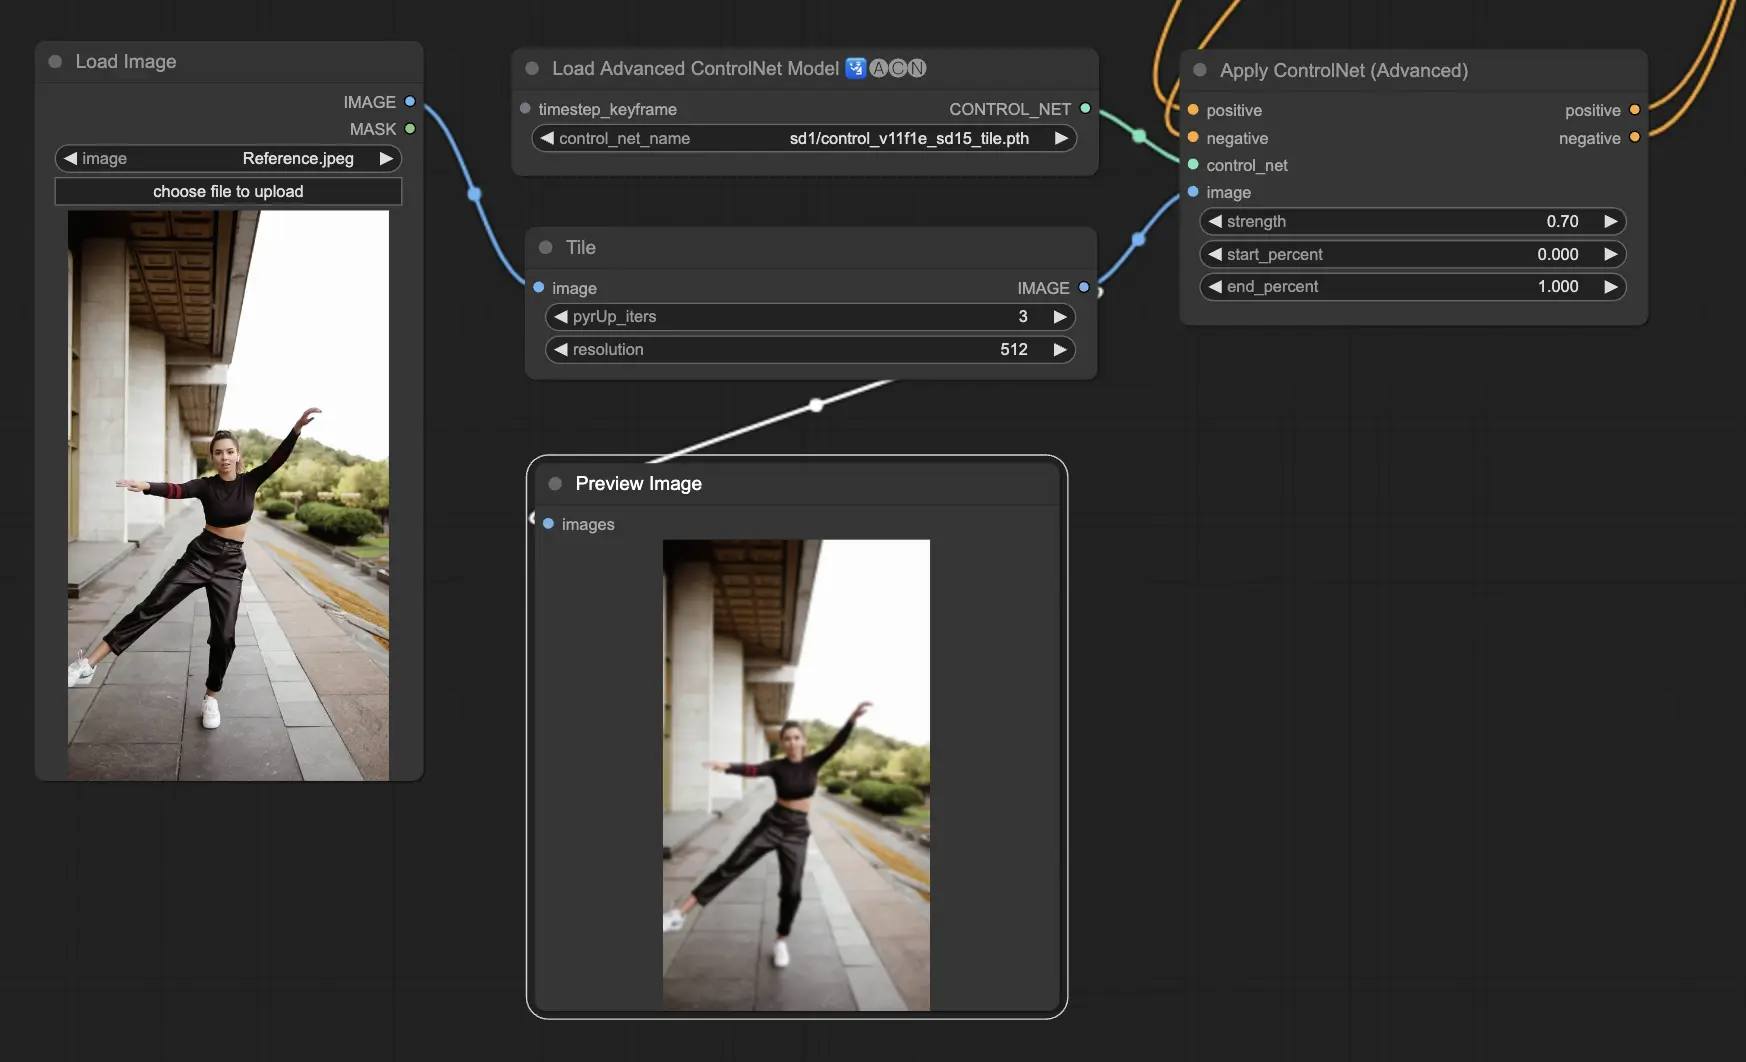
5.2. ComfyUI ControlNet Tile#
The Tile Resample model is used for detail enhancement in images. It is particularly useful in conjunction with an upscaler to improve image resolution while adding finer details, often utilized to sharpen and enrich textures and elements within an image.
Preprocessor: Tile
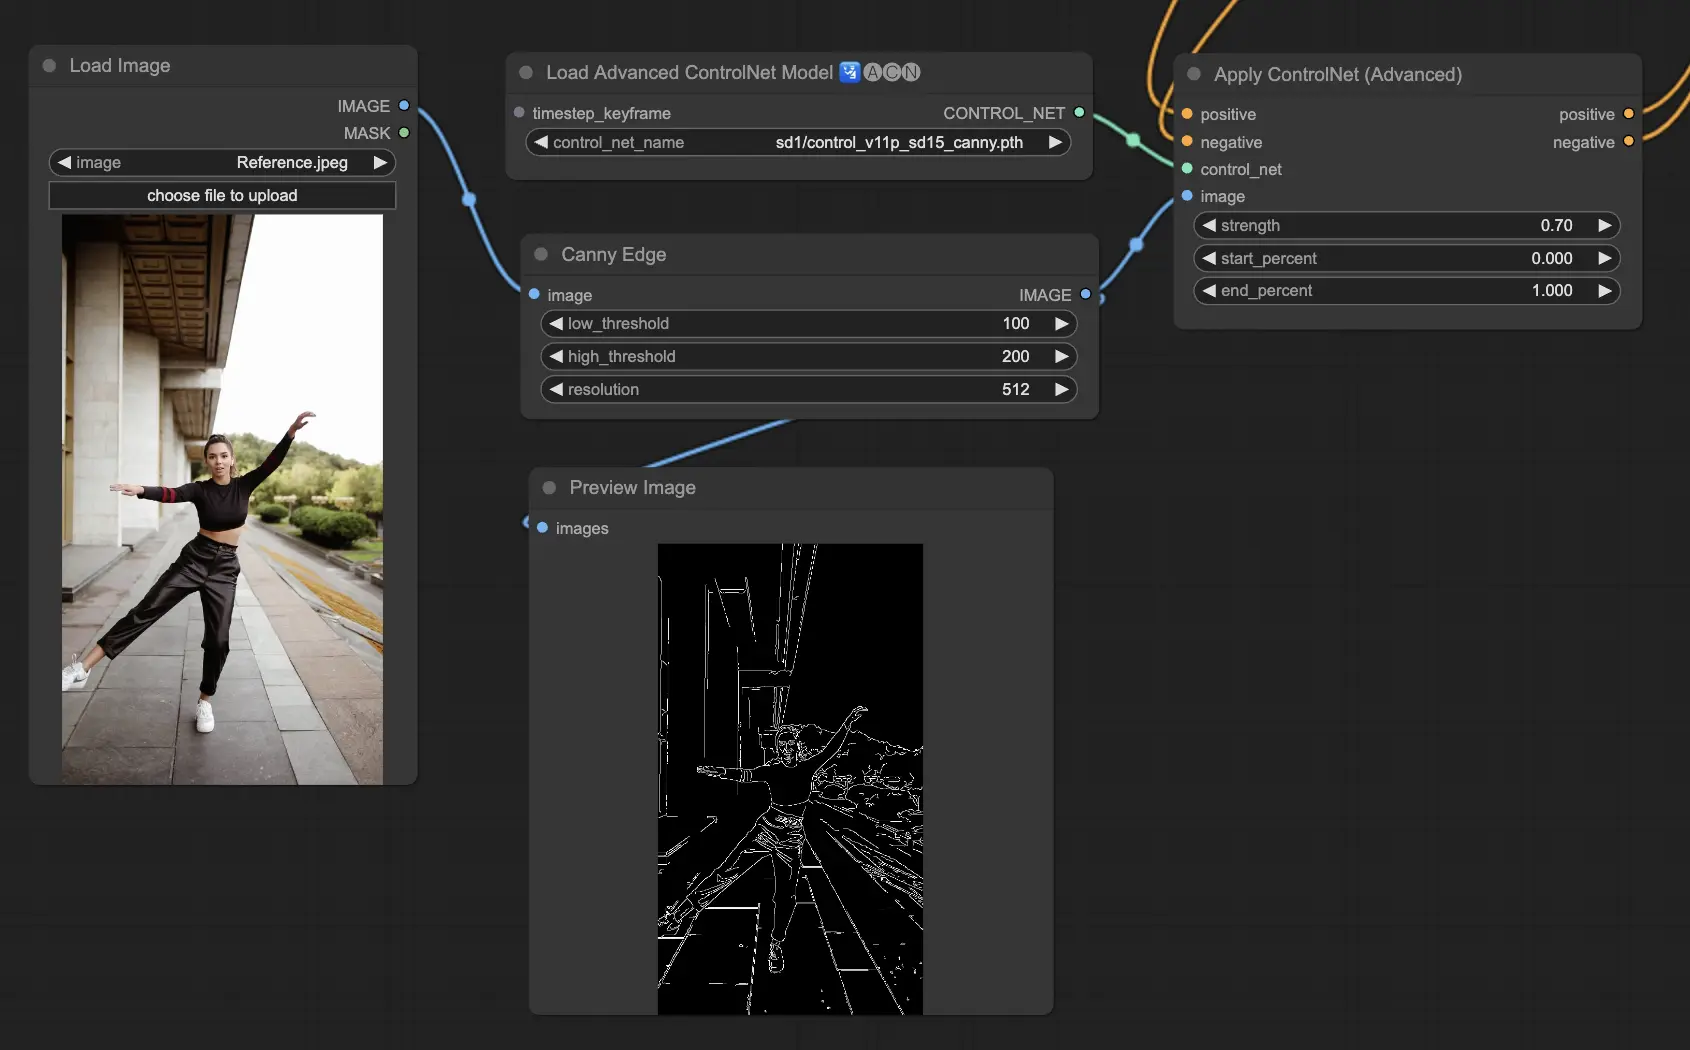
5.3. ComfyUI ControlNet Canny#
The Canny model applies the Canny edge detection algorithm, a multi-stage process to detect a wide range of edges in images. This model is beneficial for preserving the structural aspects of an image while simplifying its visual composition, making it useful for stylized art or pre-processing before further image manipulation.
Preprocessors: Canny
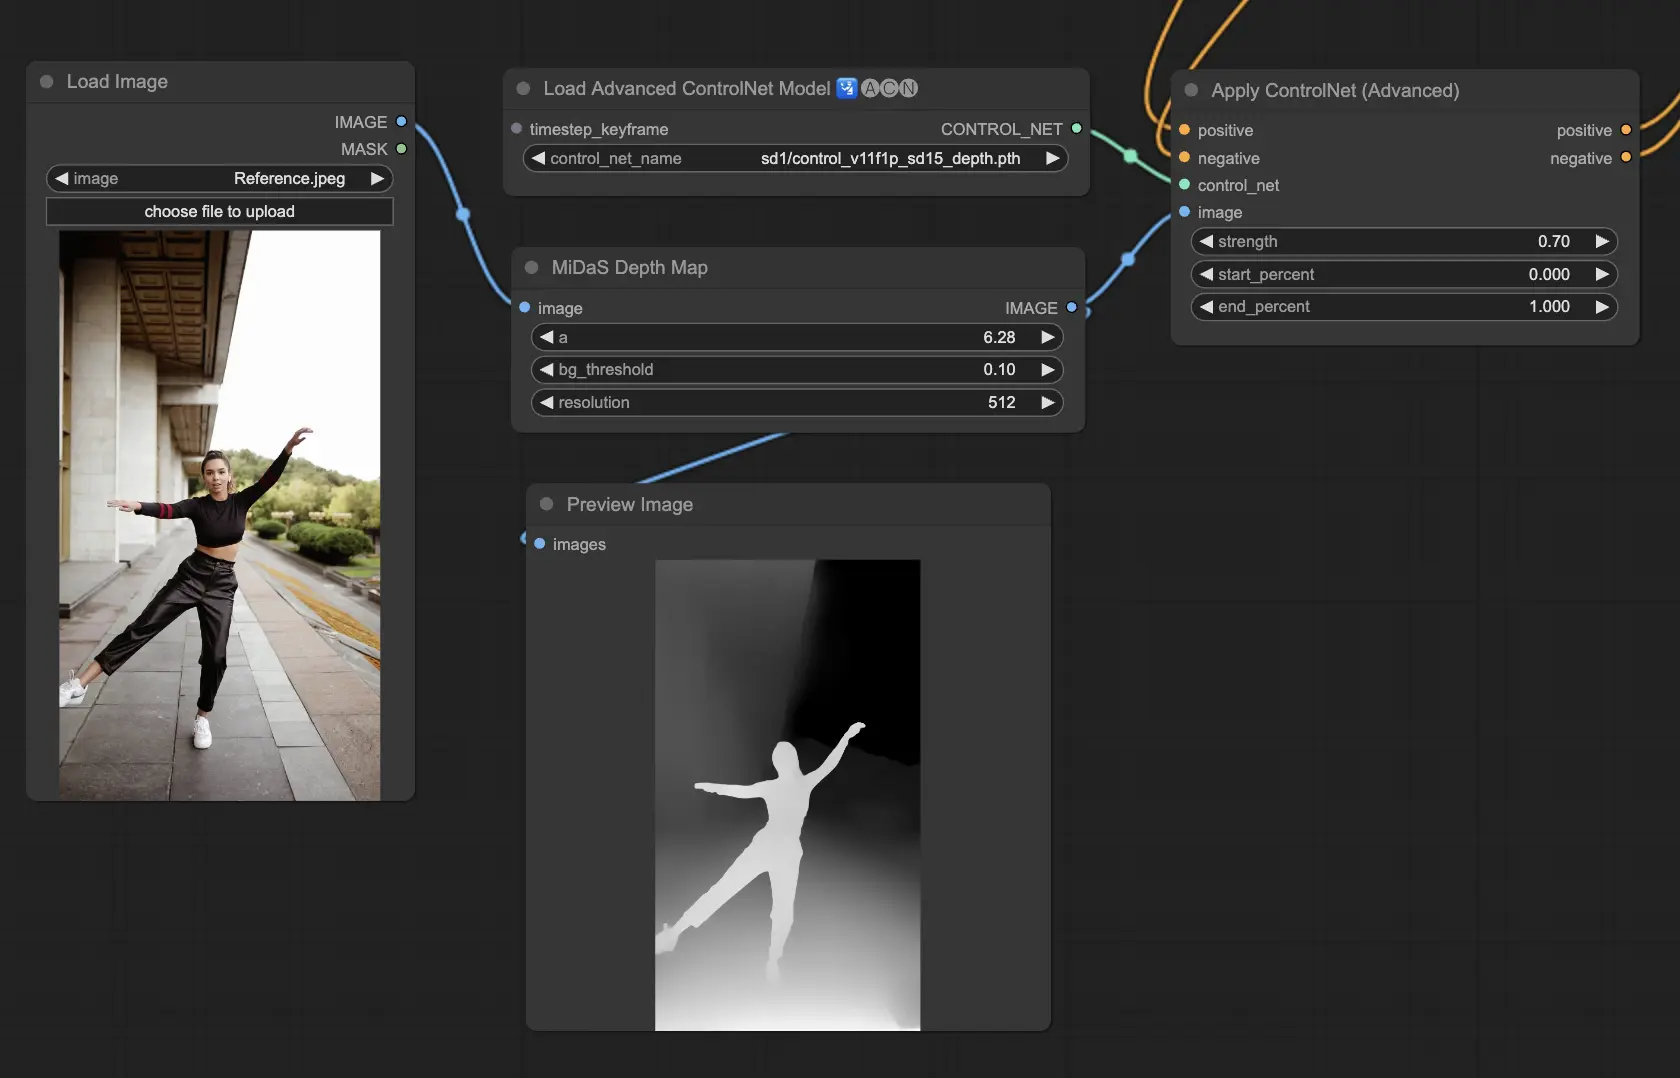
5.4. ComfyUI ControlNet Depth#
Depth models infer depth information from a 2D image, translating perceived distance into a grayscale depth map. Each variant offers a different balance between detail capture and background emphasis:
- Depth Midas: Provides a classic depth estimation, balancing detail and background rendering.
- Depth Leres: Focuses on enhancing details with a tendency to include more background elements.
- Depth Leres++: Offers an advanced level of detail for depth information, ideal for complex scenes.
- Zoe: Strikes a balance between the Midas and Leres models in terms of detail level.
- Depth Anything: A newer, improved model for depth estimation, designed for a wide range of scenes.
- Depth Hand Refiner: Specifically designed for improving hand details in depth maps, useful for scenes where hand positioning is critical.
Preprocessors: Depth_Midas, Depth_Leres, Depth_Zoe, Depth_Anything, MeshGraphormer_Hand_Refiner. This model is highly robust and can work on real depth map from rendering engines.
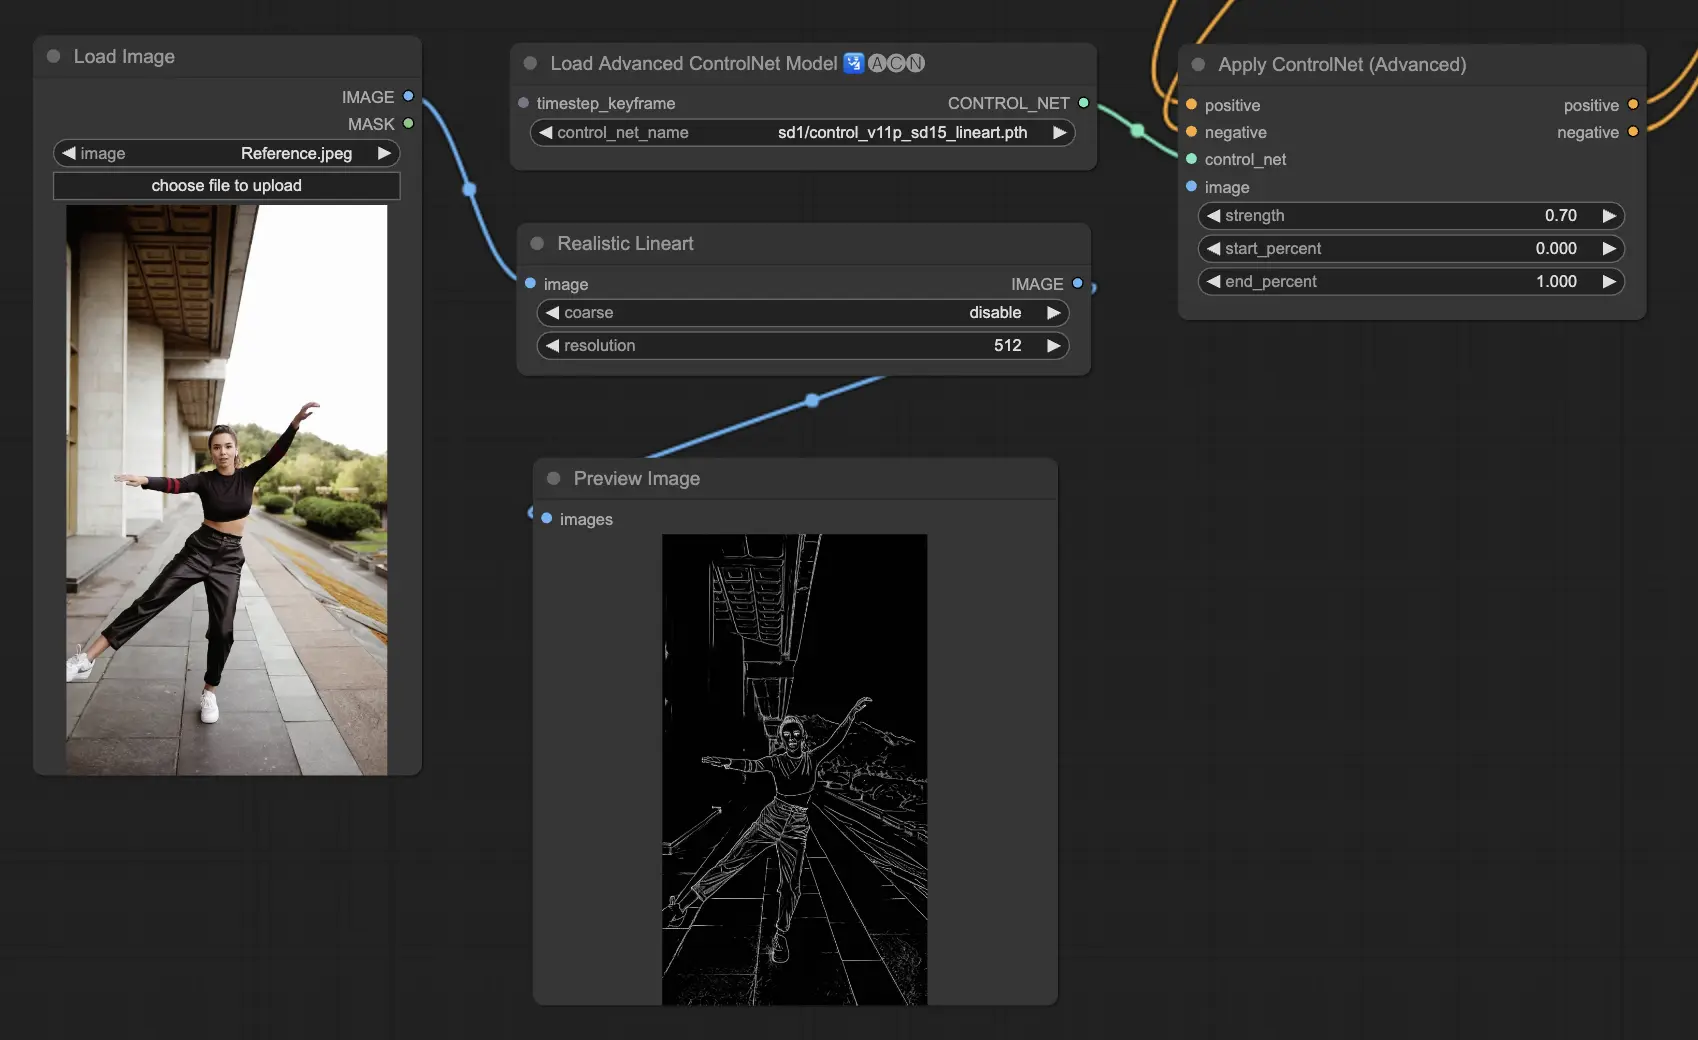
5.5. ComfyUI ControlNet Lineart#
Lineart models convert images into stylized line drawings, useful for artistic renditions or as a base for further creative work:
- Lineart: This standard model converts images into stylized line drawings, offering a versatile base for various artistic or creative projects.
- Lineart anime: Focuses on generating anime-style line drawings, characterized by clean and precise lines, making it suitable for projects aiming for an anime aesthetic.
- Lineart realistic: Produces line drawings with a more realistic touch, capturing the essence of the subject with greater detail, perfect for projects requiring a lifelike representation.
- Lineart coarse: Delivers a more pronounced line drawing with heavier, bolder lines, creating a striking effect that stands out, especially suitable for bold artistic expressions.
The preprocessor can generate detailed or coarse linearts from images (Lineart and Lineart_Coarse)
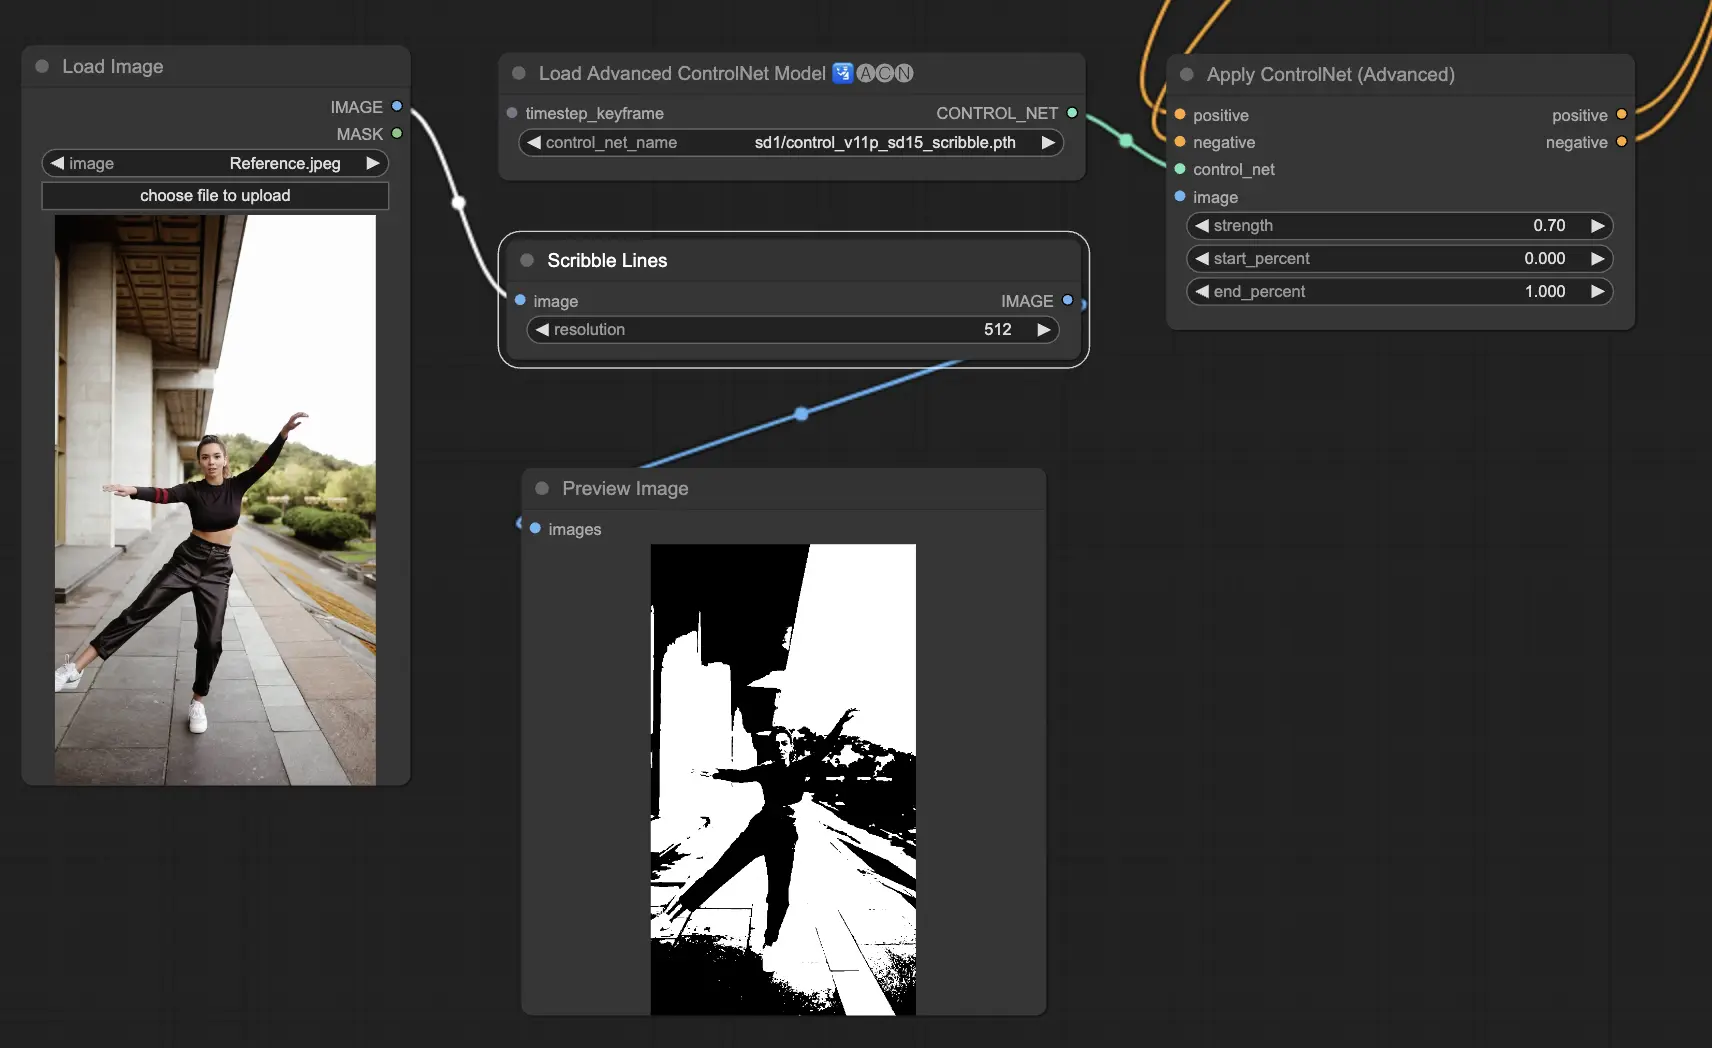
5.6. ComfyUI ControlNet Scribbles#
Scribble models are designed to transform images into a scribble-like appearance, simulating the look of hand-drawn sketches. They are particularly useful for artistic restyling or as a preliminary step in a larger design workflow:
- Scribble: Designed to convert images into detailed artworks that simulate hand-drawn scribbles or sketches.
- Scribble HED: Utilizes Holistically-Nested Edge Detection (HED) to create outlines that resemble hand-drawn sketches. It's recommended for recoloring and restyling images, adding a unique artistic flair to the artwork.
- Scribble Pidinet: Focuses on detecting pixel differences to produce cleaner lines with reduced detail, making it ideal for clearer, more abstract representations. Scribble Pidinet is perfect for those seeking crisp curves and straight edges, offering a polished look while preserving essential details
- Scribble xdog: Employs the Extended Difference of Gaussian (xDoG) method for edge detection. This allows for adjustable threshold settings to fine-tune the scribble effect, making it possible to control the level of detail in your artwork. xDoG is versatile, enabling users to strike the perfect balance in their artistic creations
Preprocessors: Scribble, Scribble_HED, Scribble_PIDI, and Scribble_XDOG
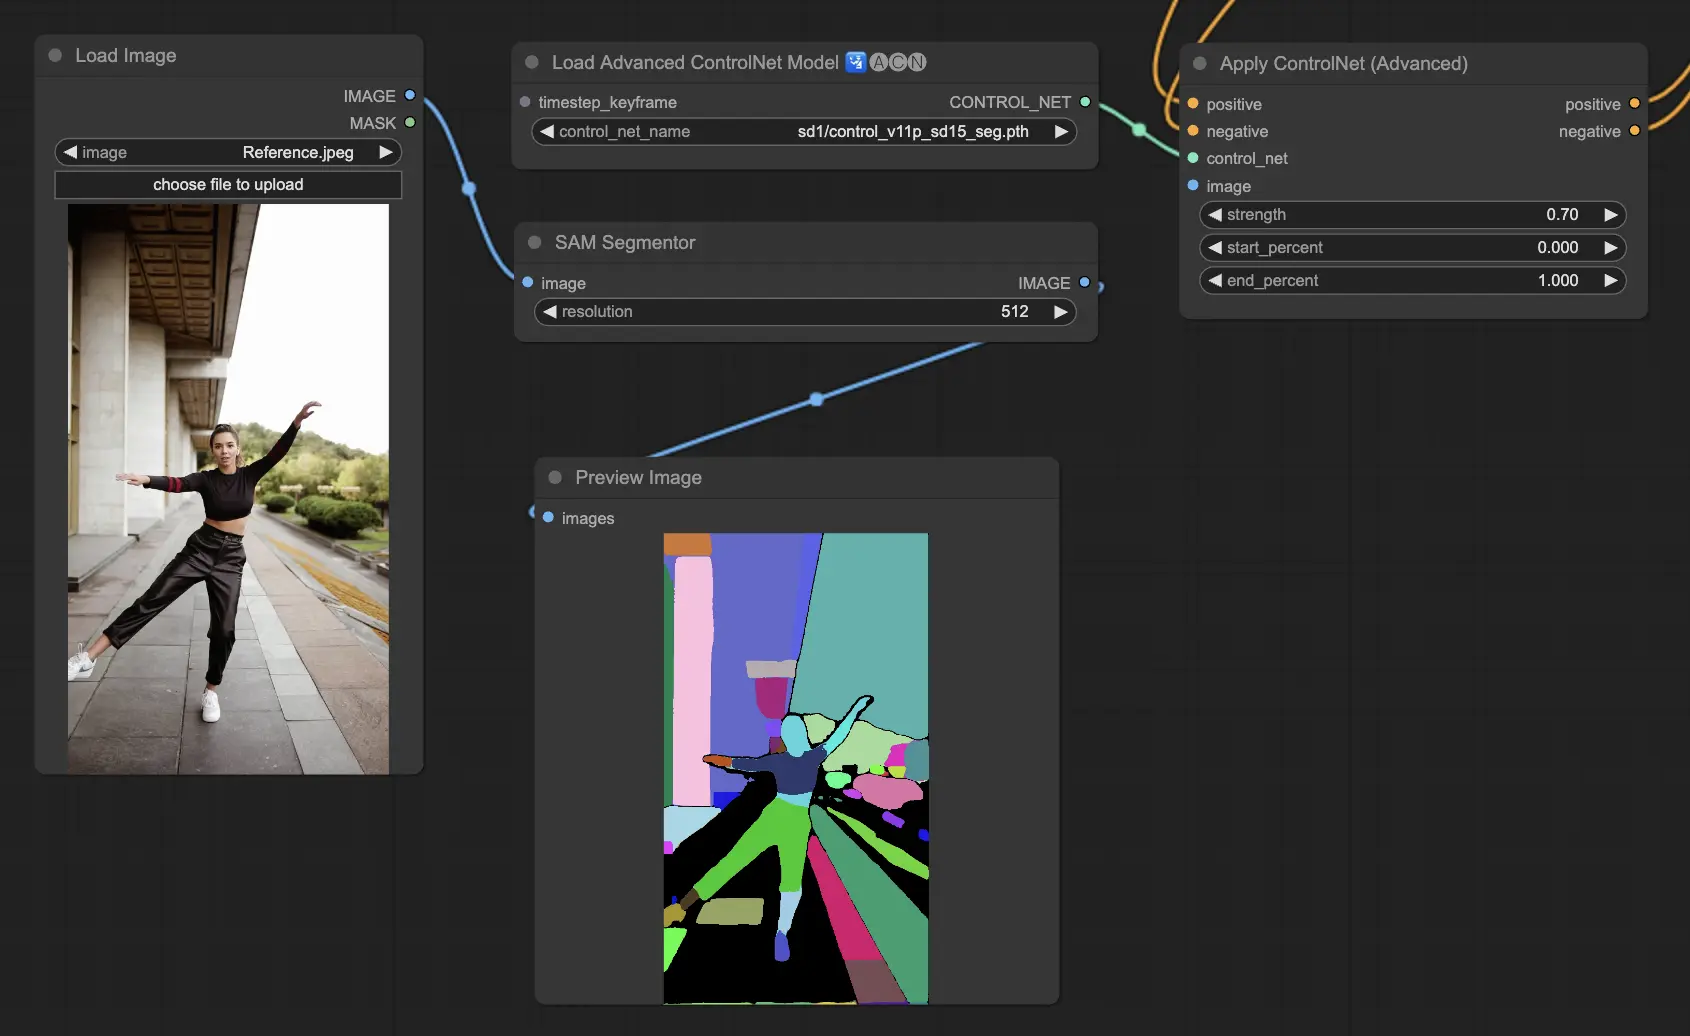
5.7. ComfyUI ControlNet Segmentation#
Segmentation models categorize image pixels into distinct object classes, each represented by a specific color. This is invaluable for identifying and manipulating individual elements within an image, such as separating foreground from background or differentiating objects for detailed editing.
- Seg: Designed to differentiate objects within an image by color, effectively translating these distinctions into distinct elements in the output. For example, it can separate furniture in a room layout, making it particularly valuable for projects requiring precise control over image composition and editing
- ufade20k: Utilizes the UniFormer segmentation model trained on the ADE20K dataset, capable of distinguishing a broad array of object types with high accuracy.
- ofade20k: Employs the OneFormer segmentation model, also trained on ADE20K, offering an alternative approach to object differentiation with its unique segmentation capabilities.
- ofcoco: Leverages OneFormer segmentation trained on the COCO dataset, tailored for images with objects categorized within the COCO dataset's parameters, facilitating precise object identification and manipulation.
Acceptable Preprocessors: Sam, Seg_OFADE20K (Oneformer ADE20K), Seg_UFADE20K (Uniformer ADE20K), Seg_OFCOCO (Oneformer COCO), or manually created masks.
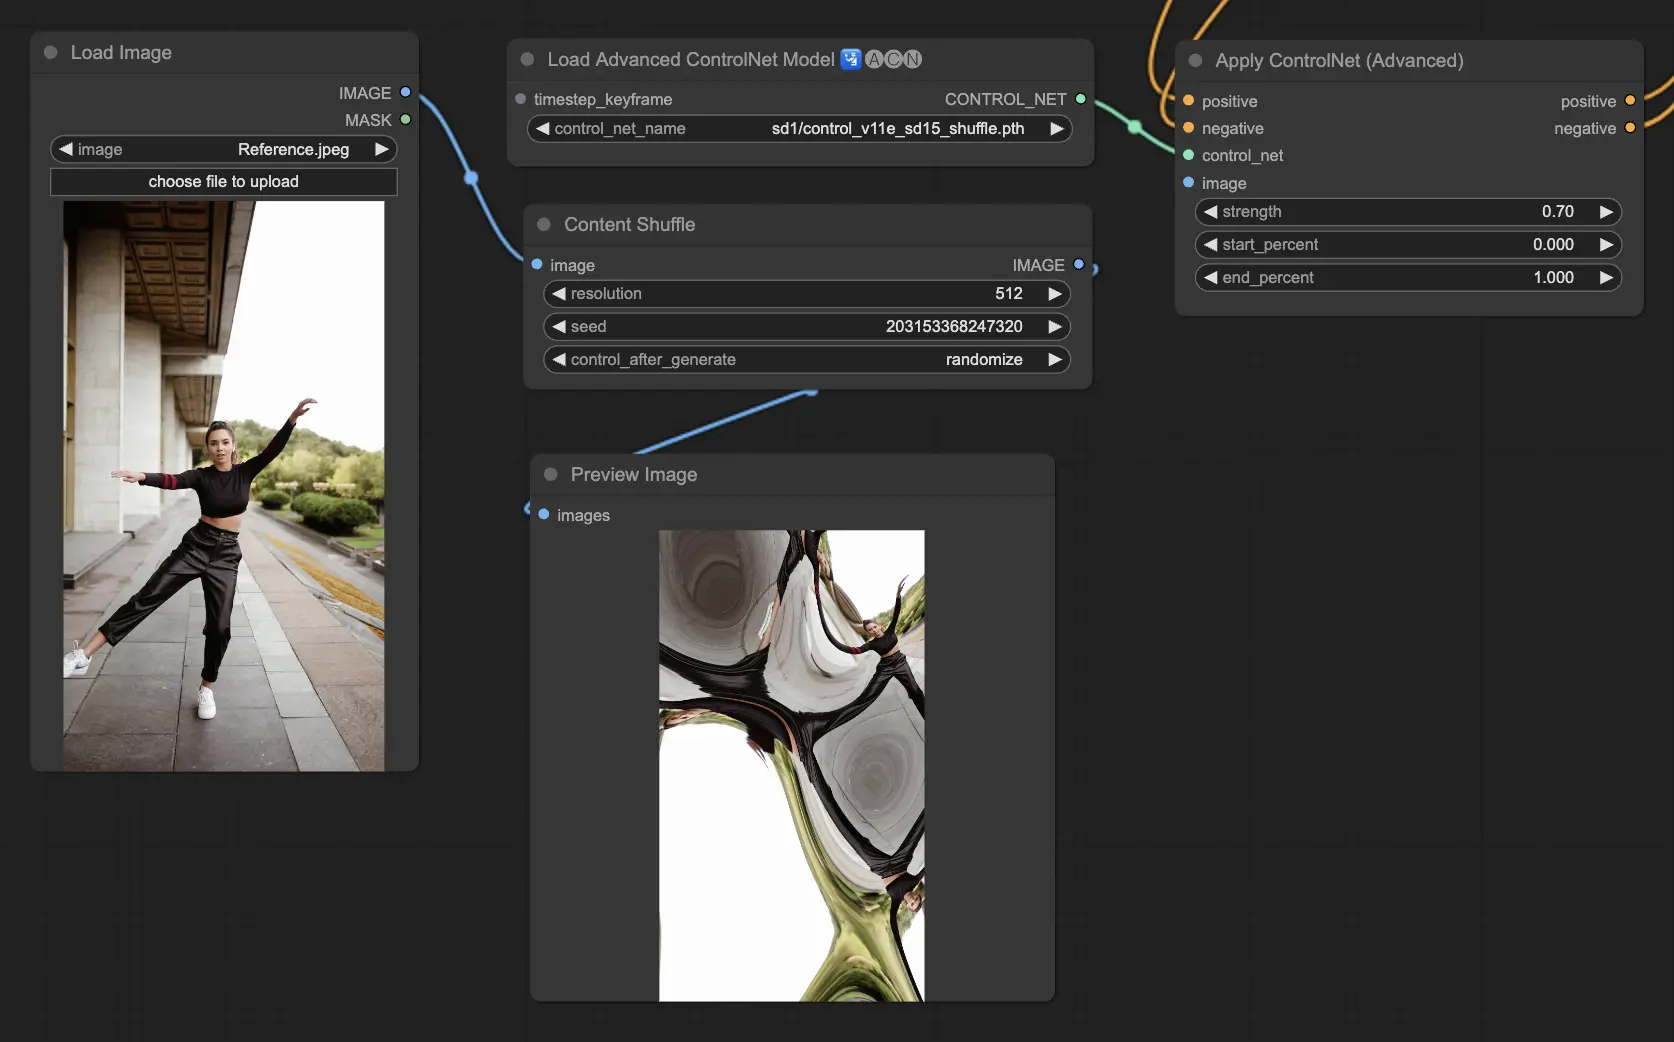
5.8. ComfyUI ControlNet Shuffle#
The Shuffle model introduces a novel approach by randomizing the input image's attributes, such as color schemes or textures, without altering the composition. This model is particularly effective for creative explorations and generating variations of an image with retained structural integrity but altered visual aesthetics. Its randomized nature means that each output is unique, influenced by the seed value used in the generation process.
Preprocessors: Shuffle
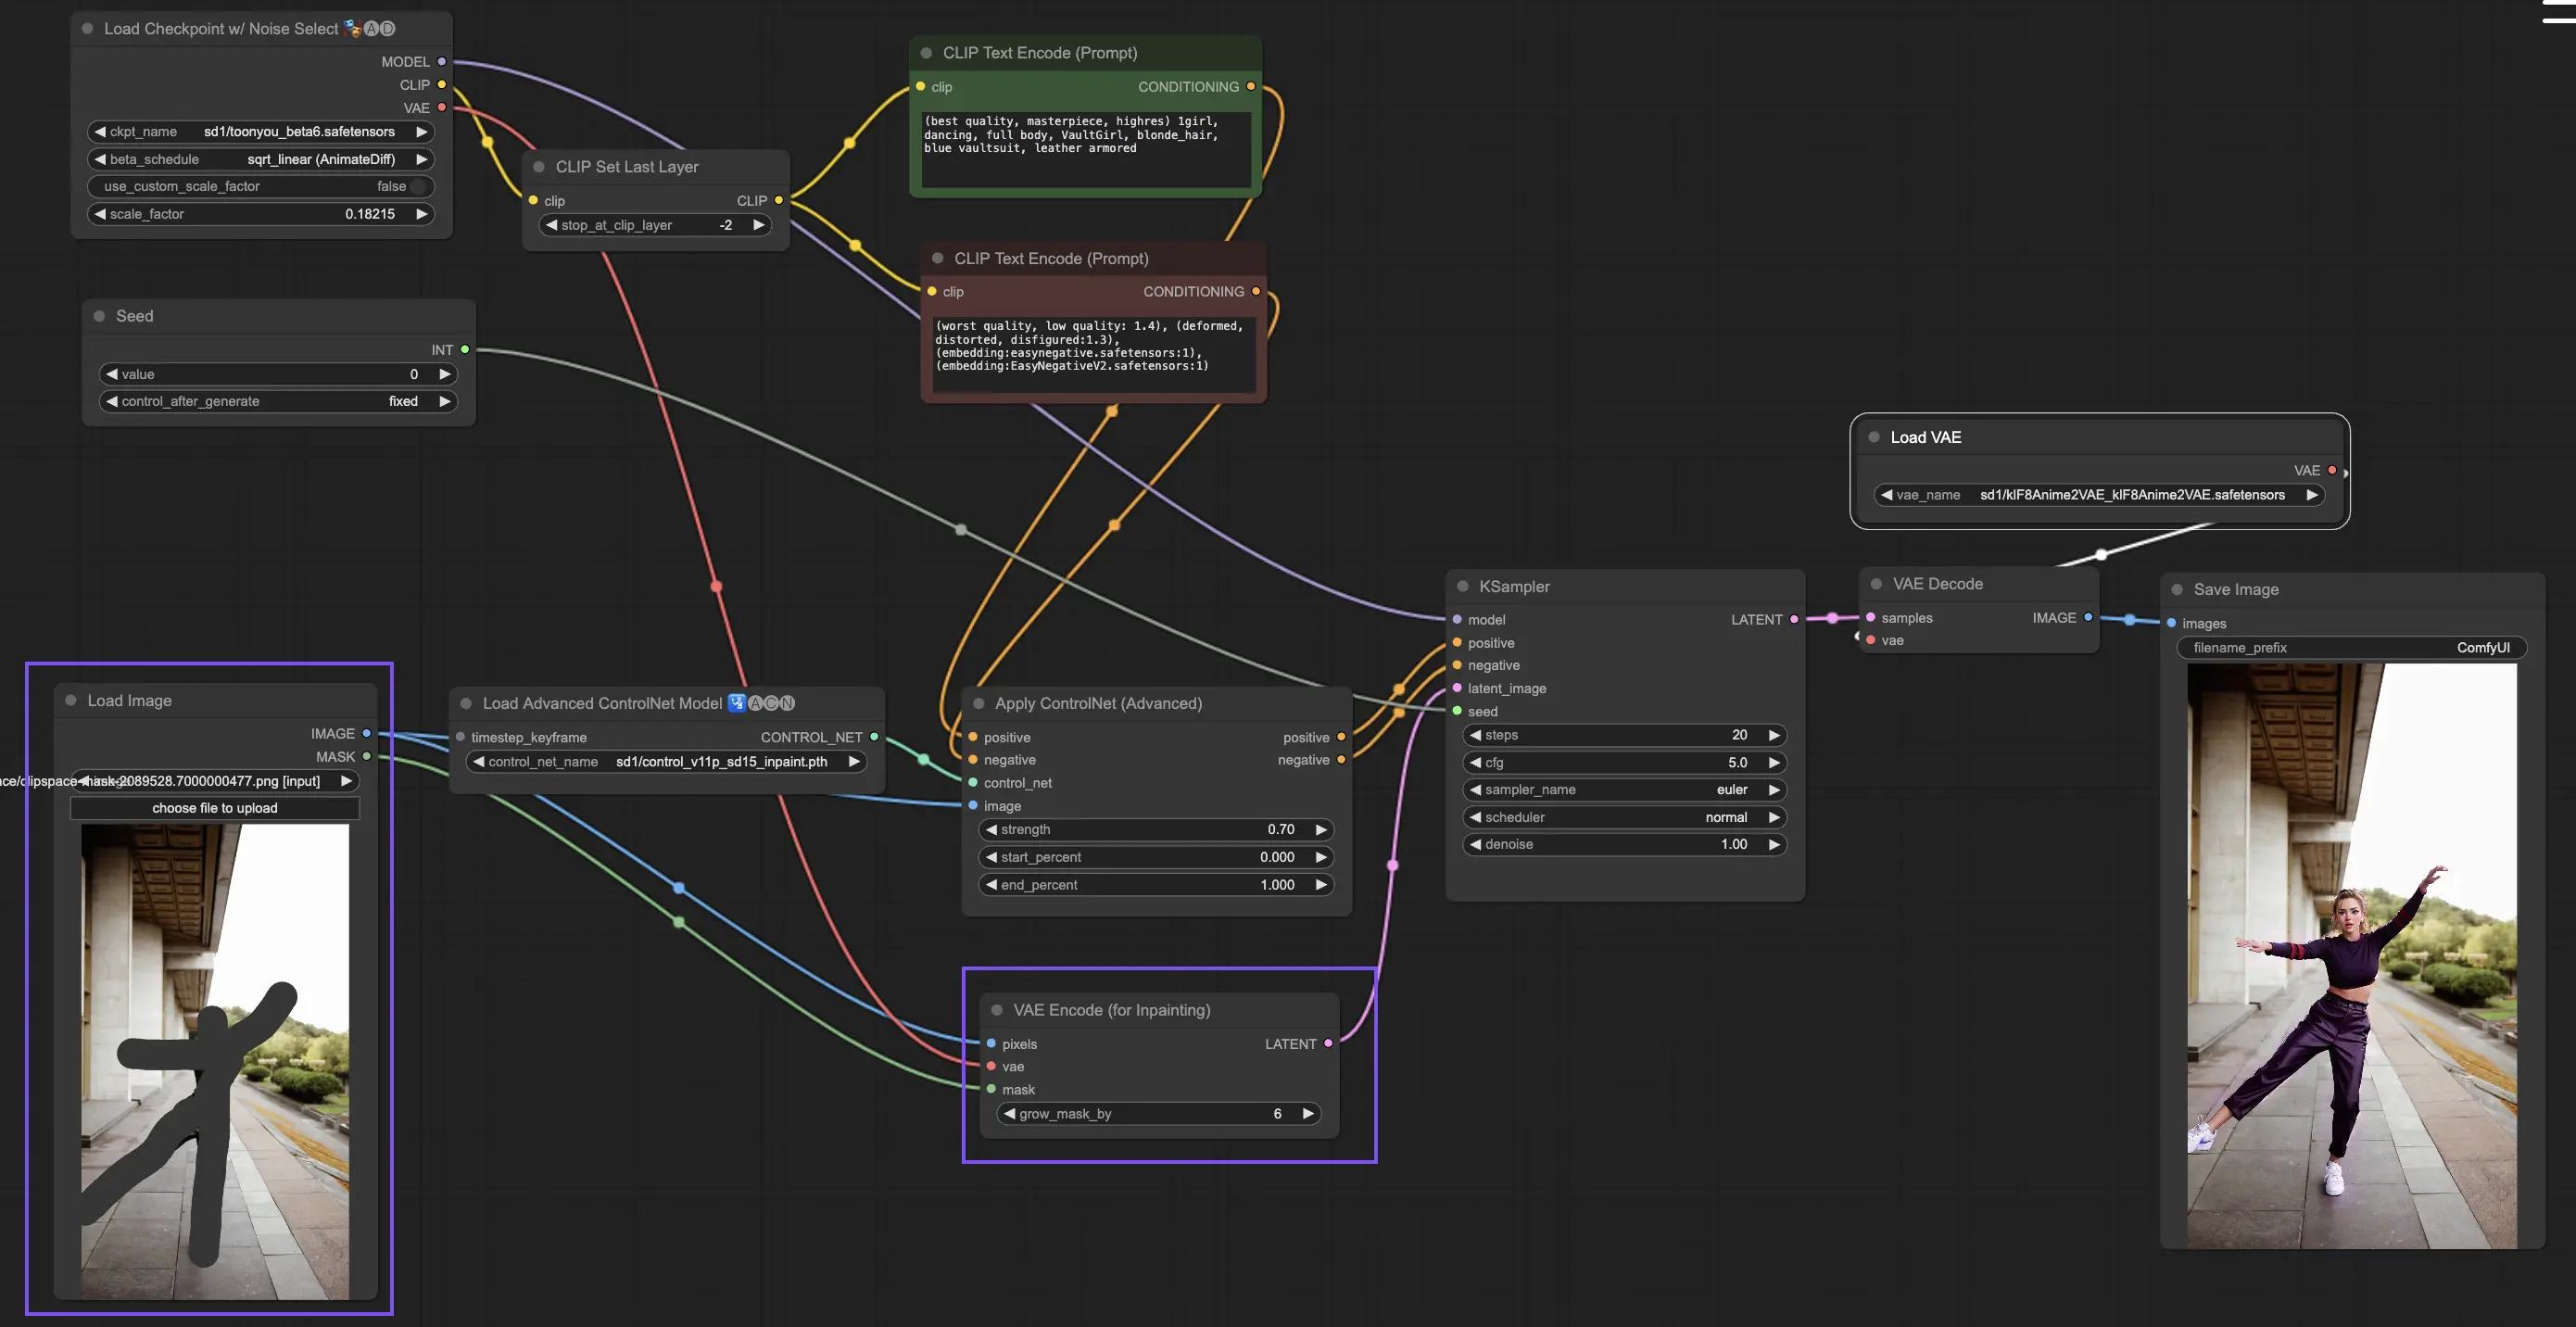
5.9. ComfyUI ControlNet Inpainting#
Inpainting models within ControlNet allow for refined editing within specific areas of an image, maintaining overall coherence while introducing significant variations or corrections.
To utilize ControlNet Inpainting, begin by isolating the area you wish to regenerate through masking. This can be done by right-clicking on the desired image and selecting "Open in MaskEditor" for modifications.
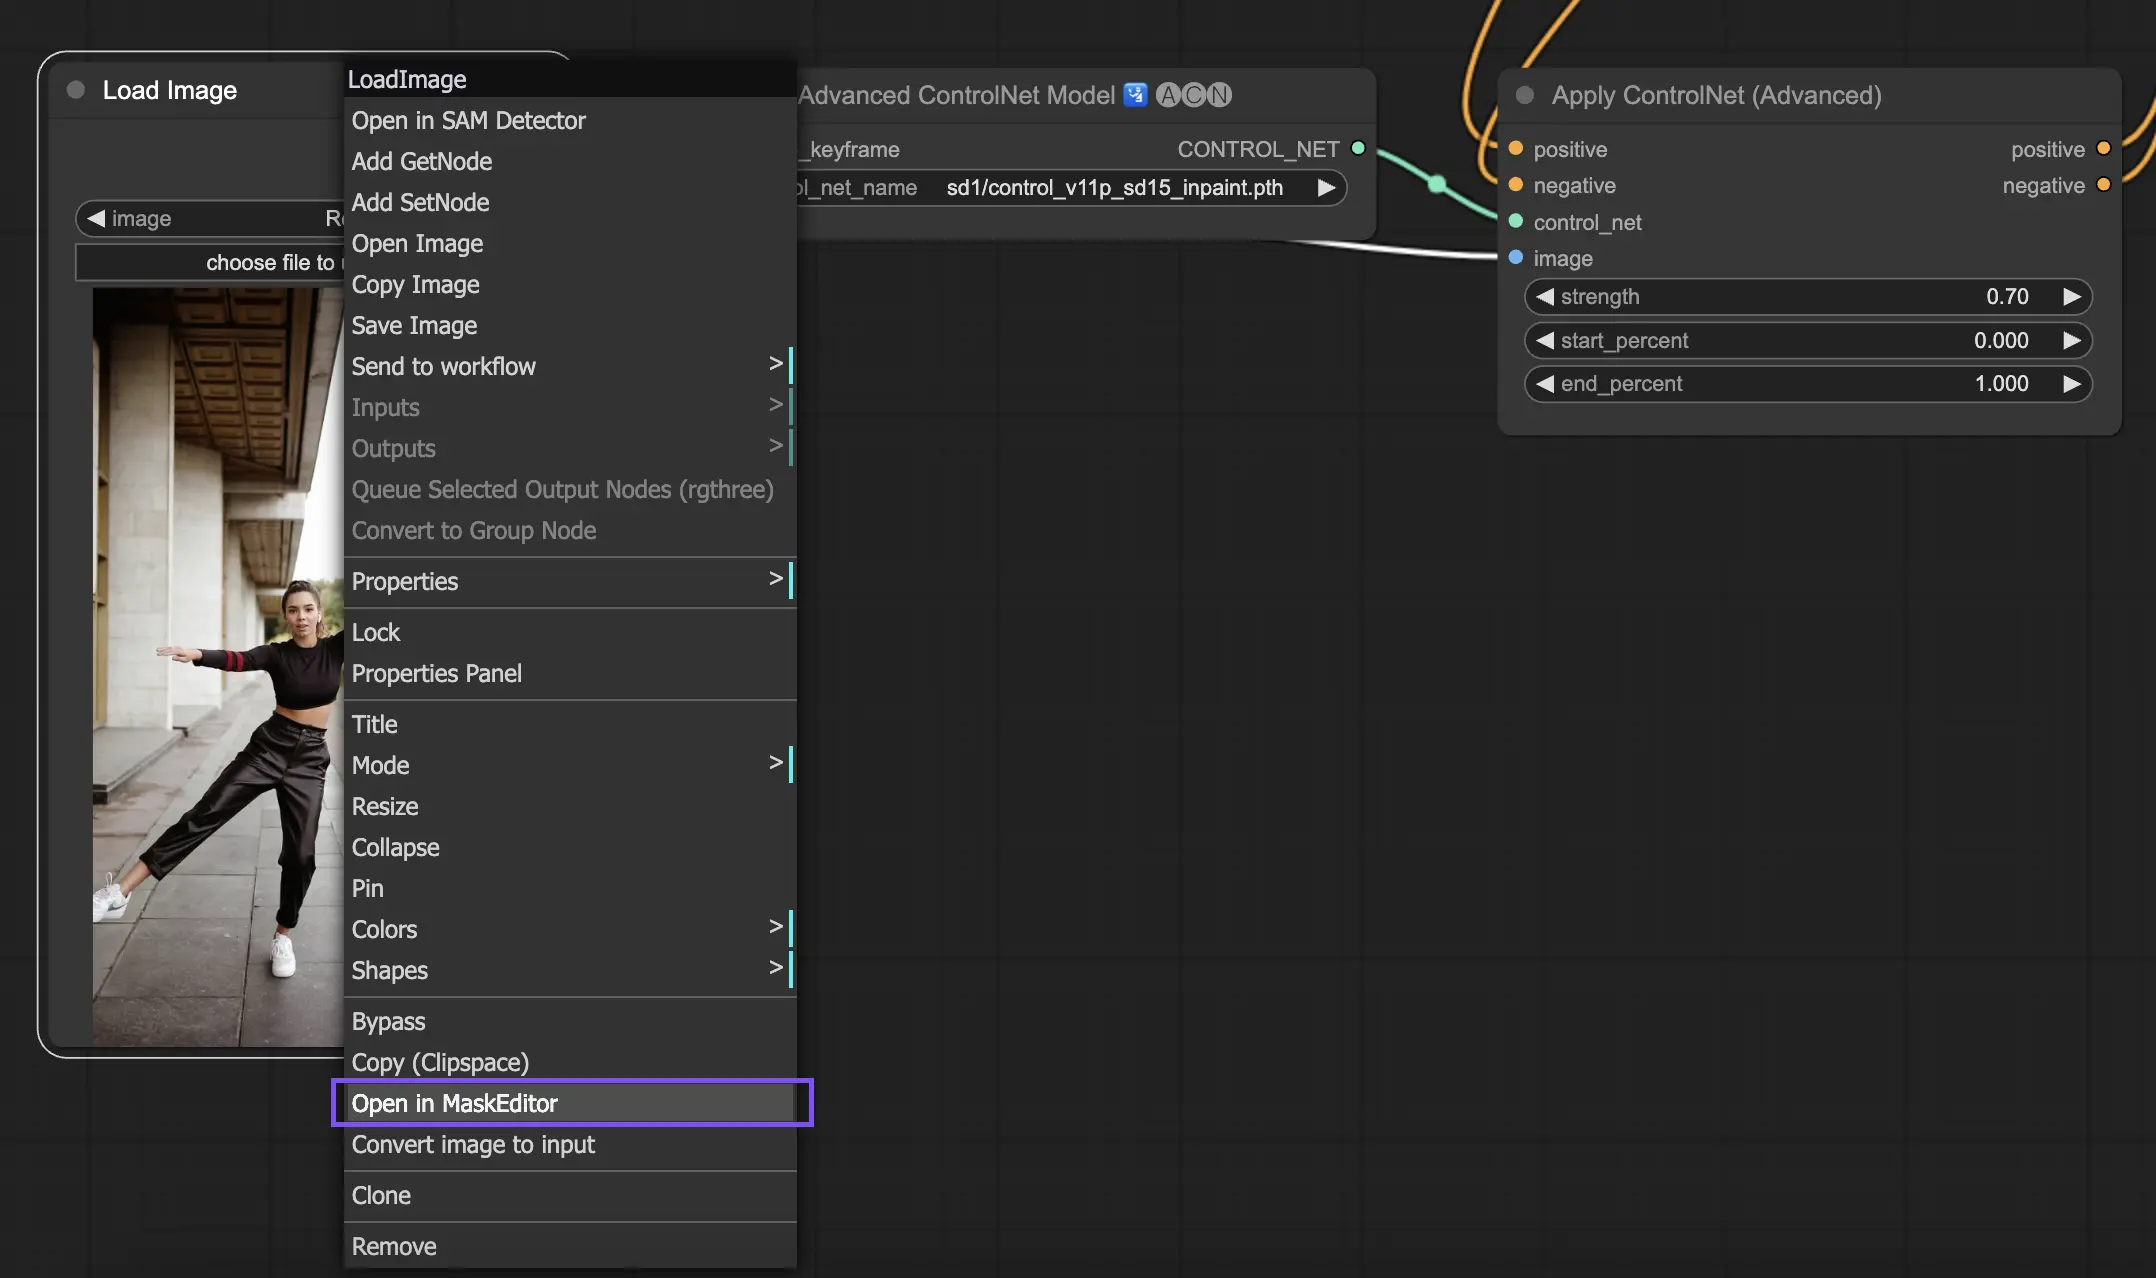
Unlike other implementations within ControlNet, Inpainting bypasses the need for a preprocessor due to the direct modifications applied to the image. However, it's crucial to forward the edited image to the latent space via the KSampler. This ensures that the diffusion model focuses solely on regenerating the masked region, maintaining the integrity of the unmasked areas.
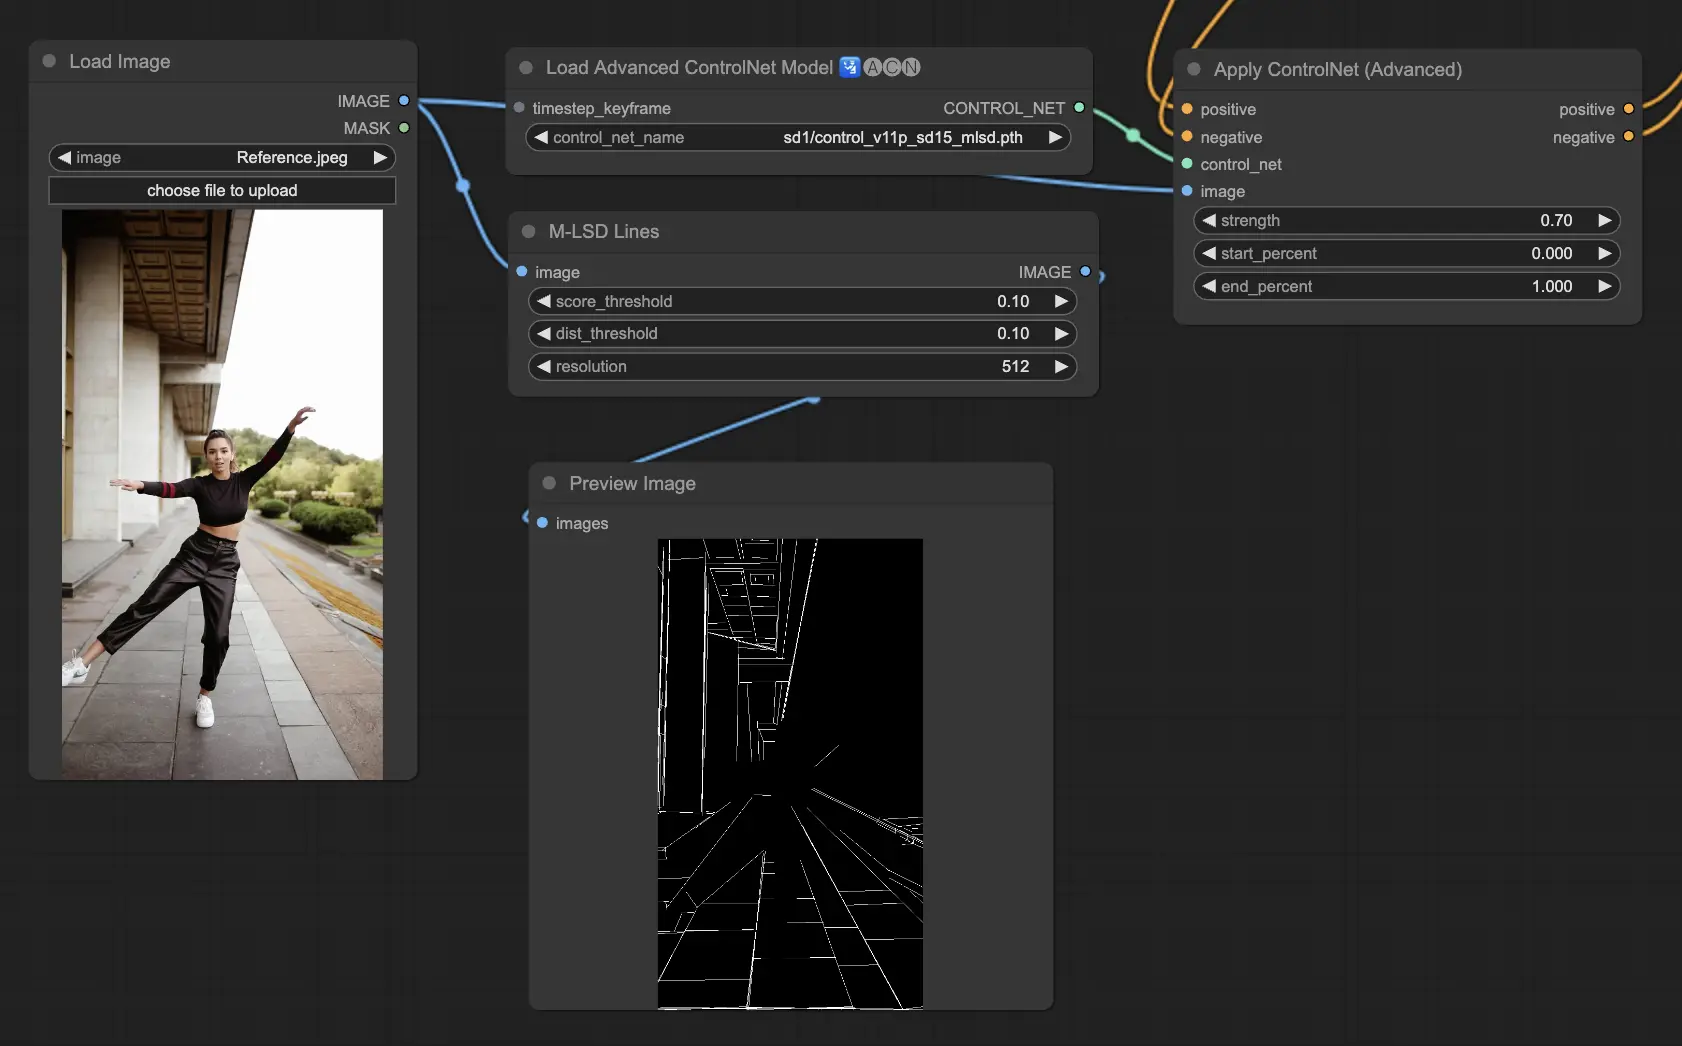
5.10. ComfyUI ControlNet MLSD#
M-LSD (Mobile Line Segment Detection) focuses on detecting straight lines, ideal for images with strong architectural elements, interiors, and geometric forms. It simplifies scenes to their structural essence, facilitating creative projects involving man-made environments.
Preprocessors: MLSD.
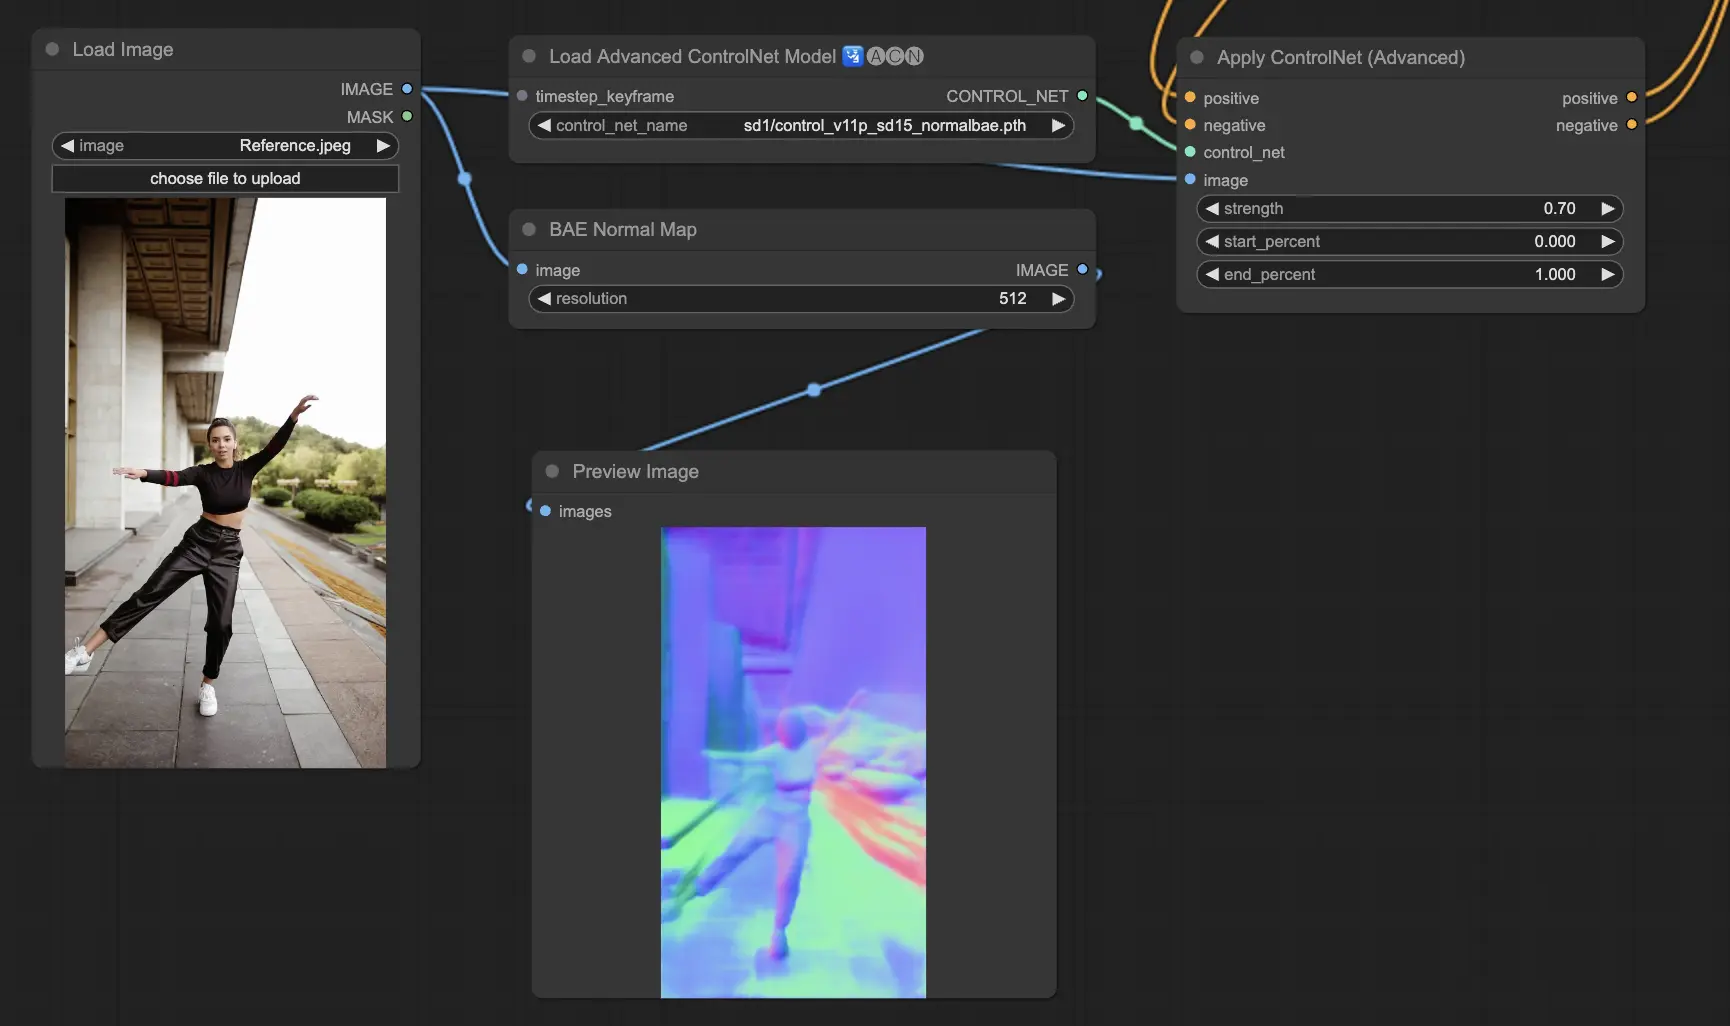
5.11. ComfyUI ControlNet Normalmaps#
Normalmaps enables the simulation of complex lighting and texture effects by modeling the orientation of surfaces in a visual scene, rather than relying on color data alone.This is critical for 3D modeling and simulation tasks.
- Normal Bae: This method generates normal maps by leveraging the normal uncertainty approach. It provides an innovative technique for depicting the orientation of surfaces, enhancing the simulation of lighting effects based on the physical geometry of the modeled scene rather than conventional color-based methods.
- Normal Midas: Utilizing depth maps produced by the Midas model, Normal Midas accurately estimates normal maps. This approach allows for a nuanced simulation of surface textures and lighting, based on the depth information of the scene, thereby enriching the visual complexity of 3D models.
Preprocessors: Normal BAE, Normal Midas
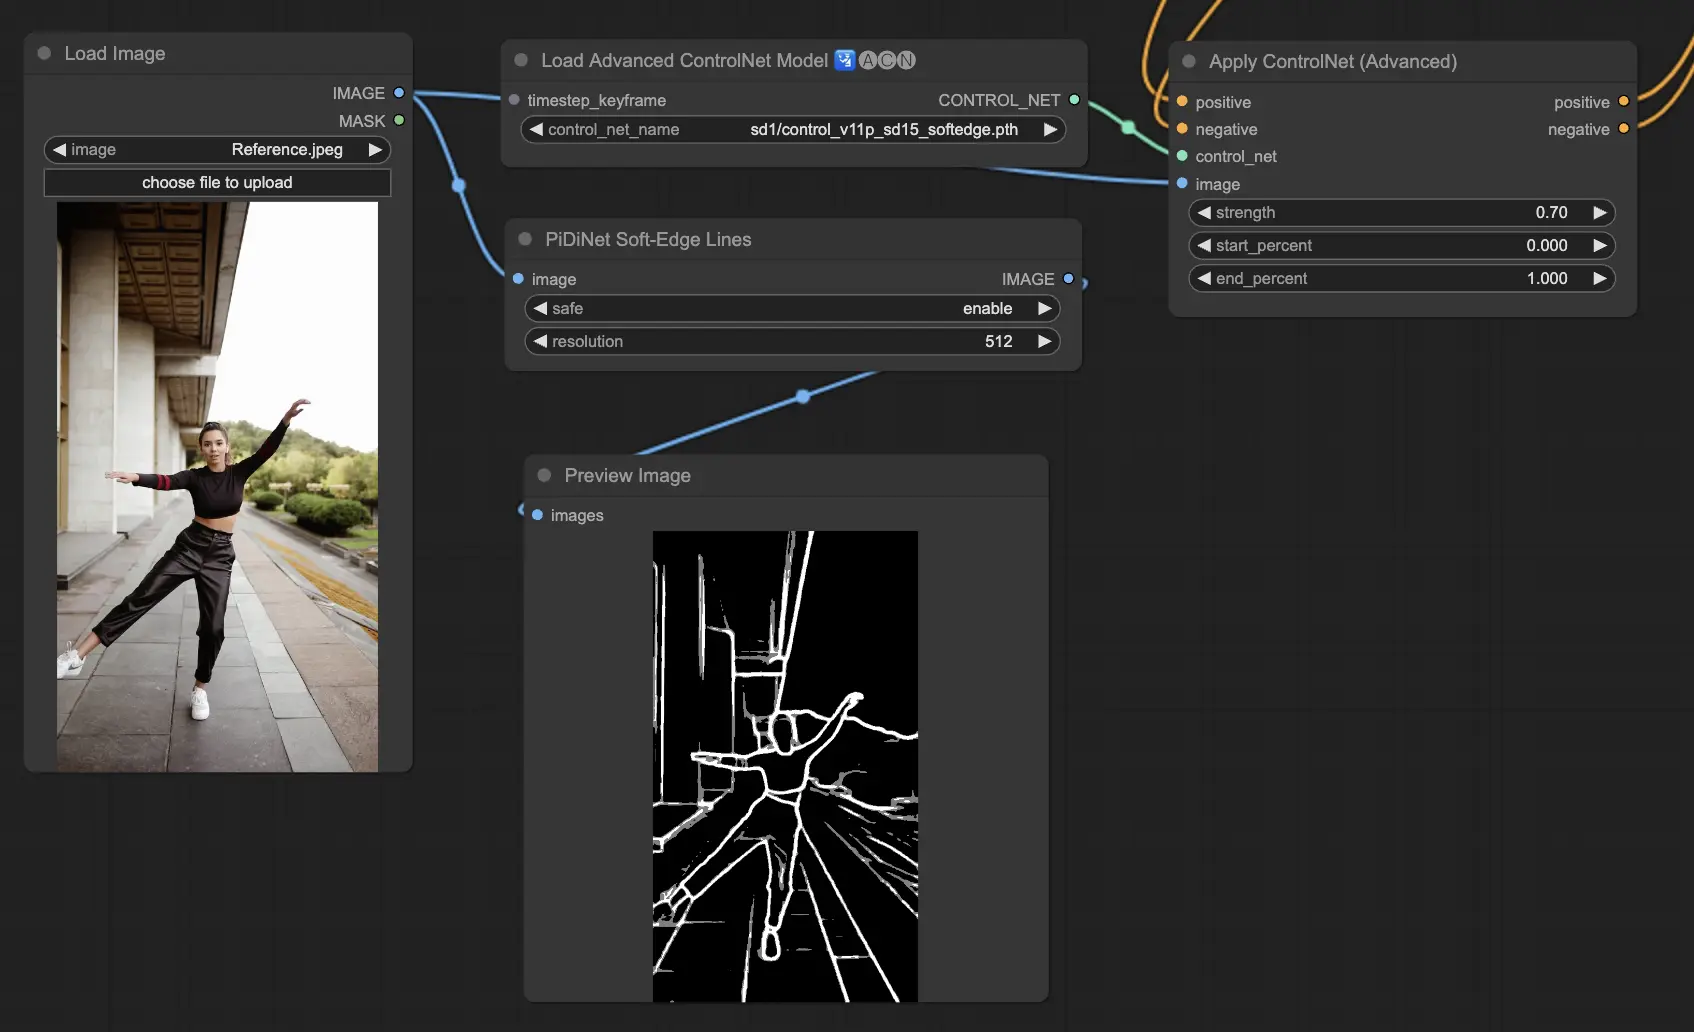
5.12. ComfyUI ControlNet Soft Edge#
ControlNet Soft Edge is designed to generate images with softer edges, focusing on detail control and natural appearance. It uses advanced neural network techniques for precise image manipulation, offering greater creative freedom and seamless blending capabilities
Robustness: SoftEdge_PIDI_safe > SoftEdge_HED_safe >> SoftEdge_PIDI > SoftEdge_HED
Maximum result quality: SoftEdge_HED > SoftEdge_PIDI > SoftEdge_HED_safe > SoftEdge_PIDI_safe
Considering the trade-off, we recommend to use SoftEdge_PIDI by default. In most cases it works very well.
Preprocessors: SoftEdge_PIDI, SoftEdge_PIDI_safe, SoftEdge_HED, SoftEdge_HED_safe.
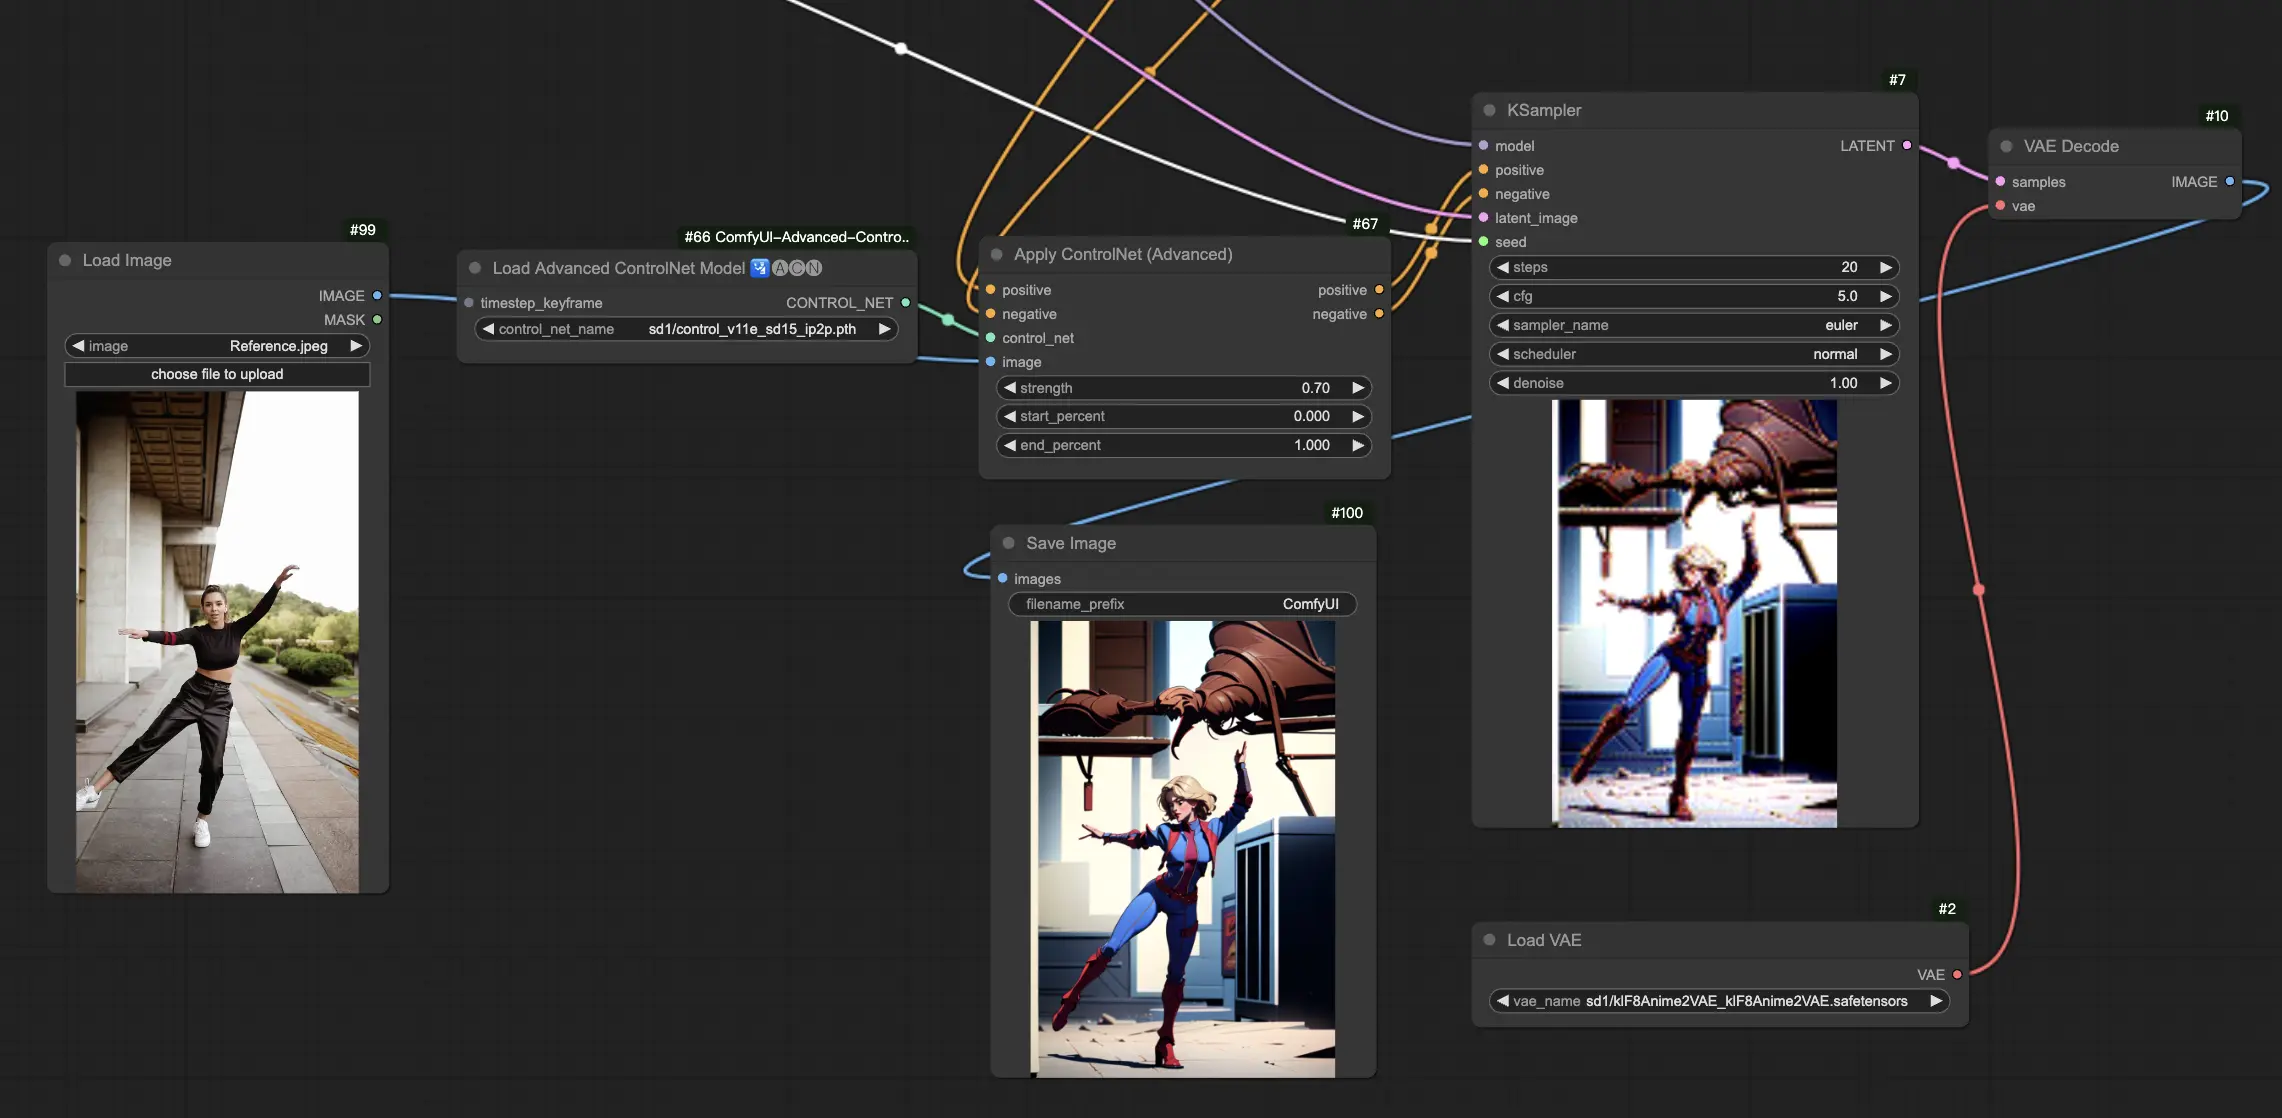
5.13. ComfyUI ControlNet IP2P (Instruct Pix2Pix)#
The ControlNet IP2P (Instruct Pix2Pix) model stands out as a unique adaptation within the ControlNet framework, tailored to leverage the Instruct Pix2Pix dataset for image transformations. This ControlNet variant differentiates itself by balancing between instruction prompts and description prompts during its training phase. Unlike the conventional approach in official Instruct Pix2Pix, ControlNet IP2P incorporates a 50/50 mix of these prompt types, enhancing its versatility and effectiveness in generating desired outcomes.
5.14. ComfyUI T2I Adapter#
t2iadapter color: The t2iadapter_color model is specifically designed to enhance the color representation and accuracy in generated images when using text-to-image diffusion models. By focusing on color adaptation, this model allows for a more accurate and vibrant color palette, closely aligned with the descriptions provided in the text prompts. It is particularly useful for projects where color fidelity and specificity are crucial, adding a new layer of realism and detail to the generated imagery.
t2iadapter style: The t2iadapter_style model targets the stylistic aspects of image generation, enabling the modification and control over the artistic style of the output images. This adapter allows users to guide the text-to-image model towards generating images that adhere to specific artistic styles or aesthetics described in the text prompts. It's an invaluable tool for creative projects where the style of the image plays a pivotal role, offering a seamless way to blend traditional art styles with modern AI capabilities.
5.15. Other Popular ComfyUI ControlNet: QRCode Monster and IP-Adapter#
For these segments, we'll dedicate separate articles to provide a thorough introduction to each, given the substantial amount of information we wish to share.
6. How to Use Multiple ComfyUI ControlNets#
Using multiple ComfyUI ControlNets in ComfyUI involves a process of layering or chaining ControlNet models to refine the image generation with more precise controls over various aspects like pose, shape, style, and color.
Thus, you can build your workflow by applying a ControlNet (e.g., OpenPose) and then feeding its output into another ControlNet (e.g., Canny). This layered application allows for detailed customization of the image, where each ControlNet applies its specific transformations or controls. The process allows for a refined control over the final output, integrating multiple aspects guided by different ControlNets.
🌟🌟🌟 ComfyUI Online - Experience the ControlNet Workflow Now 🌟🌟🌟#
If you're interested in exploring the ControlNet workflow, use the following ComfyUI web. It comes fully equipped with all the essential customer nodes and models, enabling seamless creativity without the need for manual setups. Gain hands-on experience and familiarize yourself with ControlNet's features now!