


Welcome! In this guide, let's explore the exciting features of the ComfyUI IPAdapter Plus, also known as ComfyUI IPAdapter V2.
IPAdapter models are very powerful for image-to-image conditioning, enabling the easy transfer of the subject or style of reference images onto new creations. Think of it as a 1-image LoRA.
The introduction of IPAdapter Plus (IPAdapter V2) has brought a plethora of new features aimed at streamlining the model integration process, enhancing usability, and expanding creative possibilities.
It's important to note that upgrading to ComfyUI IPAdapter Plus (IPAdapter V2) will render your previous workflows, which rely on ComfyUI IPAdapter V1 node, malfunctional. Consequently, you will need to rebuild your projects using ComfyUI IPAdapter Plus.
We will cover:
- 1.1. The Simplest ComfyUI IPAdapter Workflow
- 1.2. Inputs of ComfyUI "IPAdapter" Node
- 1.3. Parameters in ComfyUI "IPAdapter" Node
- 1.4. The Difference in Using ComfyUI IPAdapter Plus with SD1.5 and SDXL Checkpoint Models
- 2. ComfyUI IPAdapter Plus - IPAdapter Advanced Node
- 2.1. The ComfyUI IPAdapter Advanced Workflow
- 2.2. Expanded Parameters in ComfyUI "IPAdapter Advanced" Node
- 3. ComfyUI IPAdapter Plus - FaceID
- 3.1. ComfyUI IPAdapter FaceID Workflow
- 4. ComfyUI IPAdapter Plus - Image Merge Feature
- 4.1. Method 1: Utilizing ComfyUI "Batch Image" Node
- 4.2. Method 2: Precise Control Over Reference Weights Using ComfyUI "IPAdapter Encoder" Node
- 5. ComfyUI IPAdapter Plus - IPAdapter Tile for Tall Images
- 5.1 ComfyUI IPAdapter Tile Workflow
- 6. ComfyUI IPAdapter Plus - Style and Composition
- 6.1. ComfyUI IPAdapter Plus for Style Transfer
- 6.2. ComfyUI IPAdapter Plus for Maintaining Composition
- 6.3. ComfyUI IPAdapter Plus for Maintaining Composition and Style Transfer
🌟🌟🌟 ComfyUI Online - Experience the IPAdapter Plus Workflow Now 🌟🌟🌟#
If you're interested in exploring the ComfyUI IPAdapter Plus (IPAdapter V2) Workflow, use the following ComfyUI web. It comes fully equipped with all the essential customer nodes and models, enabling seamless creativity without the need for manual setups. Start gaining hands-on experience immediately, or continue with this tutorial to learn how to use IPAdapter Plus effectively.
For more advanced and premium ComfyUI workflows, visit our 🌟ComfyUI Workflow List🌟#
1. ComfyUI IPAdapter Plus - IPAdapter Basic Node#
1.1. The Simplest ComfyUI IPAdapter Workflow#
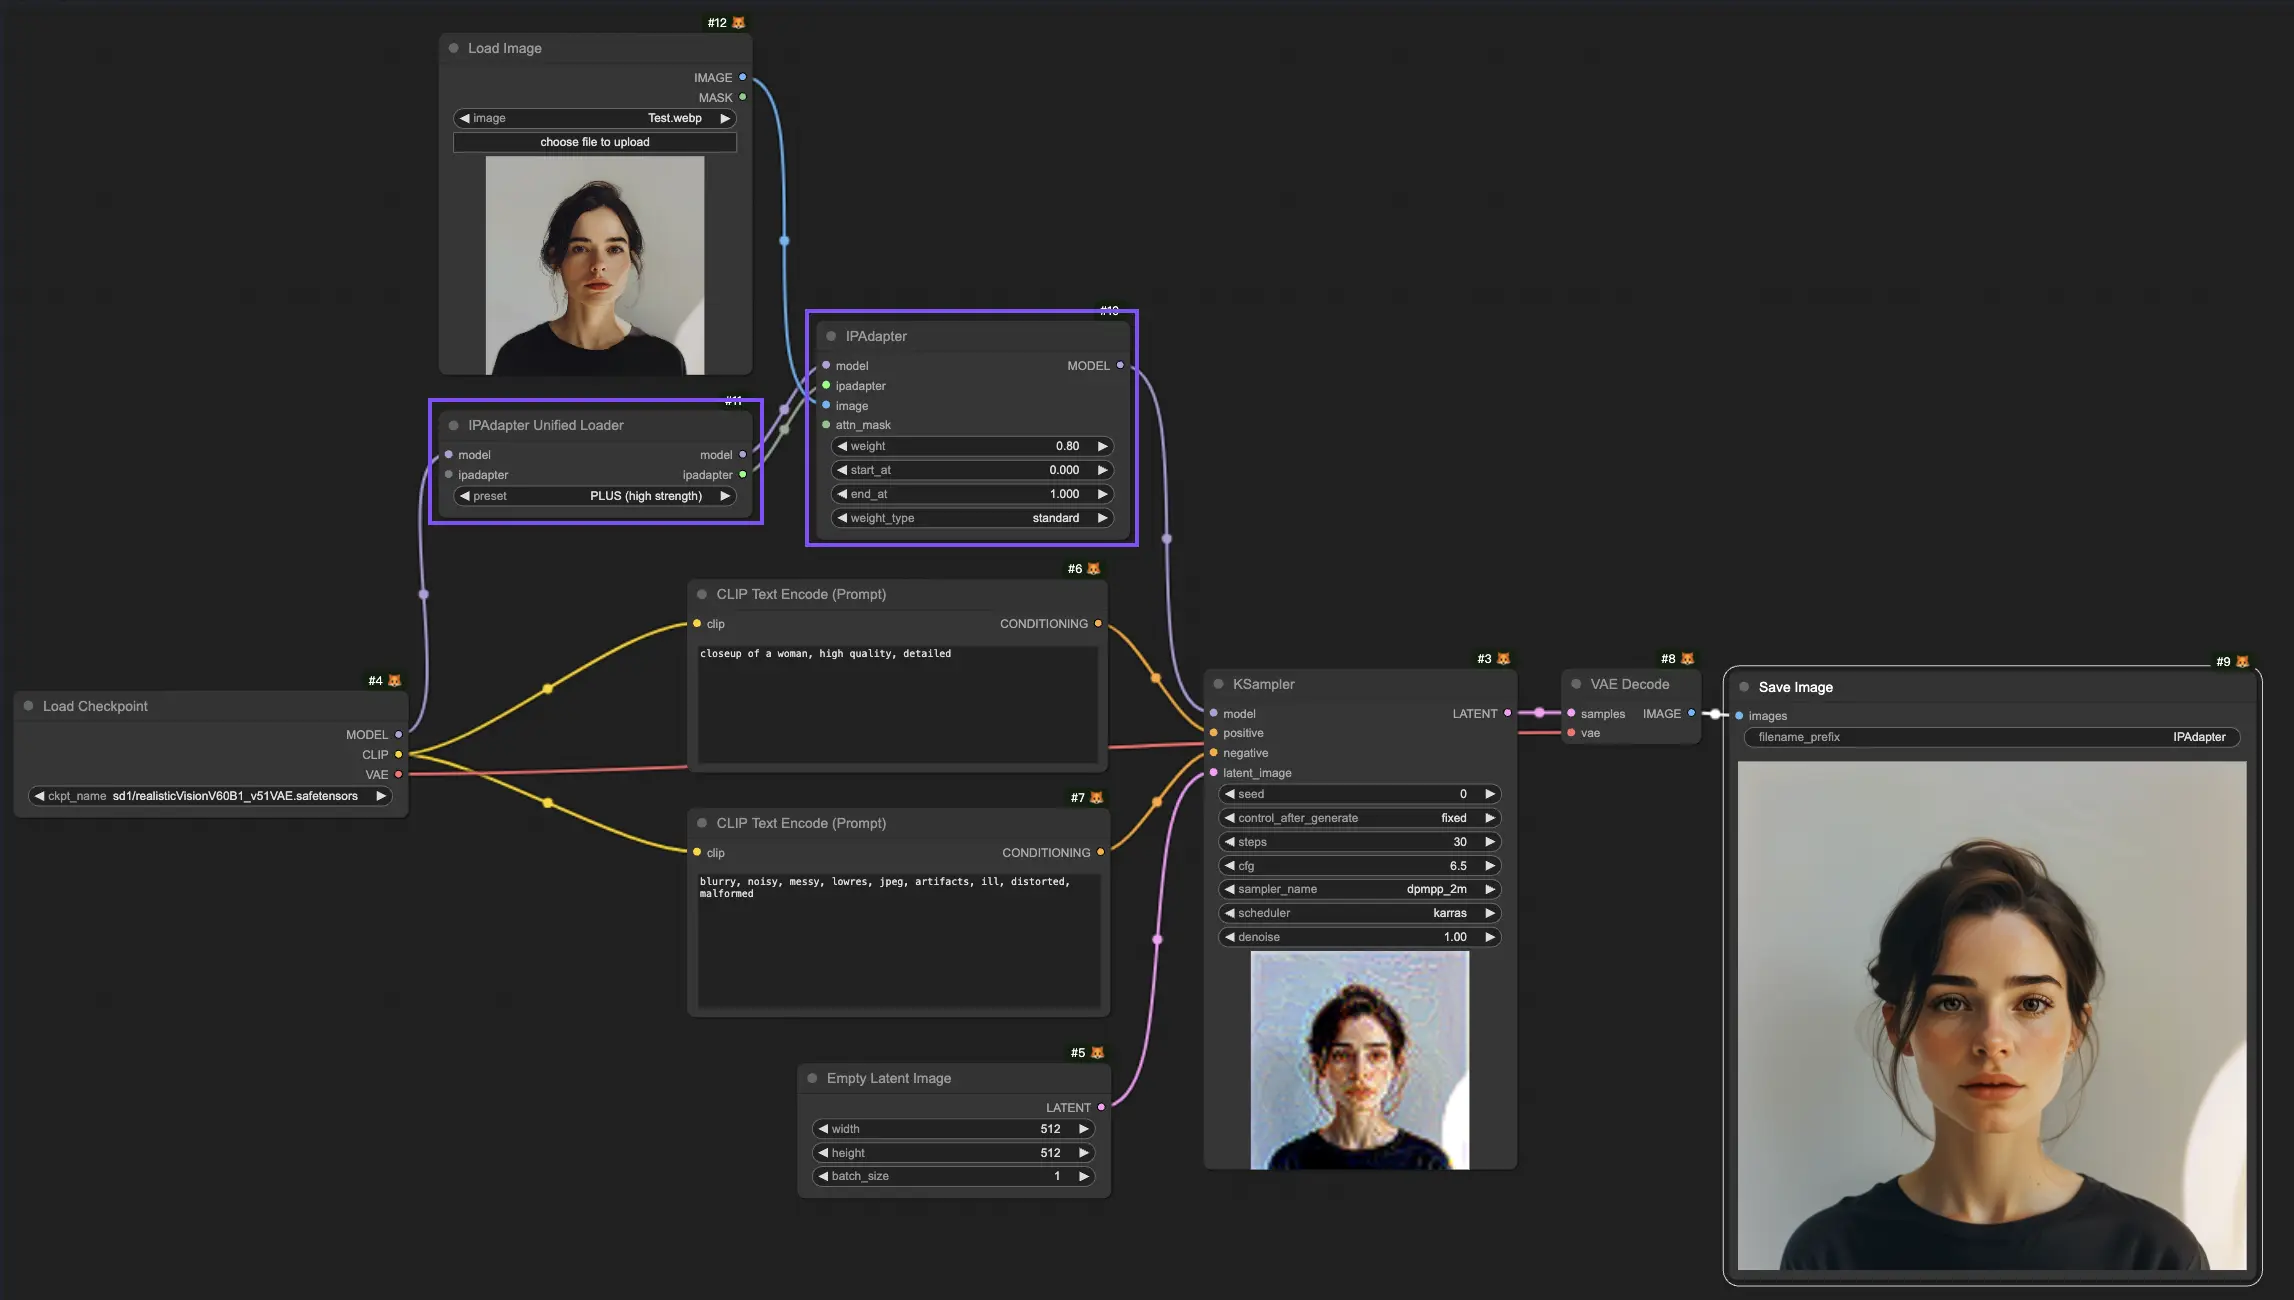
1.2. Inputs of ComfyUI "IPAdapter" Node#
1.2.1. Inputs of "IPAdapter" Node: Model and IPAdapter#
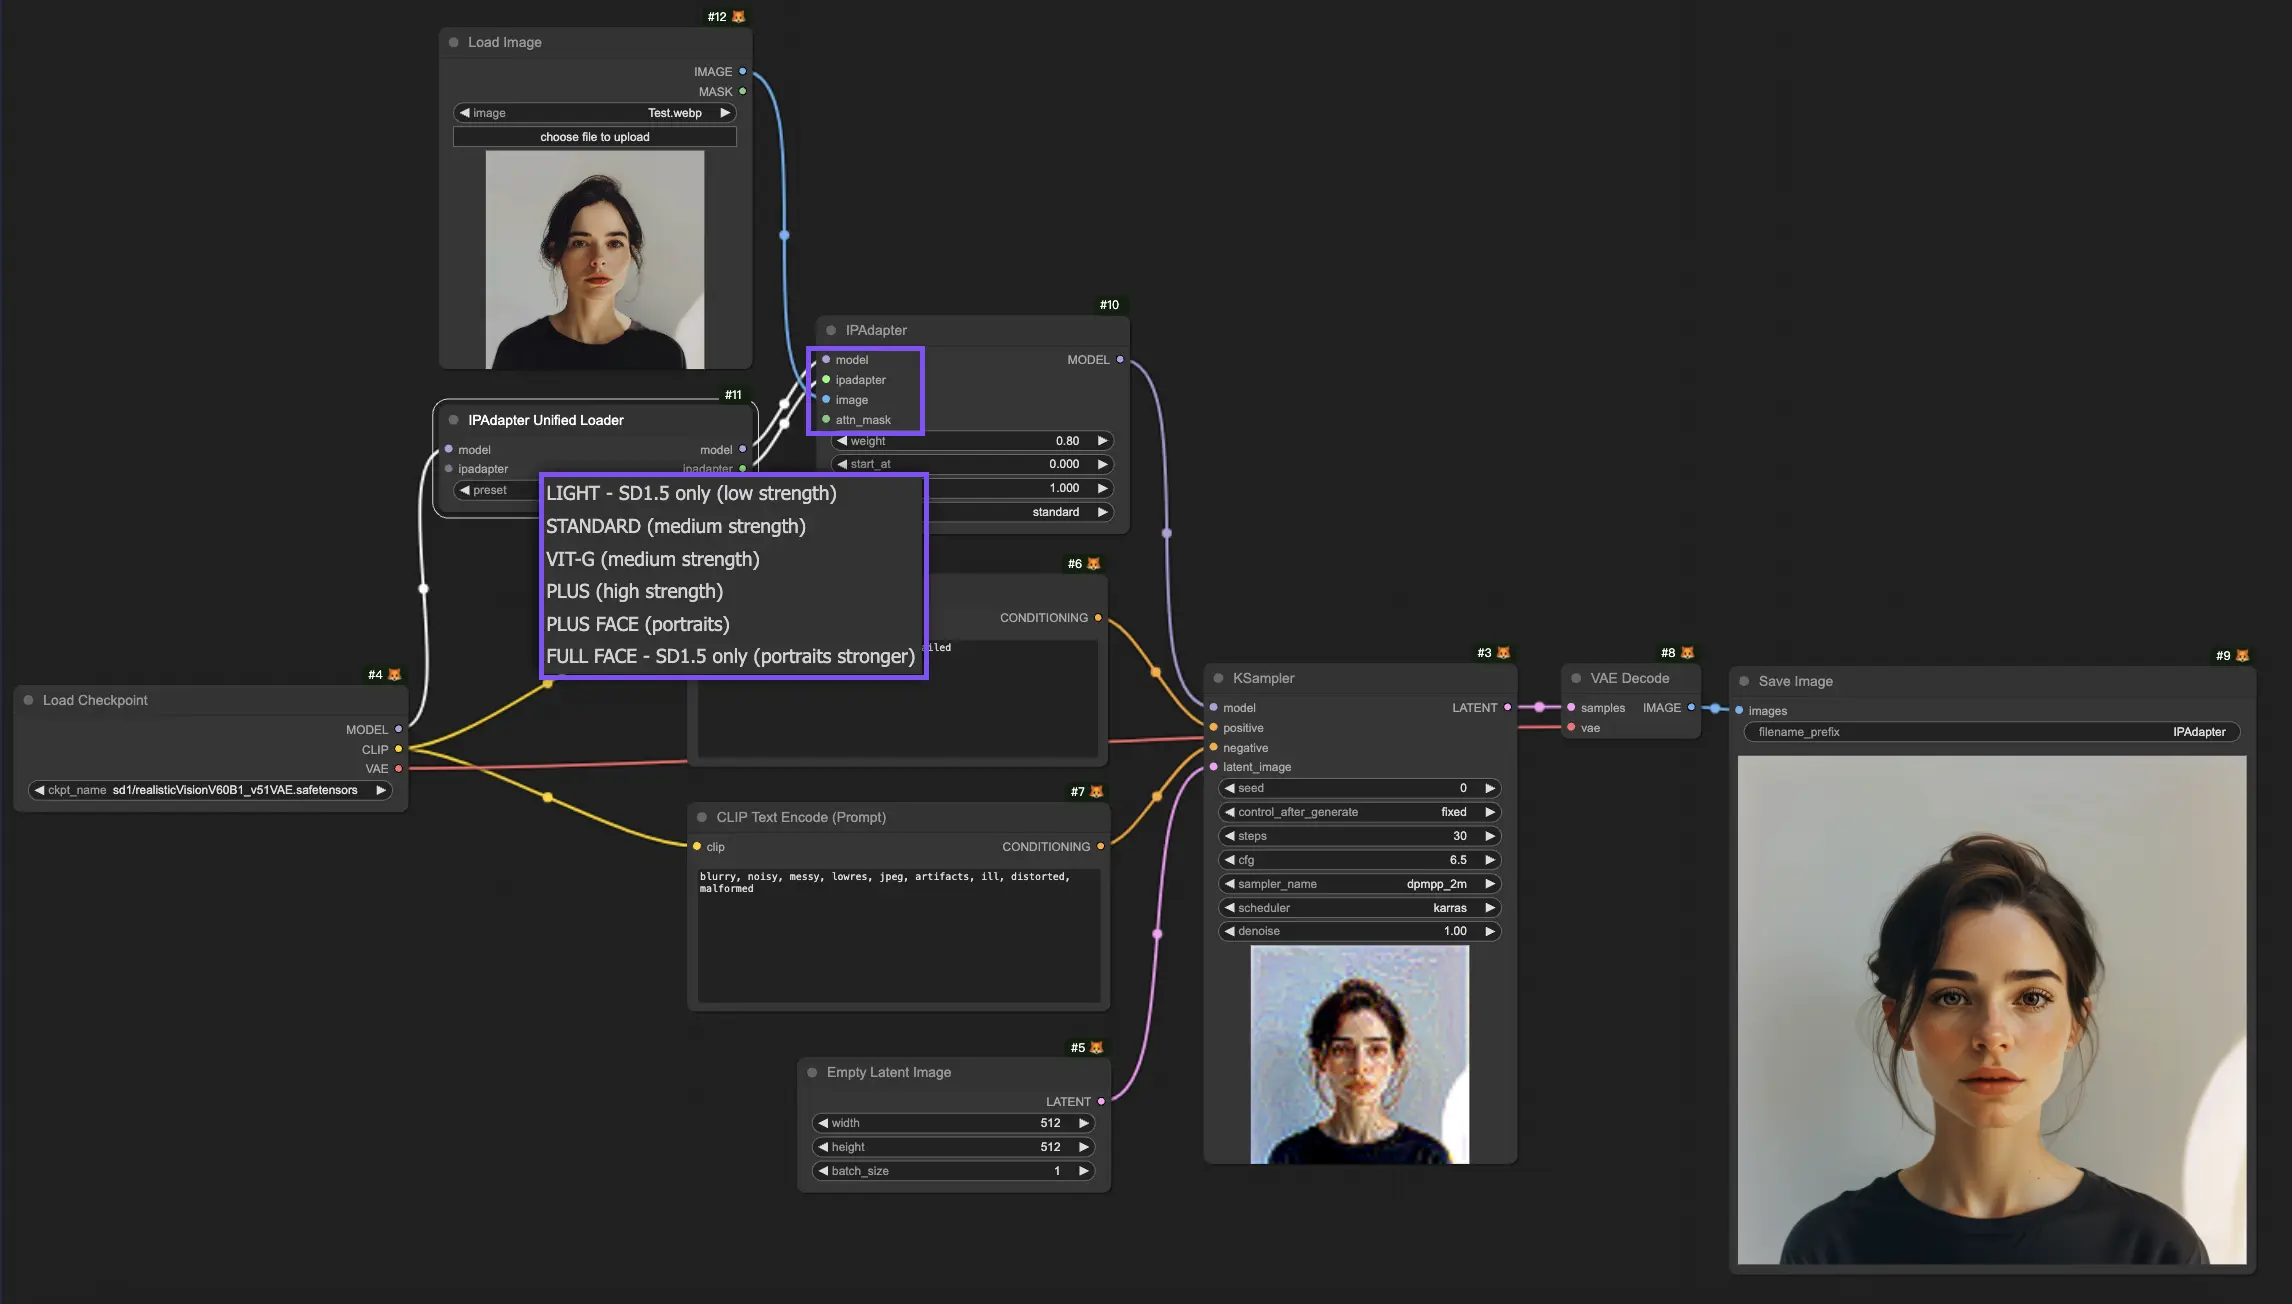
The "Model" and "IPAdapter" inputs of the "IPAdapter" node are connected to the output of the "IPAdapter Unified Loader" node. Here, you can select from various IPAdapter models, each tailored to different requirements:
- Light - SD1.5 Only (low strength): This model is ideal for minimal adjustments and is exclusively compatible with the SD1.5 model.
- Standard (medium strength): This model achieves medium-intensity modifications, suited for a broad array of applications, balancing subtle and noticeable alterations.
- VIT-G (medium strength): While offering medium adjustments like the Standard, the VIT-G model is tailored for more intricate or varied image data, potentially enhancing performance in specific scenarios.
- PLUS (high strength): For those requiring substantial modifications, the PLUS model offers powerful creative capabilities, enabling significant alterations.
- PLUS FACE (portraits): Designed specifically for enhancing portraits, PLUS FACE focuses on improving facial features, ideal for portrait photography and artwork.
- Full FACE - SD1.5 Only (portraits stronger): A more intense version of the PLUS FACE, the Full FACE model is designed for dramatic transformations in portraits, but it is only compatible with the SD1.5 model.
1.2.2. Inputs of "IPAdapter" Node: Image#
The "Image" input of the "IPAdapter" node is the reference image used for image-to-image conditioning. This is where the "IPAdapter" node applies its transformative capabilities, altering the reference image based on the defined parameters and the model's functionalities. Through this process, new images are generated, inheriting attributes from the reference image and blending them with the creative potential of the IPAdapter model.
1.2.3. Inputs of "IPAdapter" Node: Attn Mask (Attention Mask)#
With the "Attn Mask", you can highlight specific image areas for focused processing or to guide the model’s attention, enhancing or preserving certain image features while directing the model's focus.
1.3. Parameters in ComfyUI "IPAdapter" Node#
1.3.1. Parameters in "IPAdapter" Node: Weight#
The parameter "Weight" adjusts the intensity of the applied modifications; higher values lead to more pronounced effects, while lower values result in subtler changes.
1.3.2. Parameters in "IPAdapter" Node: Start At & End At#
The parameters "Start At" and "End At" dictate the initial and final steps at which the effects of the IPAdapter are applied, offering control over the processing.
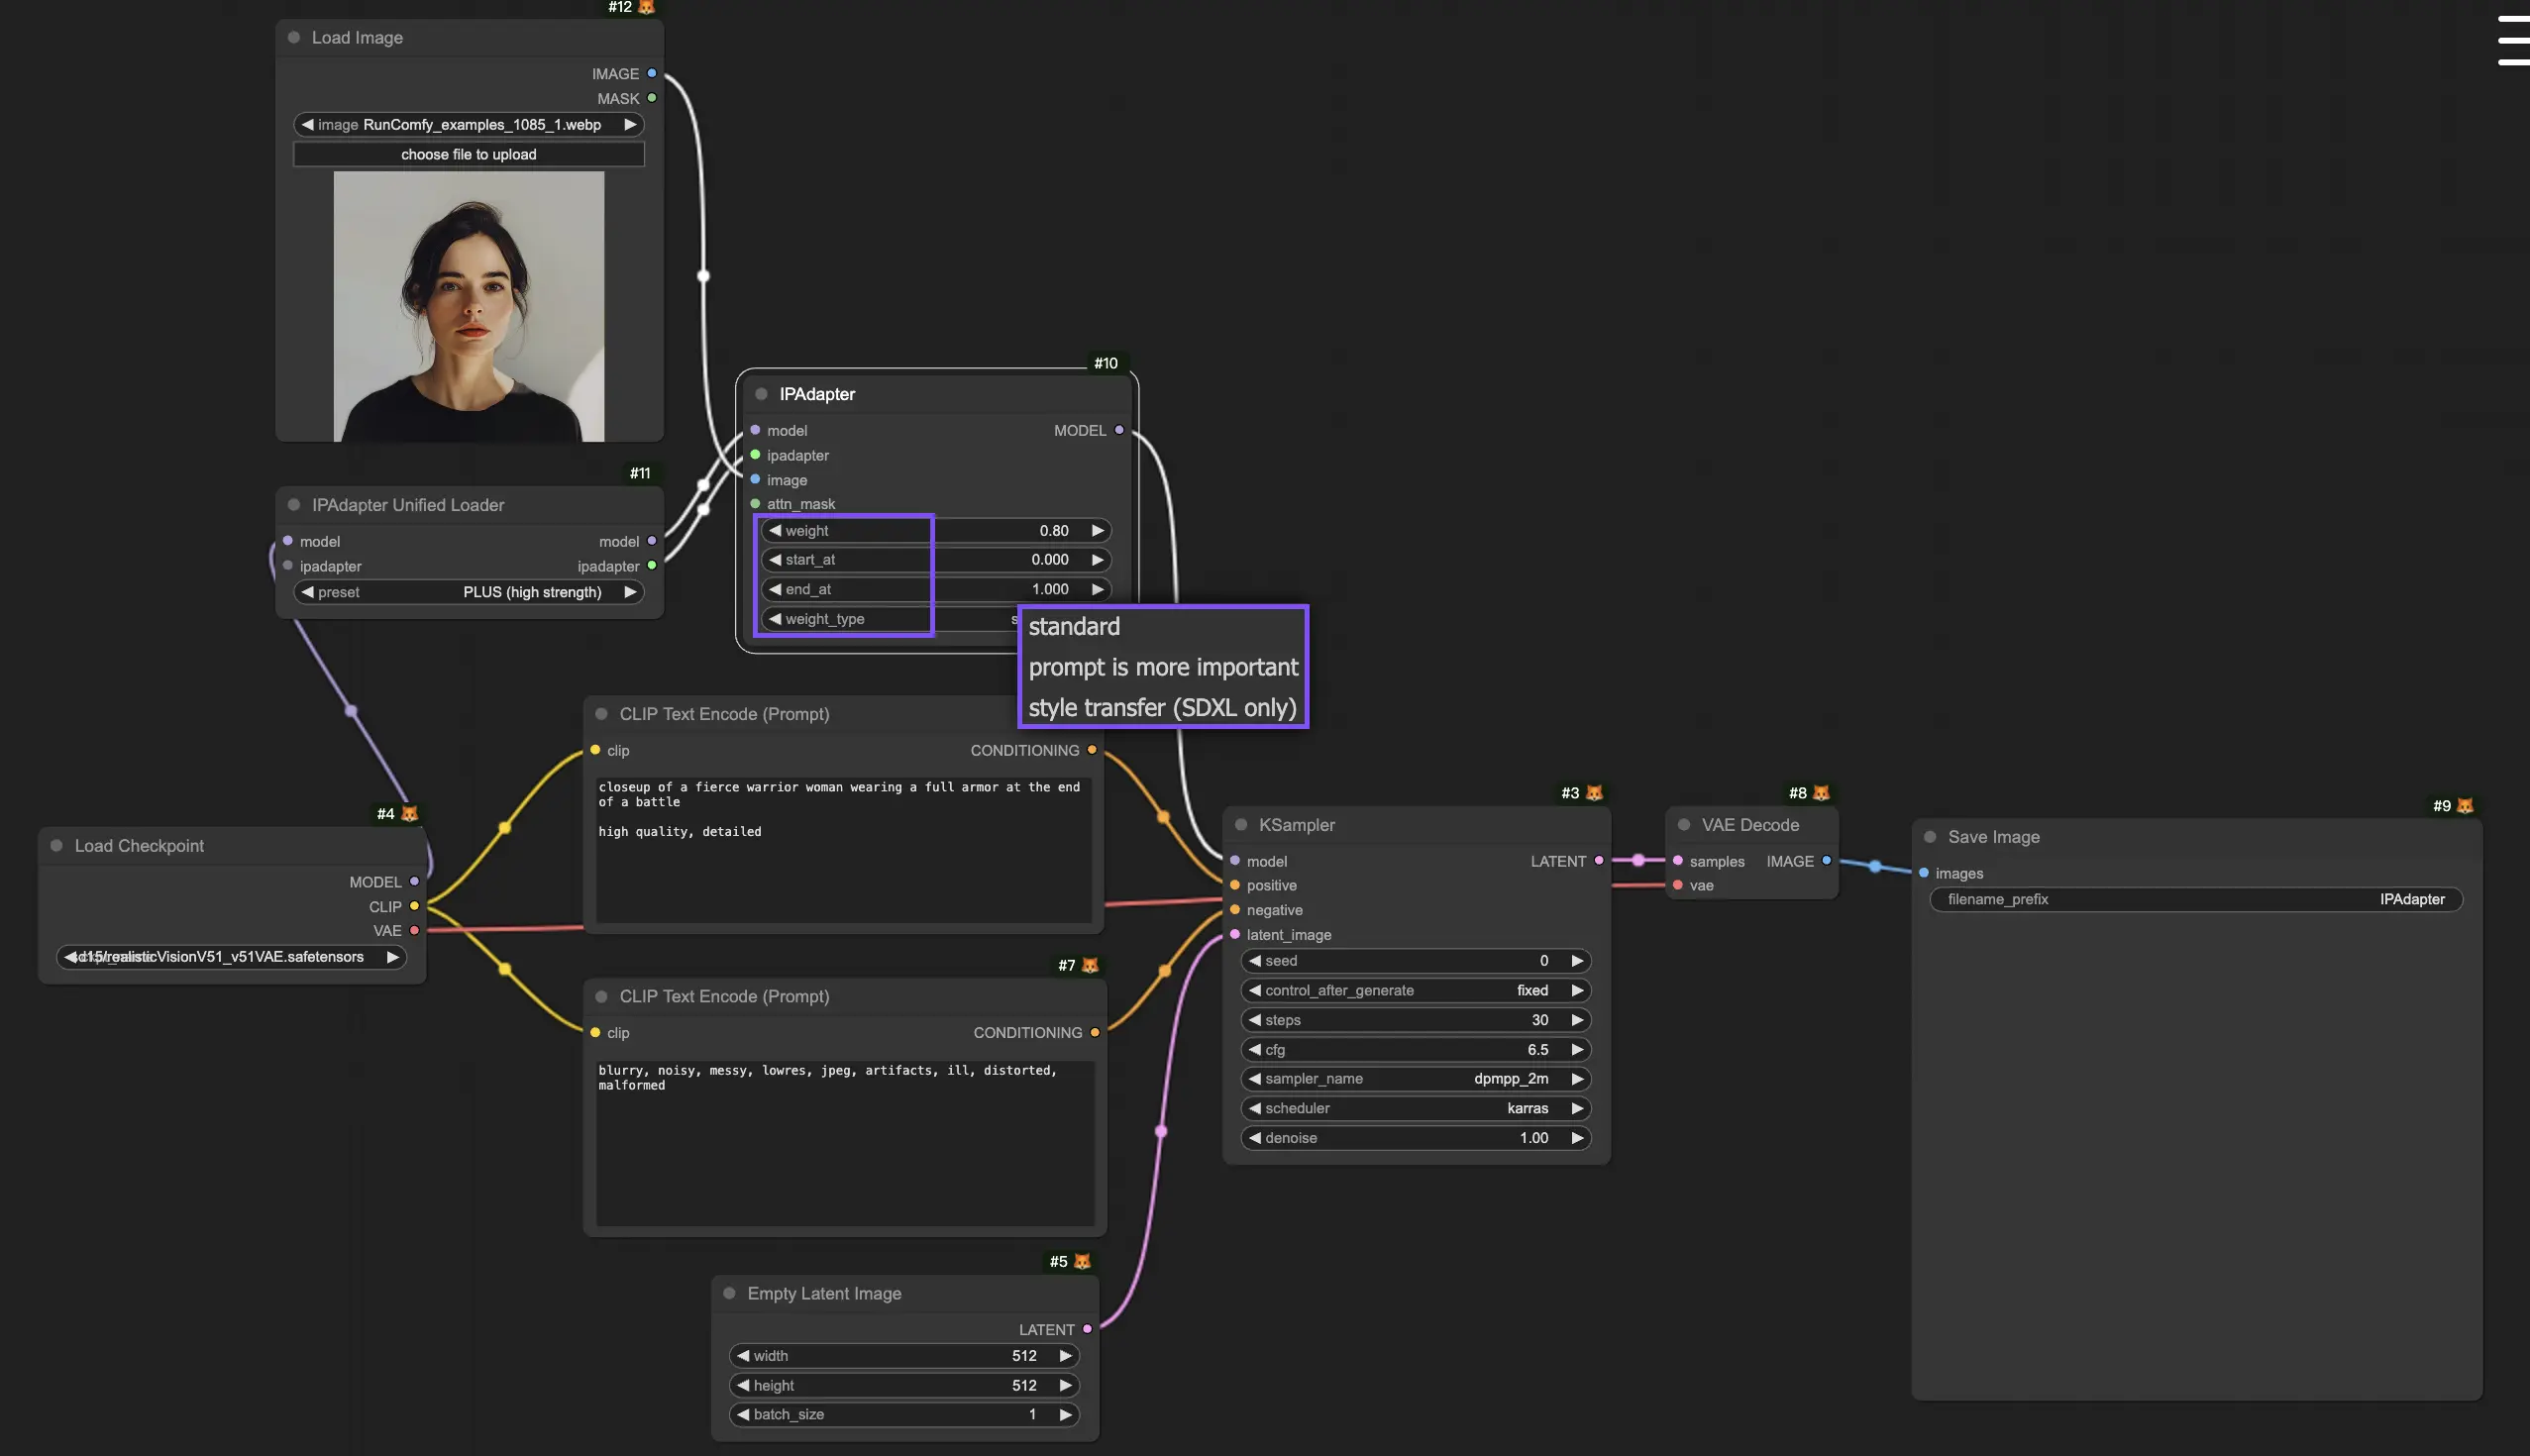
1.3.3. Parameters in "IPAdapter" Node: Weight Type#
The "Weight Type" for applying weight through the processing stages varies, each affecting the output in a distinctive manner:
- Standard
- Prompt is more important
- Style Transfer (SDXL only)
1.4. The Difference in Using ComfyUI IPAdapter Plus with SD1.5 and SDXL Checkpoint Models#
When working with SDXL models, the IPAdapter Plus model seamlessly integrates and automatically adapts to the characteristics of the SDXL model. However, it is essential to adjust the latent size appropriately to align with the requirements of the SDXL model.
2. ComfyUI IPAdapter Plus - IPAdapter Advanced Node#
2.1. The ComfyUI IPAdapter Advanced Workflow#
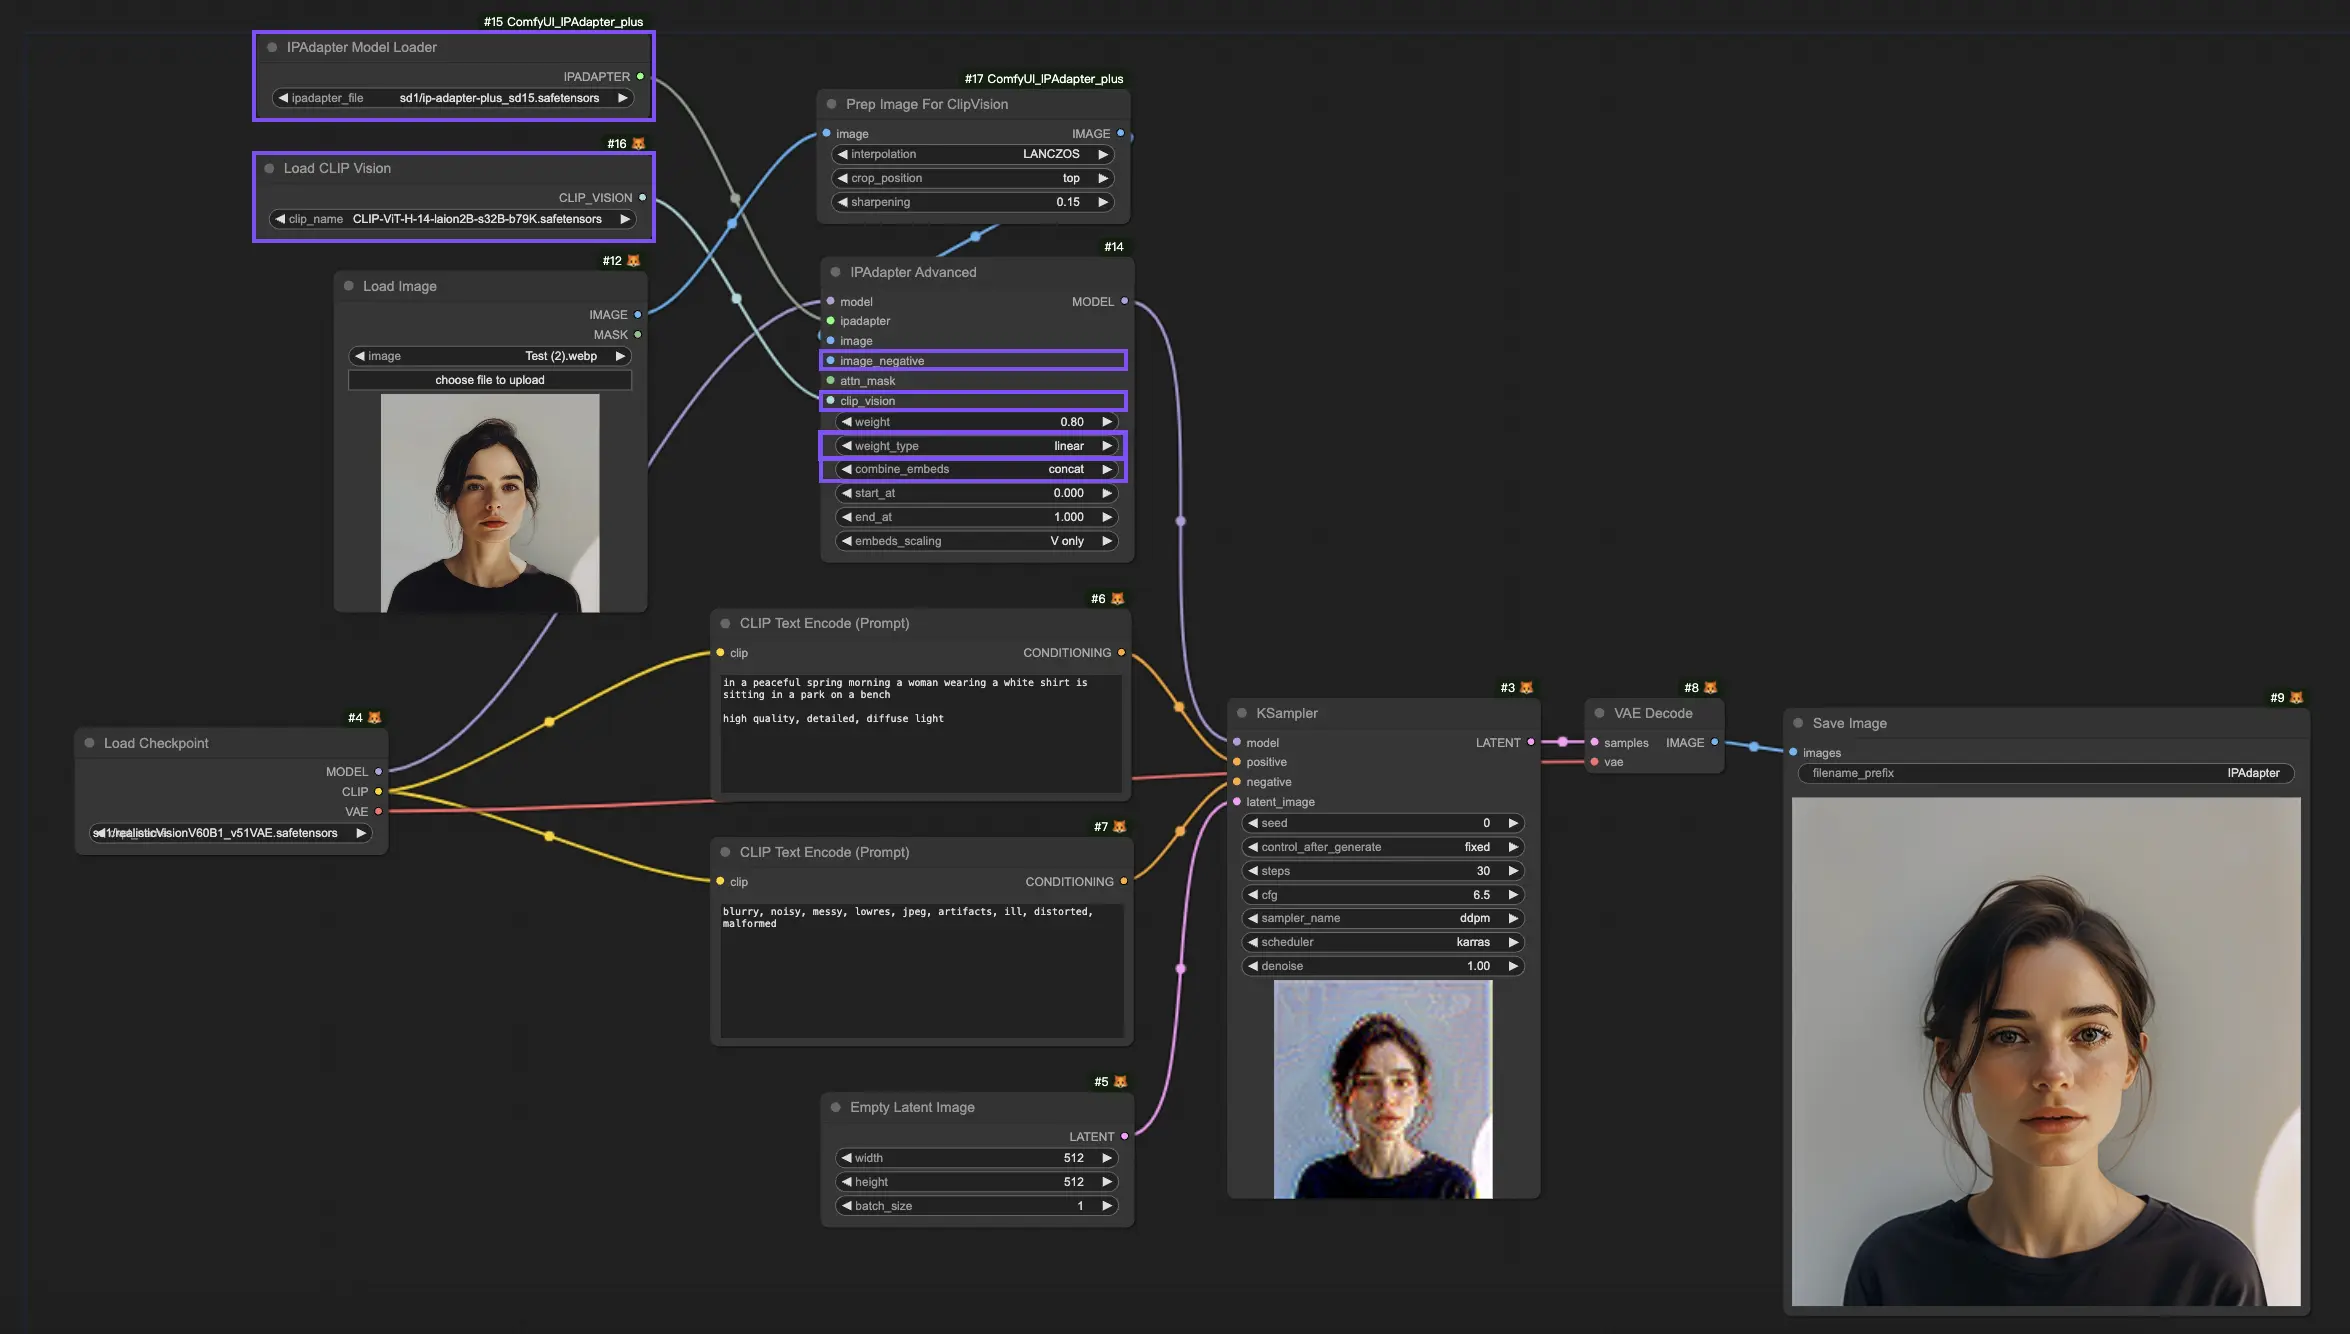
Offering a more comprehensive set of features, ComfyUI IPAdapter Advanced node enhances control over the generation process through parameters like "Image Negative", "CLIP Vision", "Combine Embeds", and more options of "Weight Type", aligning images closer with your creative vision.
2.2. Expanded Parameters in ComfyUI "IPAdapter Advanced" Node#
2.2.1. Expanded Parameters in "IPAdapter Advanced" Node: Image Negative#
The "Image Negative" parameter enables you to define what you do not want to appear in the final image. By specifying negative examples, the model is guided away from undesired elements, steering towards a more desirable outcome. This feature is instrumental in avoiding specific themes, objects, or patterns in the generated image, ensuring that the output adheres to the your preferences.
2.2.2. Expanded Parameters in "IPAdapter Advanced" Node: CLIP Vision#
In the "IPAdapter Advanced" node, you'll find the "CLIP Vision" input. This connects to the output of the "Load CLIP Vision" node, where you can select from different CLIP-ViT Models.
- CLIP-ViT-H-14-laion2B-s32B-b79K.safetensors: This model variant is a part of the CLIP (Contrastive Language–Image Pre-training) family, specifically designed to understand and interpret visual content in relation to textual information. It is trained on a large dataset (laion2B), with a model size of 32 billion parameters (s32B), and has been optimized to balance performance and safety in content generation (b79K indicates a specific benchmark or version). This model is adept at handling a broad range of visual recognition tasks, making it suitable for generating high-quality, contextually accurate images.
- CLIP-ViT-bigG-14-laion2B-39B-b160k.safetensors: Similar to its counterpart, this model is also trained on the laion2B dataset but boasts a larger size of 39 billion parameters, making it capable of understanding even more nuanced relationships between text and images. The "bigG" possibly denotes a larger or more advanced version within the CLIP-ViT series, with "b160k" signifying its benchmark or version. This model excels in creating detailed and complex images that closely align with textual descriptions, suitable for applications requiring high fidelity and deep semantic understanding.
The main difference between CLIP-ViT-H-14-laion2B-s32B-b79K.safetensors and CLIP-ViT-bigG-14-laion2B-39B-b160k.safetensors lies in their size and potential complexity handling, with the latter being larger at 39 billion parameters, suggesting it can interpret more nuanced text-image relationships than the former's 32 billion parameters.
2.2.3. Expanded Parameters in "IPAdapter Advanced" Node: Weight Type#
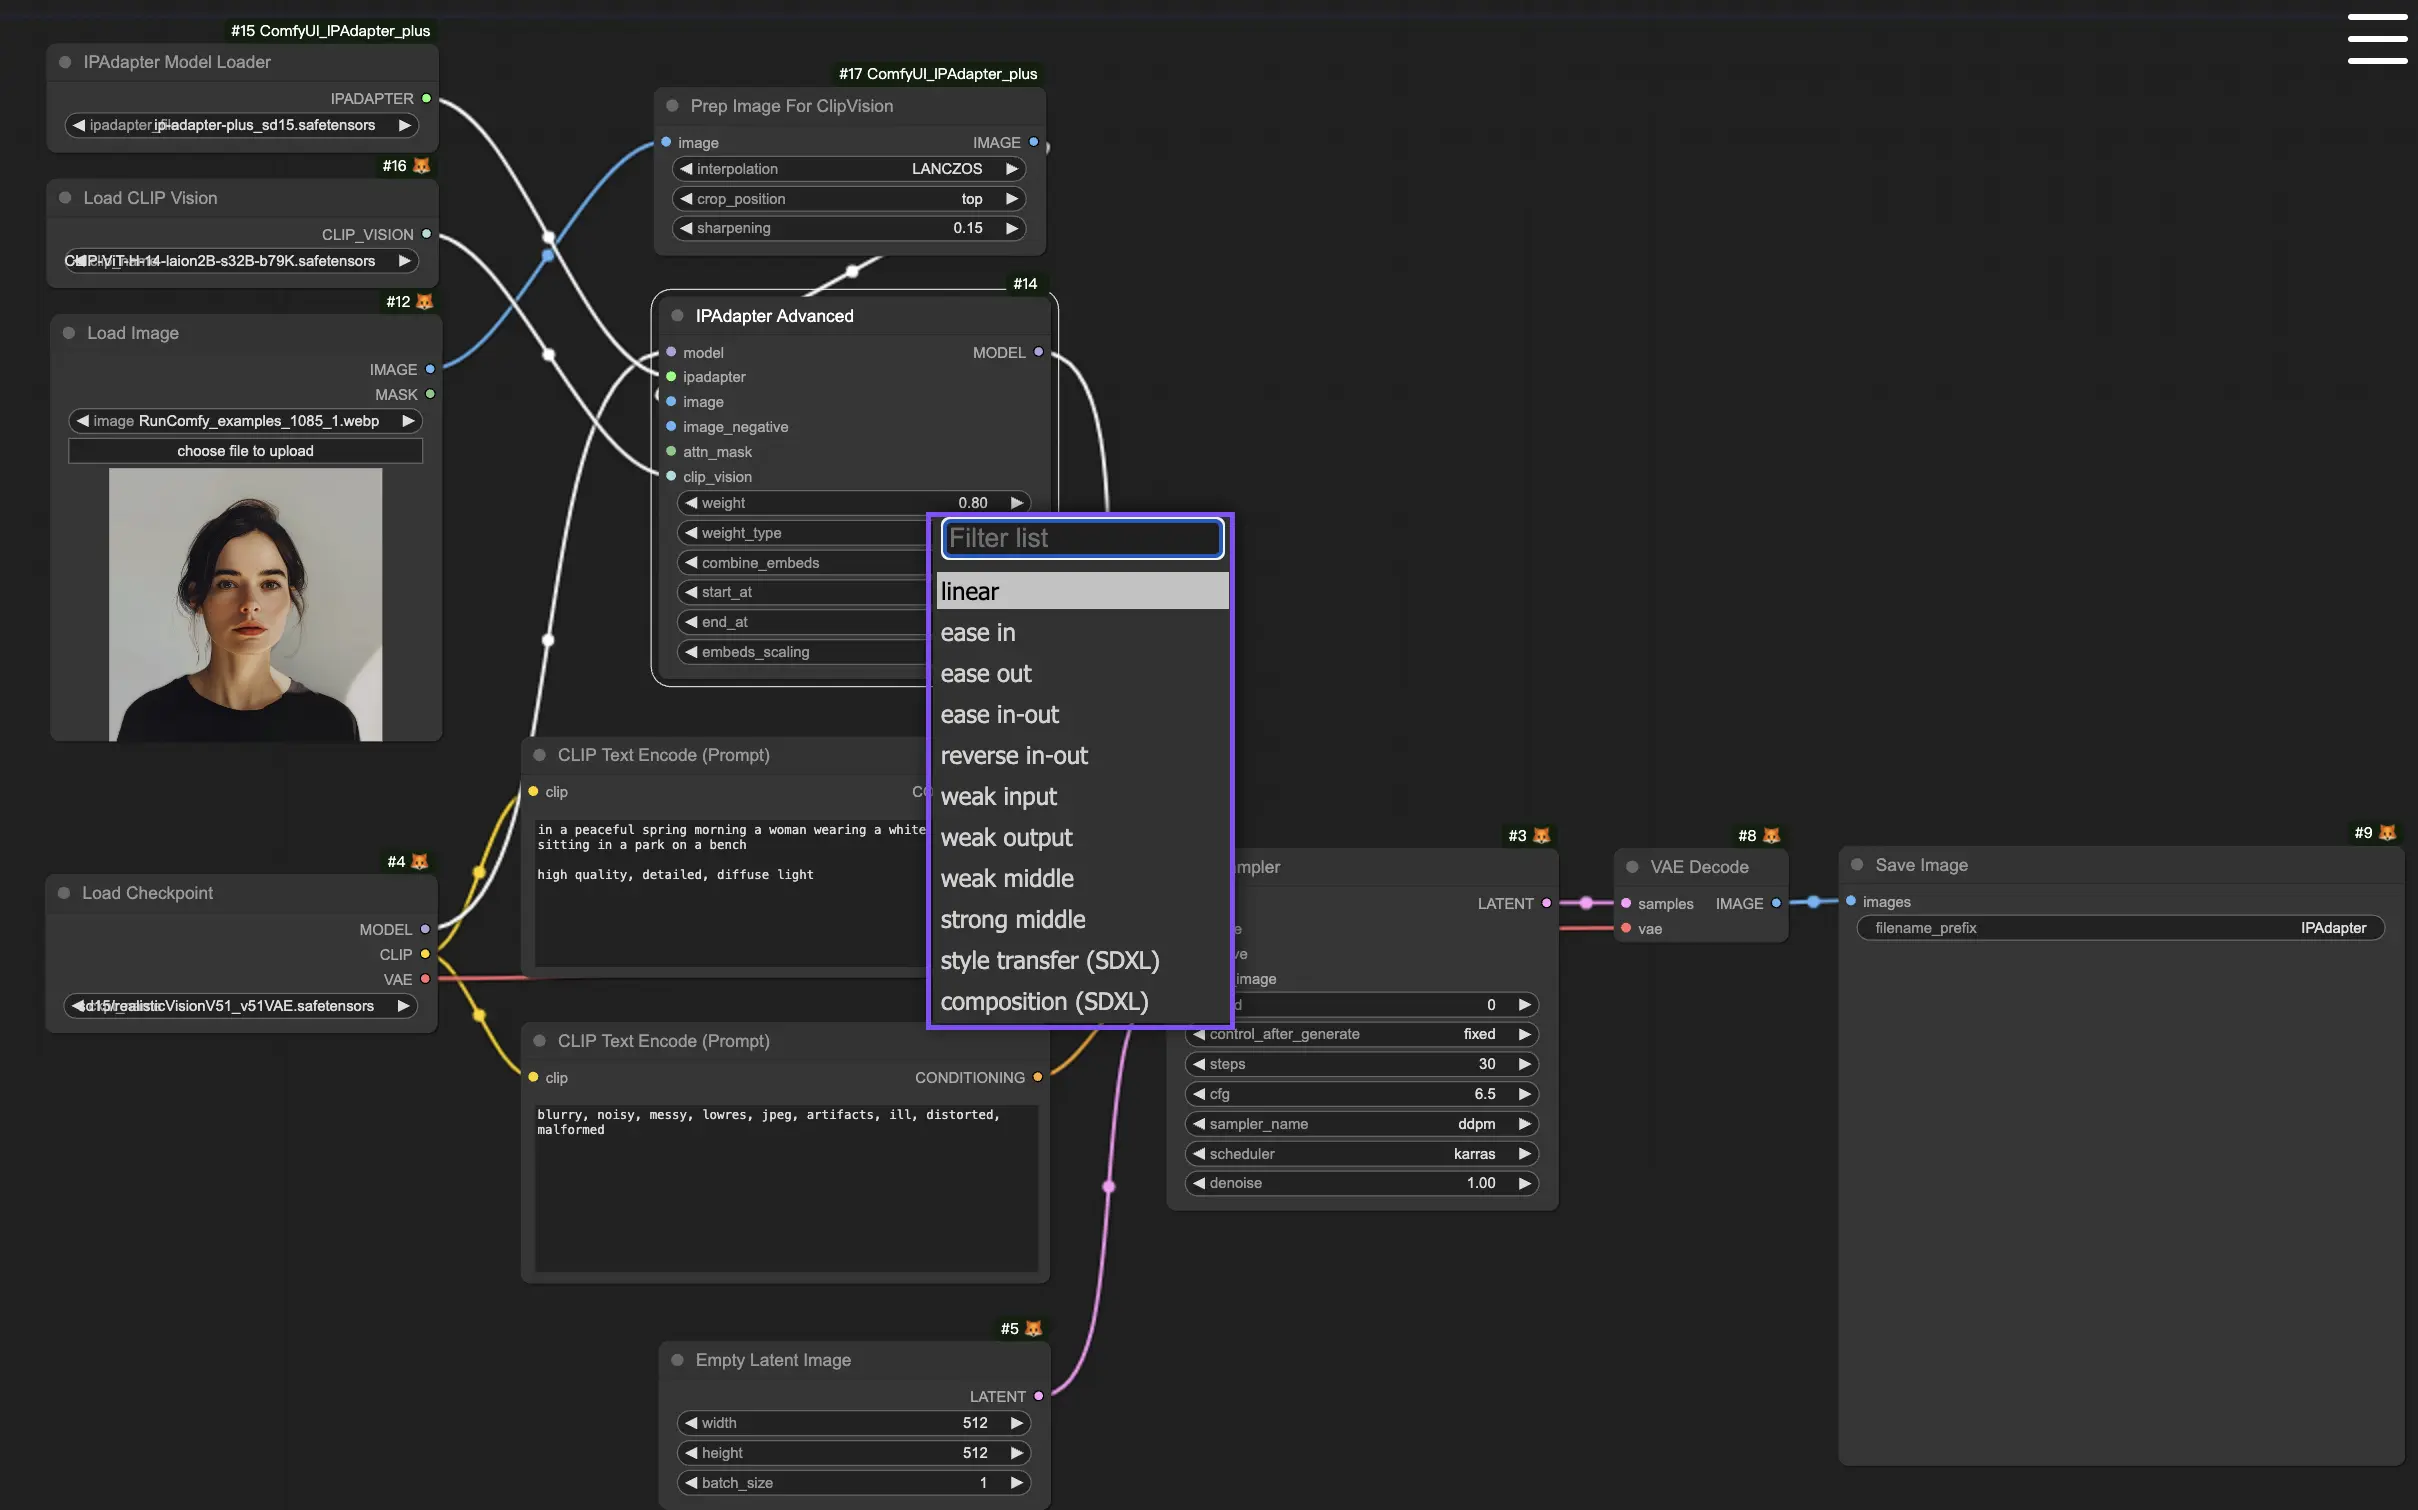
Compared with the "IPAdapter" node, the "IPAdapter Advanced" node opens more options for "weight type", each affecting the output in a distinctive manner:
- Linear: Applies weight evenly from the start to the end of the processing pipeline, ensuring a consistent influence throughout without modulation in intensity.
- Ease In: Gradually increases weight from the beginning, allowing a smooth introduction of the effect as it progresses through the pipeline.
- Ease Out: Initiates with a strong influence that gradually diminishes, effectively tapering the effect towards the end of the processing.
- Ease In-Out: A combination of both "Ease In" and "Ease Out" effects; it starts and ends with a milder influence, peaking in the middle for maximum impact.
- Weak Input: Specifically reduces the effect's influence at the start of the processing chain, making the initial elements less pronounced.
- Weak Output: Diminishes the influence towards the end of the processing chain, softening the concluding aspects of the image.
- Weak Middle: Minimizes the effect's influence at the midpoint of the processing chain, often to maintain clarity or focus on the beginning and end aspects.
- Strong Middle: Amplifies the effect in the central part of the processing chain, intensifying the impact on the core elements of the image.
- Style Transfer (SDXL): Designed exclusively for SDXL models, this option focuses on adapting the style from the reference image to the target image, leveraging SDXL's capabilities for a nuanced stylistic transformation.
- Composition (SDXL): Tailored for SDXL models, it aims to merge the compositional elements of the reference and target images, emphasizing the arrangement and interaction of elements within the space.
2.2.4. Expanded Parameters in "IPAdapter Advanced" Node: Combine Embeds#
The "Combine Embeds" feature is essential for those looking to merge inputs from multiple sources into a singular, coherent visual output. By utilizing "Combine Embeds," you have the flexibility to craft images that incorporate a wide range of artistic influences and inspirations, resulting in truly personalized and innovative creations. The methods provided for combining embeds, such as Concat, Add, Subtract, Average, and Norm Average, offer diverse approaches to merging these influences. These will be explored in detail in Section 4, "ComfyUI IPAdapter Image Merge Feature.”
3. ComfyUI IPAdapter Plus - FaceID#
In the configuration mentioned above, you may have noticed the absence of the FaceID model. To integrate the Face ID Model into your workflow, two specific nodes are required: the "IPAdapter Unified Loader FaceID" Node and the "IPAdapter FaceID" Node.
3.1. ComfyUI IPAdapte FaceID Workflow#
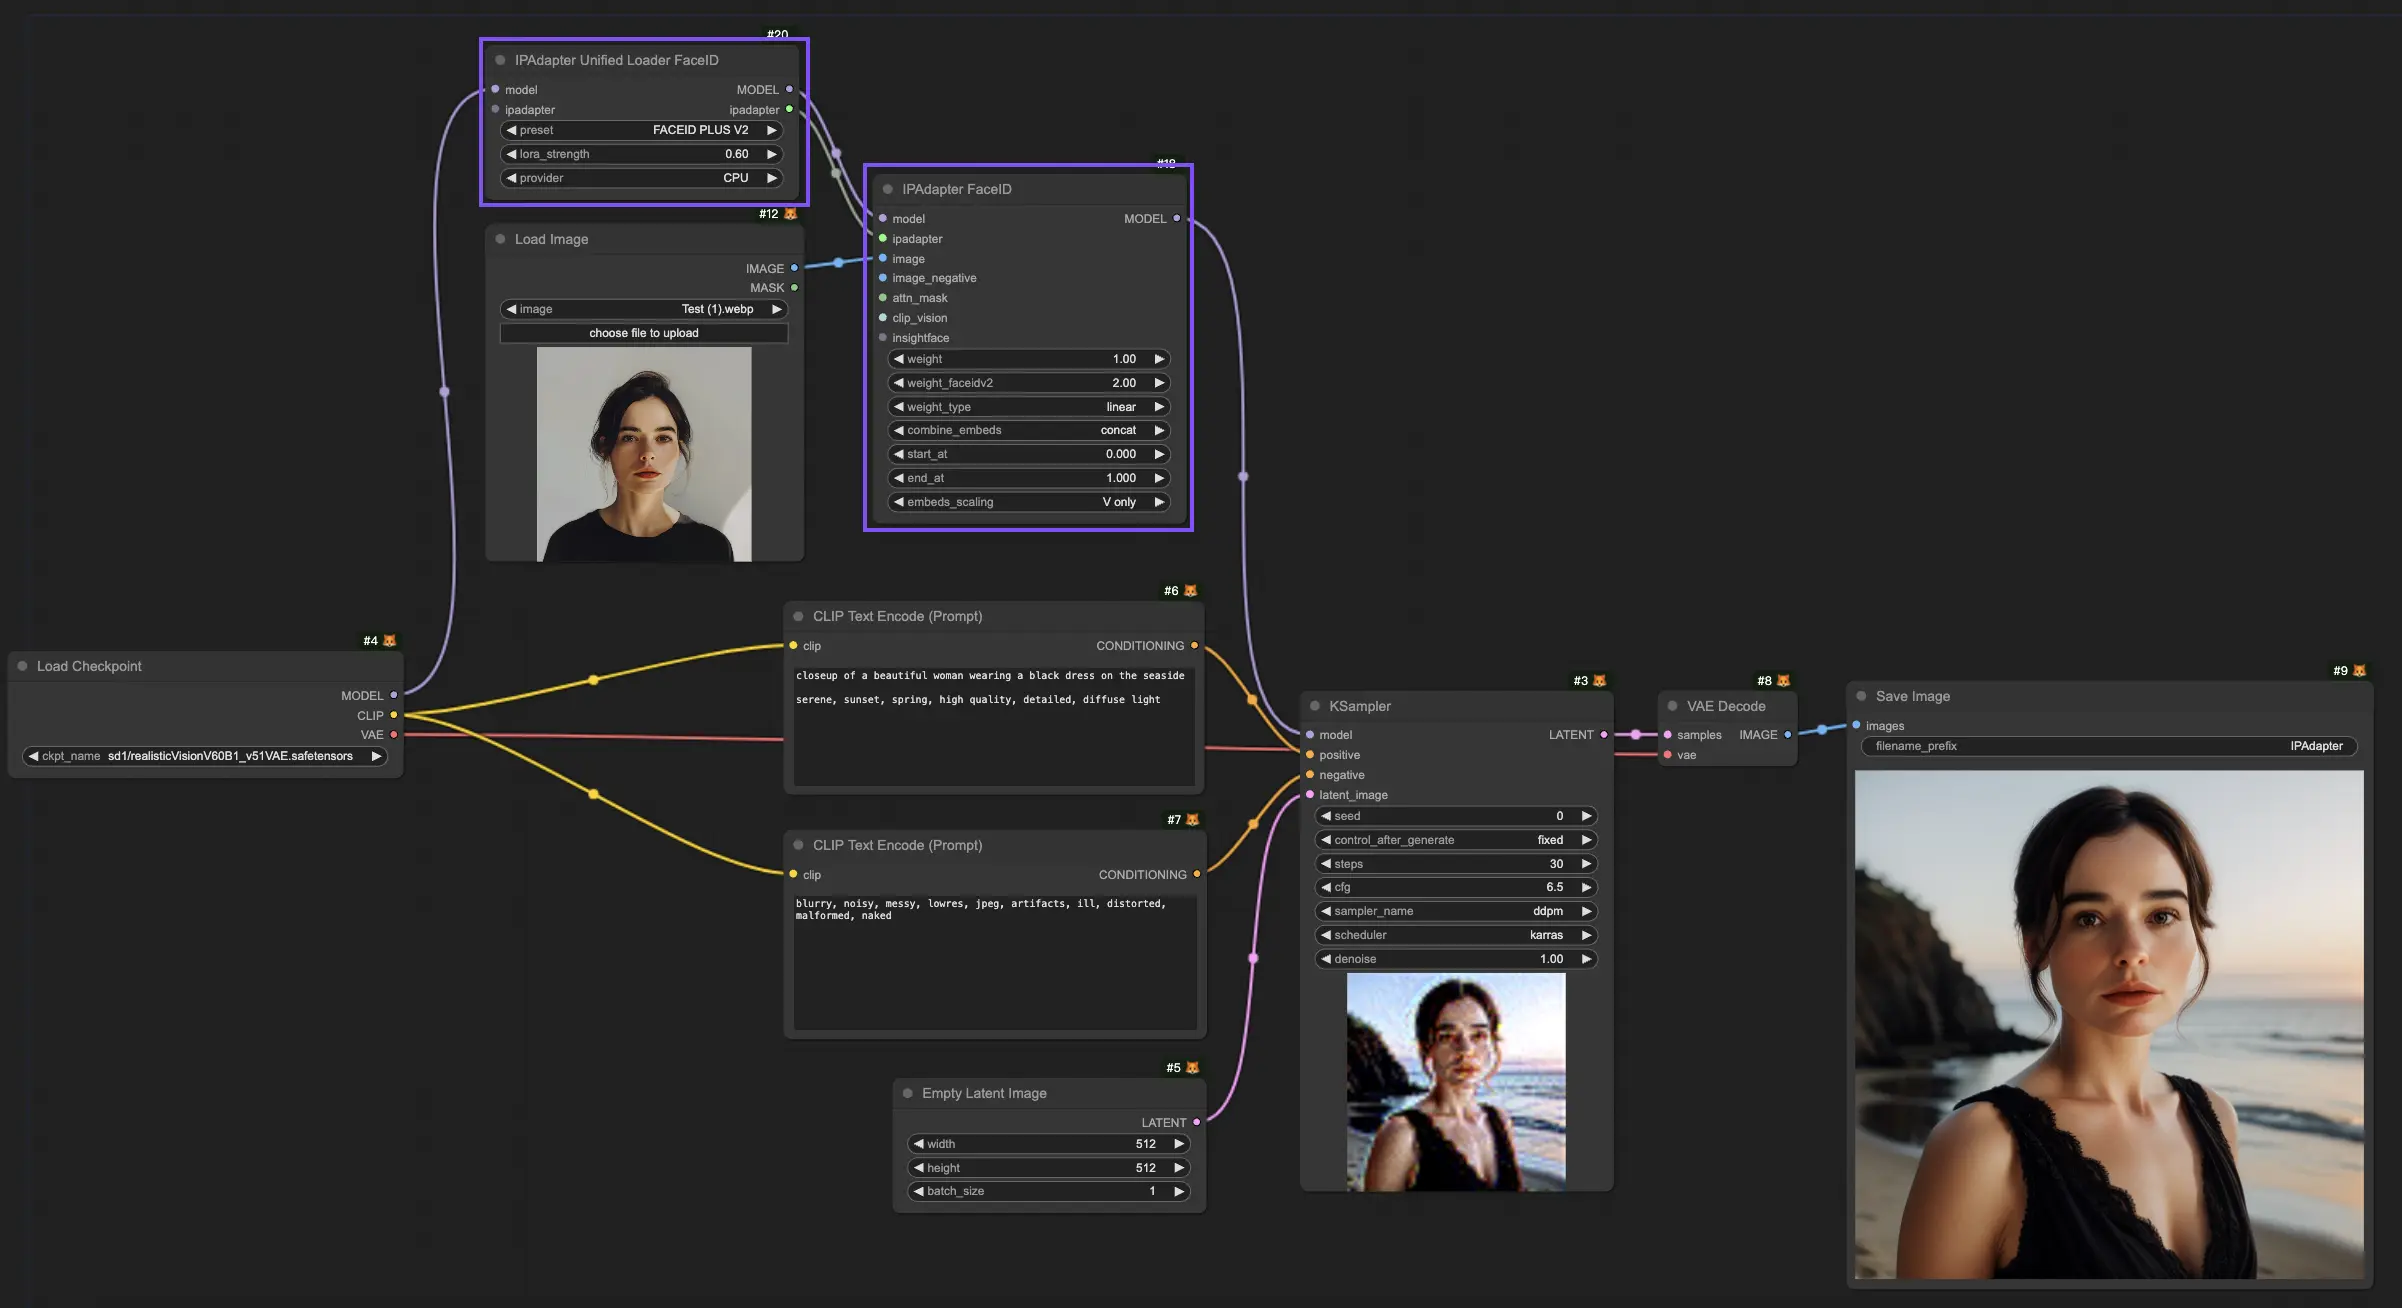
When working within the "IPAdapter Unified Loader FaceID" node, you can select the latest "Face ID Plus V2" from the dropdown menu of available models. This action instructs the loader to automatically gather and prepare all the necessary dependencies unique to the Face ID Plus V2 model.
Opt for the CPU as the Provider. Despite the potential availability of a high-performance GPU, it is advisable to configure the Face ID model to utilize the CPU as its provider. This recommendation stems from the benefit of preserving valuable Video RAM (VRAM), a strategy that proves advantageous and aids in optimizing the overall efficiency and effectiveness of your project's resource allocation.
4. ComfyUI IPAdapter Plus - Image Merge Feature#
How to use multiple reference images to generate a new one? Here are two methods to achieve this with ComfyUI's IPAdapter Plus, providing you with the flexibility and control necessary for creative image generation.
4.1. Method 1: Utilizing the ComfyUI "Batch Image" Node#
To start with the "Batch Image" node, you must first select the images you wish to merge. These images are then inputted into the node, creating a unified batch. This batch is subsequently introduced into the IPAdapter pipeline, applying each image sequentially to the generative process.
The node “IPAdapter Advanced” introduces the "Combine Embeds" options, granting you sophisticated control over how multiple images influence the generation. These options—Concat, Add, Subtract, Average, and Norm Average—dictate how embeddings from different images are merged, each leading to unique results:
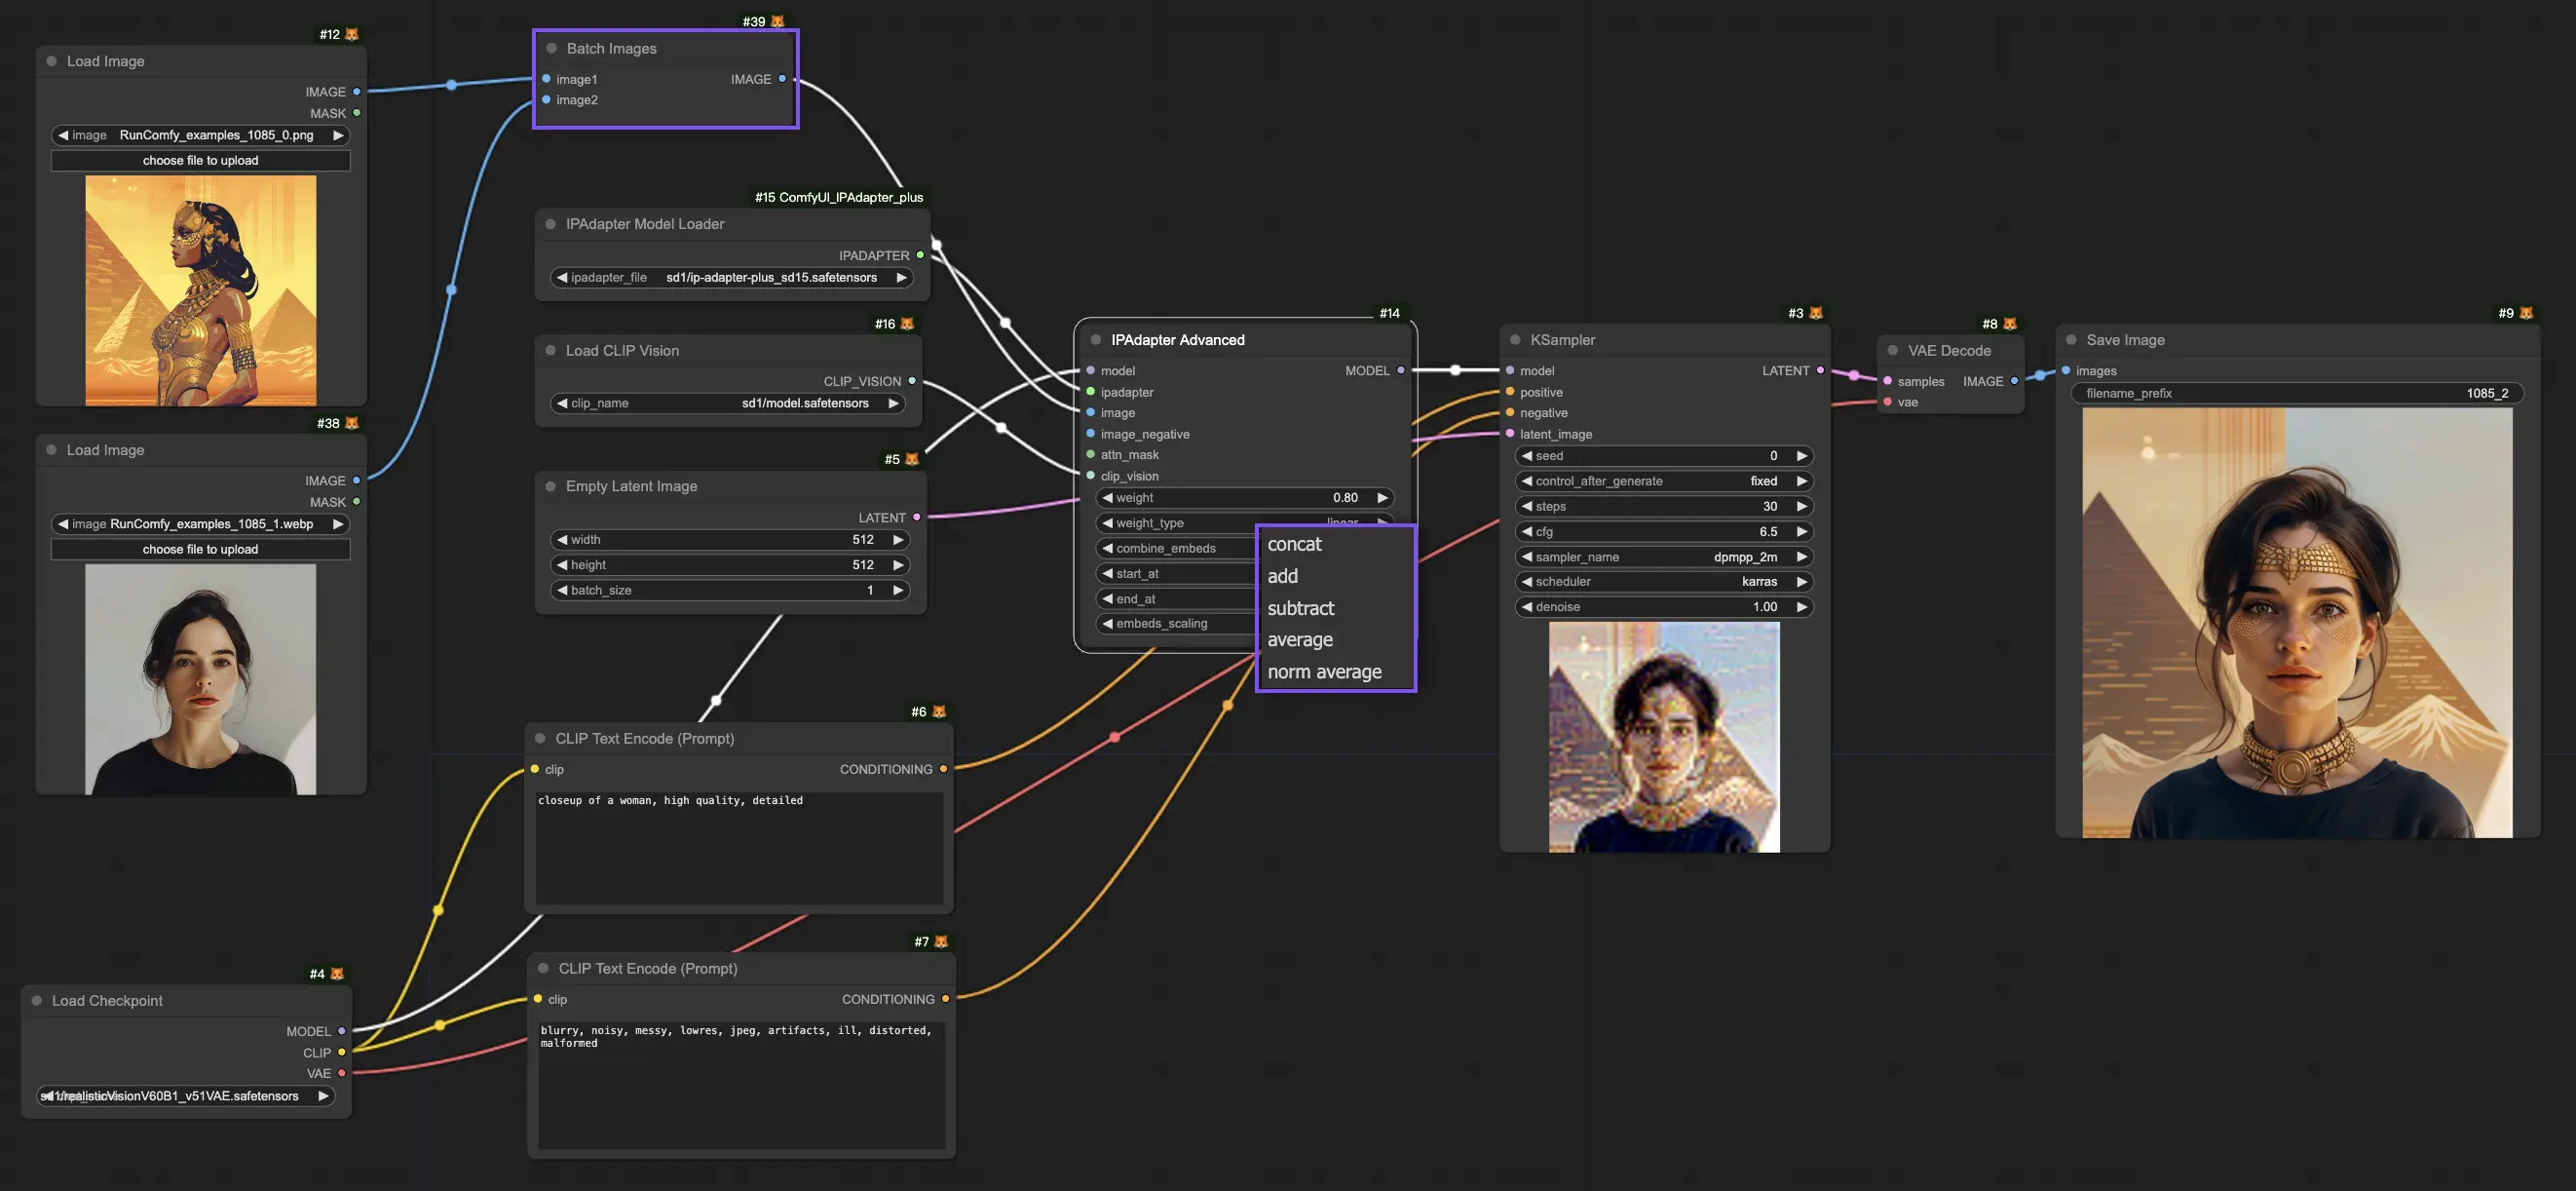
- Concat: This option concatenates the embeddings from each image, effectively preserving and combining the information from all input images into a single, extended format. This approach is beneficial for incorporating a broad spectrum of features from each image but may lead to complexity due to the increased amount of information being processed.
- Add: Summing the embeddings of the images, the "Add" method synergizes their influences, enhancing traits that are common across the images. This can be particularly useful for emphasizing shared features or themes, potentially leading to a more unified and coherent output.
- Subtract: Contrary to adding, the "Subtract" method differentiates the embeddings by subtracting them, highlighting the unique aspects of each image. This approach allows for creative exploration of contrasts and can be used to diminish certain elements present in the reference images, offering a novel avenue for artistic expression.
- Average: By averaging the embeddings, this method achieves a balanced amalgamation of the images' characteristics, ensuring that the influence of any single image is not overly dominant. This technique is ideal for attaining a harmonious integration of multiple images, providing a cohesive output that evenly represents the input images.
- Norm Average (Normalized Average): This option adjusts the influence of each image based on its relative weight within the batch, enabling precise control over how each reference image contributes to the final composition. It allows for the fine-tuning of the generated image's appearance, ensuring that the end result aligns closely with the user's vision.
In the following picture, by using different "Combine Embeds," you will obtain different results.
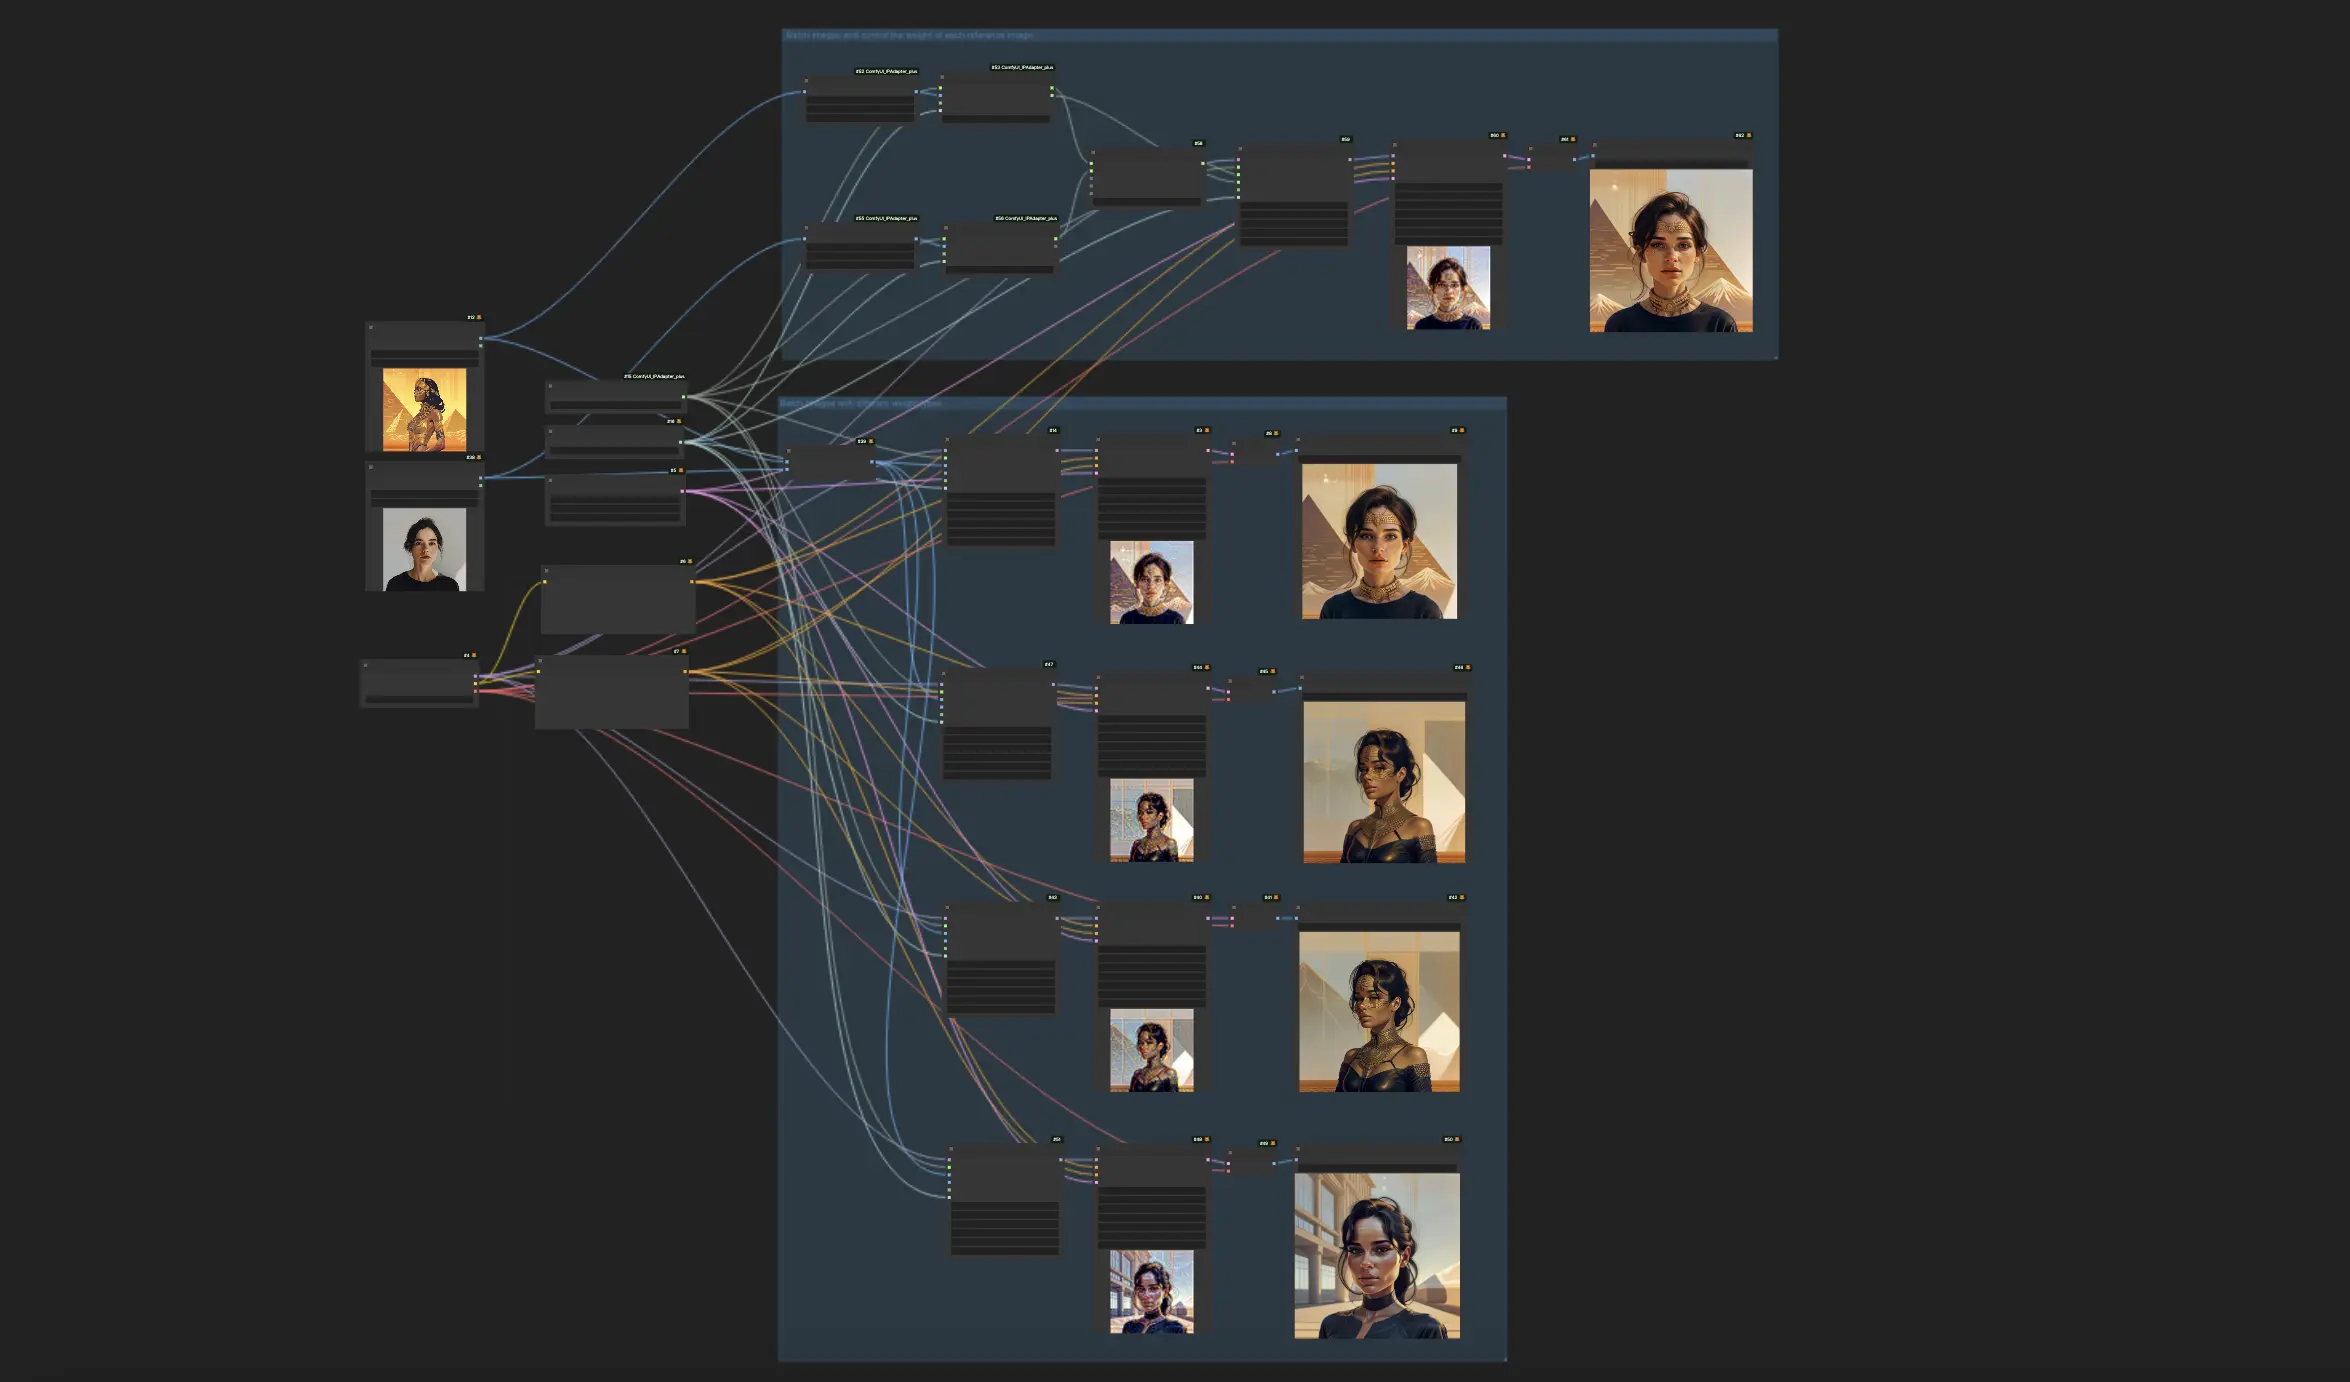
4.2. Method 2: Precise Control Over Reference Weights Using ComfyUI "IPAdapter Encoder" Node#
For those seeking finer control over how reference images are weighted in the final image, IPAdapter provides a solution through the use of "IPAdapter Encoder" nodes and a "IPAdapter Combine Embeds" node.

4.2.1. Utilizing "IPAdapter Encoder" Nodes#
Each image in the merging process is processed through an IPAdapter encoder node, which encodes the images for compatibility with the IPAdapter. Within "IPAdapter Encoder" nodes, users can assign specific weights to each image, dictating their influence on the merged output. Adjusting these weights allows for nuanced control over the dominance or subtlety of each image in the composition.
4.2.2. Merging with the "IPAdapter Combine Embeds" Node#
After encoding the images and setting their weights, the "IPAdapter Combine Embeds" node merges their encoded representations. It combines the positive embeds from the encoder nodes, reflecting the intended influence of each image on the merged output. This balanced embedding is then ready for synthesis.
4.2.3. Connection to the "IPAdapter" Node#
The synthesized embedding is finally processed by the IP Adapter to produce the new image. Although connecting negative embeds is optional, doing so is recommended to conserve computational resources. By selecting any of the two negative embeds from the encoder nodes and linking it to IPAdapter node, the process is optimized, minimizing unnecessary computation and streamlining the merging process.
By following these methods, you can effectively merge multiple images to generate new, creative compositions, taking full advantage of ComfyUI IPAdapter Plus capabilities!
5. ComfyUI IPAdapter Plus - IPAdapter Tile for Tall Images#
When processing tall images, you might encounter a unique challenge: the CLIP Vision encoder, a core component of the IPAdapter framework, inherently prefers square images. This preference can lead to cropping issues when directly connecting a tall image to an IPAdapter node, typically resulting in only the central portion of the image influencing the output. Consequently, the top and bottom sections of your image might be ignored, affecting the overall quality of the generated content.
To address this issue, the "IPAdapter Tiled" node offers a tailored solution. It allows for the direct connection of tall images by segmenting the picture into smaller, manageable tiles. This method ensures that every part of your reference image is taken into account during the generation process, avoiding the problem of partial image neglect.
5.1 ComfyUI IPAdapter Tile Workflow#
An additional feature of the "IPAdapter Tiled" node is the tiles and masks output, which provides a visual representation of how your image is processed. This feature shows the specific tiles used and their corresponding masks, offering you insight into the inner workings of the generative process. Understanding how your image is segmented and processed can help you make informed adjustments to achieve your desired outcomes.
Furthermore, the "IPAdapter Tiled" node allows for customized mask adjustments, offering flexibility to spotlight or concentrate on particular sections of your image. By tailoring these masks, you can direct more attention to specific elements of your tall image, granting enhanced control over the outcome. This feature proves invaluable for emphasizing or minimizing certain aspects within your image, ensuring the generated content aligns precisely with your vision.
Therefore, the incorporation of the "IPAdapter Tiled" node into ComfyUI IPAdapter Plus markedly improves your capacity to handle image-to-image conditioning projects involving tall images.
6. ComfyUI IPAdapter Plus - Style and Composition#
How to use the ComfyUI IPAdapter Plus to manipulate and combine the styles and compositions of reference images to create new, compelling visuals. The ComfyUI IPAdapter Plus offers a powerful suite of tools for artists and designers to experiment with, including the ability to transfer the style of one image, keep the composition of another, or even merge both style and composition from different references into a single image.
6.1. ComfyUI IPAdapter Plus for Style Transfer#
To transfer the style of a reference image, Like a 1-image LoRA, onto your target content using ComfyUI IPAdapter Advanced node, follow these steps:
Setting Up the "IPAdapter Advanced" Node: Begin by incorporating an "IPAdapter Advanced" node into your workflow.
Configuring the Node: Within the settings of ComfyUI IPAdapter Advanced node, locate the "Weight Type" option. Use the dropdown menu to select "Style Transfer (SDXL)." This configuration directs the adapter to prioritize the transfer of your reference image's visual style onto the target.
Adjusting the Style Transfer "Weight": The "weight" setting determines the strength of the style transfer. Increasing this value amplifies the influence of the reference style on your target image, making the effect more distinct.
6.2. ComfyUI IPAdapter Plus for Maintaining Composition#
To retain the composition of a reference image while generating a new one, you'll also use ComfyUI IPAdapter Advanced node but with a different setting:
Setup "IPAdapter Advanced" Node: As before, add an IPAdapter Advanced node to your workflow.
Configure the Node: Choose "Composition (SDXL)" from the "Weight Type" dropdown. This instructs the adapter to maintain the compositional elements of the reference image in the new generation.
Adjust the Composition "Weight": Modify the "weight" setting to influence how closely the new image adheres to the composition of the reference. A higher weight will more strictly enforce the reference's composition.
6.3. ComfyUI IPAdapter Plus for Maintaining Composition and Style Transfer#
For projects that require both the style of one image and the composition of another to be transferred, the “IPAdapter style & composition SDXL” node offers a streamlined solution:
Choose "IPAdapter Style & Composition SDXL" Node: Add this specialized node to your project to simultaneously handle style and composition transfers.
Load Style and Composition References: The "IPAdapter Style & Composition SDXL" node allows for two inputs, one for the image whose style you want to transfer and another for the image whose composition you wish to retain. Load both references accordingly.
Configure "Weights" for Both Style and Composition: The "IPAdapter Style & Composition SDXL" node provides separate weight settings for style and composition. Adjust these weights to balance the influence of each reference on the final image. Setting a higher weight for style or composition will prioritize that aspect in the generated image.
By following these steps and experimenting with the settings, you can leverage the ComfyUI IPAdapter Plus to create visually stunning images that merge the best of both worlds: the distinctive style of one piece of art with the thoughtful composition of another.
🌟🌟🌟 ComfyUI Online - Experience the IPAdapter Plus Workflow Now 🌟🌟🌟#
If you're interested in exploring the ComfyUI IPAdapter Plus (IPAdapter V2) Workflow, use the following ComfyUI web. It comes fully equipped with all the essential customer nodes and models, enabling seamless creativity without the need for manual setups. Start gaining hands-on experience immediately!