This workflow is inspired by enigmatic_e with some modifications. For more information, please visit his YouTube channel.
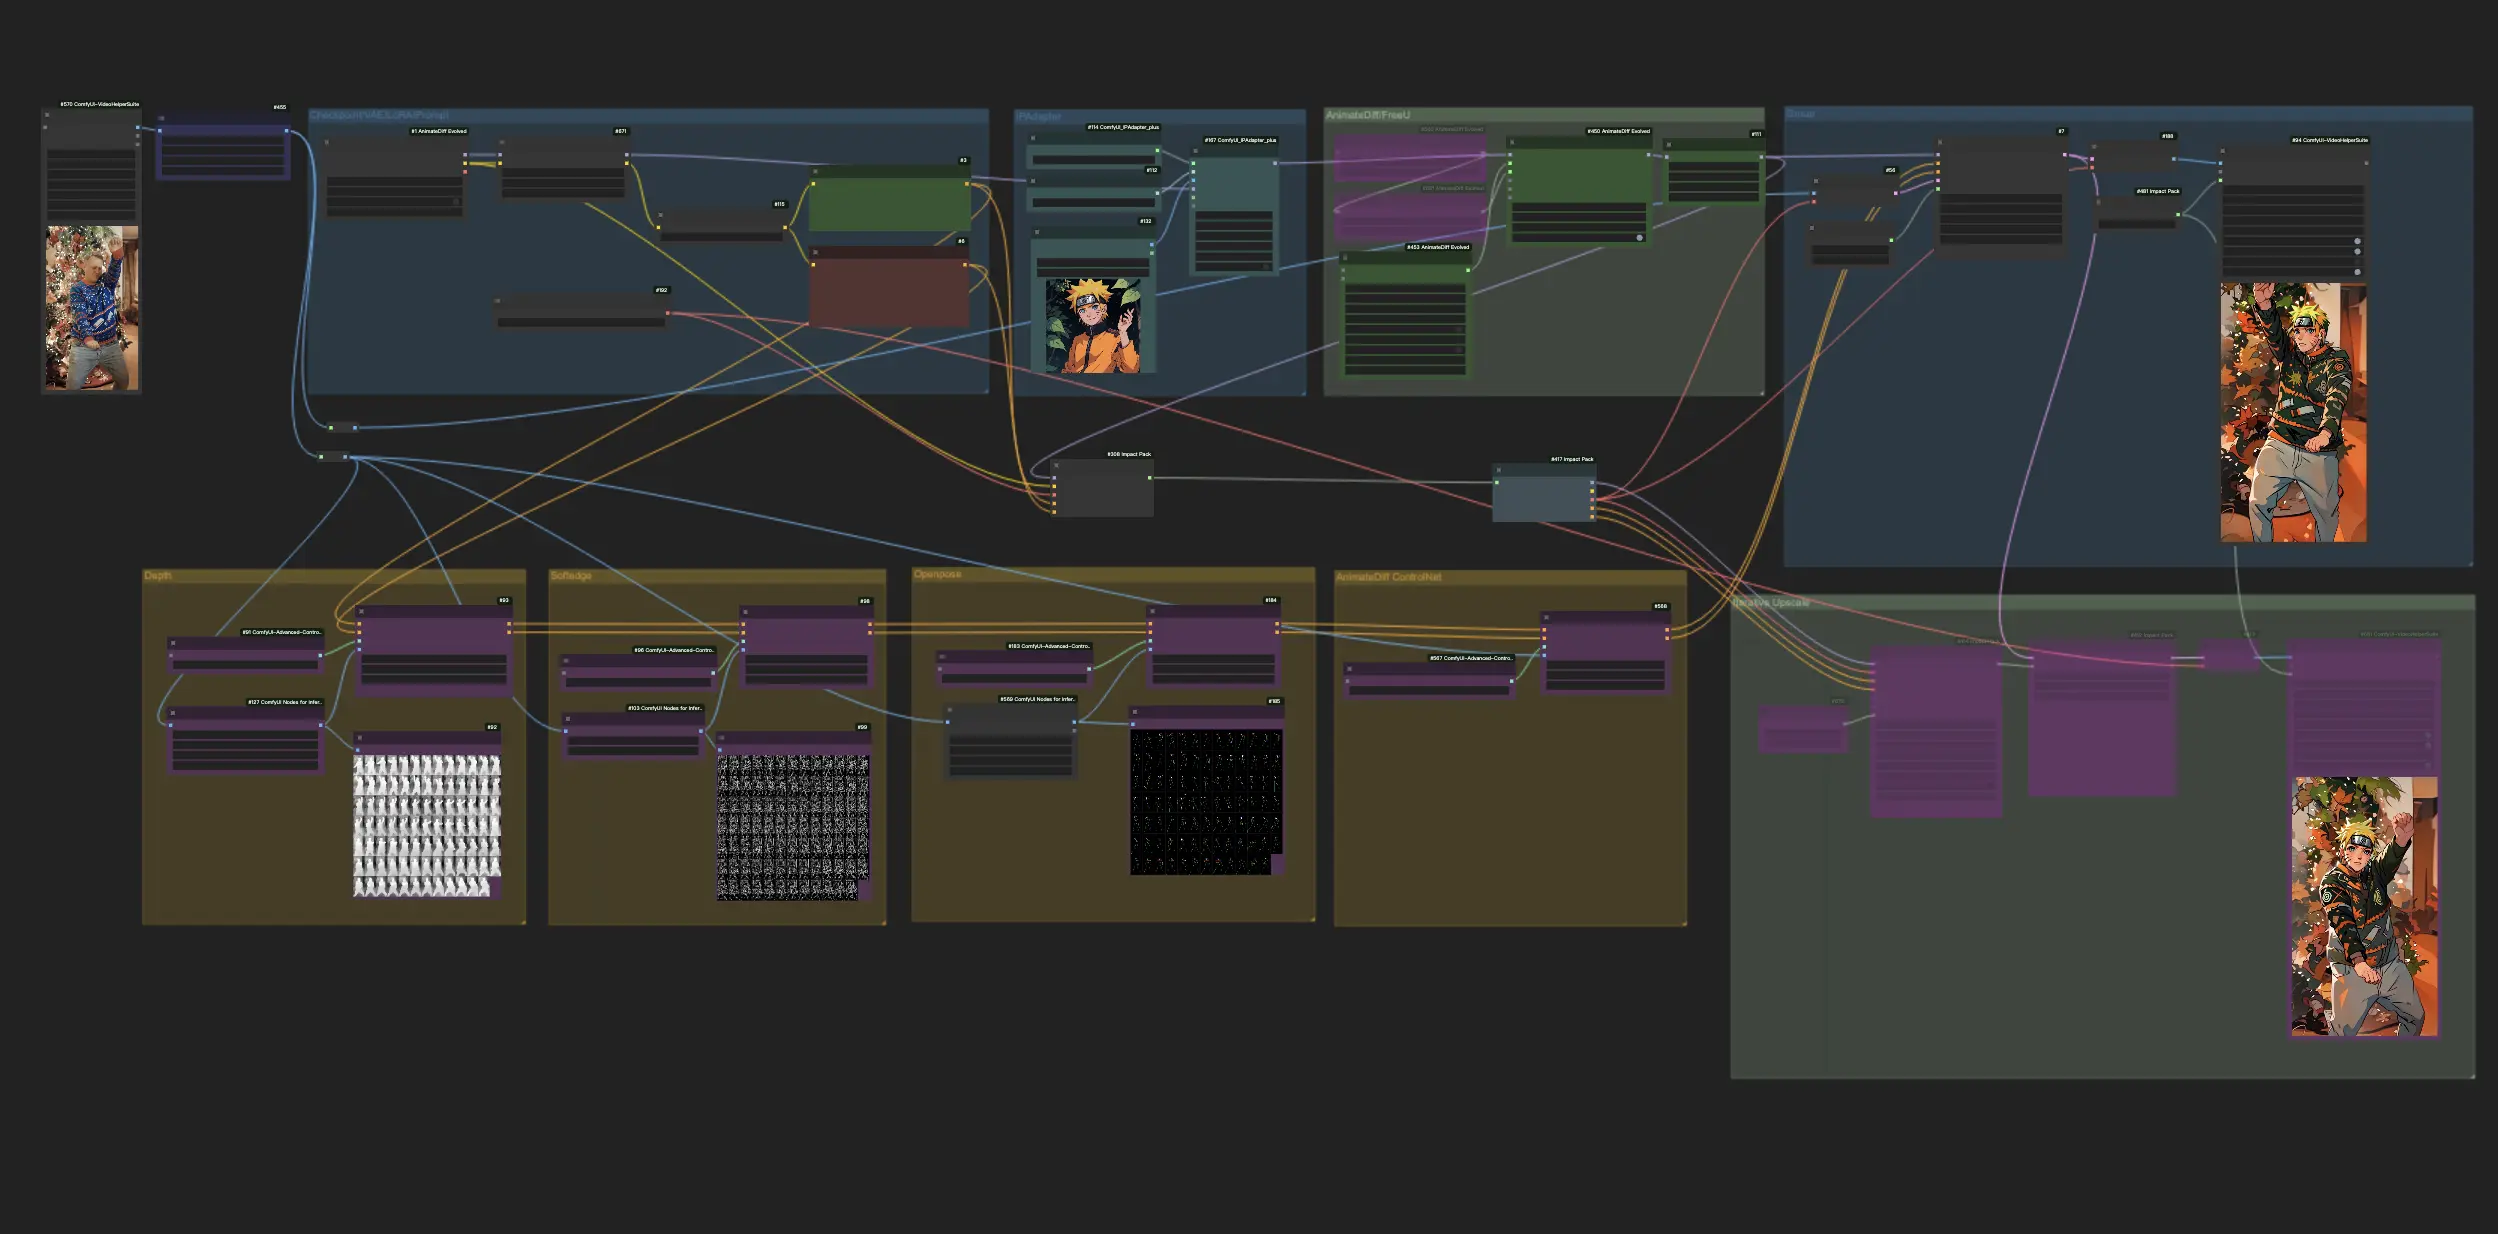
1. ComfyUI Workflow: AnimateDiff + ControlNet + IPAdapter | Japanese Anime Style#
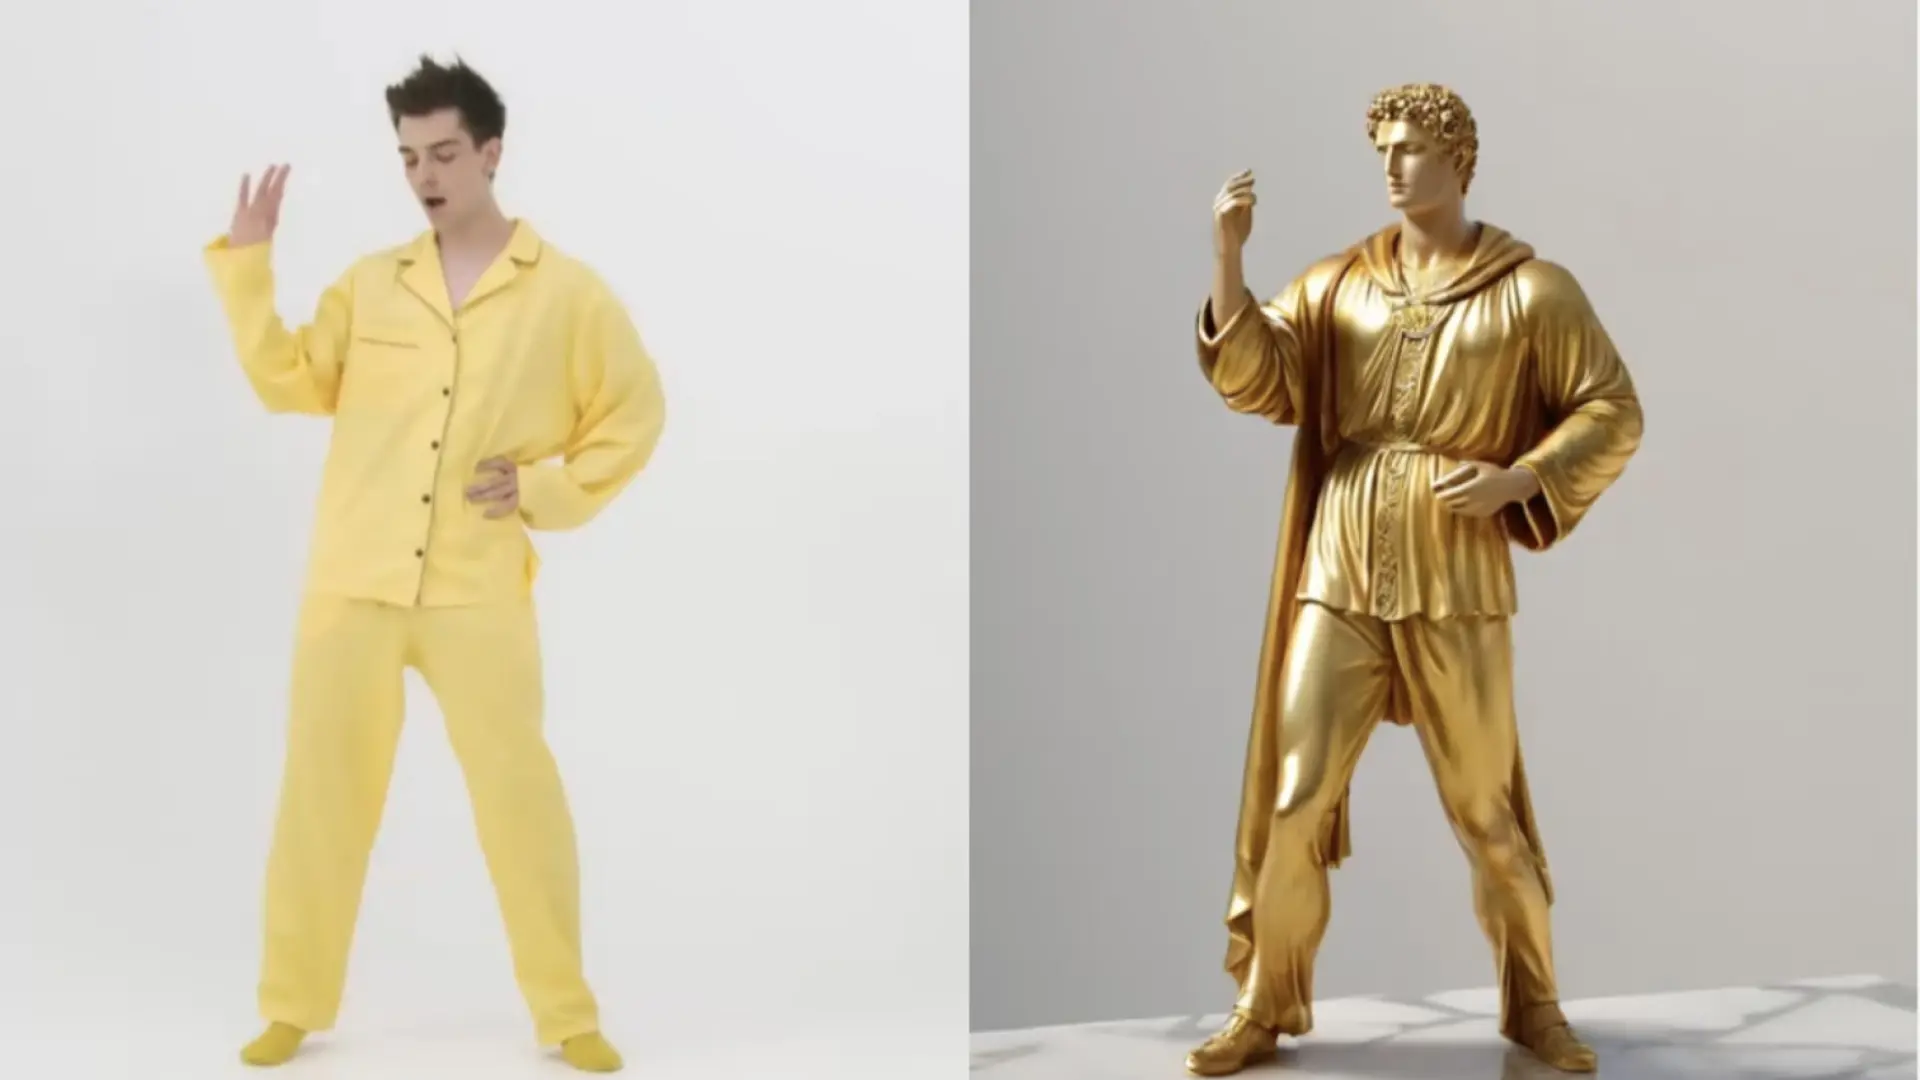
This workflow lets you transform standard videos into enchanting Japanese anime creations using AnimateDiff, ControlNet, and IPAdapter. Feel free to experiment with various checkpoints, LoRA settings, and reference images for the IPAdapter to craft your unique style. It's a fun and creative way to bring your videos to life in the anime world!
2. Overview of AnimateDiff#
Please check out the details on How to use AnimateDiff in ComfyUI
3. How to Use ControlNet#
3.1. Understanding ControlNet#
ControlNet revolutionizes the way we generate images by bringing a new level of spatial control to text-to-image diffusion models. This cutting-edge neural network architecture partners beautifully with giants like Stable Diffusion, harnessing their vast libraries—forged from billions of images—to weave spatial nuances directly into the fabric of image creation. From sketching out edges to mapping human stances, depth perception, or segmenting visuals, ControlNet empowers you to mold the imagery in ways that go far beyond the scope of mere text prompts.
3.2. The Innovation of ControlNet#
At its core, ControlNet is ingeniously straightforward. It starts by safeguarding the integrity of the original model's parameters—keeping the base training intact. Then, ControlNet introduces a mirrored set of the model's encoding layers, but with a twist: they're trained using "zero convolutions." These zeros as a starting point mean the layers gently fold in new spatial conditions without causing a ruckus, ensuring that the model's original talents are preserved even as it embarks on new learning paths.
3.3. Understand ControlNets and T2I-Adapters#
Both ControlNets and T2I-Adapters play crucial roles in the conditioning of image generation, with each offering distinct advantages. T2I-Adapters are recognized for their efficiency, particularly in terms of speeding up the image generation process. Despite this, ControlNets are unparalleled in their ability to intricately guide the generation process, making them a powerful tool for creators.
Considering the overlap in functionalities between many T2I-Adapter and ControlNet models, our discussion will primarily focus on ControlNets. However, it's worth noting that the RunComfy platform has preloaded several T2I-Adapter models for ease of use. For those interested in experimenting with T2I-Adapters, you can seamlessly load these models and integrate them into your projects.
Choosing between ControlNet and T2I-Adapter models in ComfyUI does not affect the use of ControlNet nodes or the consistency of the workflow. This uniformity ensures a streamlined process, allowing you to leverage the unique benefits of each model type according to your project needs.
3.4. Use of ControlNet Nodes#
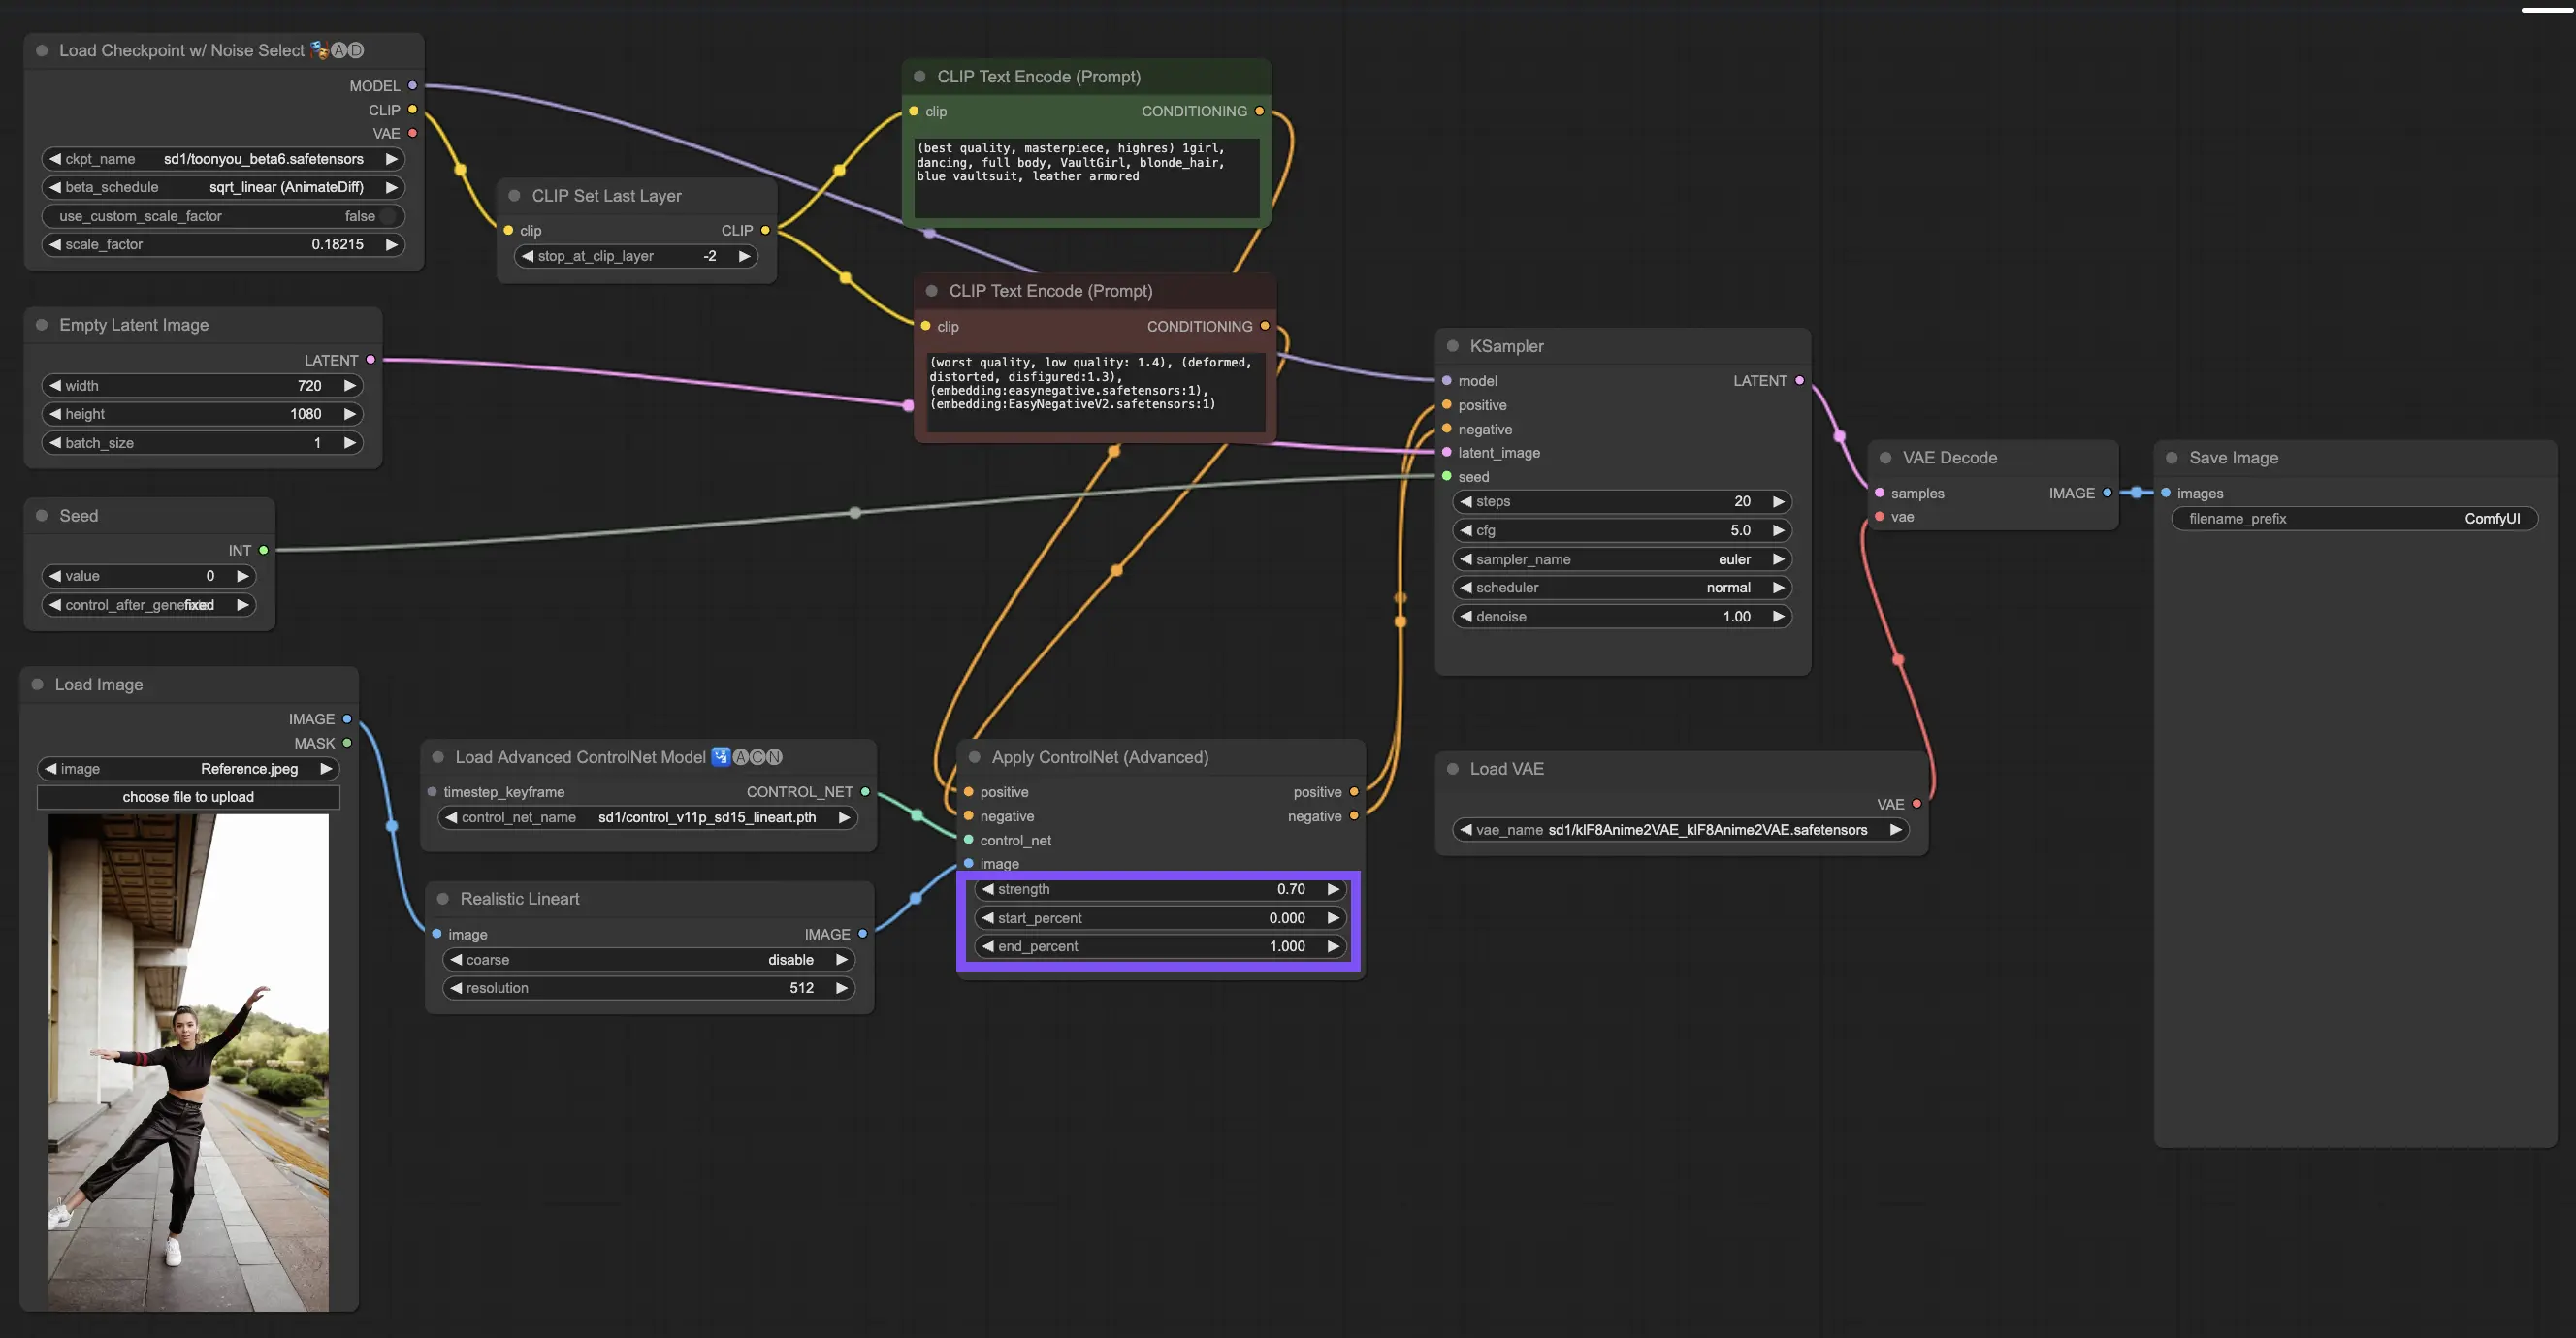
3.4.1. Loading the “Apply ControlNet” Node
To begin, you'll need to load the "Apply ControlNet" Node into your ComfyUI. This is your first step toward a dual-conditioned image crafting journey, blending visual elements with textual prompts.
3.4.2. Understanding the Inputs of “Apply ControlNet” Node
Positive and Negative Conditioning: These are your tools for shaping the final image—what it should embrace and what it should avoid. Connect these to the "Positive prompt" and "Negative prompt" slots to sync them with the text-based part of your creative direction.
Selecting the ControlNet Model: You'll need to link this input to the "Load ControlNet Model" node's output. This is where you decide whether to use a ControlNet or a T2IAdaptor model based on the specific traits or styles you're aiming for. While we're focusing on ControlNet models, mentioning some sought-after T2IAdaptors is worthwhile for a well-rounded view.
Preprocessing Your Image: Connect your image to a “ControlNet Preprocessor” node, which is vital to ensure your image is ControlNet-ready. It's essential to match the preprocessor to your ControlNet model. This step adjusts your original image to fit the model's needs perfectly—resizing, recoloring, or applying necessary filters—preparing it for use by ControlNet.
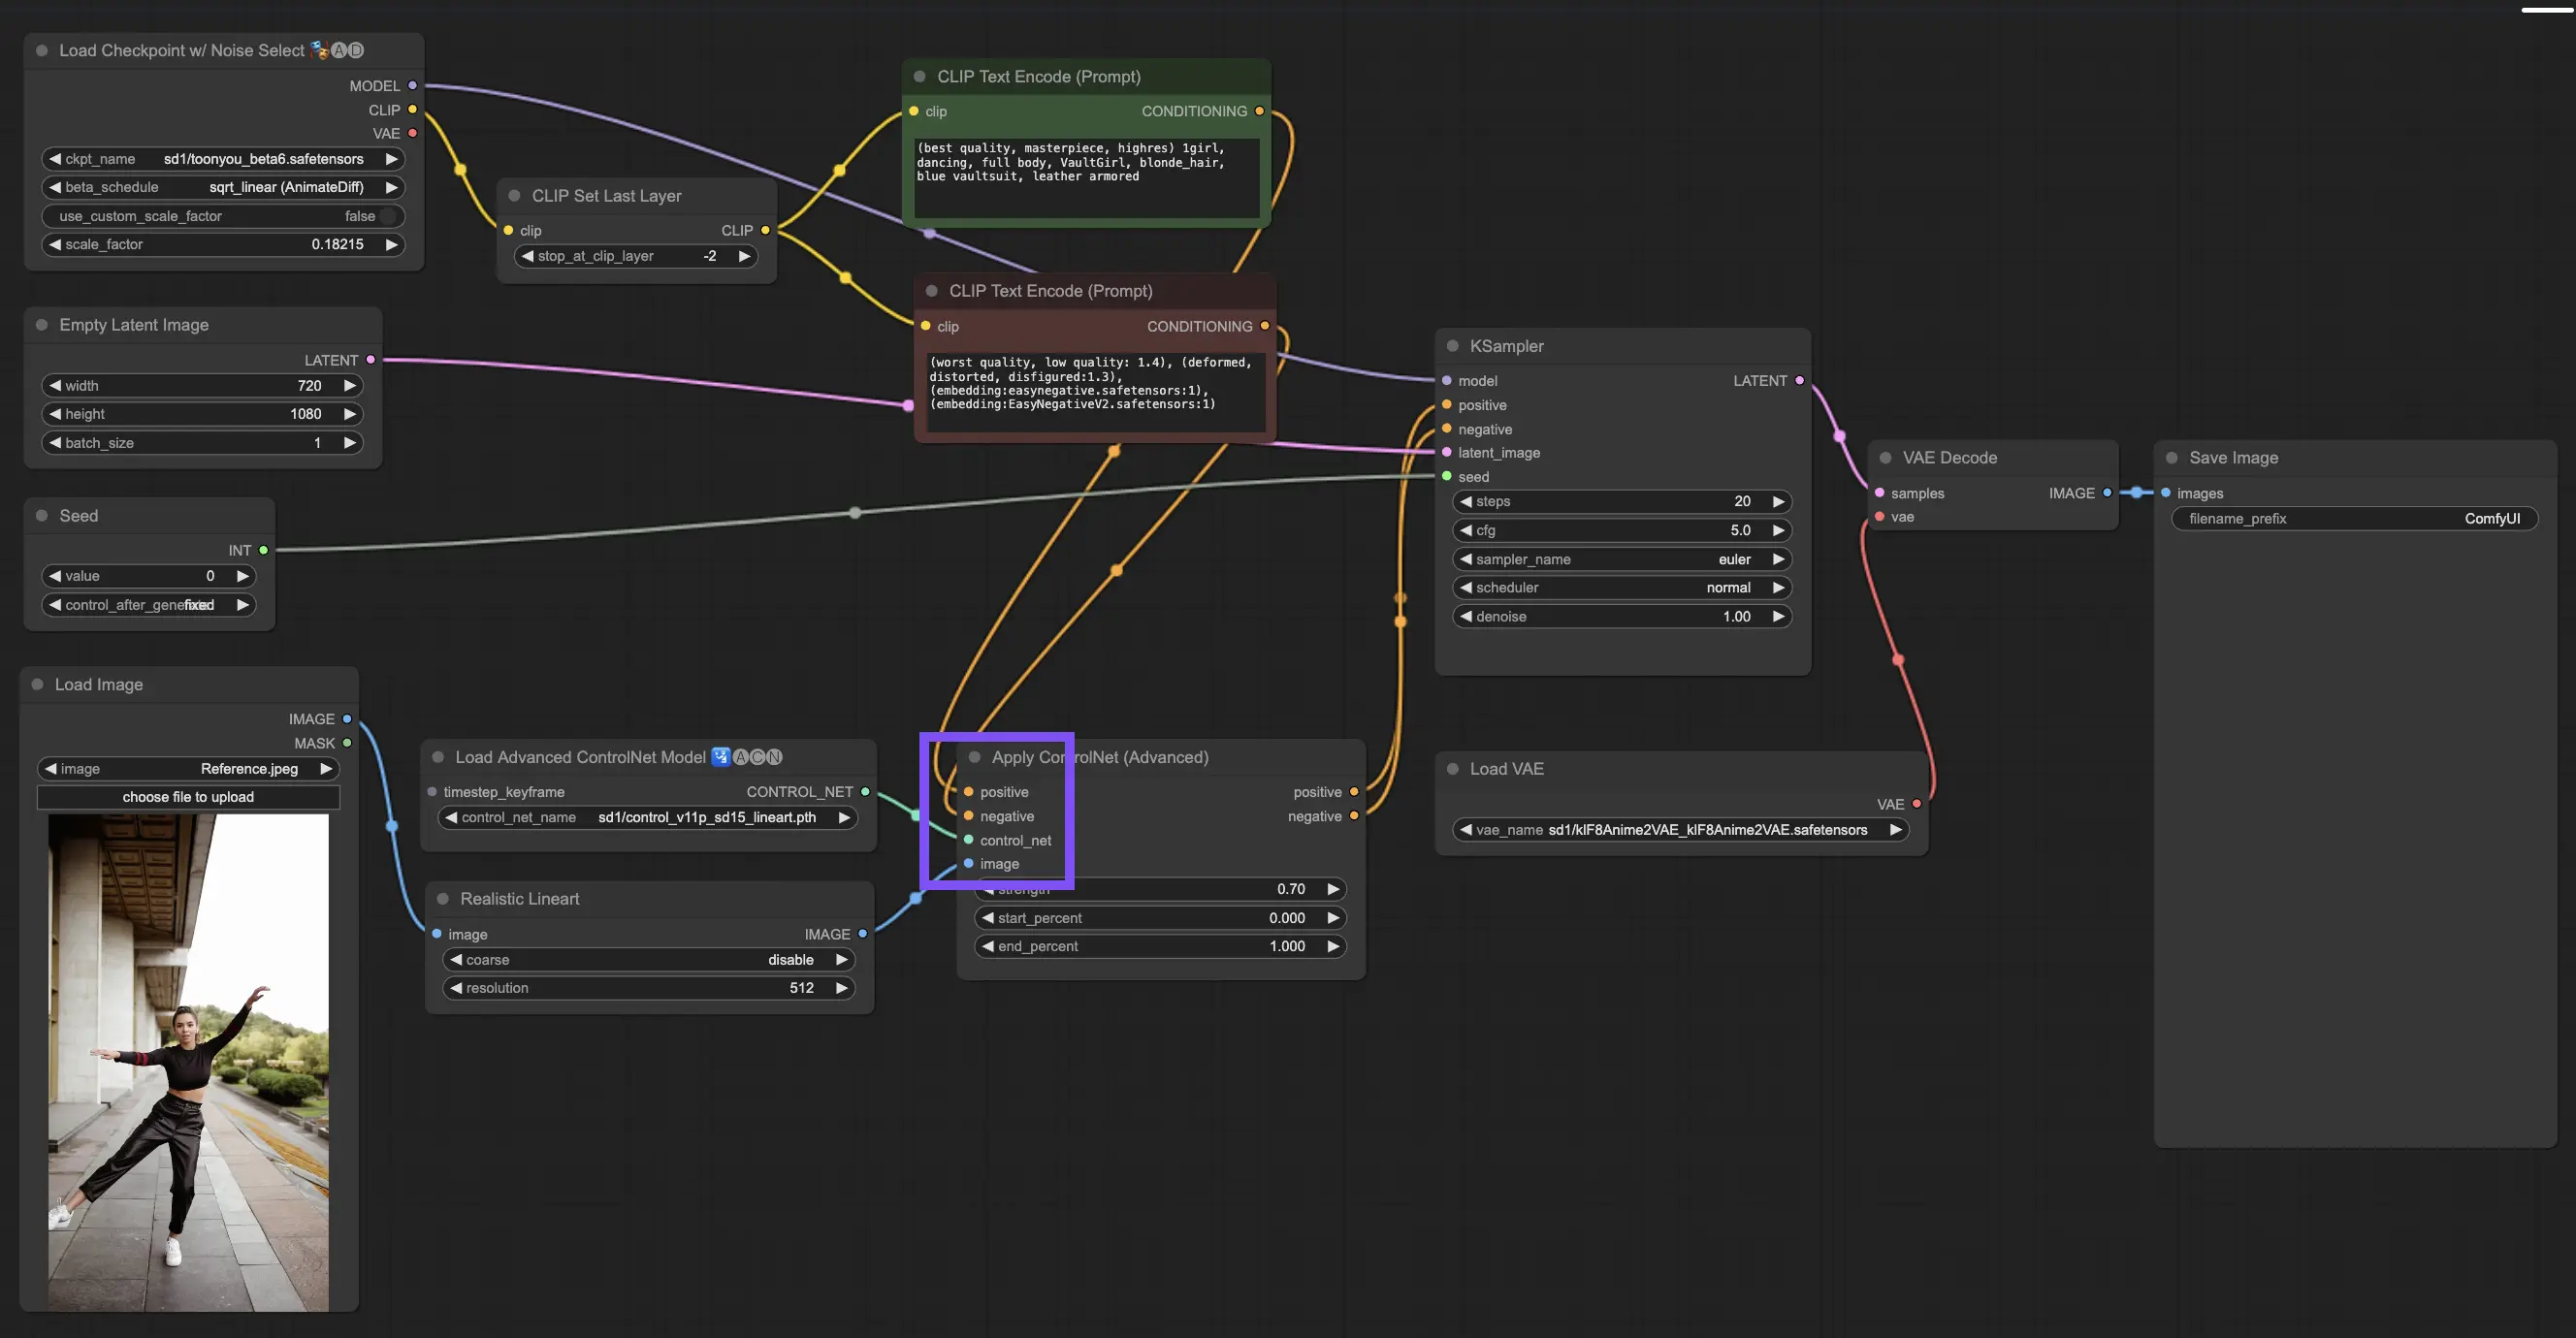
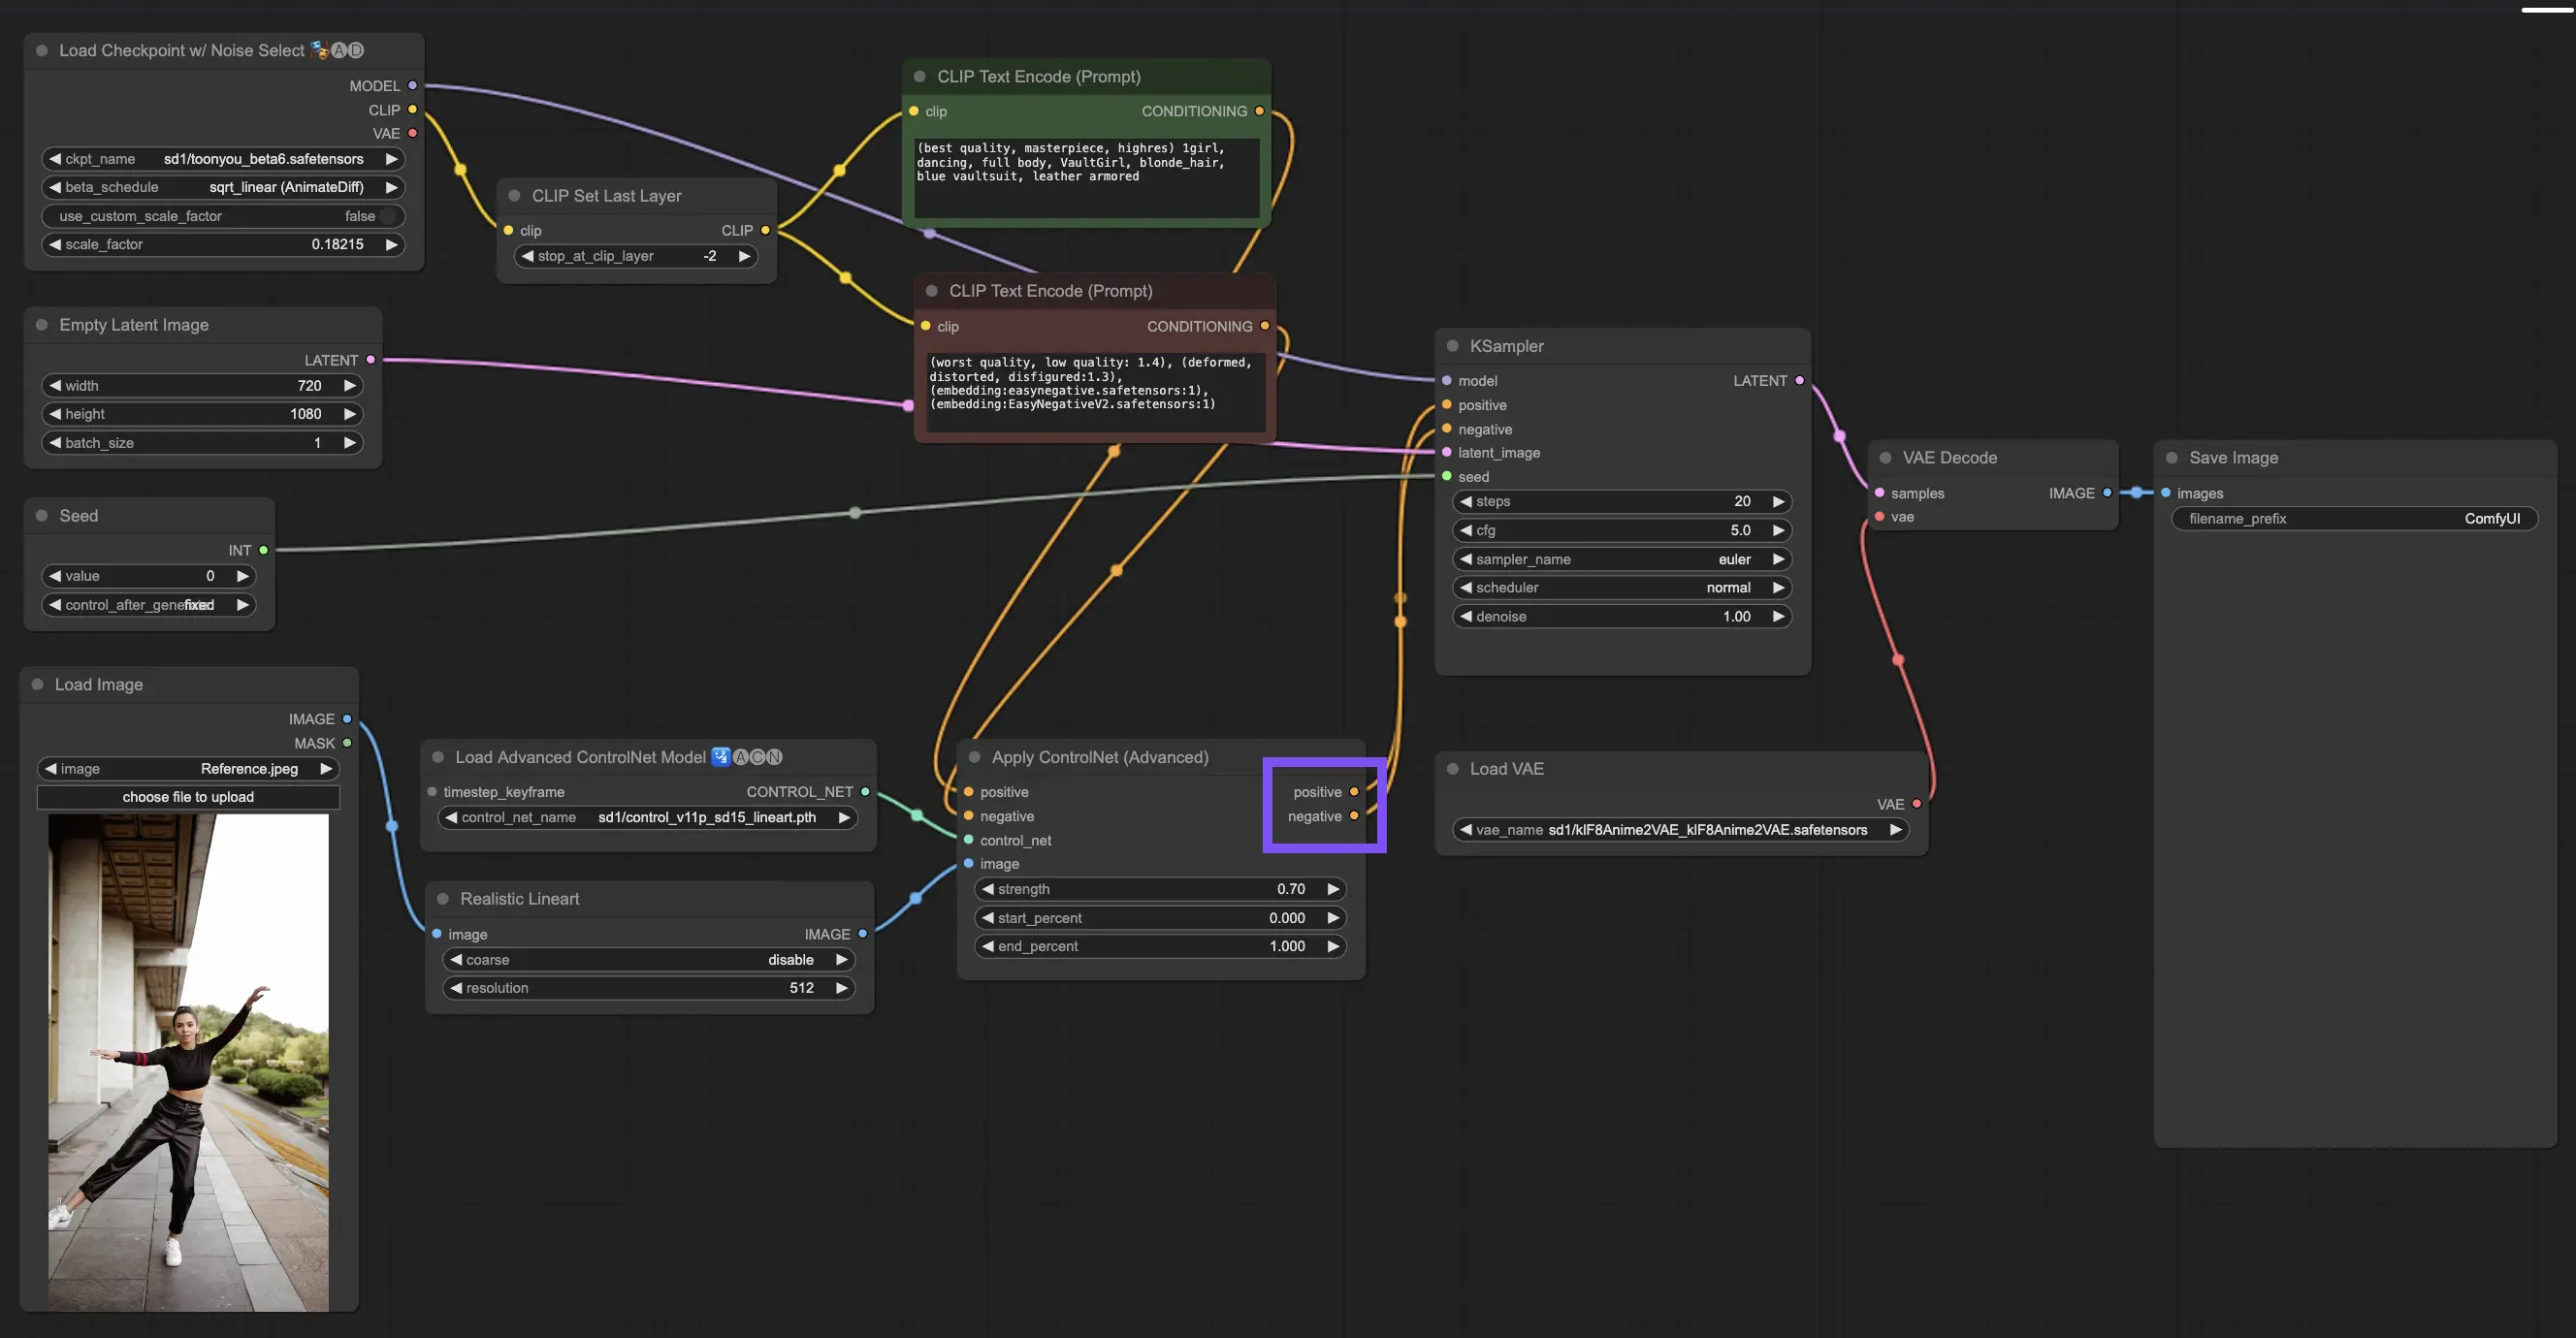
3.4.3. Understanding the Outputs of “Apply ControlNet” Node
After processing, the "Apply ControlNet" node presents you with two outputs reflecting the sophisticated interplay of ControlNet and your creative input: Positive and Negative Conditioning. These outputs guide the diffusion model within ComfyUI, leading to your next choice: refine the image using the KSampler or dive deeper by stacking more ControlNets for those seeking unparalleled detail and customization.
3.4.4. Tuning “Apply ControlNet” for Best Results
Determining Strength: This setting controls how much ControlNet sways the resulting image. A full-on 1.0 means ControlNet's input has the reins, while dialing down to 0.0 lets the model run without ControlNet's influence.
Adjusting Start Percent: This tells you when ControlNet starts to pitch in during the diffusion process. For example, a 20% start means that from one-fifth of the way through, ControlNet begins to make its mark.
Setting End Percent: This is the flip side of Start Percent, marking when ControlNet bows out. If you set it to 80%, ControlNet's influence fades away as the image nears its final stages, untouched by ControlNet in the last stretch.
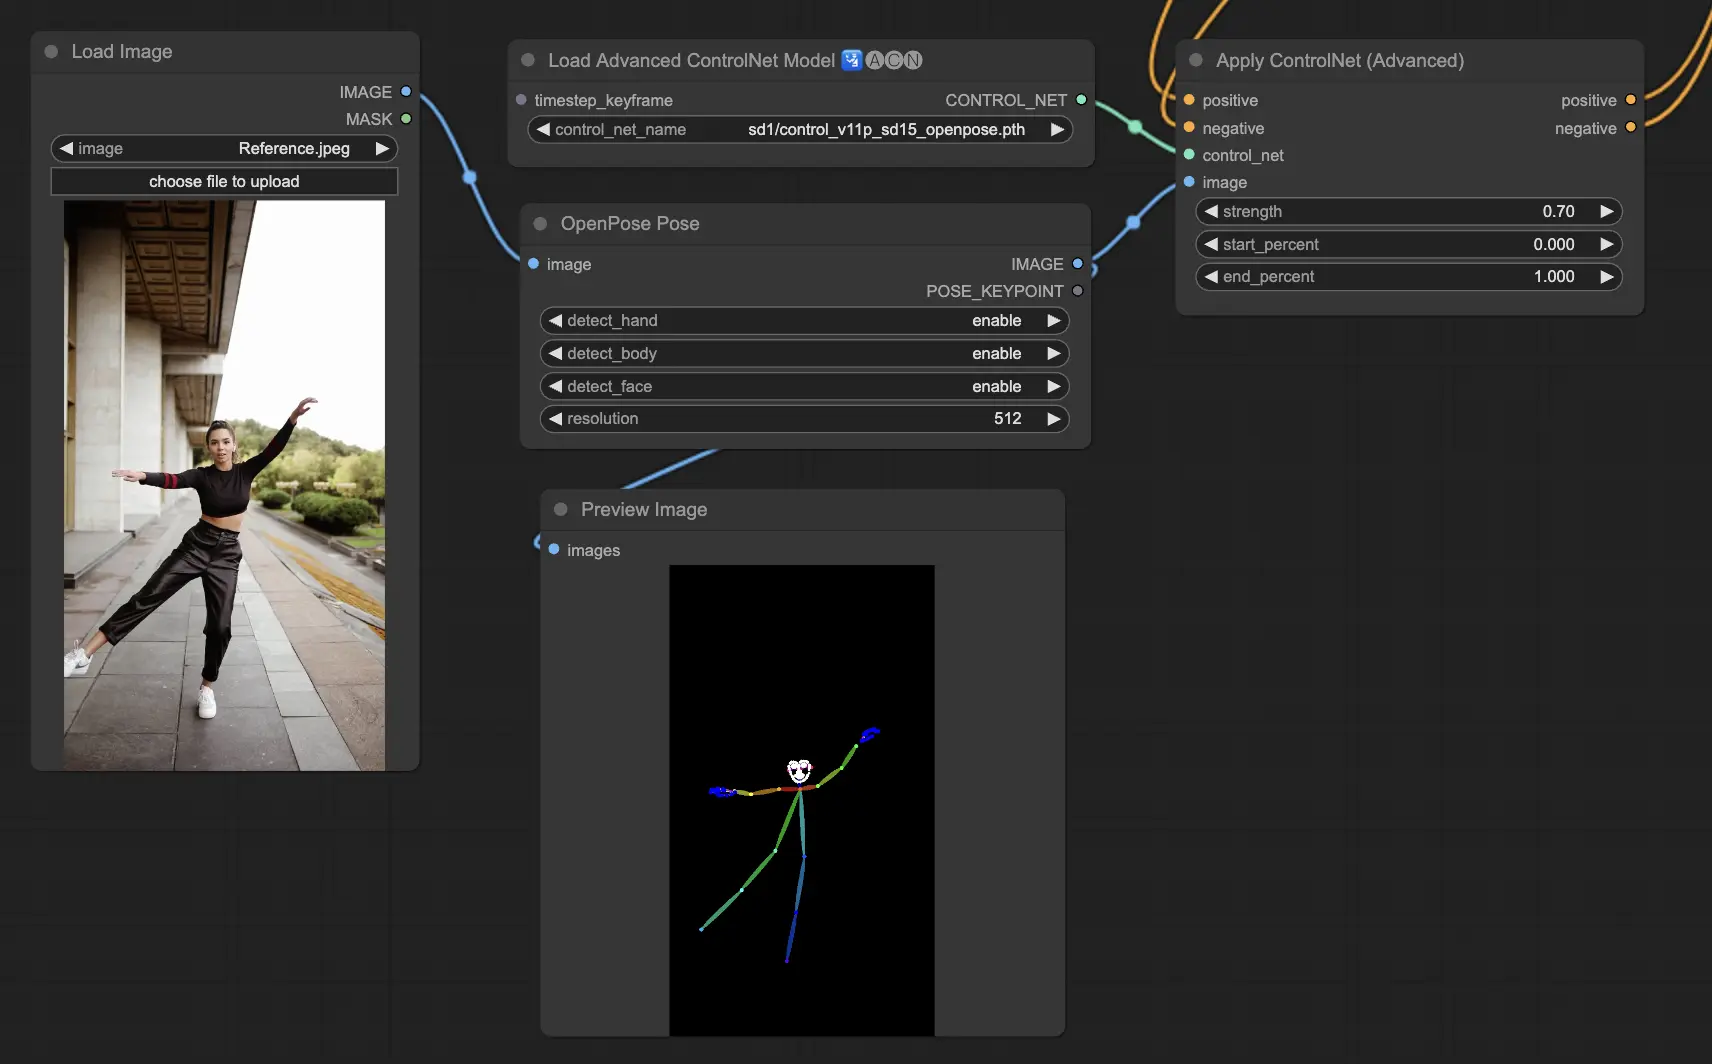
3.5. Guide to ControlNet Model: Openpose, Depth, SoftEdge, Canny, Lineart, Tile#
3.5.1. ControlNet Model: Openpose
- Openpose (also referred to as Openpose body): This model acts as the cornerstone of ControlNet for identifying key points on the human body, such as the eyes, nose, neck, shoulders, elbows, wrists, knees, and ankles. It's perfect for replicating simple human poses.
- Openpose_face: This version of Openpose takes it a step further by detecting facial key points, which allows for a nuanced analysis of facial expressions and the direction the face is pointing. If your project is centered around facial expressions, this model is vital.
- Openpose_hand: This enhancement to the Openpose model focuses on the fine details of hand and finger movements, which is key for a detailed understanding of hand gestures and positioning. It broadens the scope of what Openpose can do within ControlNet.
- Openpose_faceonly: Tailored for facial detail analysis, this model skips over body key points to zero in on facial expressions and orientation exclusively. When facial features are all that matter, this is the model to choose.
- Openpose_full: This all-in-one model integrates the capabilities of Openpose, Openpose_face, and Openpose_hand for full-body, face, and hand keypoint detection, making it the go-to for comprehensive human pose analysis within ControlNet.
- DW_Openpose_full: Building upon Openpose_full, this model introduces further enhancements for superior pose detection detail and accuracy. It's the most advanced version available in the ControlNet suite.
Preprocessor options include: Openpose or DWpose
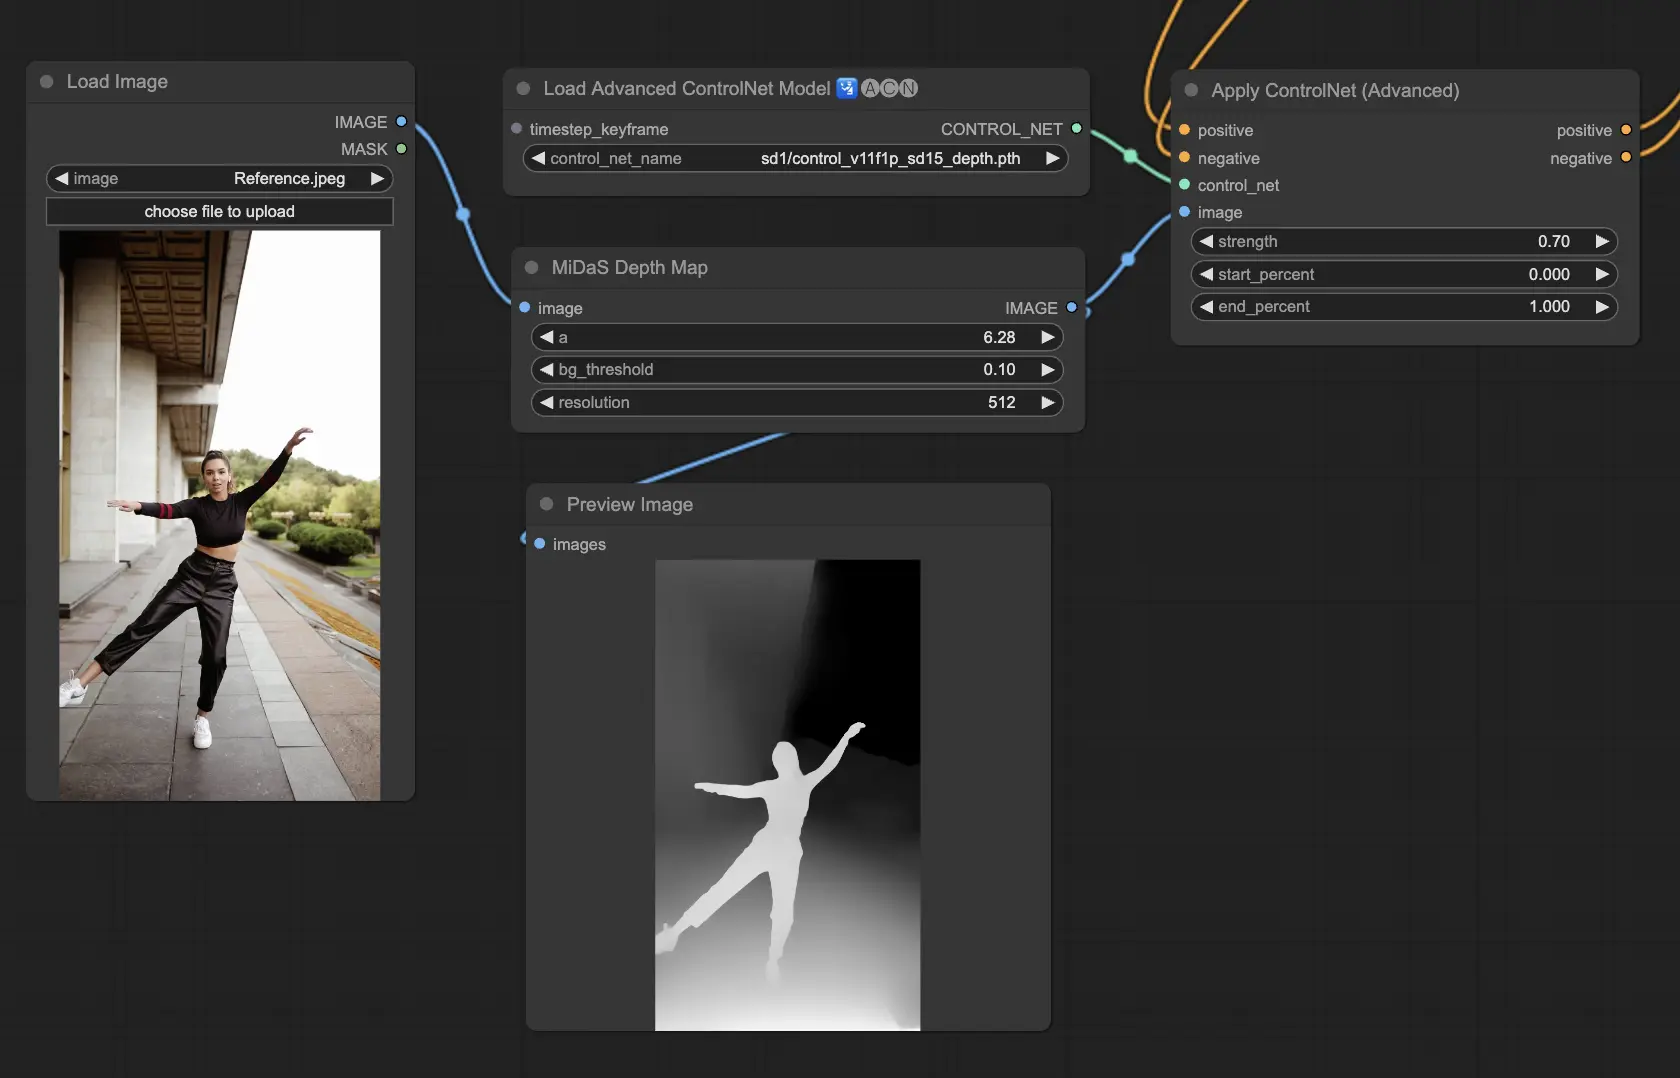
3.5.2. ControlNet Model: Depth
Depth models use a 2D image to infer depth, representing it as a grayscale map. Each has its strengths in terms of detail or background focus:
- Depth Midas: A balanced approach to depth estimation, Depth Midas offers a middle ground in detailing and background portrayal.
- Depth Leres: Puts an emphasis on details while still capturing background elements more prominently.
- Depth Leres++: Pushes the envelope for detail in depth information, which is particularly useful for complex scenes.
- Zoe: Finds equilibrium between the detail levels of Midas and Leres models.
- Depth Anything: An improved model for versatile depth estimation across various scenes.
- Depth Hand Refiner: Specifically fine-tunes details of hands in depth maps, making it invaluable for scenes where precise hand placement is essential.
Preprocessors to consider: Depth_Midas, Depth_Leres, Depth_Zoe, Depth_Anything, MeshGraphormer_Hand_Refiner. This model excels in robustness and compatibility with actual depth maps from rendering engines.
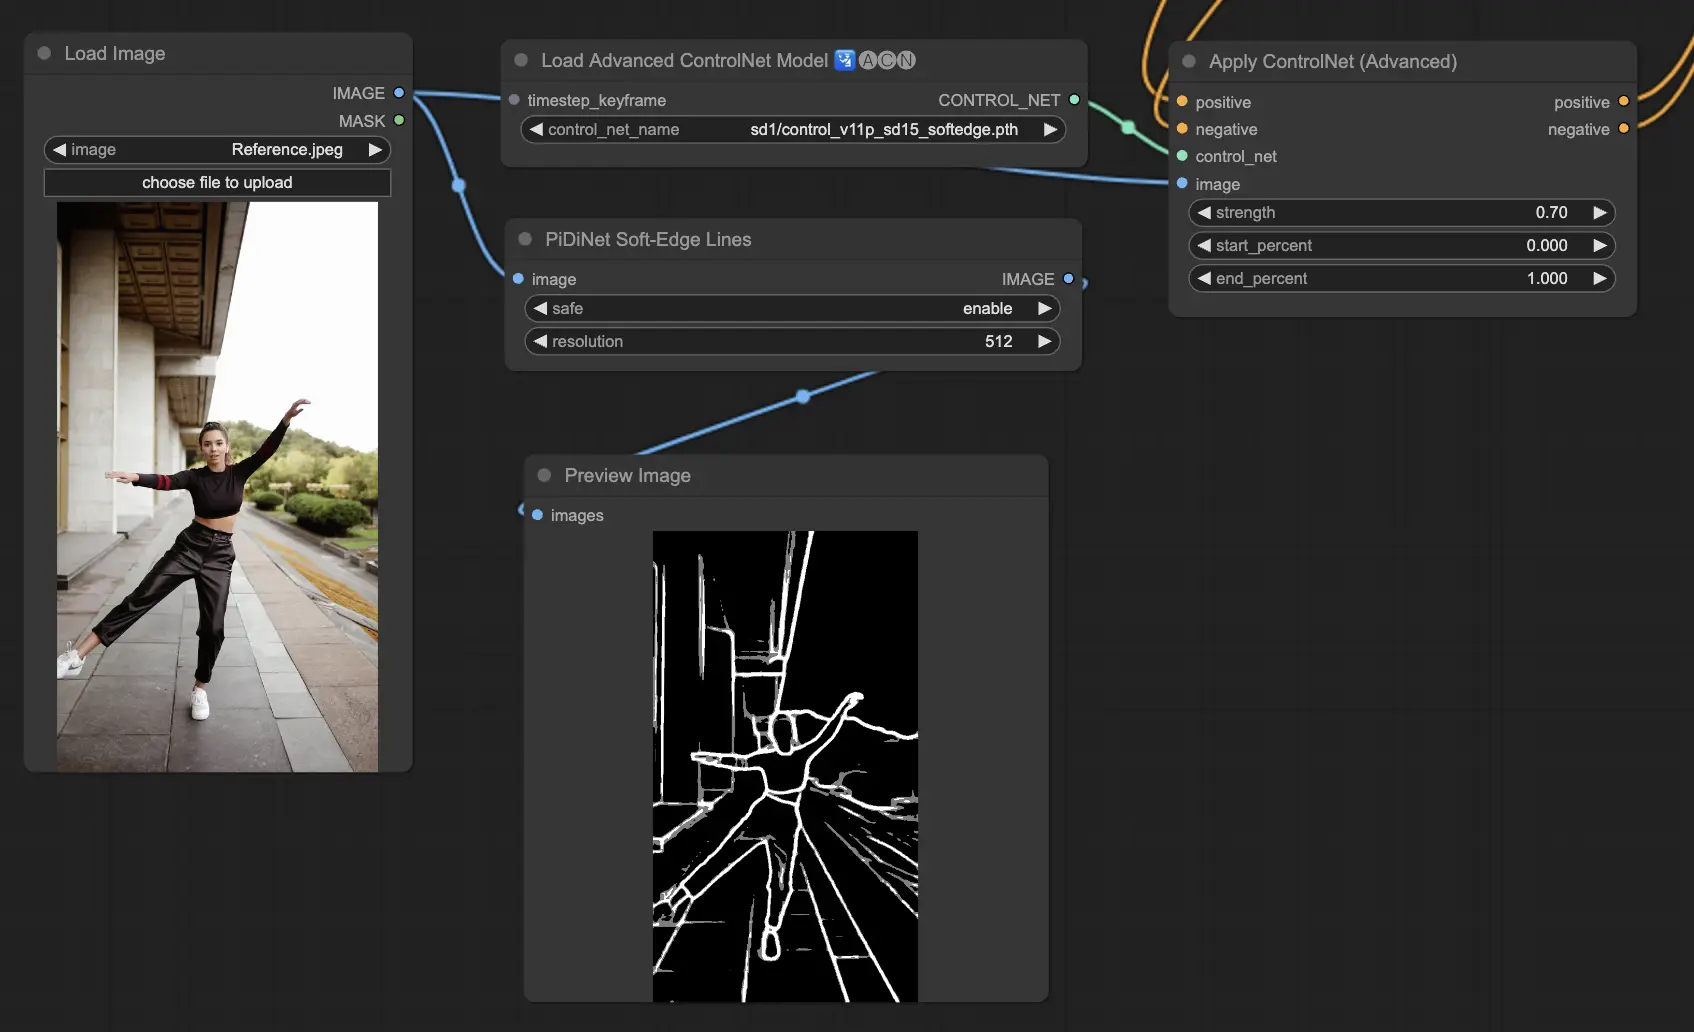
3.5.3. ControlNet Model: SoftEdge
ControlNet Soft Edge is crafted to produce images with gentler edges, enhancing detail while maintaining a natural look. It utilizes cutting-edge neural networks for refined image manipulation, offering extensive creative control and flawless integration.
In terms of robustness: SoftEdge_PIDI_safe > SoftEdge_HED_safe >> SoftEdge_PIDI > SoftEdge_HED
For the highest quality results: SoftEdge_HED > SoftEdge_PIDI > SoftEdge_HED_safe > SoftEdge_PIDI_safe
As a general recommendation, SoftEdge_PIDI is the go-to option since it typically delivers excellent results.
Preprocessors include: SoftEdge_PIDI, SoftEdge_PIDI_safe, SoftEdge_HED, SoftEdge_HED_safe.
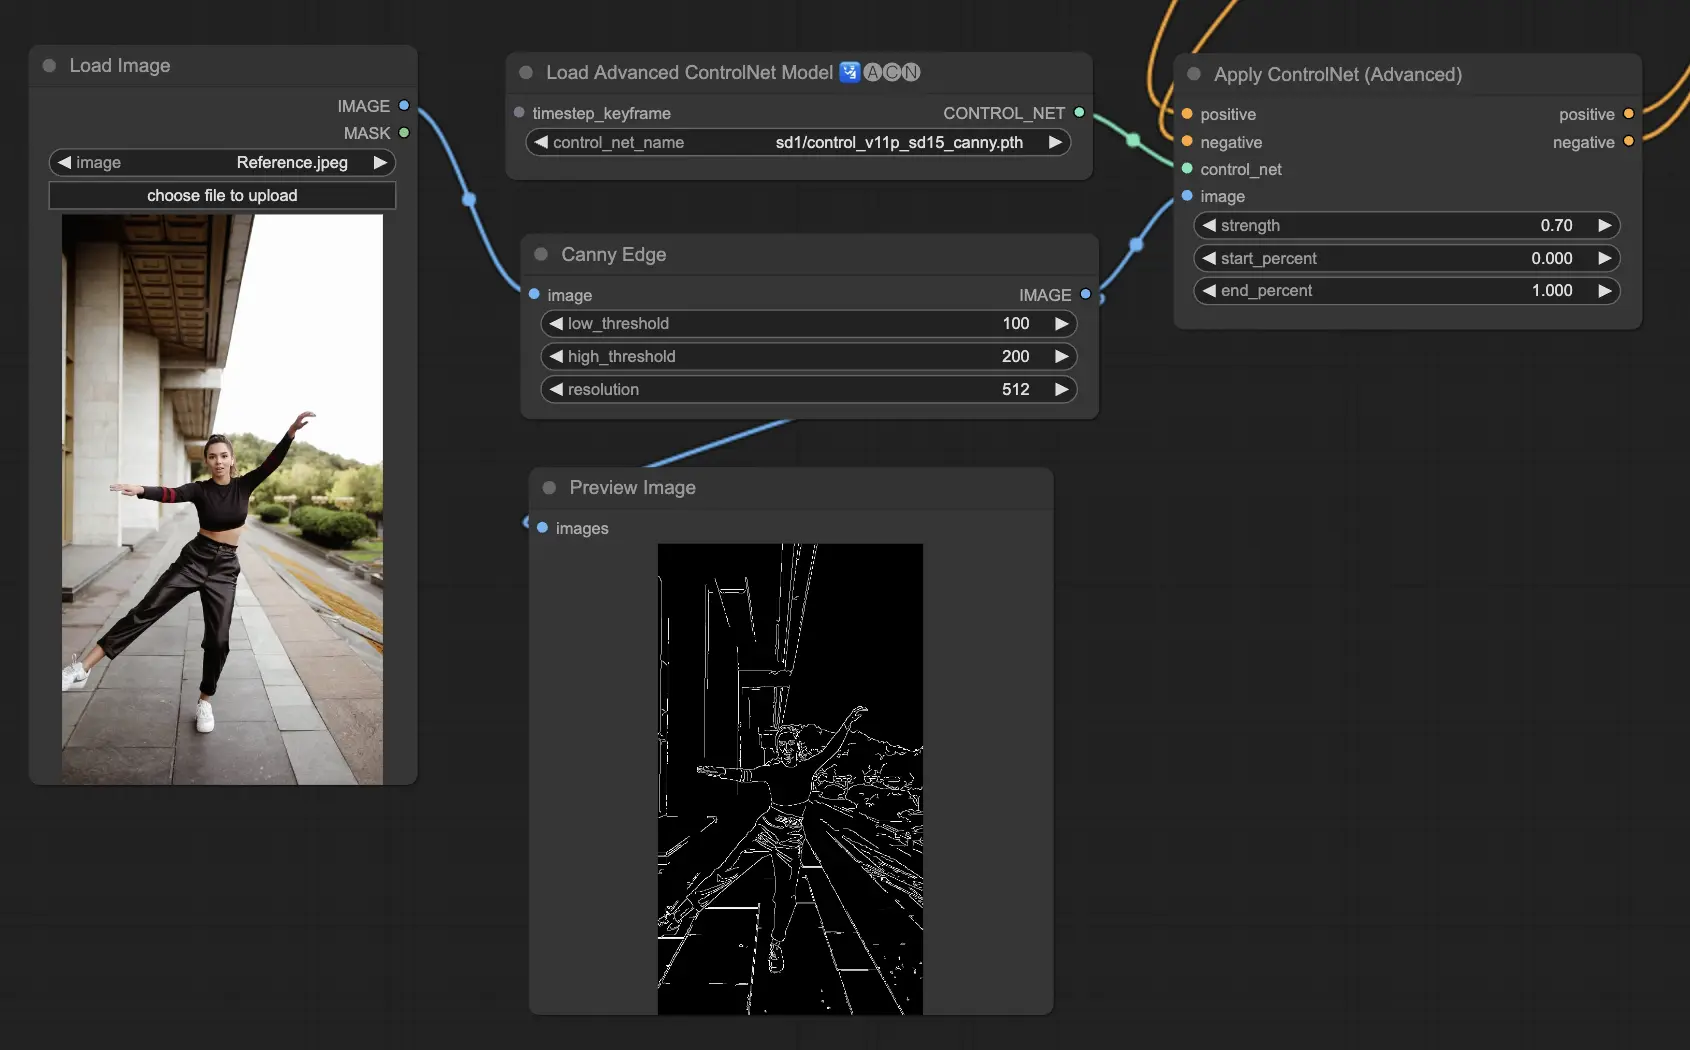
3.5.4. ControlNet Model: Canny
The Canny model implements the Canny edge detection to spotlight a wide spectrum of edges within images. This model is excellent for maintaining the integrity of structural elements while simplifying the image's overall look, aiding in creating stylized art or preparing images for additional manipulation.
Preprocessors available: Canny
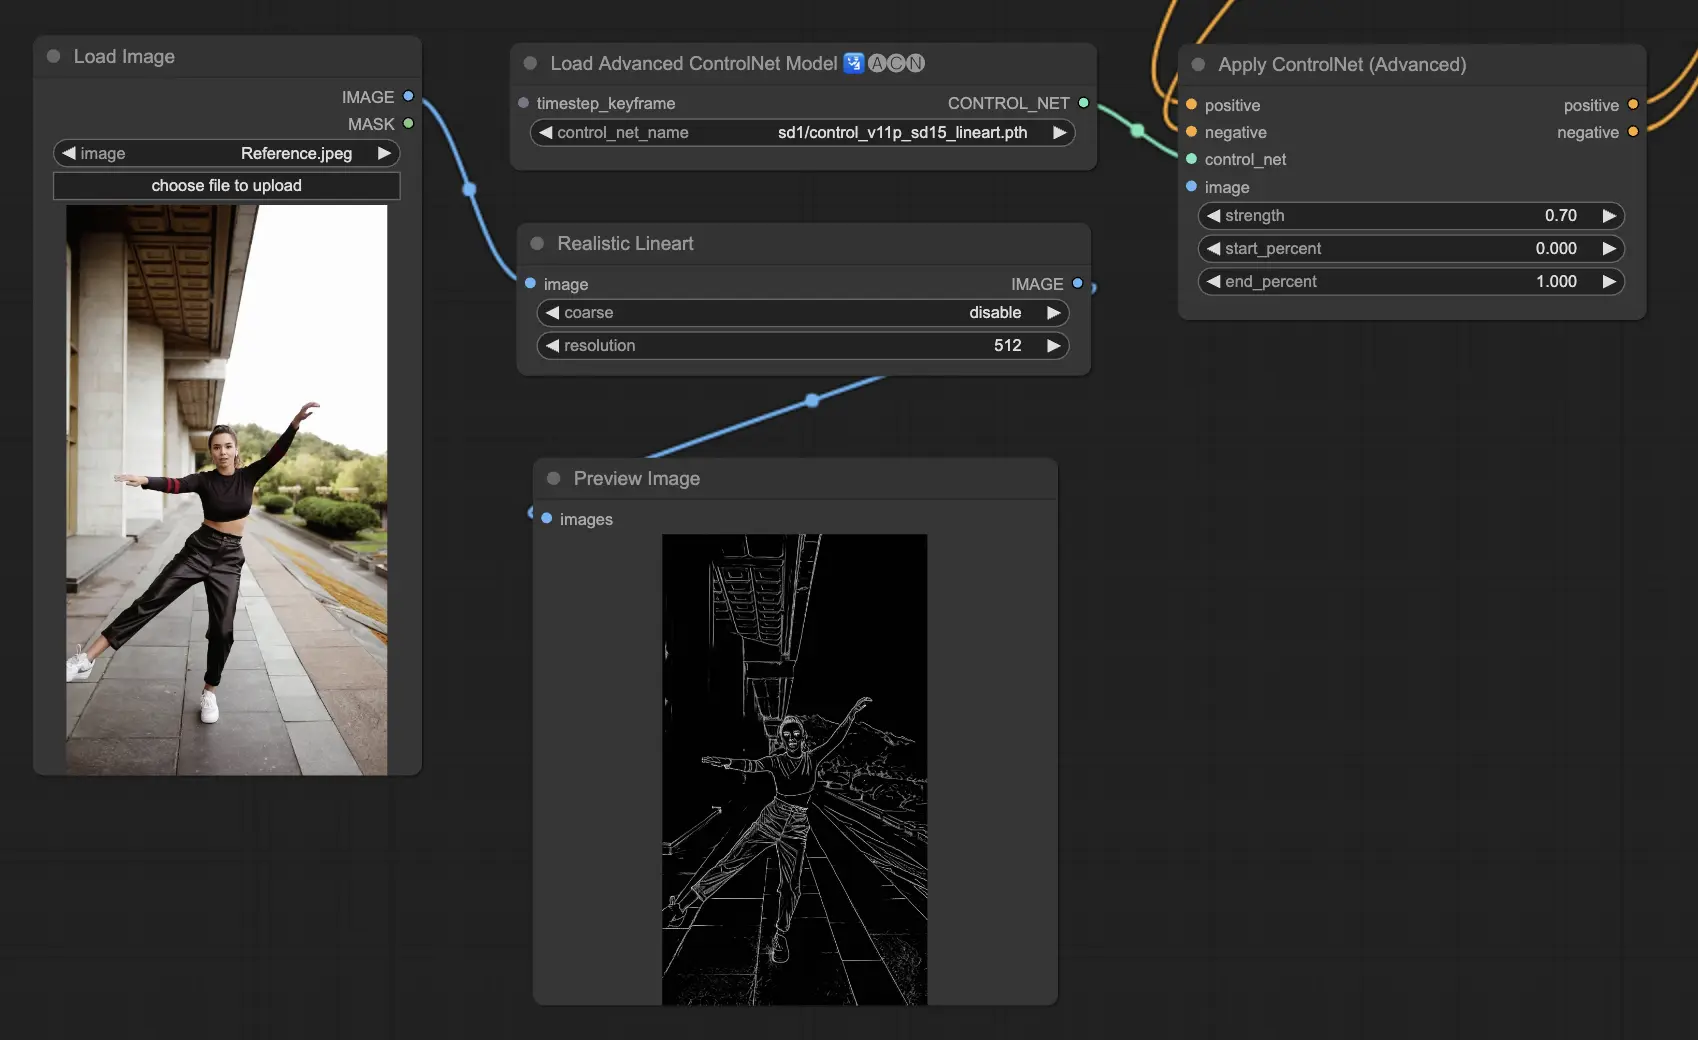
3.5.5. ControlNet Model: Lineart
Lineart models are your tools for transforming images into stylized line drawings, suitable for a variety of artistic applications:
- Lineart: The standard choice for turning images into line drawings, providing a versatile starting point for different artistic or creative endeavors.
- Lineart anime: Tailored for creating clean, precise anime-style line drawings, perfect for projects aiming for an anime-inspired look.
- Lineart realistic: Aims to capture a more lifelike representation in line drawings, offering more detail for projects that require realism.
- Lineart coarse: Emphasizes bolder, more pronounced lines for a striking visual impact, ideal for bold graphic statements.
Preprocessors available can produce either detailed or more pronounced lineart (Lineart and Lineart_Coarse).
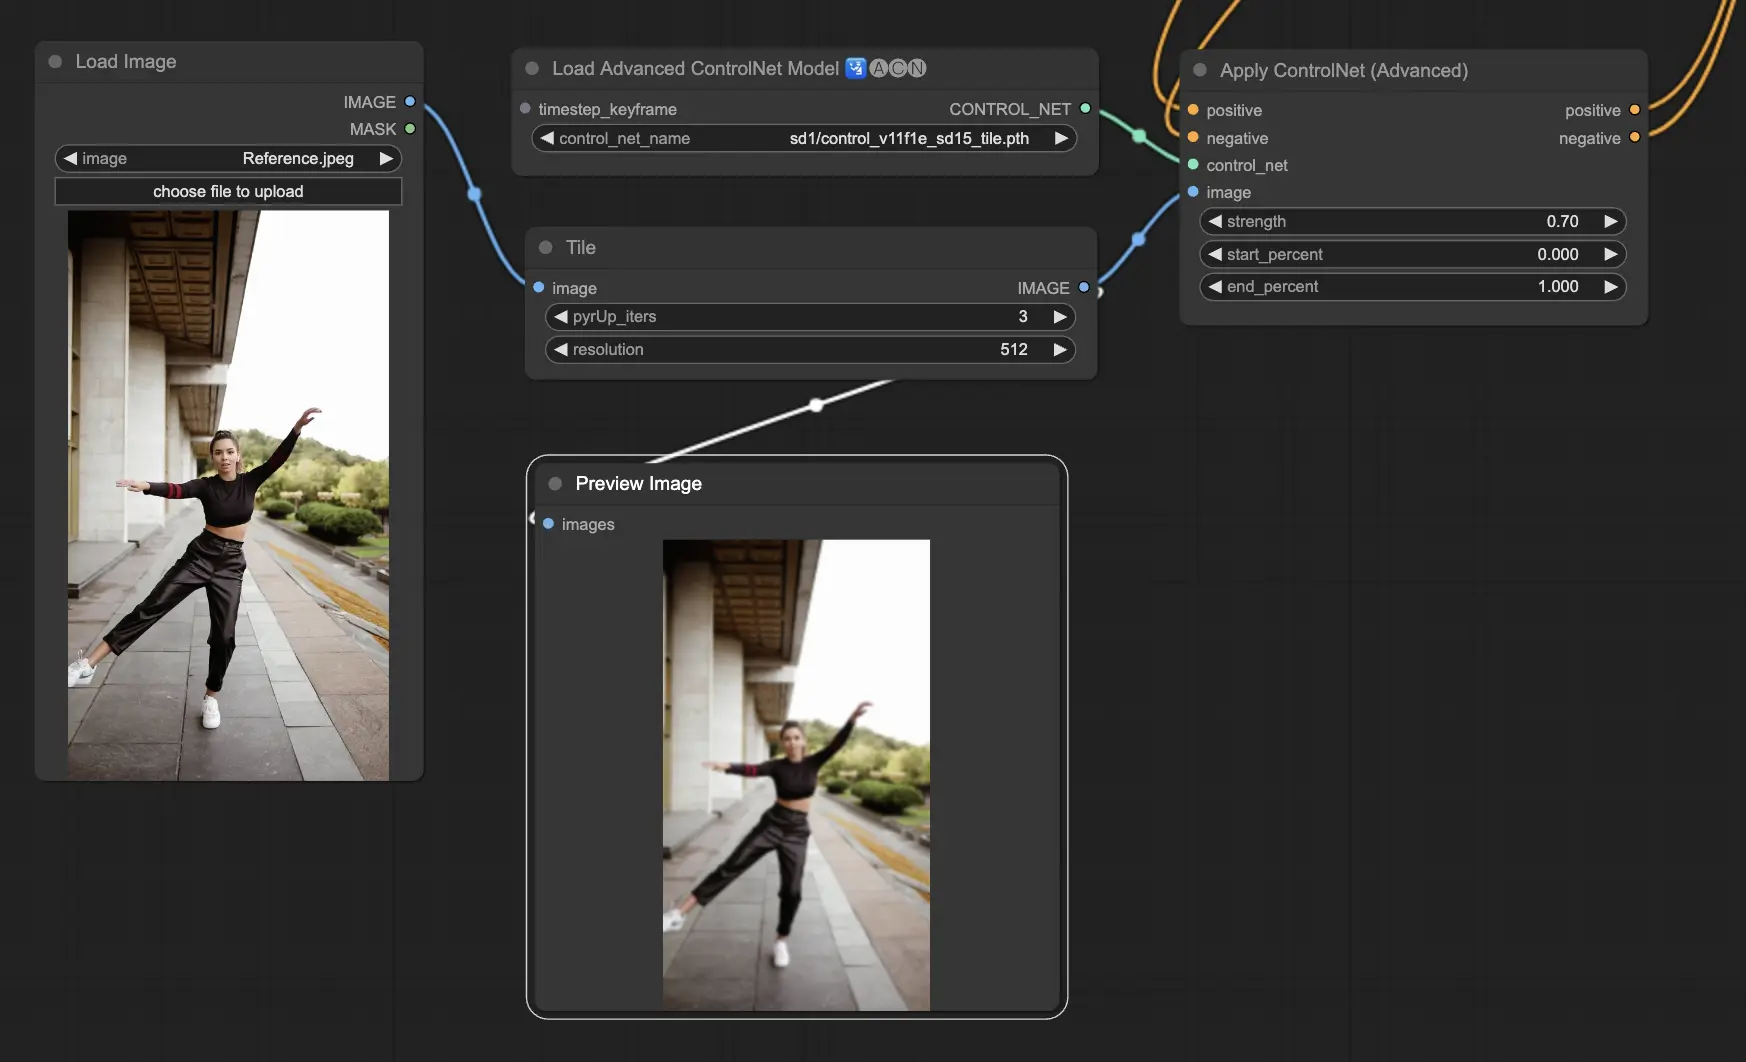
3.5.6. ControlNet Model: Tile
The Tile Resample model excels in bringing out details in images. It's especially effective when used in tandem with an upscaler to enhance image resolution and detail, often applied to sharpen and enrich image textures and elements.
Preprocessor recommended: Tile
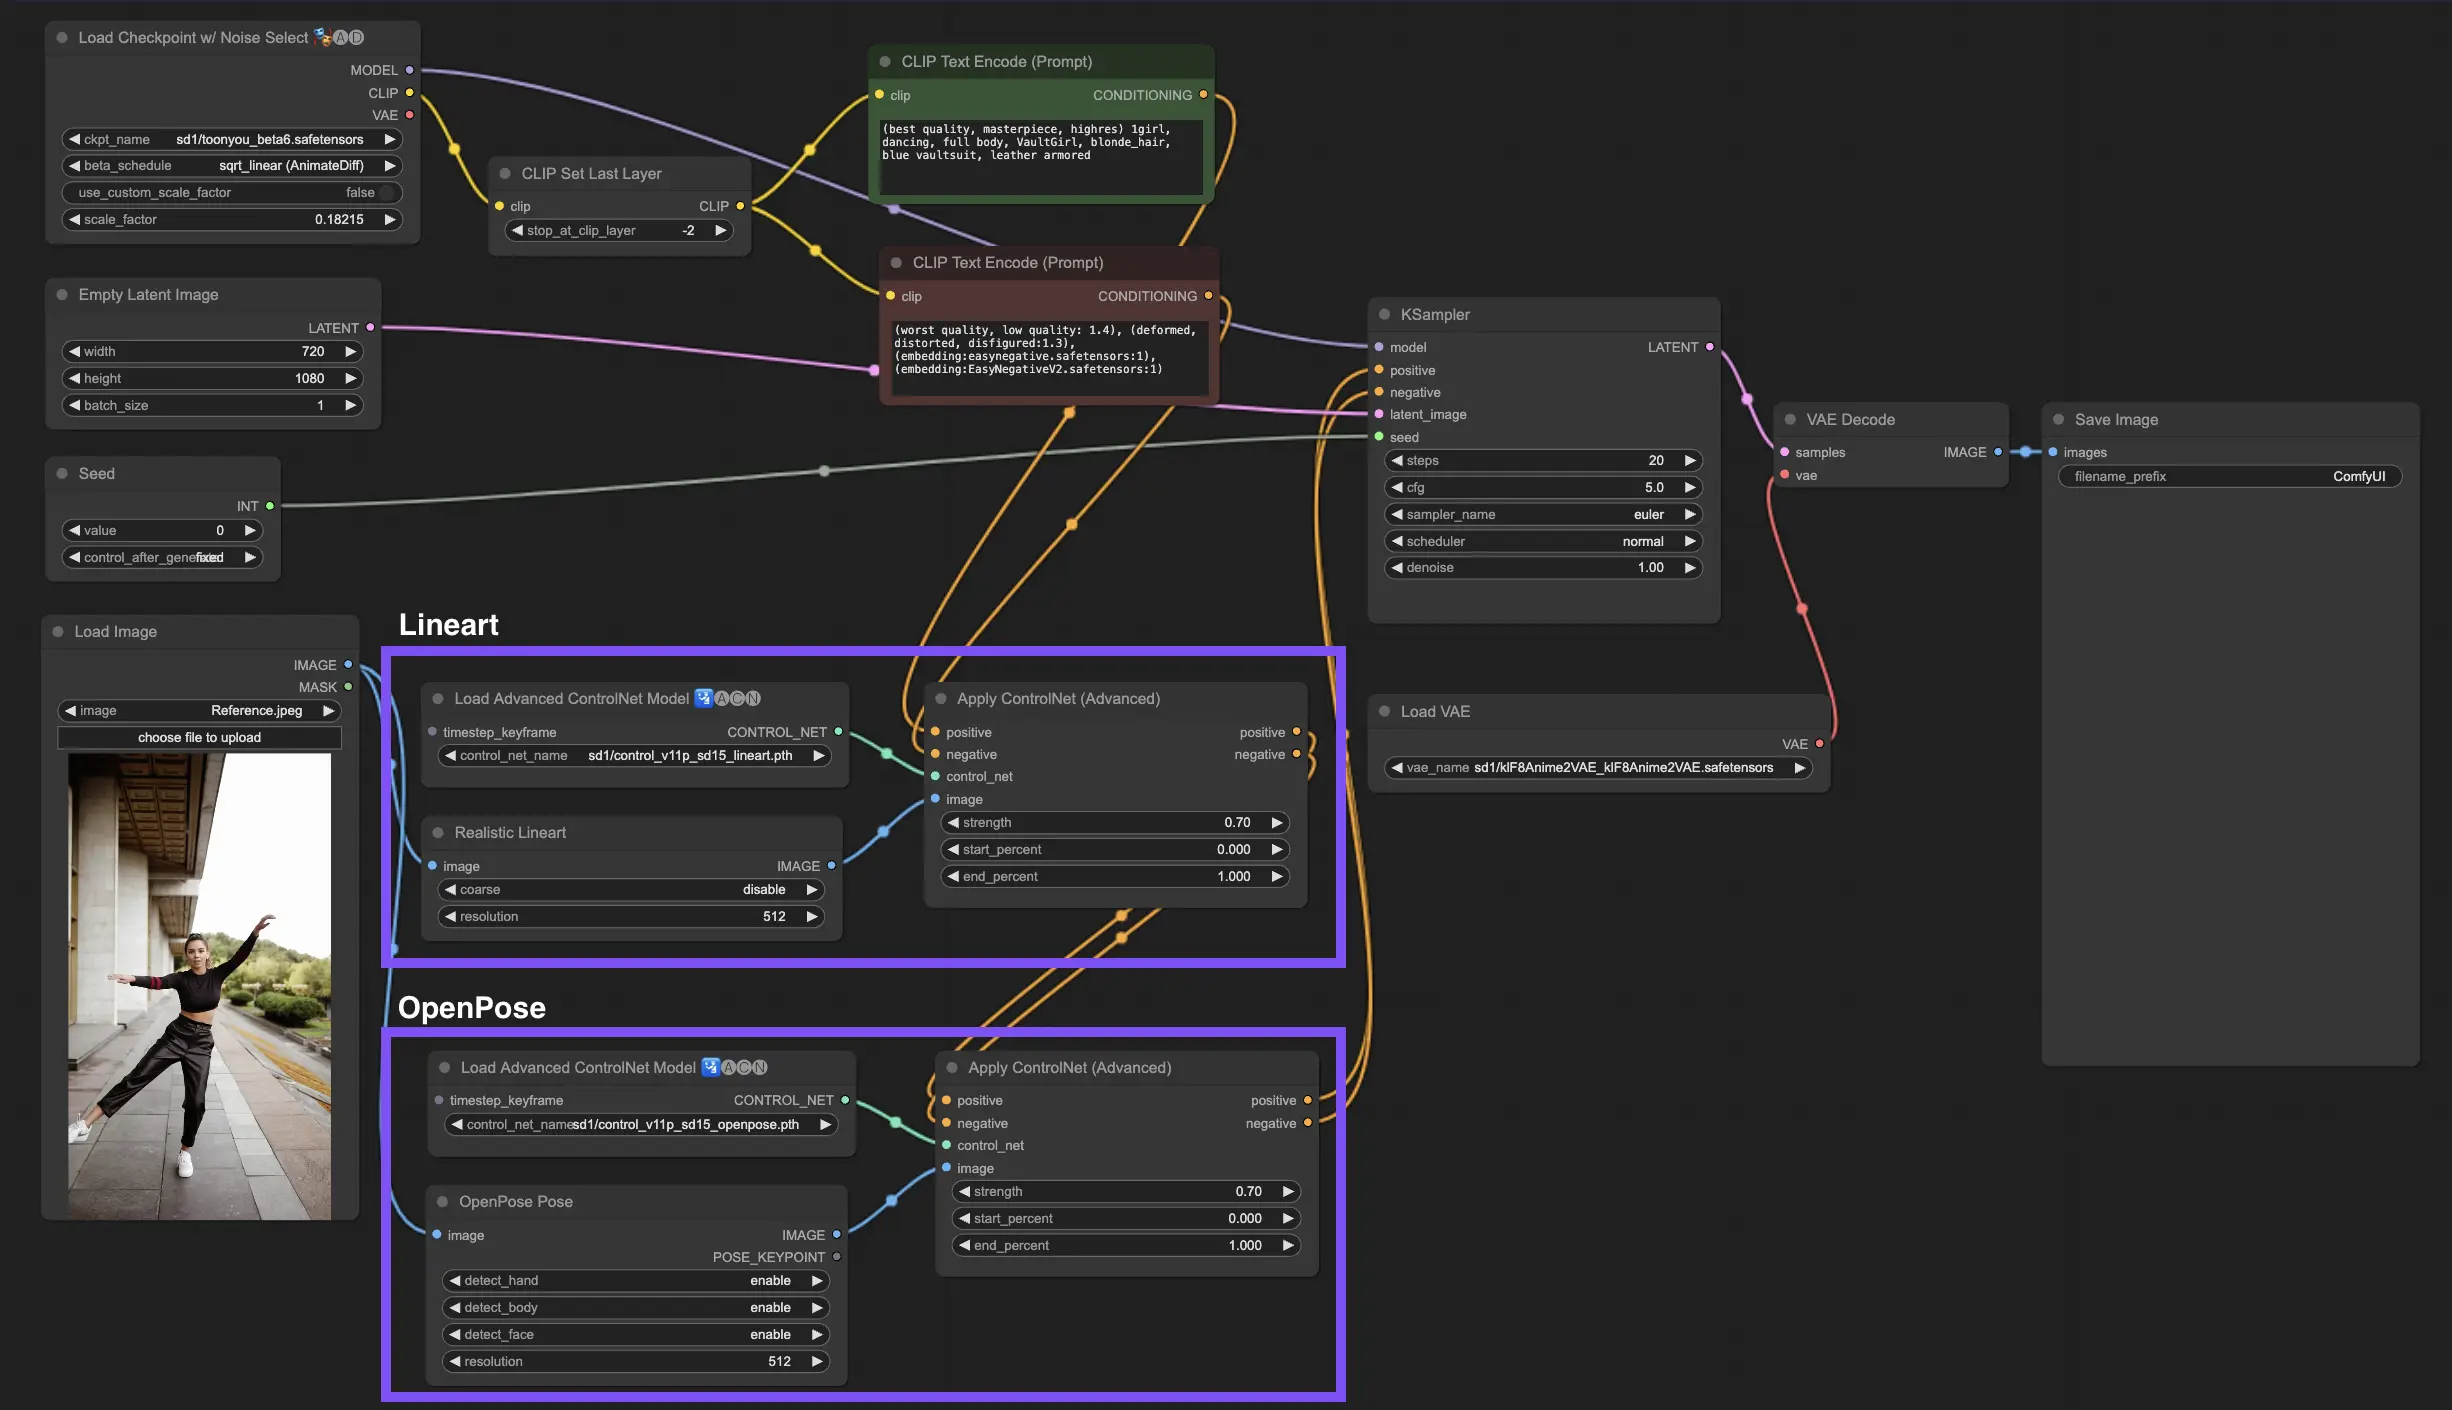
3.6. Guide to use multiple ControlNet#
Incorporating multiple ControlNets or T2I-Adapters allows for the sequential application of different conditioning types to your image generation process. For example, you can combine Lineart and OpenPose ControlNets for enhanced detailing.
Lineart for Object Shape: Start by integrating a Lineart ControlNet to add depth and detail to objects or elements in your imagery. This process involves preparing a lineart or canny map for the objects you wish to include.
OpenPose for Pose Control: Following the lineart detailing, utilize the OpenPose ControlNet to dictate the pose of individuals within your image. You will need to generate or acquire an OpenPose map that captures the desired pose.
Sequential Application: To effectively combine these effects, link the output from the Lineart ControlNet into the OpenPose ControlNet. This method ensures that both the pose of the subjects and the shapes of objects are simultaneously guided during the generation process, creating an outcome that harmoniously aligns with all input specifications.
4. Overview of IPAdapter#
Please check out the details on How to use IPAdapter in ComfyUI