


Hello, fellow AI artists! 👋 Welcome to our beginner-friendly tutorial on ComfyUI, an incredibly powerful and flexible tool for creating stunning AI-generated artwork. 🎨 In this guide, we'll walk you through the basics of ComfyUI, explore its features, and help you unlock its potential to take your AI art to the next level. 🚀
We will cover:
- 1. What is ComfyUI?
- 1.1. ComfyUI vs. AUTOMATIC1111
- 1.2. Where to Start with ComfyUI?
- 1.3. Basic Controls
- 2. ComfyUI Workflows: Text-to-Image
- 2.1. Selecting a Model
- 2.2. Entering the Positive Prompt and Negative Prompt
- 2.3. Generating an Image
- 2.4. Technical Explanation of ComfyUI
- 2.4.1 Load Checkpoint Node
- 2.4.2. CLIP Text Encode
- 2.4.3. Empty Latent Image
- 2.4.4. VAE
- 2.4.5. KSampler
- 3. ComfyUI Workflow: Image-to-Image
- 4. ComfyUI SDXL
- 5. ComfyUI Inpainting
- 6. ComfyUI Outpainting
- 7. ComfyUI Upscale
- 7.1. Upscale Pixel
- 7.1.1. Upscale Pixel by Algorithm
- 7.1.2. Upscale Pixel by Model
- 7.2. Upscale Latent
- 7.3. Upscale Pixel vs. Upscale Latent
- 8. ComfyUI ControlNet
- 9. ComfyUI Manager
- 9.1. How to Install Missing Custom Nodes
- 9.2. How to Update Custom Nodes
- 9.3. How to Load Custom Nodes in Your Workflow
- 10. ComfyUI Embeddings
- 10.1. Embedding with Autocomplete
- 10.2. Embedding Weight
- 11. ComfyUI LoRA
- 11.1. Simple LoRA Workflows
- 11.2. Multiple LoRAs
- 12. Shortcuts and Tricks for ComfyUI
- 12.1. Copy and Paste
- 12.2. Moving Multiple Nodes
- 12.3. Bypass a Node
- 12.4. Minimize a Node
- 12.5. Generate Image
- 12.6. Embedded Workflow
- 12.7. Fix Seeds to Save Time
1. What is ComfyUI? 🤔#
ComfyUI is like having a magic wand 🪄 for creating stunning, AI-generated artwork with ease. At its core, ComfyUI is a node-based graphical user interface (GUI) built on top of Stable Diffusion, a state-of-the-art deep learning model that generates images from text descriptions. 🌟 But what makes ComfyUI truly special is how it empowers artists like you to unleash your creativity and bring your wildest ideas to life.
Imagine a digital canvas where you can construct your own unique image generation workflows by connecting different nodes, each representing a specific function or operation. 🧩 It's like building a visual recipe for your AI-generated masterpieces!
Want to generate an image from scratch using a text prompt? There's a node for that! Need to apply a specific sampler or fine-tune the noise level? Simply add the corresponding nodes and watch the magic happen. ✨
But here's the best part: ComfyUI breaks down the workflow into rearrangeable elements, giving you the freedom to create your own custom workflows tailored to your artistic vision. 🖼️ It's like having a personalized toolkit that adapts to your creative process.
1.1. ComfyUI vs. AUTOMATIC1111 🆚#
AUTOMATIC1111 is the default GUI for Stable Diffusion. So, should you use ComfyUI instead? Let's compare:
✅ Benefits of using ComfyUI:
- Lightweight: It runs fast and efficiently.
- Flexible: Highly configurable to suit your needs.
- Transparent: The data flow is visible and easy to understand.
- Easy to share: Each file represents a reproducible workflow.
- Good for prototyping: Create prototypes with a graphic interface instead of coding.
❌ Drawbacks of using ComfyUI:
- Inconsistent interface: Each workflow may have a different node layout.
- Too much detail: Average users may not need to know the underlying connections.
1.2. Where to Start with ComfyUI? 🏁#
We believe that the best way to learn ComfyUI is by diving into examples and experiencing it firsthand. 🙌 That's why we've created this unique tutorial that sets itself apart from others. In this tutorial, you'll find a detailed, step-by-step guide that you can follow along with.
But here's the best part: 🌟 We've integrated ComfyUI directly into this webpage! You'll be able to interact with ComfyUI examples in real time as you progress through the guide.🌟 Let's dive in!
2. ComfyUI Workflows: Text-to-Image 🖼️#
Let's begin with the simplest case: generating an image from text. Click Queue Prompt to run the workflow. After a short wait, you should see your first generated image! To check your queue, just click View Queue.
Here's a default text-to-image workflow for you to try:
Basic Building Blocks 🕹️#
The ComfyUI workflow consists of two basic building blocks: Nodes and Edges.
- Nodes are the rectangular blocks, e.g., Load Checkpoint, Clip Text Encoder, etc. Each node executes specific code and requires inputs, outputs, and parameters.
- Edges are the wires connecting the outputs and inputs between nodes.
Basic Controls 🕹️#
- Zoom in and out using the mouse wheel or two-finger pinch.
- Drag and hold the input or output dot to create connections between nodes.
- Move around the workspace by holding and dragging with the left mouse button.
Let's dive into the details of this workflow.#
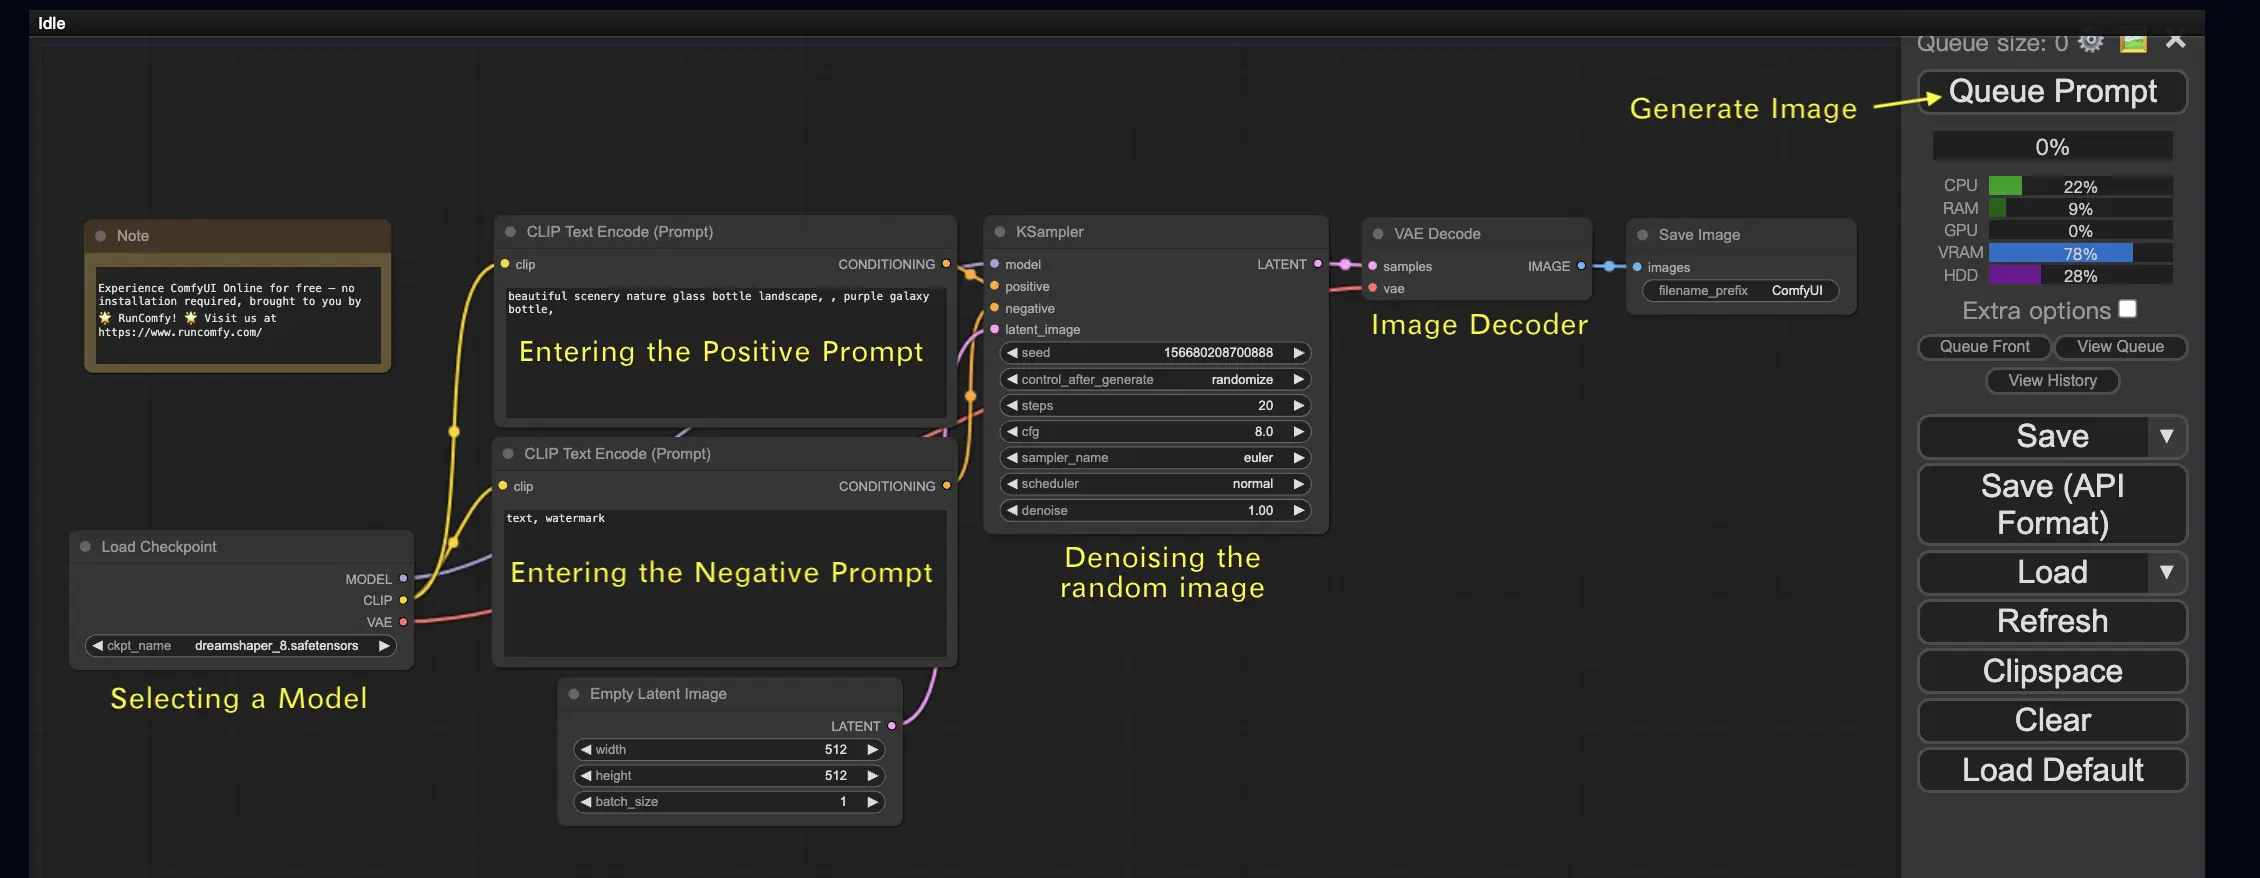
2.1. Selecting a Model 🗃️#
First, select a Stable Diffusion Checkpoint model in the Load Checkpoint node. Click on the model name to view available models. If clicking the model name does nothing, you may need to upload a custom model.
2.2. Entering the Positive Prompt and Negative Prompt 📝#
You'll see two nodes labeled CLIP Text Encode (Prompt). The top prompt is connected to the positive input of the KSampler node, while the bottom prompt is connected to the negative input. So enter your positive prompt in the top one and your negative prompt in the bottom one.
The CLIP Text Encode node converts the prompt into tokens and encodes them into embeddings using the text encoder.
💡 Tip: Use (keyword:weight) syntax to control the weight of a keyword, e.g., (keyword:1.2) to increase its effect or (keyword:0.8) to decrease it.
2.3. Generating an Image 🎨#
Click Queue Prompt to run the workflow. After a short wait, your first image will be generated!
2.4. Technical Explanation of ComfyUI 🤓#
The power of ComfyUI lies in its configurability. Understanding what each node does allows you to tailor them to your needs. But before diving into the details, let's take a look at the Stable Diffusion process to better understand how ComfyUI works.
The Stable Diffusion process can be summarized in three main steps:
- Text Encoding: The user-input prompt is compiled into individual word feature vectors by a component called the Text Encoder. This step converts the text into a format that the model can understand and work with.
- Latent Space Transformation: The feature vectors from the Text Encoder and a random noise image are transformed into a latent space. In this space, the random image undergoes a denoising process based on the feature vectors, resulting in an intermediate product. This step is where the magic happens, as the model learns to associate the text features with visual representations.
- Image Decoding: Finally, the intermediate product from the latent space is decoded by the Image Decoder, converting it into an actual image that we can see and appreciate.
Now that we have a high-level understanding of the Stable Diffusion process, let's dive into the key components and nodes in ComfyUI that make this process possible.
2.4.1 Load Checkpoint Node 🗃️#
The Load Checkpoint node in ComfyUI is crucial for selecting a Stable Diffusion model. A Stable Diffusion model consists of three main components: MODEL, CLIP, and VAE. Let's explore each component and its relationship with the corresponding nodes in ComfyUI.
- MODEL: The MODEL component is the noise predictor model that operates in the latent space. It is responsible for the core process of generating images from the latent representation. In ComfyUI, the MODEL output of the Load Checkpoint node connects to the KSampler node, where the reverse diffusion process takes place. The KSampler node uses the MODEL to denoise the latent representation iteratively, gradually refining the image until it matches the desired prompt.
- CLIP: CLIP (Contrastive Language-Image Pre-training) is a language model that preprocesses the positive and negative prompts provided by the user. It converts the text prompts into a format that the MODEL can understand and use to guide the image generation process. In ComfyUI, the CLIP output of the Load Checkpoint node connects to the CLIP Text Encode node. The CLIP Text Encode node takes the user-provided prompts and feeds them into the CLIP language model, transforming each word into embeddings. These embeddings capture the semantic meaning of the words and enable the MODEL to generate images that align with the given prompts.
- VAE: VAE (Variational AutoEncoder) is responsible for converting the image between the pixel space and the latent space. It consists of an encoder that compresses the image into a lower-dimensional latent representation and a decoder that reconstructs the image from the latent representation. In the text-to-image process, the VAE is used only in the final step to convert the generated image from the latent space back to the pixel space. The VAE Decode node in ComfyUI takes the output of the KSampler node (which operates in the latent space) and uses the decoder part of the VAE to transform the latent representation into the final image in the pixel space.
It's important to note that the VAE is a separate component from the CLIP language model. While CLIP focuses on processing text prompts, the VAE deals with the conversion between pixel and latent spaces.
2.4.2. CLIP Text Encode 📝#
The CLIP Text Encode node in ComfyUI is responsible for taking the user-provided prompts and feeding them into the CLIP language model. CLIP is a powerful language model that understands the semantic meaning of words and can associate them with visual concepts. When a prompt is entered into the CLIP Text Encode node, it undergoes a transformation process where each word is converted into embeddings. These embeddings are high-dimensional vectors that capture the semantic information of the words. By transforming the prompts into embeddings, CLIP enables the MODEL to generate images that accurately reflect the meaning and intent of the given prompts.
2.4.3. Empty Latent Image 🌌#
In the text-to-image process, the generation starts with a random image in the latent space. This random image serves as the initial state for the MODEL to work with. The size of the latent image is proportional to the actual image size in the pixel space. In ComfyUI, you can adjust the height and width of the latent image to control the size of the generated image. Additionally, you can set the batch size to determine the number of images generated in each run.
The optimal sizes for latent images depend on the specific Stable Diffusion model being used. For SD v1.5 models, the recommended sizes are 512x512 or 768x768, while for SDXL models, the optimal size is 1024x1024. ComfyUI provides a range of common aspect ratios to choose from, such as 1:1 (square), 3:2 (landscape), 2:3 (portrait), 4:3 (landscape), 3:4 (portrait), 16:9 (widescreen), and 9:16 (vertical). It's important to note that the width and height of the latent image must be divisible by 8 to ensure compatibility with the model's architecture.
2.4.4. VAE 🔍#
The VAE (Variational AutoEncoder) is a crucial component in the Stable Diffusion model that handles the conversion of images between the pixel space and the latent space. It consists of two main parts: an Image Encoder and an Image Decoder.
The Image Encoder takes an image in the pixel space and compresses it into a lower-dimensional latent representation. This compression process significantly reduces the data size, allowing for more efficient processing and storage. For example, an image of size 512x512 pixels can be compressed down to a latent representation of size 64x64.
On the other hand, the Image Decoder, also known as the VAE Decoder, is responsible for reconstructing the image from the latent representation back into the pixel space. It takes the compressed latent representation and expands it to generate the final image.
Using a VAE offers several advantages:
- Efficiency: By compressing the image into a lower-dimensional latent space, the VAE enables faster generation and shorter training times. The reduced data size allows for more efficient processing and memory usage.
- Latent space manipulation: The latent space provides a more compact and meaningful representation of the image. This allows for more precise control and editing of image details and style. By manipulating the latent representation, it becomes possible to modify specific aspects of the generated image.
However, there are also some disadvantages to consider:
- Data loss: During the encoding and decoding process, some details of the original image may be lost. The compression and reconstruction steps can introduce artifacts or slight variations in the final image compared to the original.
- Limited capturing of original data: The lower-dimensional latent space may not be able to fully capture all the intricate features and details of the original image. Some information may be lost during the compression process, resulting in a slightly less accurate representation of the original data.
Despite these limitations, the VAE plays a vital role in the Stable Diffusion model by enabling efficient conversion between the pixel space and the latent space, facilitating faster generation and more precise control over the generated images.
2.4.5. KSampler ⚙️#
The KSampler node in ComfyUI is the heart of the image generation process in Stable Diffusion. It is responsible for denoising the random image in the latent space to match the user-provided prompt. The KSampler employs a technique called reverse diffusion, where it iteratively refines the latent representation by removing noise and adding meaningful details based on the guidance from the CLIP embeddings.
The KSampler node offers several parameters that allow users to fine-tune the image generation process:
Seed: The seed value controls the initial noise and composition of the final image. By setting a specific seed, users can achieve reproducible results and maintain consistency across multiple generations.
Control_after_generation: This parameter determines how the seed value changes after each generation. It can be set to randomize (generate a new random seed for each run), increment (increase the seed value by 1), decrement (decrease the seed value by 1), or fixed (keep the seed value constant).
Step: The number of sampling steps determines the refinement process's intensity. Higher values result in fewer artifacts and more detailed images but also increase the generation time.
Sampler_name: This parameter allows users to choose the specific sampling algorithm used by the KSampler. Different sampling algorithms may yield slightly different results and have varying generation speeds.
Scheduler: The scheduler controls how the noise level changes at each step of the denoising process. It determines the rate at which noise is removed from the latent representation.
Denoise: The denoise parameter sets the amount of initial noise that should be erased by the denoising process. A value of 1 means that all noise will be removed, resulting in a clean and detailed image.
By adjusting these parameters, you can fine-tune the image generation process to achieve the desired results.
Now, Are you ready to embark on your ComfyUI journey?#
At RunComfy, we've created the ultimate ComfyUI online experience just for you. Say goodbye to complicated installations! 🎉 Try ComfyUI Online now and unleash your artistic potential like never before! 🎉
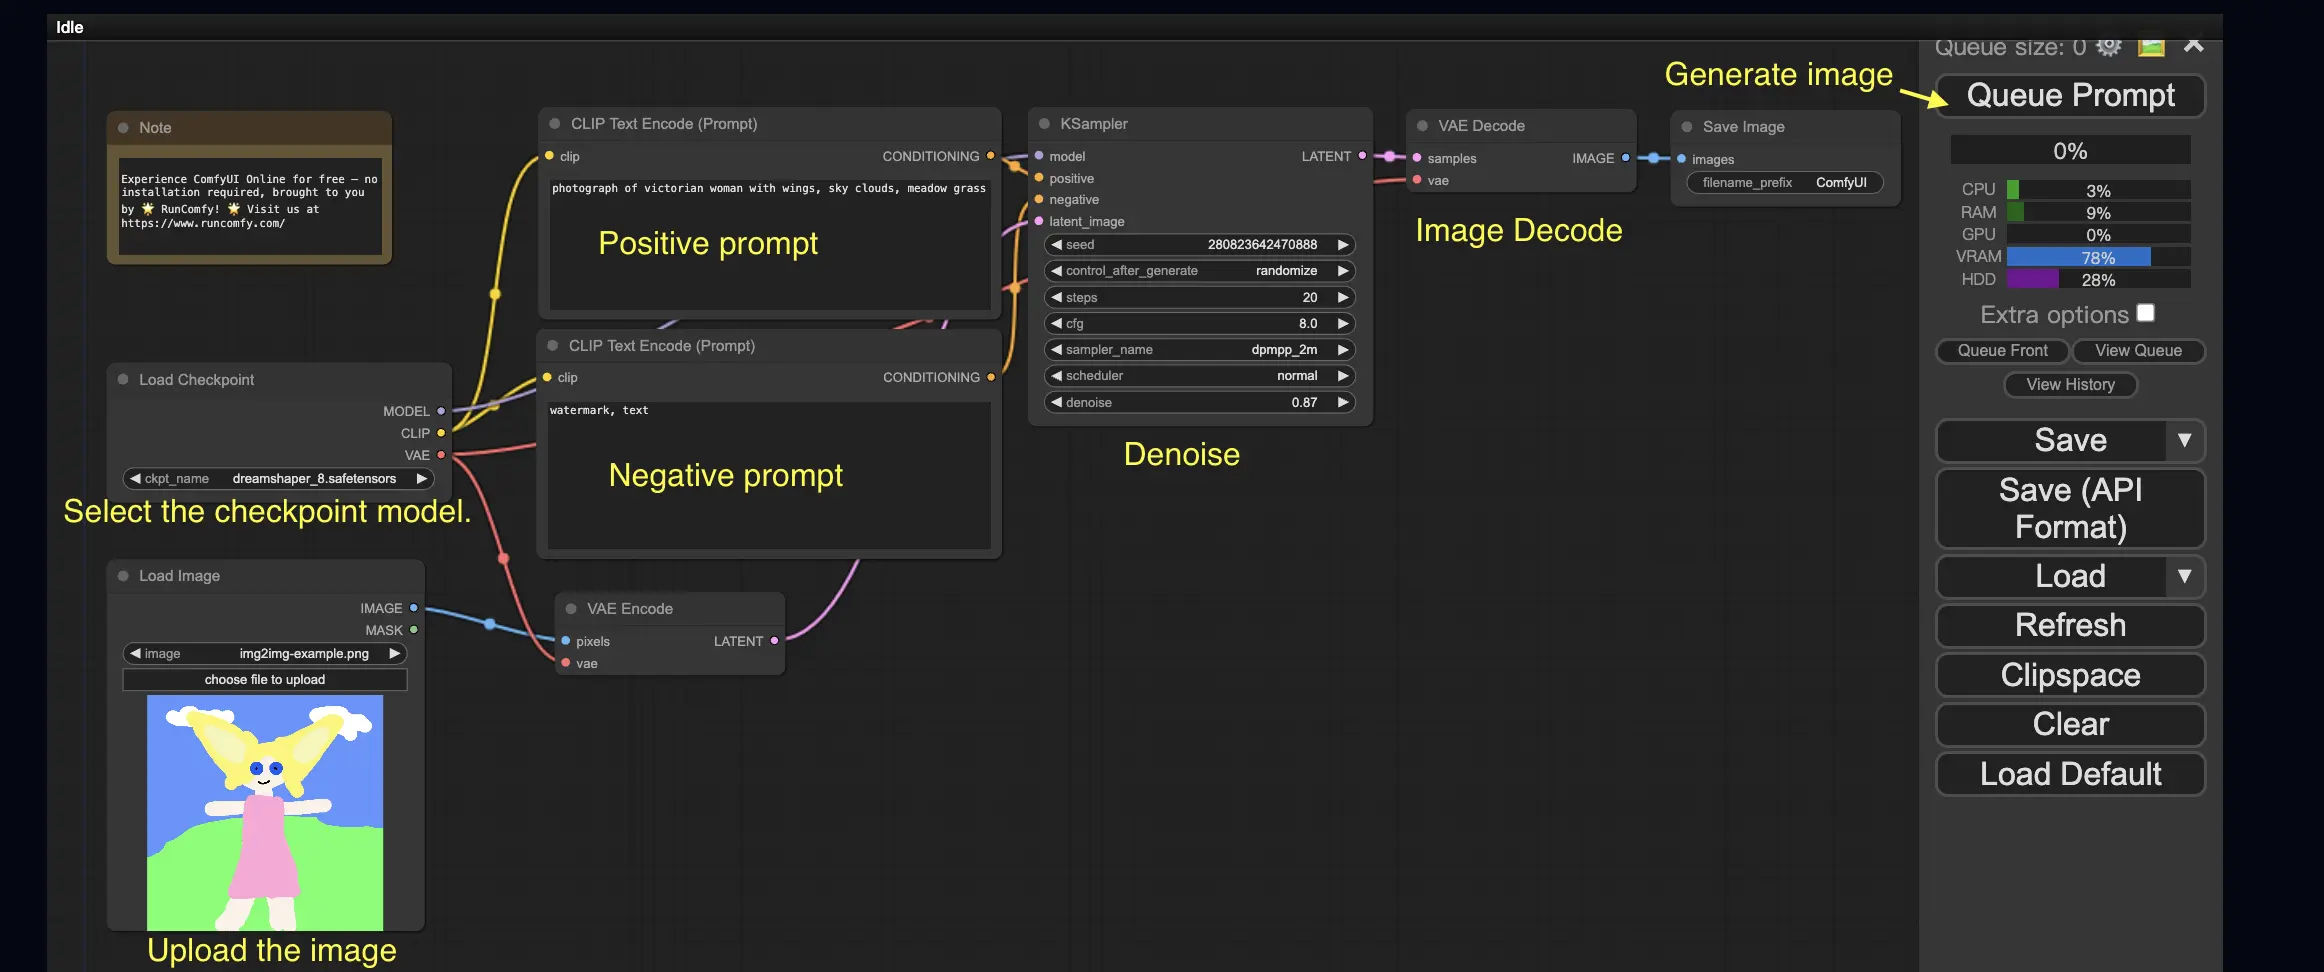
3. ComfyUI Workflow: Image-to-Image 🖼️#
The Image-to-Image workflow generates an image based on a prompt and an input image. Try it yourself!
To use the Image-to-Image workflow:
- Select the checkpoint model.
- Upload the image as an image prompt.
- Revise the positive and negative prompts.
- Optionally adjust the denoise (denoising strength) in the KSampler node.
- Press Queue Prompt to start generation.
For more premium ComfyUI workflows, visit our 🌟ComfyUI Workflow List🌟
4. ComfyUI SDXL 🚀#
Thanks to its extreme configurability, ComfyUI is one of the first GUIs to support the Stable Diffusion XL model. Let's give it a try!
To use the ComfyUI SDXL workflow:
- Revise the positive and negative prompts.
- Press Queue Prompt to start generation.
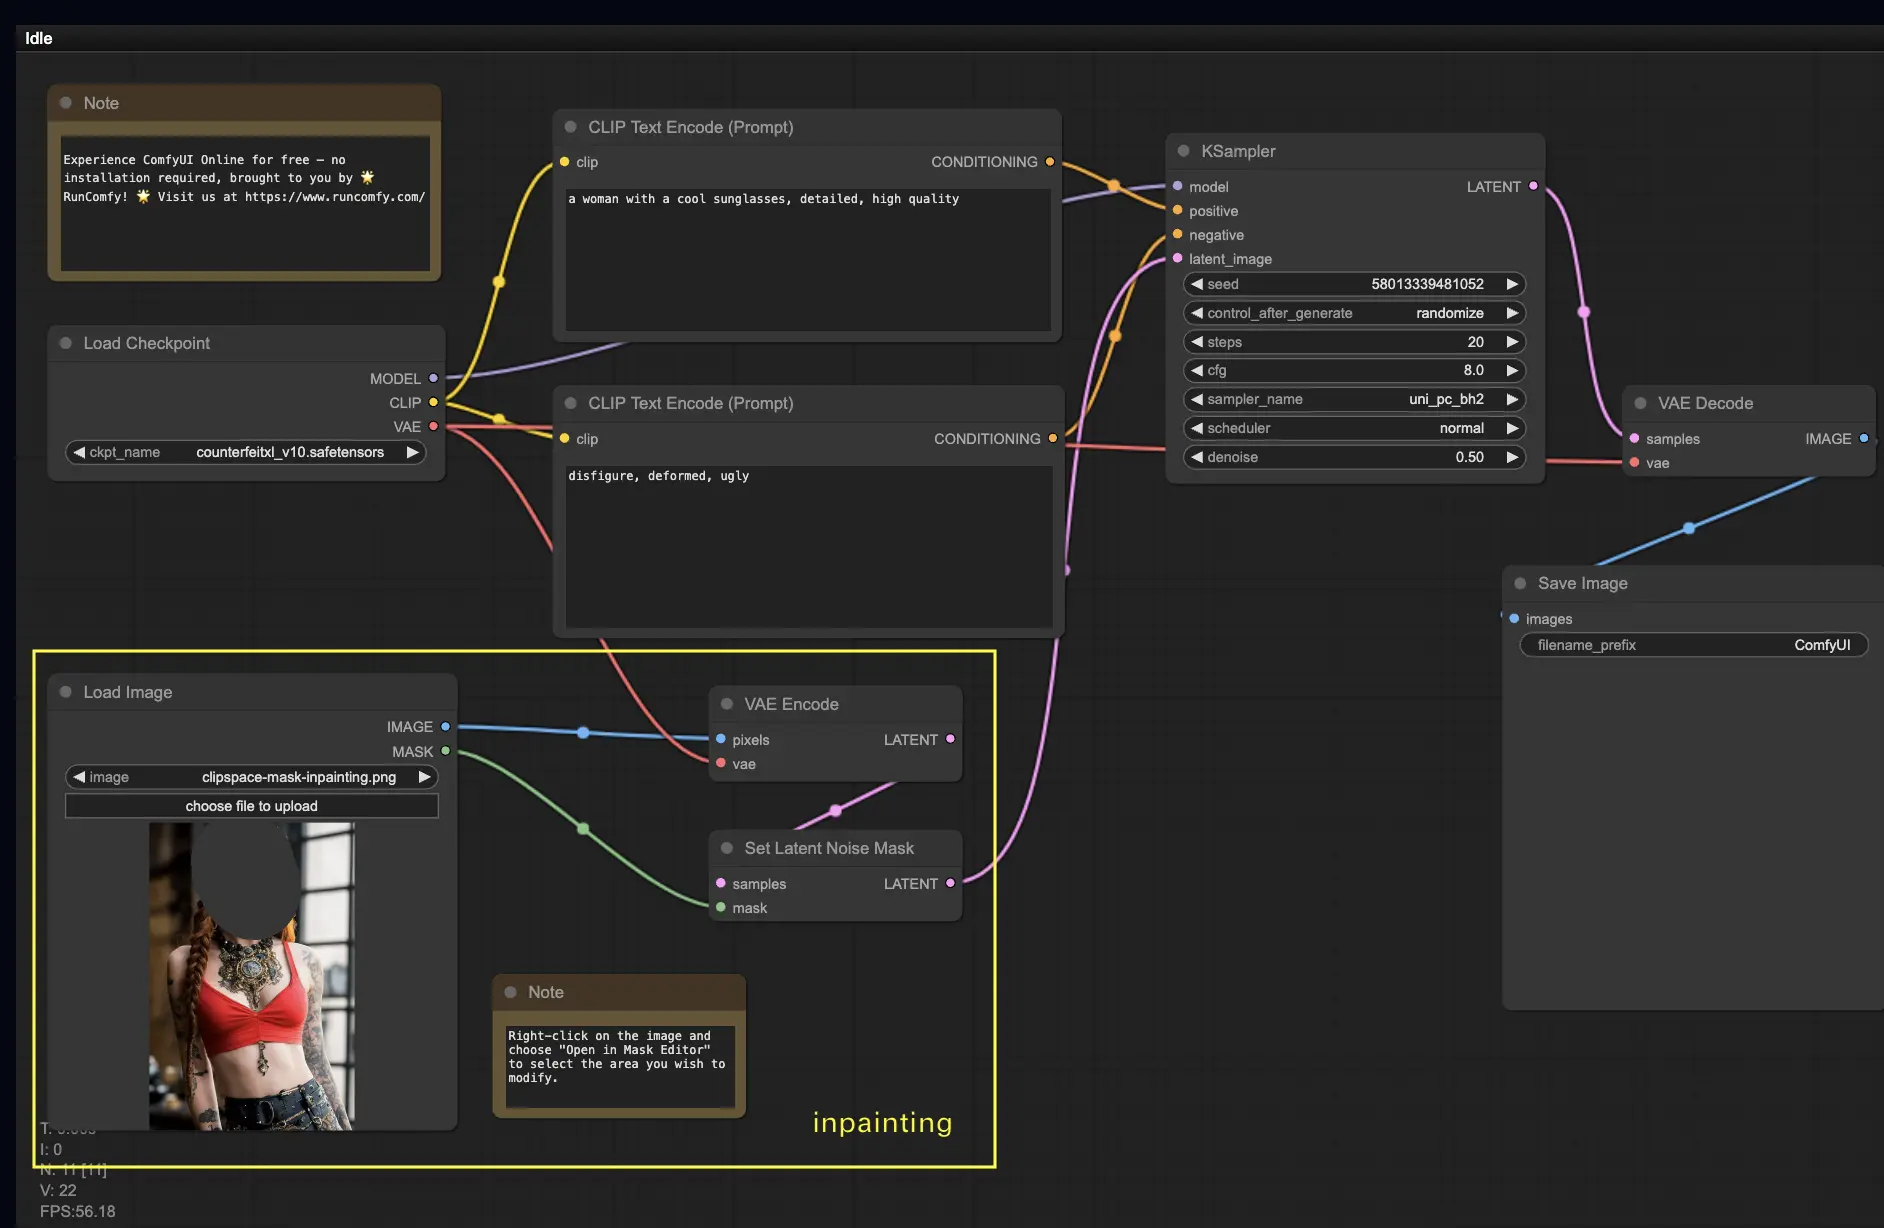
5. ComfyUI Inpainting 🎨#
Let's dive into something more complex: inpainting! When you have a great image but want to modify specific parts, inpainting is the best method. Try it here!
To use the inpainting workflow:
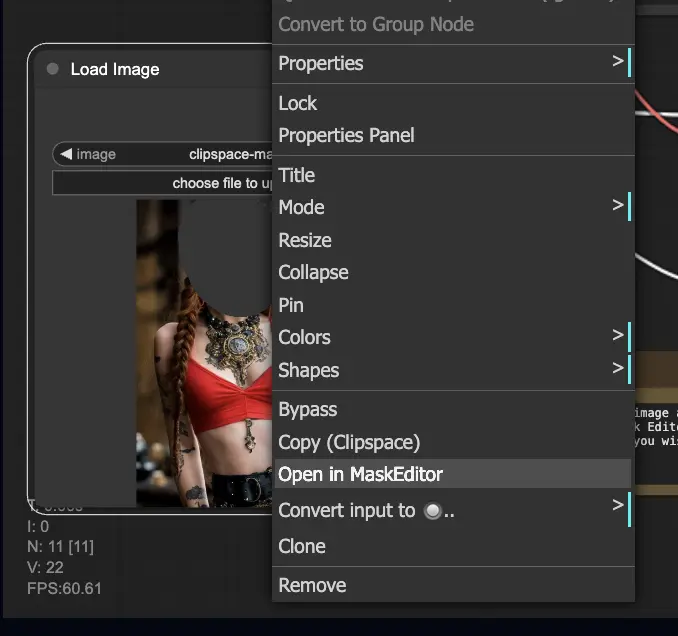
- Upload an image you want to inpaint.
- Right-click the image and select "Open in MaskEditor". Mask the area to regenerate, then click "Save to node".
- Select a Checkpoint model:
- This workflow only works with a standard Stable Diffusion model, not an Inpainting model.
- If you want to utilize an inpainting model, please switch the "VAE Encode" and "Set Noise Latent Mask" nodes to the "VAE Encode (Inpaint)" node, which is specifically designed for inpainting models.
- Customize the inpainting process:
- In the CLIP Text Encode (Prompt) node, you can input additional information to guide the inpainting. For example, you can specify the style, theme, or elements you want to include in the inpainting area.
- Set the original denoising strength (denoise), e.g., 0.6.
- Press Queue Prompt to perform inpainting.
6. ComfyUI Outpainting 🖌️#
Outpainting is another exciting technique that allows you to expand your images beyond their original boundaries. 🌆 It's like having an infinite canvas to work with!
To use the ComfyUI Outpainting workflow:
- Start with an image you want to expand.
- Use the Pad Image for Outpainting node to your workflow.
- Configure the outpainting settings:
- left, top, right, bottom: Specify the number of pixels to expand in each direction.
- feathering: Adjust the smoothness of the transition between the original image and the outpainted area. Higher values create a more gradual blend but may introduce a smudging effect.
- Customize the outpainting process:
- In the CLIP Text Encode (Prompt) node, you can input additional information to guide the outpainting. For example, you can specify the style, theme, or elements you want to include in the expanded area.
- Experiment with different prompts to achieve the desired results.
- Fine-tune the VAE Encode (for Inpainting) node:
- Adjust the grow_mask_by parameter to control the size of the outpainting mask. A value greater than 10 is recommended for optimal results.
- Press Queue Prompt to start the outpainting process.

For more premium inpainting/outpainting workflows, visit our 🌟ComfyUI Workflow List🌟
7. ComfyUI Upscale ⬆️#
Next, let's explore ComfyUI upscale. We'll introduce three fundamental workflows to help you upscale efficiently.
There are two main methods for upscaling:
- Upscale pixel: Directly upscale the visible image.
- Input: image, Output: upscaled image
- Upscale latent: Upscale the invisible latent space image.
- Input: latent, Output: upscaled latent (requires decoding to become a visible image)
7.1. Upscale Pixel 🖼️#
Two ways to achieve this:
- Using algorithms: Fastest generation speed, but slightly inferior results compared to models.
- Using models: Better results, but slower generation time.
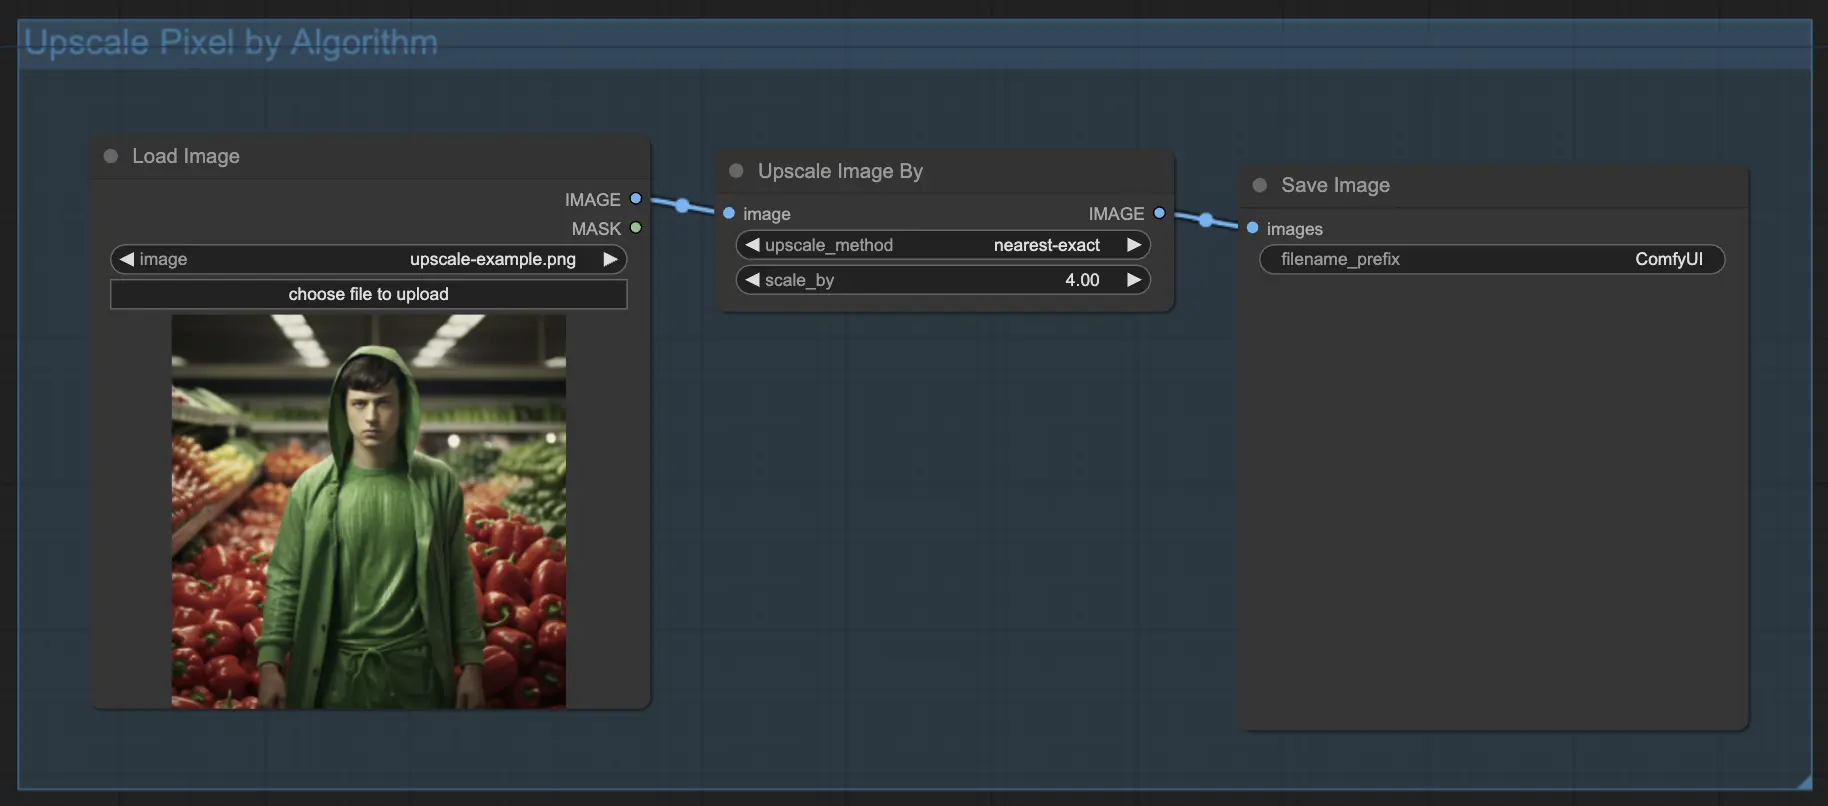
7.1.1. Upscale Pixel by Algorithm 🧮#
- Add Upscale Image by node.
- method parameter: Choose the upscaling algorithm (bicubic, bilinear, nearest-exact).
- Scale parameter: Specify the upscaling factor (e.g., 2 for 2x).
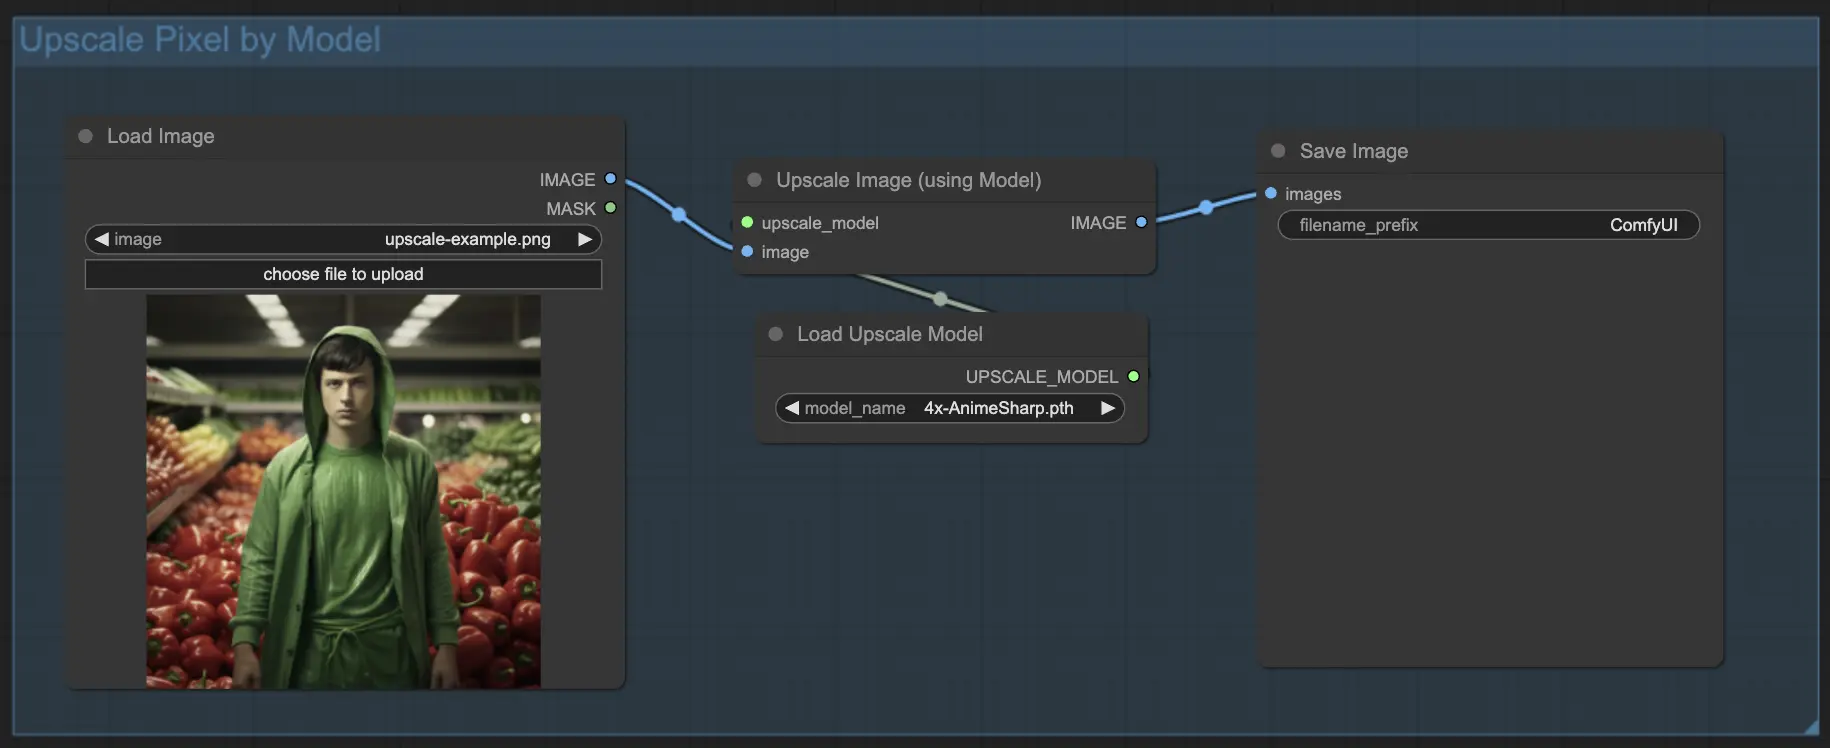
7.1.2. Upscale Pixel by Model 🤖#
- Add Upscale Image (using Model) node.
- Add Load Upscale Model node.
- Choose a model suitable for your image type (e.g., anime or real-life).
- Select the upscaling factor (X2 or X4).
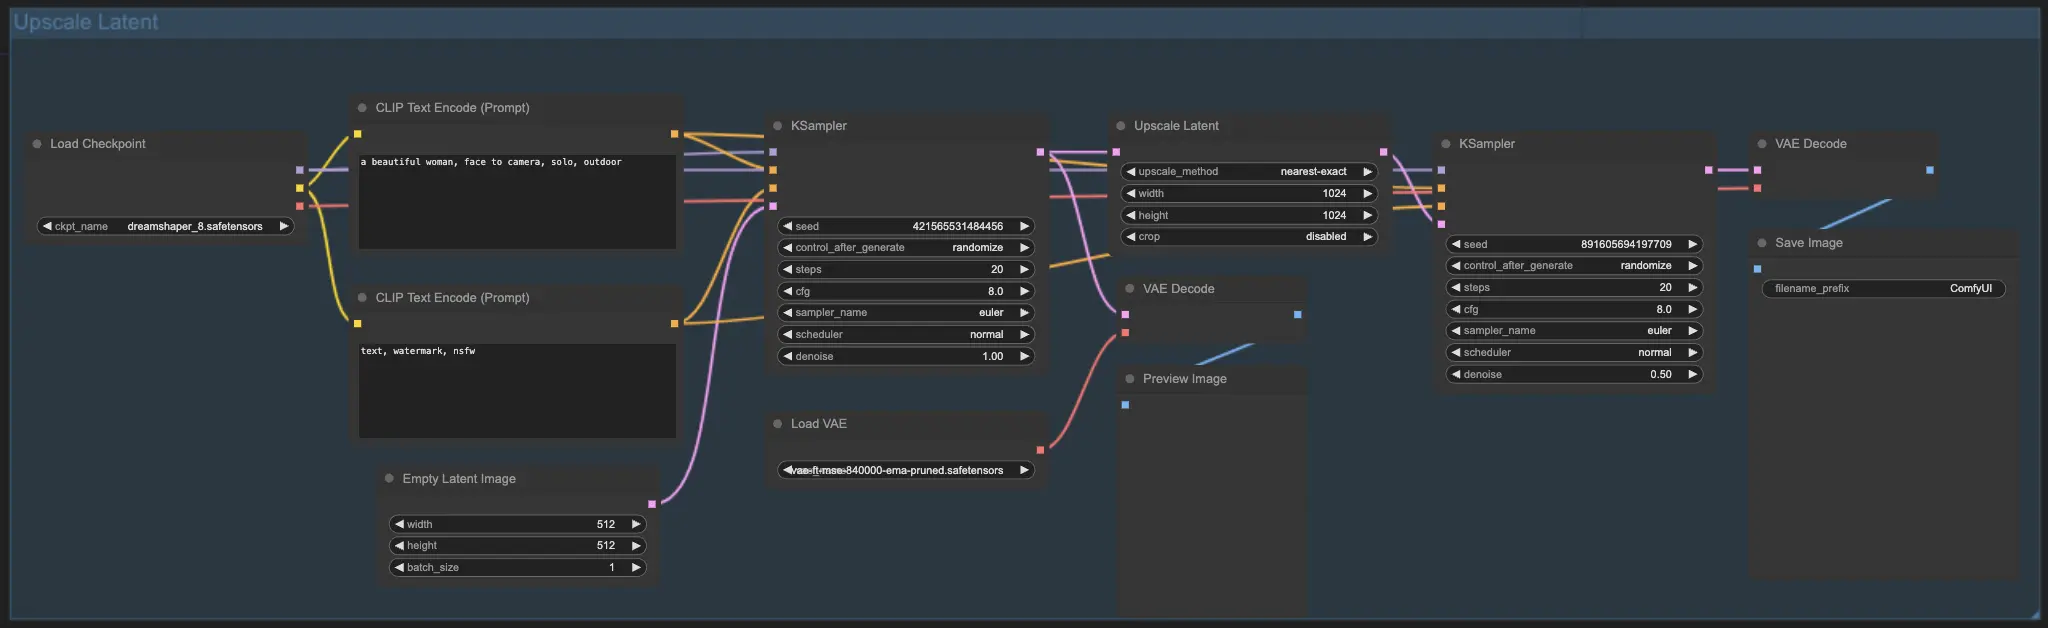
7.2. Upscale Latent ⚙️#
Another upscaling method is Upscale Latent, also known as Hi-res Latent Fix Upscale, which directly upscales in the latent space.
7.3. Upscale Pixel vs. Upscale Latent 🆚#
- Upscale Pixel: Only enlarges the image without adding new information. Faster generation, but may have a smudging effect and lack details.
- Upscale Latent: In addition to enlarging, it changes some of the original image information, enriching details. May deviate from the original image and has a slower generation speed.
For more premium restore/upscale workflows, visit our 🌟ComfyUI Workflow List🌟
8. ComfyUI ControlNet 🎮#
Get ready to take your AI art to the next level with ControlNet, a game-changing technology that revolutionizes image generation!
ControlNet is like a magic wand 🪄 that grants you unprecedented control over your AI-generated images. It works hand in hand with powerful models like Stable Diffusion, enhancing their capabilities and allowing you to guide the image creation process like never before!
Imagine being able to specify the edges, human poses, depth, or even segmentation maps of your desired image. 🌠 With ControlNet, you can do just that!
If you're eager to dive deeper into the world of ControlNet and unleash its full potential, we've got you covered. Check out our detailed tutorial on mastering ControlNet in ComfyUI! 📚 It's packed with step-by-step guides, and inspiring examples to help you become a ControlNet pro. 🏆
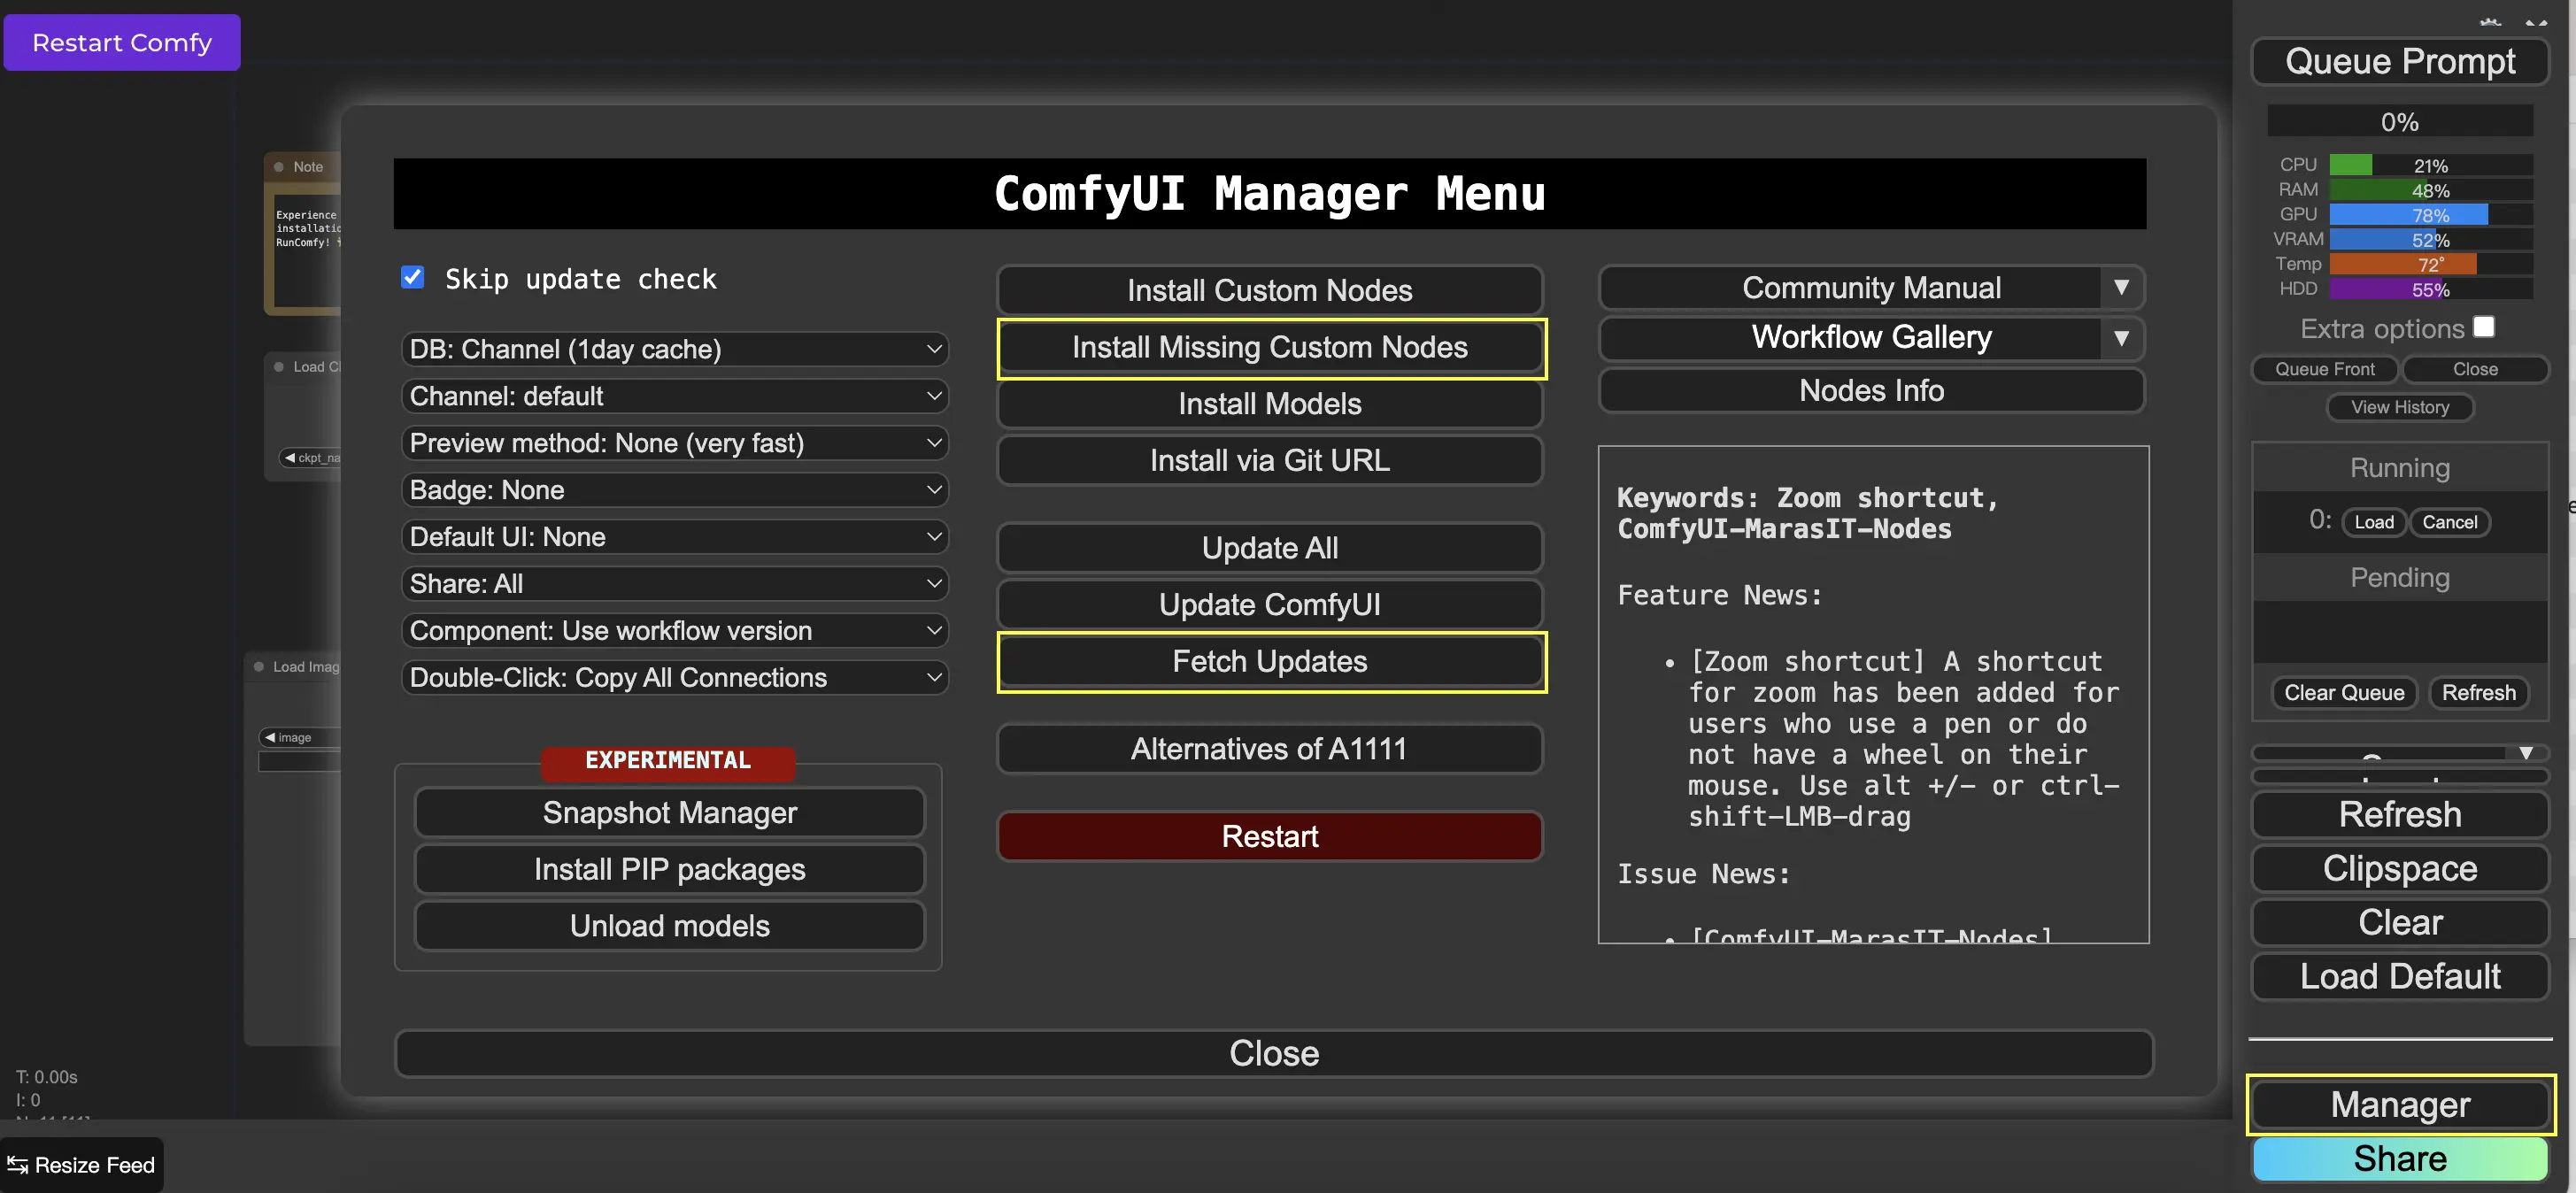
9. ComfyUI Manager 🛠️#
ComfyUI Manager is a custom node that allows you to install and update other custom nodes through the ComfyUI interface. You'll find the Manager button on the Queue Prompt menu.
9.1. How to Install Missing Custom Nodes 📥#
If a workflow requires custom nodes that you haven't installed, follow these steps:
- Click Manager in the Menu.
- Click Install Missing Custom Nodes.
- Restart ComfyUI completely.
- Refresh the browser.
9.2. How to Update Custom Nodes 🔄#
- Click Manager in the Menu.
- Click Fetch Updates (may take a while).
- Click Install Custom Nodes.
- If an update is available, an Update button will appear next to the installed custom node.
- Click Update to update the node.
- Restart ComfyUI.
- Refresh the browser.
9.3. How to Load Custom Nodes in Your Workflow 🔍#
Double-click any empty area to bring up a menu to search for nodes.

10. ComfyUI Embeddings 📝#
Embeddings, also known as textual inversion, are a powerful feature in ComfyUI that allows you to inject custom concepts or styles into your AI-generated images. 💡 It's like teaching the AI a new word or phrase and associating it with specific visual characteristics.
To use embeddings in ComfyUI, simply type "embedding:" followed by the name of your embedding in the positive or negative prompt box. For example:
embedding: BadDream
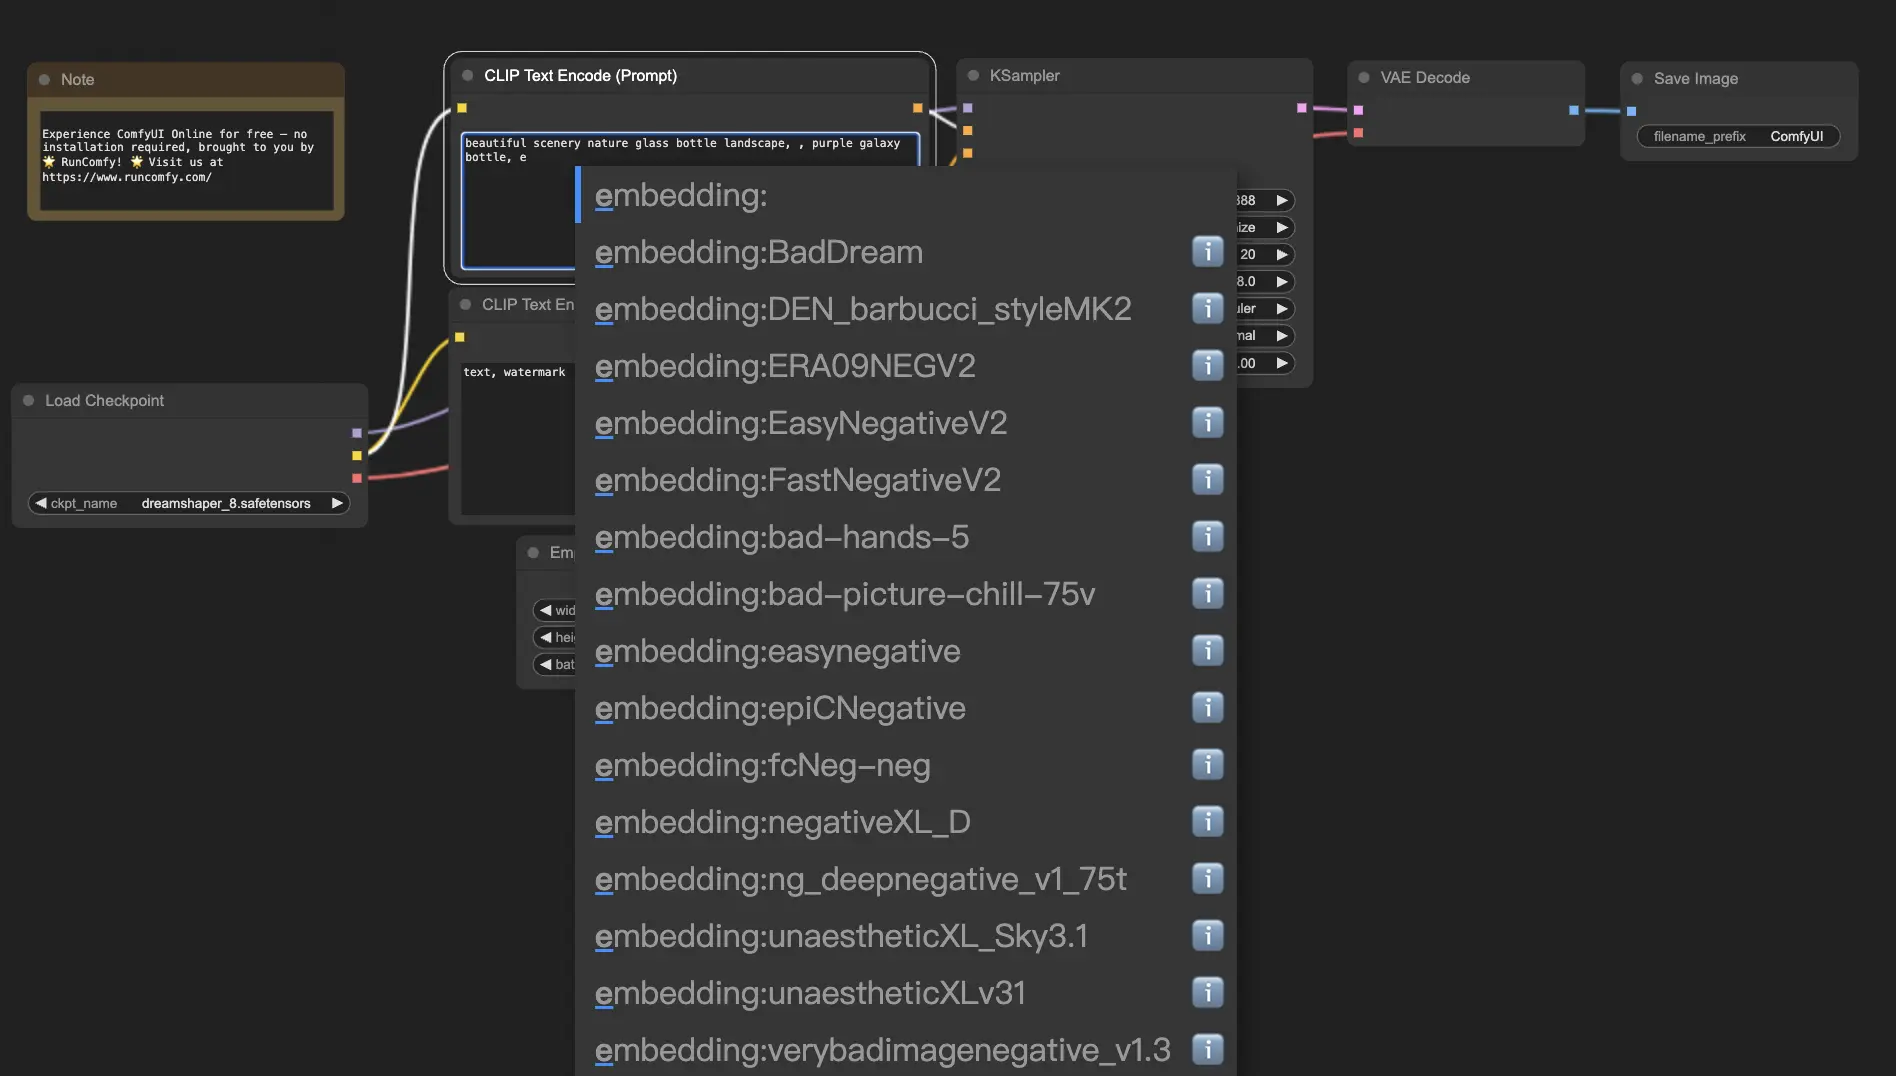
When you use this prompt, ComfyUI will search for an embedding file named "BadDream" in the ComfyUI > models > embeddings folder. 📂 If it finds a match, it will apply the corresponding visual characteristics to your generated image.
Embeddings are a great way to personalize your AI art and achieve specific styles or aesthetics. 🎨 You can create your own embeddings by training them on a set of images that represent the desired concept or style.
10.1. Embedding with Autocomplete 🔠#
Remembering the exact names of your embeddings can be a hassle, especially if you have a large collection. 😅 That's where the ComfyUI-Custom-Scripts custom node comes to the rescue!
To enable embedding name autocomplete:
- Open the ComfyUI Manager by clicking on "Manager" in the top menu.
- Go to "Install Custom nodes" and search for "ComfyUI-Custom-Scripts".
- Click on "Install" to add the custom node to your ComfyUI setup.
- Restart ComfyUI to apply the changes.
Once you have the ComfyUI-Custom-Scripts node installed, you'll experience a more user-friendly way of using embeddings. 😊 Simply start typing "embedding:" in a prompt box, and a list of available embeddings will appear. You can then select the desired embedding from the list, saving you time and effort!
10.2. Embedding Weight ⚖️#
Did you know that you can control the strength of your embeddings? 💪 Since embeddings are essentially keywords, you can apply weights to them just like you would with regular keywords in your prompts.
To adjust the weight of an embedding, use the following syntax:
(embedding: BadDream:1.2)
In this example, the weight of the "BadDream" embedding is increased by 20%. So higher weights (e.g., 1.2) will make the embedding more prominent, while lower weights (e.g., 0.8) will reduce its influence. 🎚️ This gives you even more control over the final result!
11. ComfyUI LoRA 🧩#
LoRA, short for Low-rank Adaptation, is another exciting feature in ComfyUI that allows you to modify and fine-tune your checkpoint models. 🎨 It's like adding a small, specialized model on top of your base model to achieve specific styles or incorporate custom elements.
LoRA models are compact and efficient, making them easy to use and share. They are commonly used for tasks such as modifying the artistic style of an image or injecting a specific person or object into the generated result.
When you apply a LoRA model to a checkpoint model, it modifies the MODEL and CLIP components while leaving the VAE (Variational Autoencoder) untouched. This means that the LoRA focuses on adjusting the content and style of the image without altering its overall structure.
11.1. How to use LoRA 🔧#
Using LoRA in ComfyUI is straightforward. Let's take a look at the simplest method:
- Select a checkpoint model that serves as the base for your image generation.
- Choose a LoRA model that you want to apply to modify the style or inject specific elements.
- Revise the positive and negative prompts to guide the image generation process.
- Click on "Queue Prompt" to start generating the image with the applied LoRA. ▶
ComfyUI will then combine the checkpoint model and the LoRA model to create an image that reflects the specified prompts and incorporates the modifications introduced by the LoRA.
11.2. Multiple LoRAs 🧩🧩#
But what if you want to apply multiple LoRAs to a single image? No problem! ComfyUI allows you to use two or more LoRAs in the same text-to-image workflow.
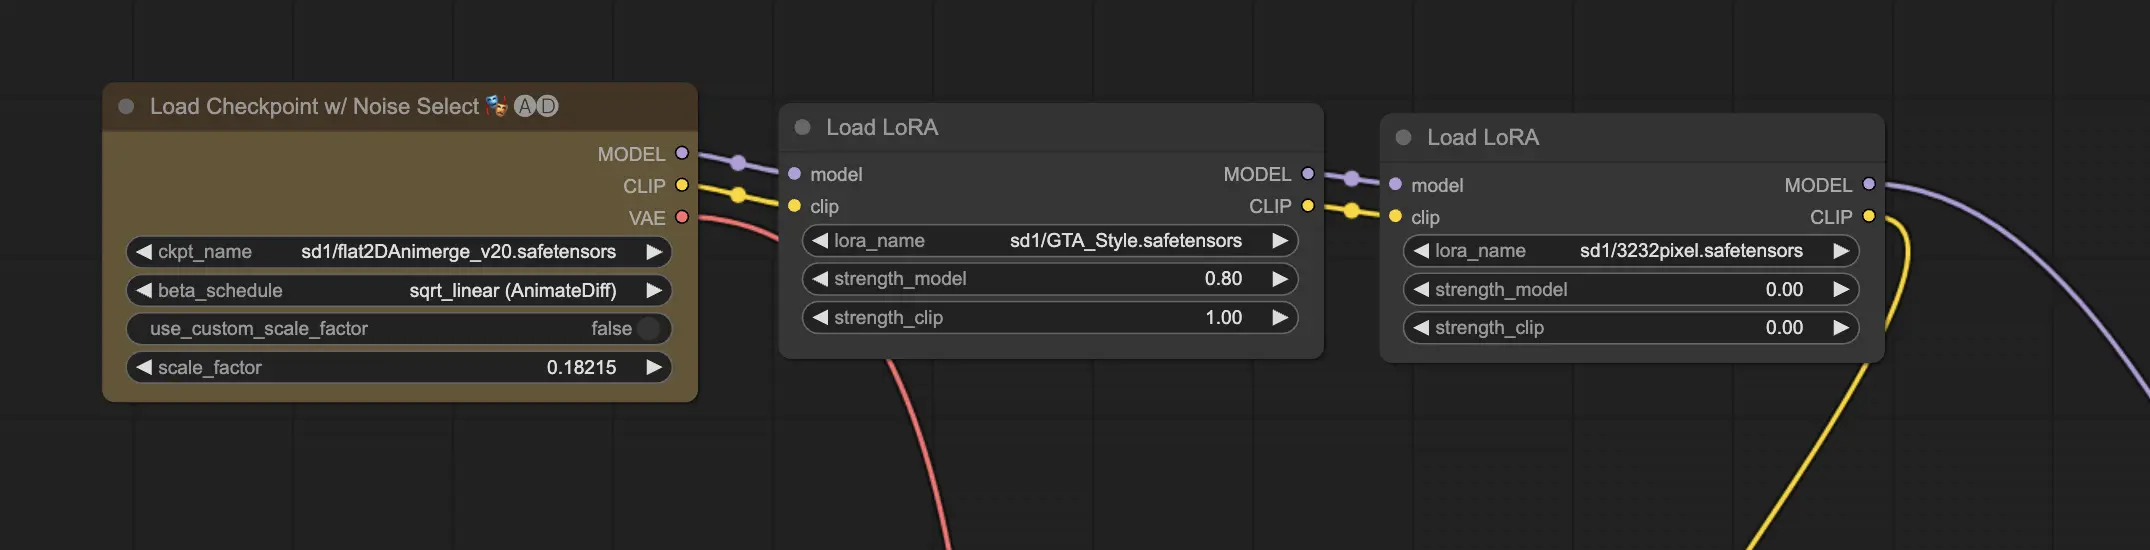
The process is similar to using a single LoRA, but you'll need to select multiple LoRA models instead of just one. ComfyUI will apply the LoRAs sequentially, meaning that each LoRA will build upon the modifications introduced by the previous one.
This opens up a world of possibilities for combining different styles, elements, and modifications in your AI-generated images. 🌍💡 Experiment with different LoRA combinations to achieve unique and creative results!
12. Shortcuts and Tricks for ComfyUI ⌨️🖱️#
12.1. Copy and Paste 📋#
- Select a node and press Ctrl+C to copy.
- Press Ctrl+V to paste.
- Press Ctrl+Shift+V to paste with input connections intact.
12.2. Moving Multiple Nodes 🖱️#
- Create a group to move a set of nodes together.
- Alternatively, hold down Ctrl and drag to create a box to select multiple nodes or hold down Ctrl to select multiple nodes individually.
- To move the selected nodes, hold down Shift and move the mouse.
12.3. Bypass a Node 🔇#
- Temporarily disable a node by muting it. Select a node and press Ctrl+M.
- There's no keyboard shortcut to mute a group. Select Bypass Group Node in the right-click menu or mute the first node in the group to disable it.
12.4. Minimize a Node 🔍#
- Click the dot on the top left corner of the node to minimize it.
12.5. Generate Image ▶️#
- Press Ctrl+Enter to put the workflow in the queue and generate images.
12.6. Embedded Workflow 🖼️#
- ComfyUI saves the entire workflow in the metadata of the PNG file it generates. To load the workflow, drag and drop the image into ComfyUI.
12.7. Fix Seeds to Save Time ⏰#
- ComfyUI only reruns a node if the input changes. When working on a long chain of nodes, save time by fixing the seed to avoid regenerating upstream results.
13. ComfyUI Online 🚀#
Congratulations on completing this beginner's guide to ComfyUI! 🙌 You're now ready to dive into the exciting world of AI art creation. But why hassle with installation when you can start creating right away? 🤔
At RunComfy, we've made it simple for you to use ComfyUI online without any setup. Our ComfyUI Online service comes preloaded with over 200 popular nodes and models, along with 50+ stunning workflows to inspire your creations.
🌟 Whether you're a beginner or an experienced AI artist, RunComfy has everything you need to bring your artistic visions to life. 💡 Don't wait any longer – try ComfyUI Online now and experience the power of AI art creation at your fingertips! 🚀