
Hey there! 🌟 Today we're going to explore the art of replacing and fixing faces in images and videos with something super cool: the Face Detailer ComfyUI. Grab your digital paintbrushes and let's get artsy!
We will cover:
- What is the Face Detailer in ComfyUI?
- After Detailer (ADetailer) for Automatic111 vs. Face Detailer for ComfyUI
- ComfyUI Impact Pack - Face Detailer
- Face Detailer ComfyUI Workflow - No Installation Needed, Totally Free
- Add Face Detailer Node
- Input for Face Detailer
- Input the image you wish to restore
- Choose the Model, Clip, VAE, and Enter both a Positive and a Negative Prompt
- The difference of BBox Detector and Segm Detector (Sam model)
- Face Detailer Settings: How to Use Face Detailer in ComfyUI
- Face Detailer - Guide Size, Guide Size For, Max Size and BBX Crop Factor
- Face Detailer - Feather
- Face Detailer - Noise Mask
- Face Detailer - Force Inpainting
- Face Detailer - Drop Size
- Face Detailer - BBox Related Features
- Face Detailer - Segm/Sam Related Features
- Other Improvements
- Two Pass Refine with Face Detailer(Pipe)
- Upscale Video using 4x-UltraSharp
- Run Face Detailer ComfyUI Workflow for Free
1. What is the Face Detailer in ComfyUI?#
1.1 After Detailer (ADetailer) for Automatic111 vs. Face Detailer for ComfyUI#
I believe you might be familiar with or have heard of the After Detailer (ADetailer) extension for Automatic111, used for fixing faces. A similar function to this extension, known as Face Detailer, exists in ComfyUI and is part of the Impact Pack Node. Therefore, if you wish to use ADetailer in ComfyUI, you should opt for the Face Detailer from Impact Pack in ComfyUI instead.
1.2 ComfyUI Impact Pack - Face Detailer#
The ComfyUI Impact Pack serves as your digital toolbox for image enhancement, akin to a Swiss Army knife for your images. It's equipped with various modules such as Detector, Detailer, Upscaler, Pipe, and more. The highlight is the Face Detailer, which effortlessly restores faces in images, videos, and animations.
2. Face Detailer ComfyUI Workflow - No Installation Needed, Totally Free#
Check out the video above, crafted using the Face Detailer ComfyUI Workflow. Now, you can experience the Face Detailer Workflow without any installations. Everything is set up for you in a cloud-based ComfyUI, pre-loaded with the Impact Pack - Face Detailer node and every model required for a seamless experience. You can run this Face Detailer Workflow now or continue reading this tutorial on how to use it and then give it a try later.
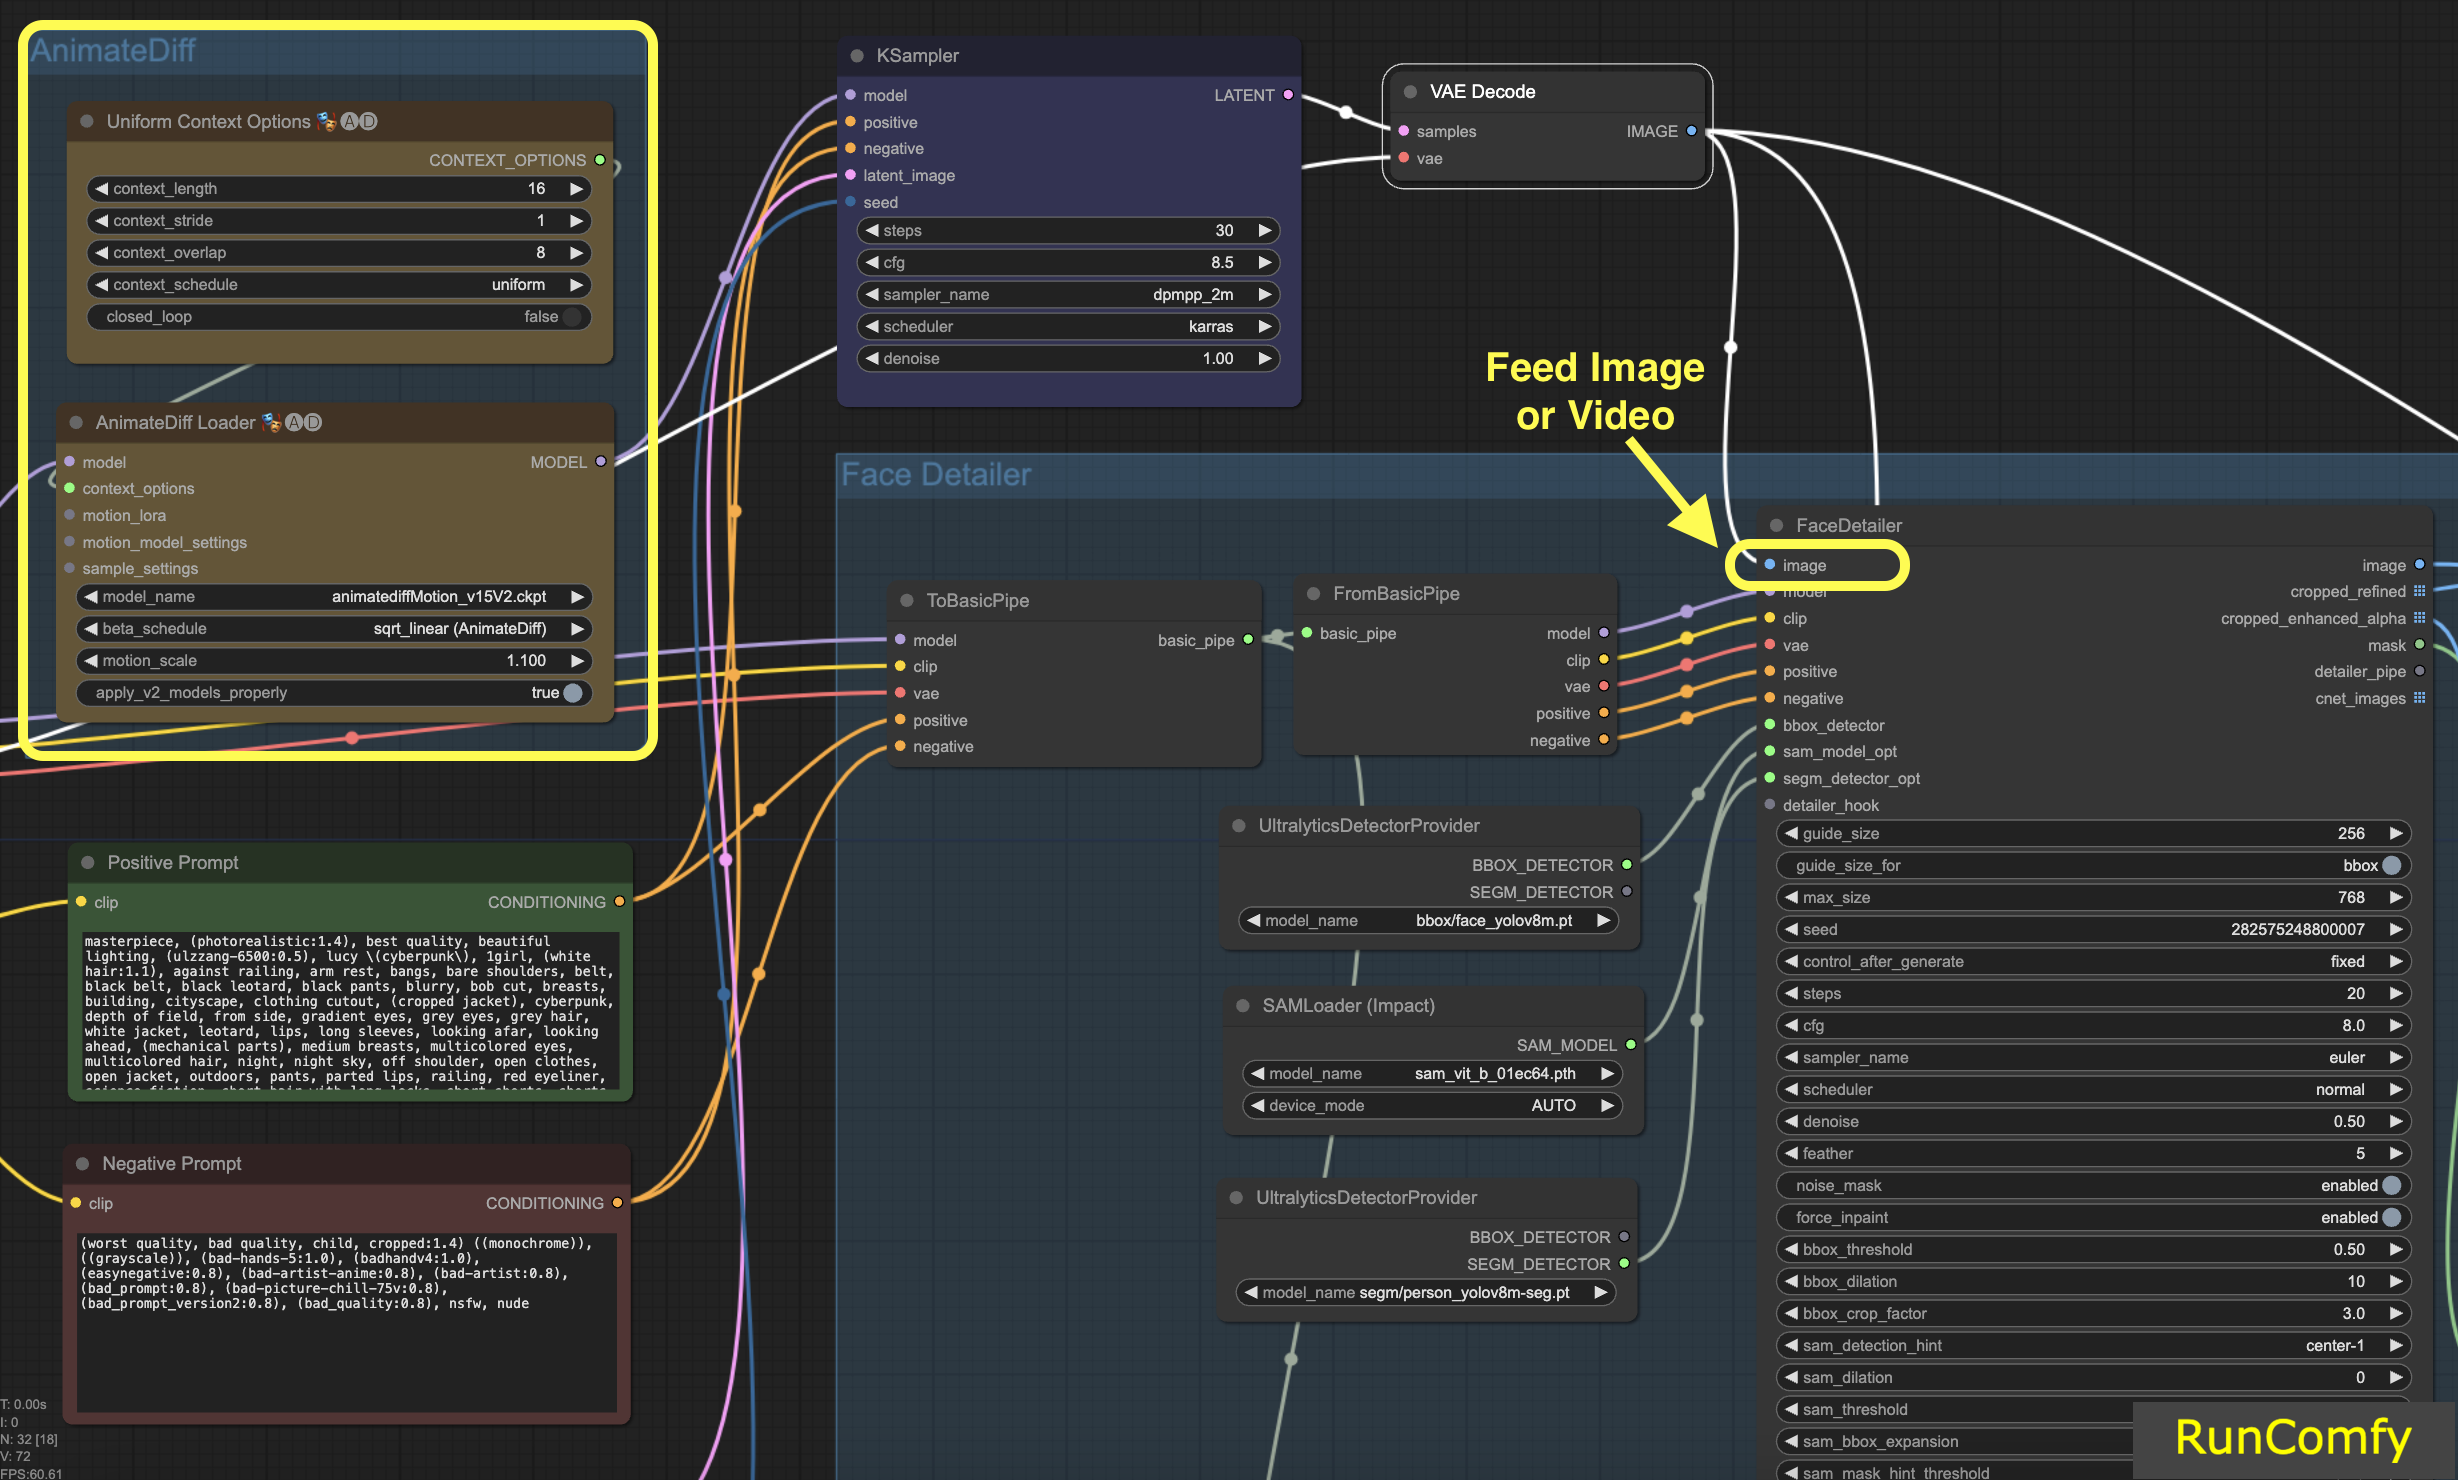
3. Add Face Detailer Node#
Alright let's get our hands dirty with the Face Detailer ComfyUI. The Face Detailer node might looks complex at first glance, but fear not and we'll break it down piece by piece. By understanding each input, output and parameter you'll be wielding this powerful tool like a pro in no time.
To locate the Face Detailer in ComfyUI, just go to Add Node → Impact Pack → Simple → Face Detailer / Face Detailer (pipe).
Let's kick off with "Face Detailer" and then delve into the "Face Detailer Pipe".
- FaceDetailer - Easily detects faces and improves them.
- FaceDetailer (pipe) - Easily detects faces and improves them (for multipass).

In this tutorial, we're diving into how to fix faces or replace faces in videos. The video is generated using AnimateDiff. If you're eager to learn more about AnimateDiff, we have a dedicated AnimateDiff tutorial!
If you're more comfortable working with images, simply swap out the nodes related to the video for those related to the image. The Face Detailer is versatile enough to handle both video and image.
4. Input for Face Detailer#
4.1 Input the image you wish to restore#
Let's start with the image input (top left button in Face Detailer), which means feeding an image or video into the Face Detailer ComfyUI. This is where the transformation begins! Here we feed the Face Detailer the video generated by AnimateDiff.
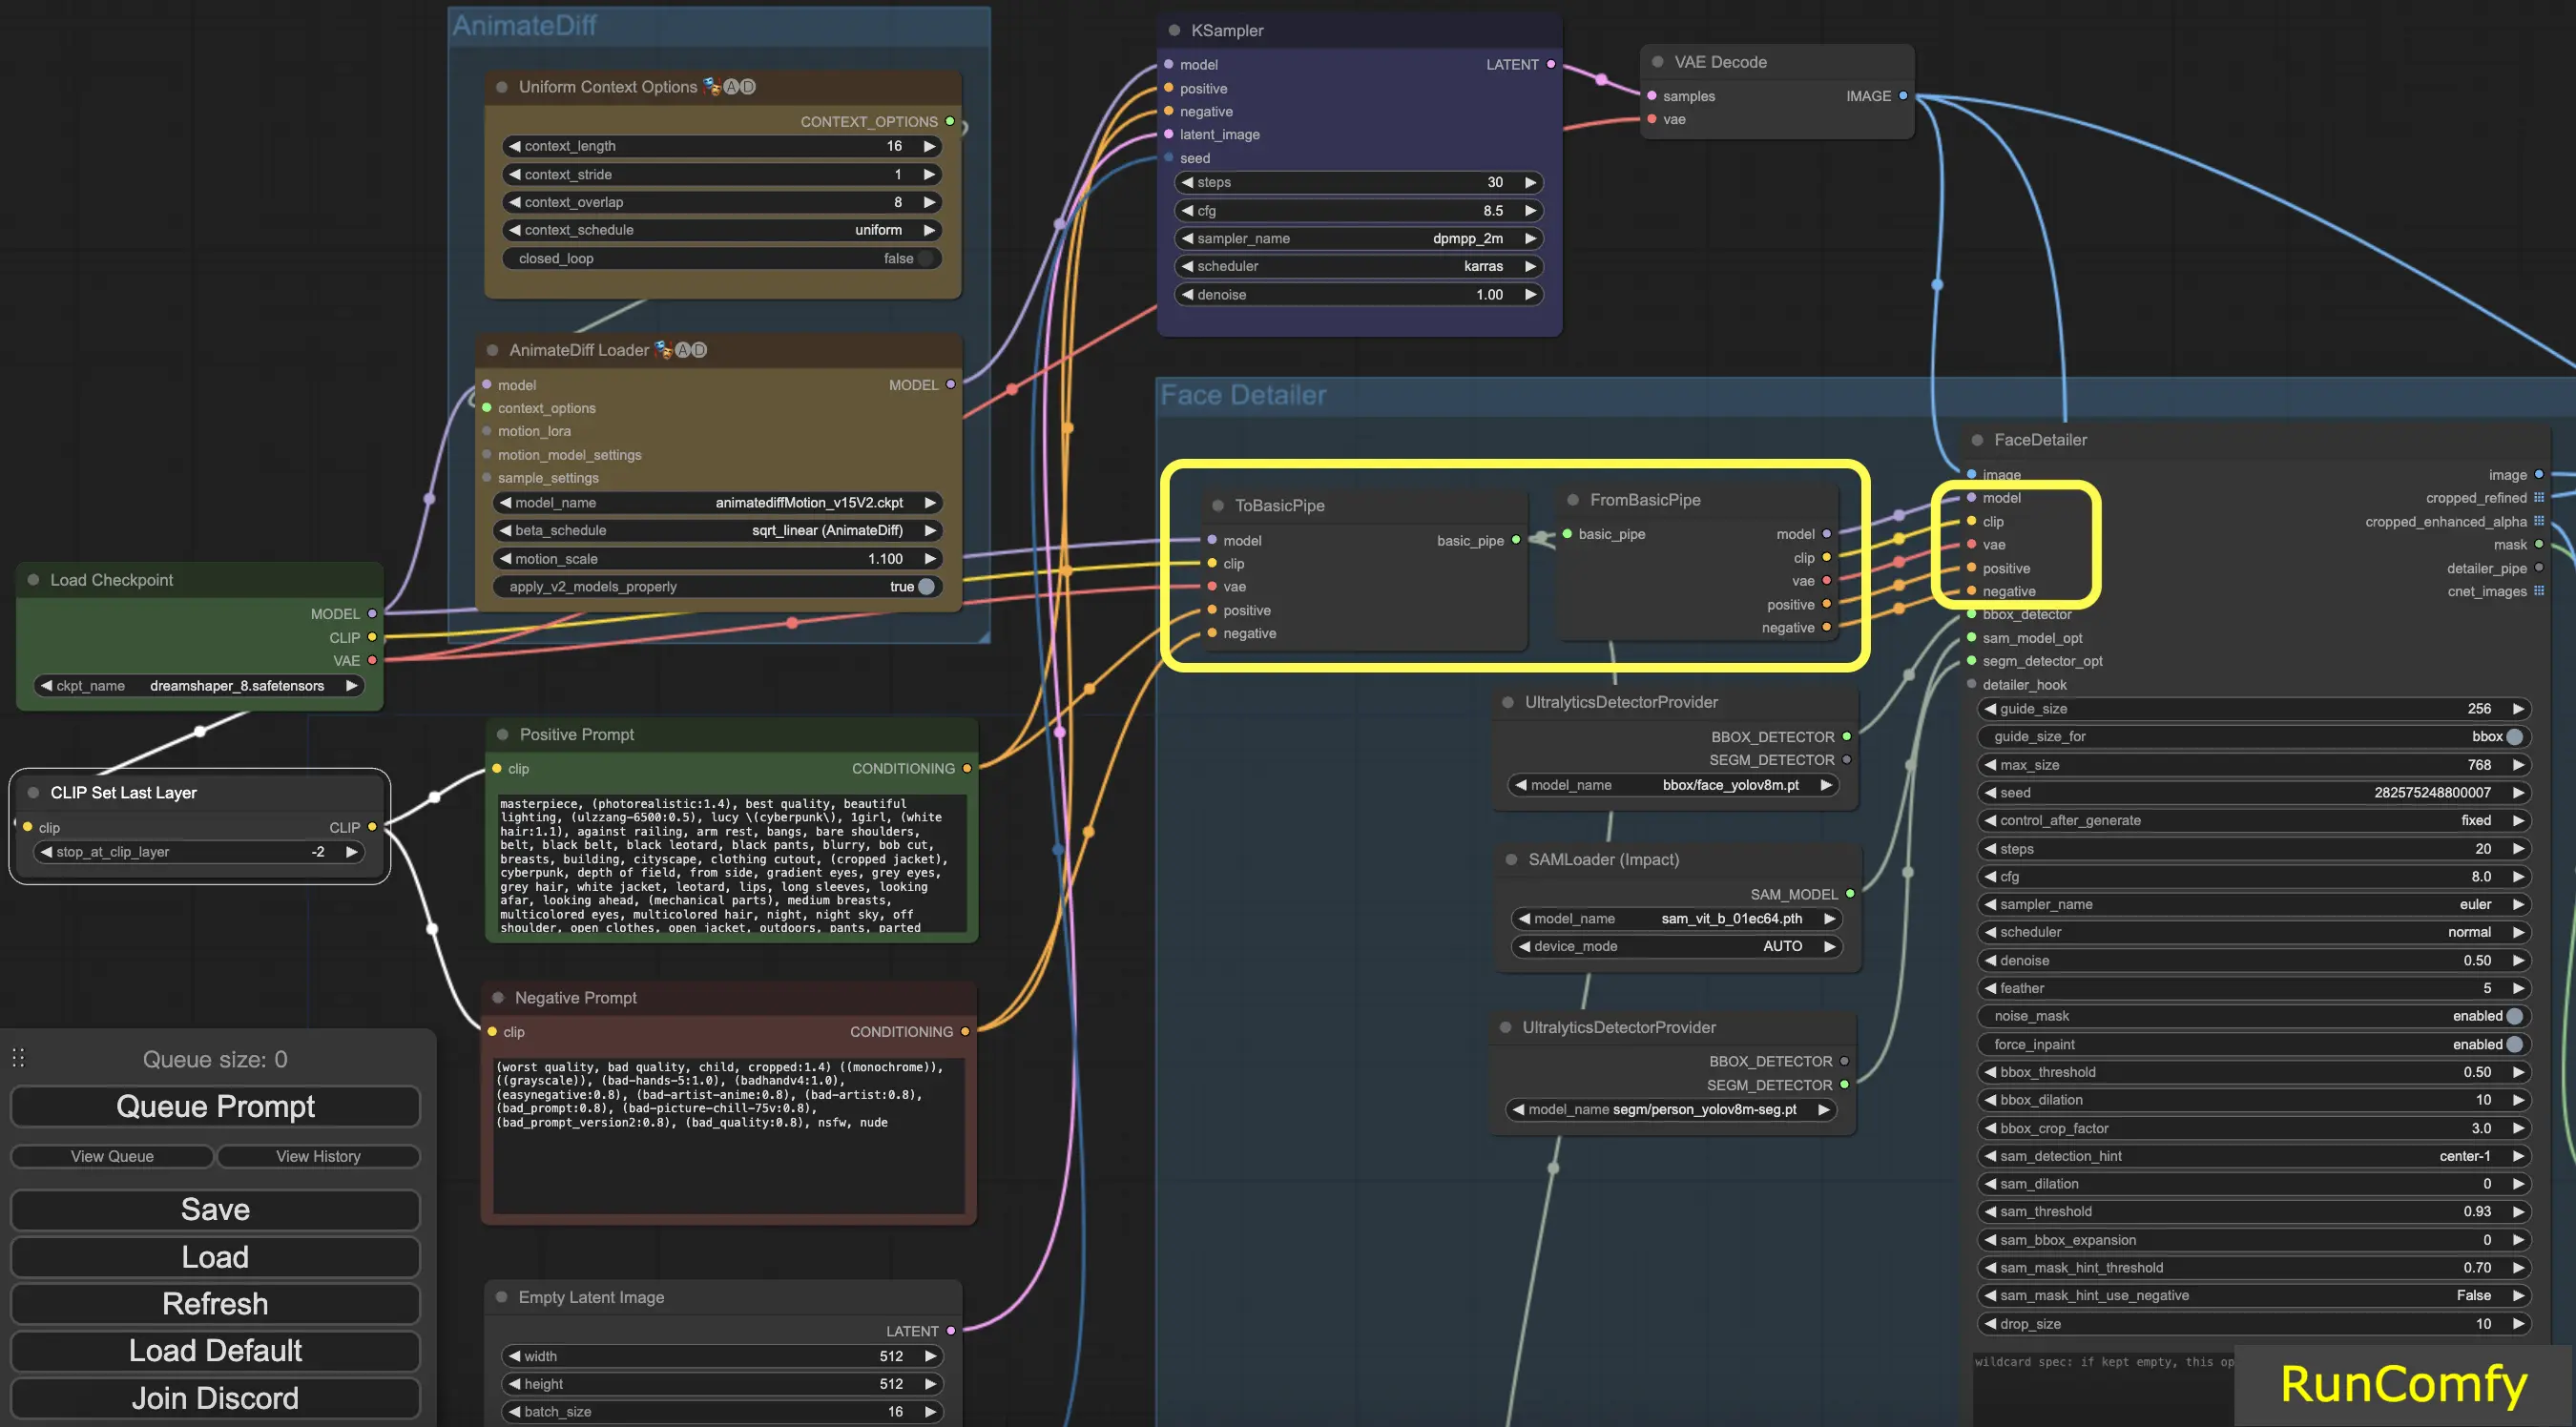
4.2 Choose the Model, Clip, VAE, and Enter both a Positive and a Negative Prompt#
You're probably already familiar with these settings. We'll skip the basics and just note that the prompts - both positive and negative - play a crucial role here. We'll use the same prompts that generated the video. However, you have the flexibility to customize these prompts, especially for the face you intend to replace.
Here's an interesting bit: using the same prompts as the image generation leads to face restoration. On the other hand, different prompts mean you're opting for a complete face replacement. It's all your call!
Tip: Use "To Basic Pipe" and "From Basic Pipe"
To simplify the process of connecting numerous nodes, utilize the "Pipe" system. Start with "To Basic Pipe," an input combiner, to gather various inputs. Then, use "From Basic Pipe" to unpack these inputs. Simply connect these two pipes, and you'll have all the necessary inputs ready for quick and efficient integration.
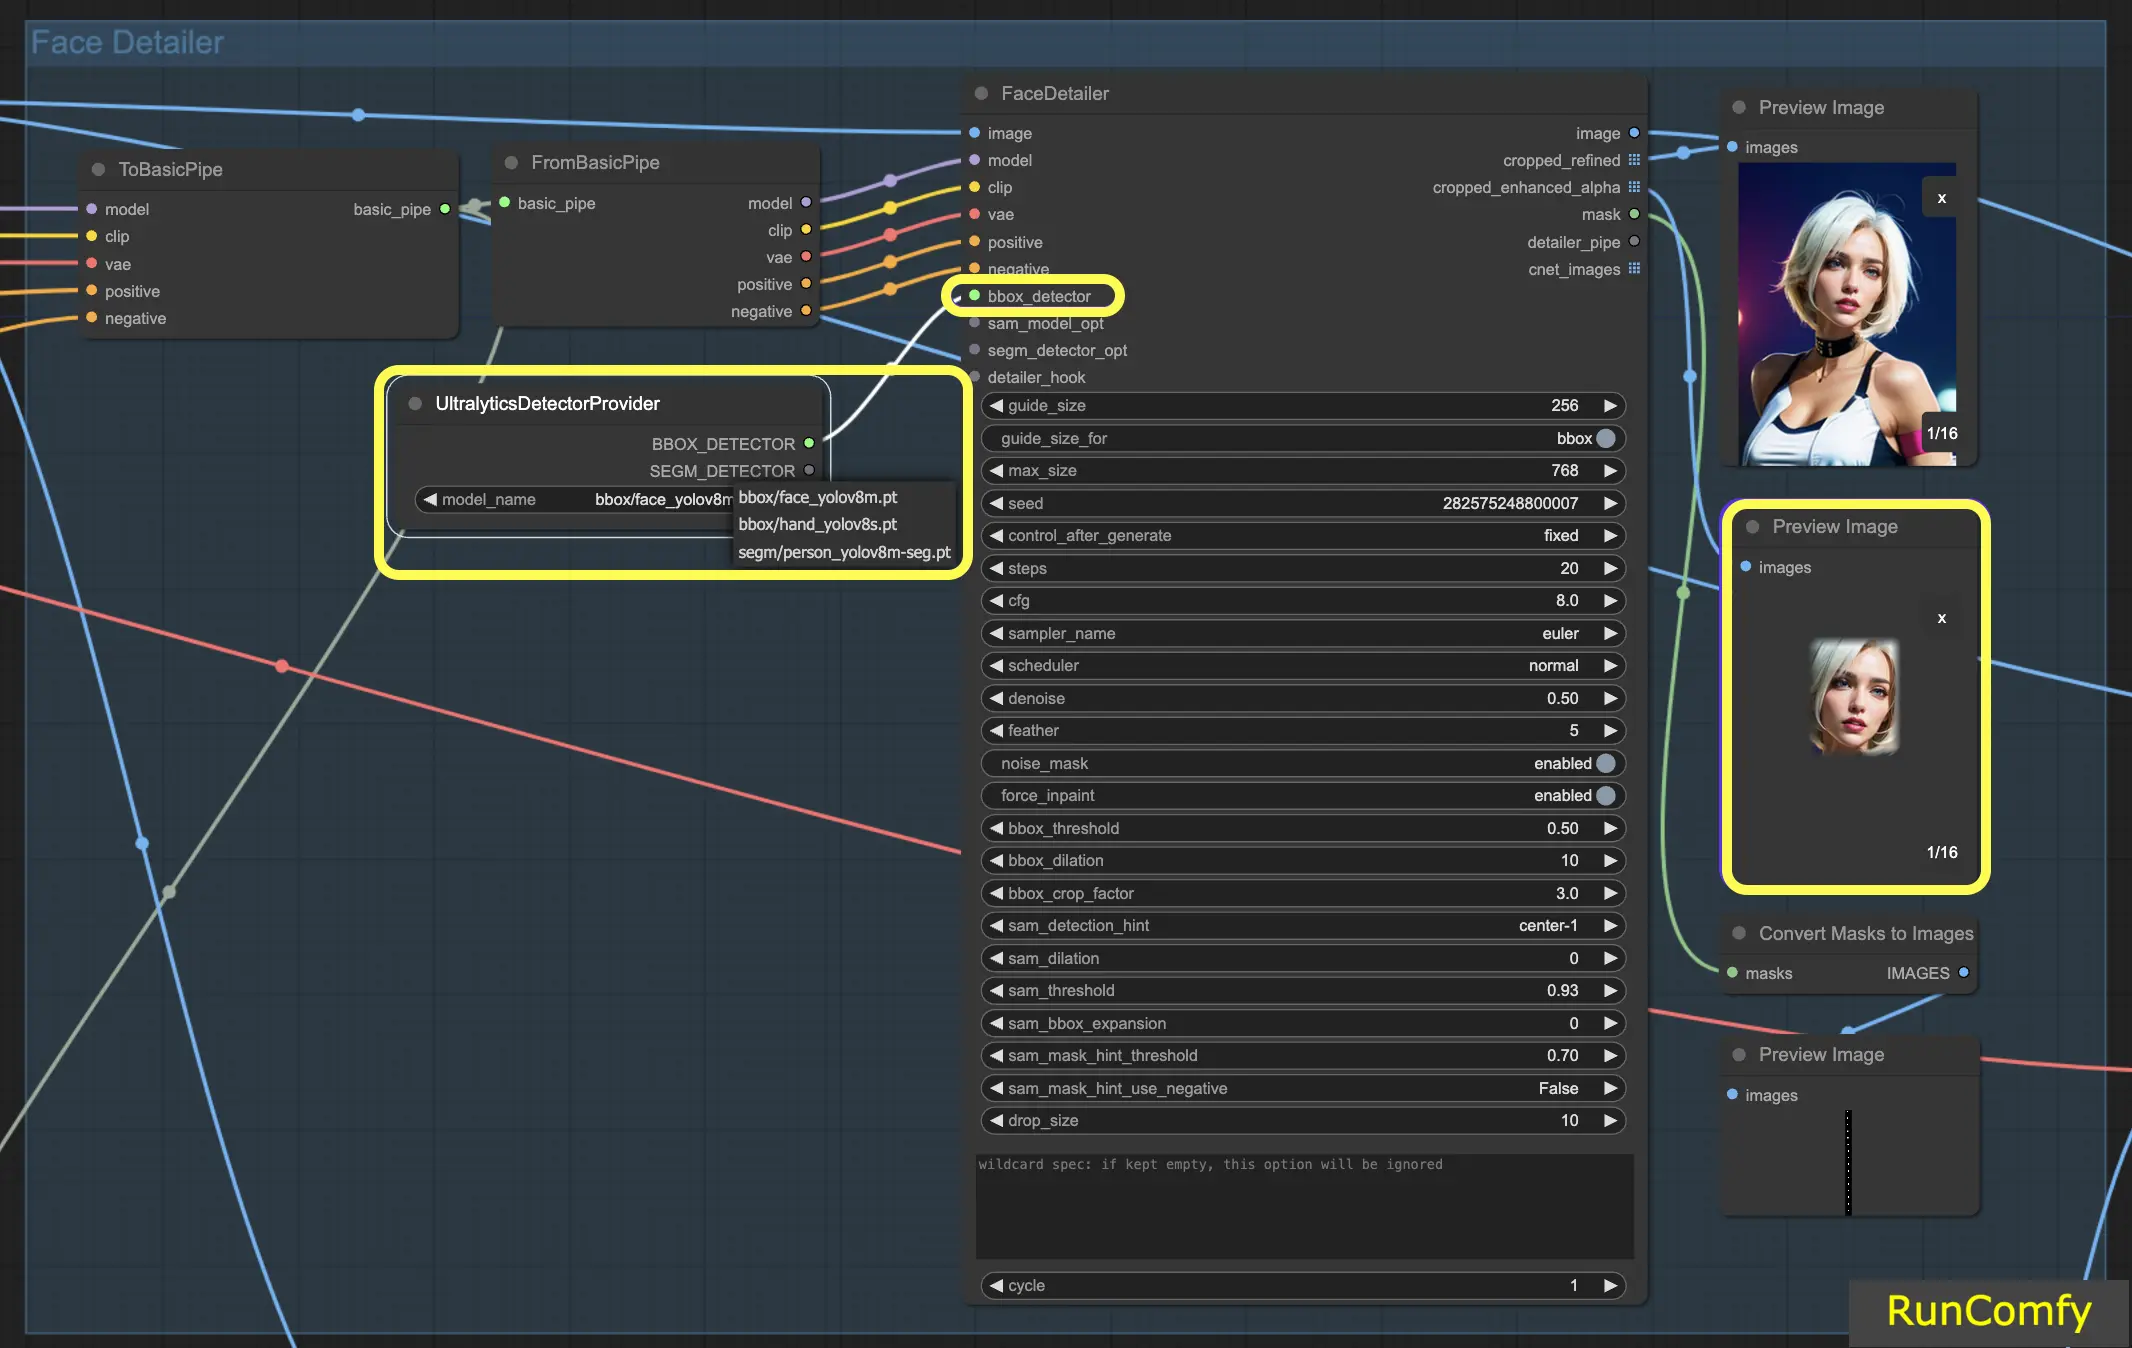
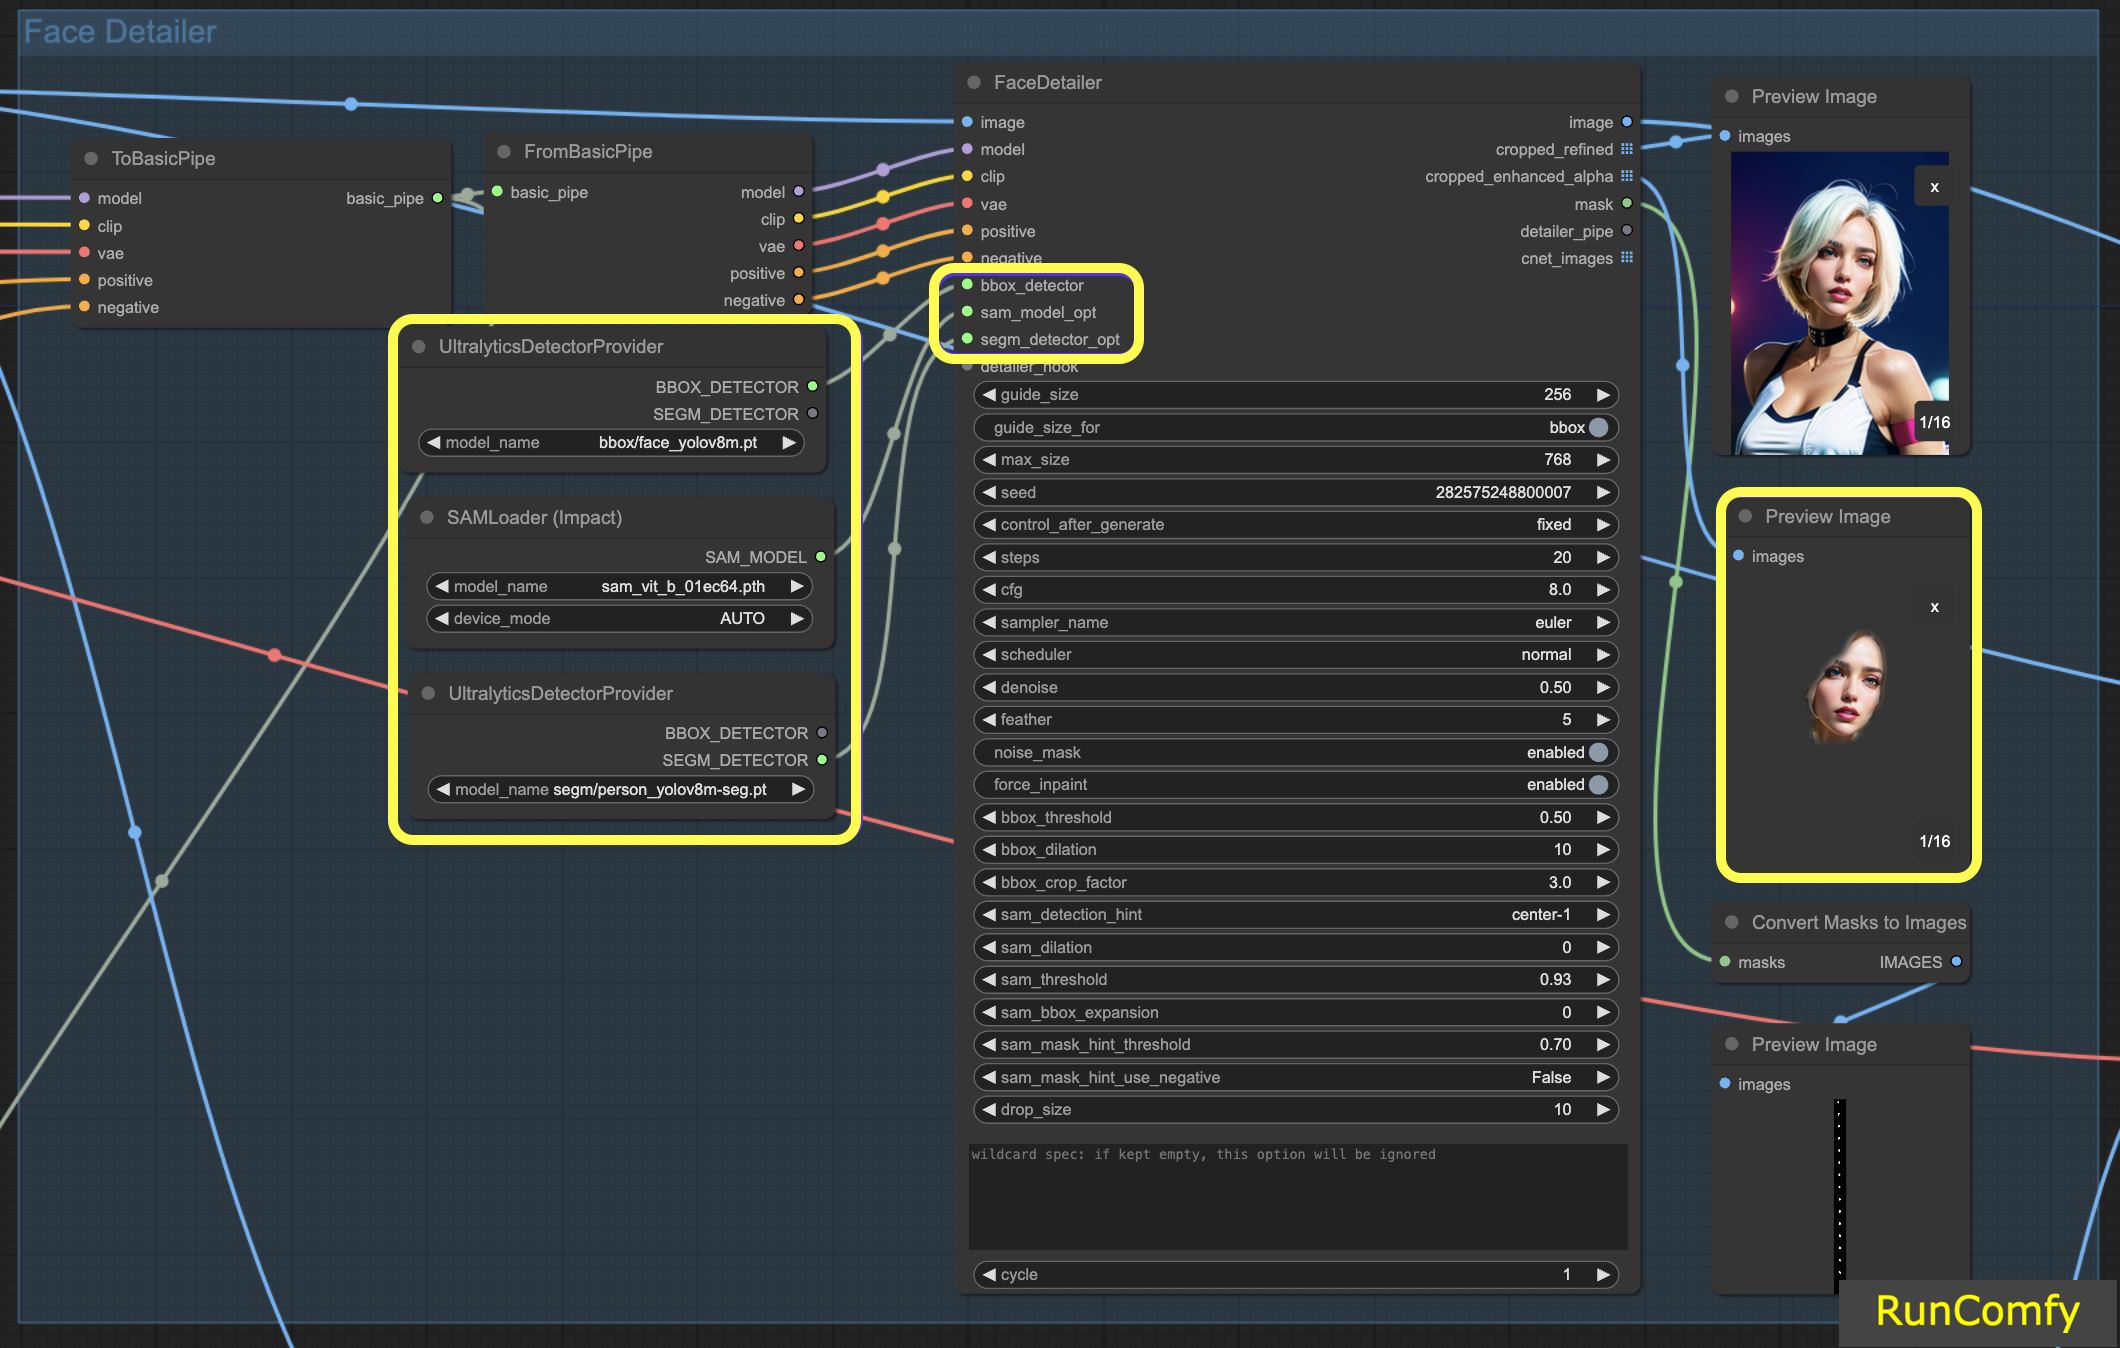
4.3 The difference of BBox Detector and Segm Detector (Sam model)#
The BBox models specialize in identifying elements using bounding boxes, whereas the Segm/person models utilize masks for detection.
In both cases, whether it's the BBox Detector or the Segm Detector, we employ the "Ultral Litic Detector Provider" node. However, it's important to note that for the BBox Detector, we specifically use the bbox/face_yolov8m and bbox/hand_yolov8s models. In contrast, the segm/person_yolov8m-seg model is exclusively utilized for the Segm Detector.
What follows pertains solely to the BBox Detector. Hence, you'll observe that the Preview of the cropped and enhanced image appears as a box.
Subsequently, when we combine the capabilities of both the BBox Detector and the Segm Detector, and integrate the Sam model, the Preview of the cropped and enhanced image takes on a mask-like appearance.
5. Face Detailer Settings: How to Use Face Detailer ComfyUI#
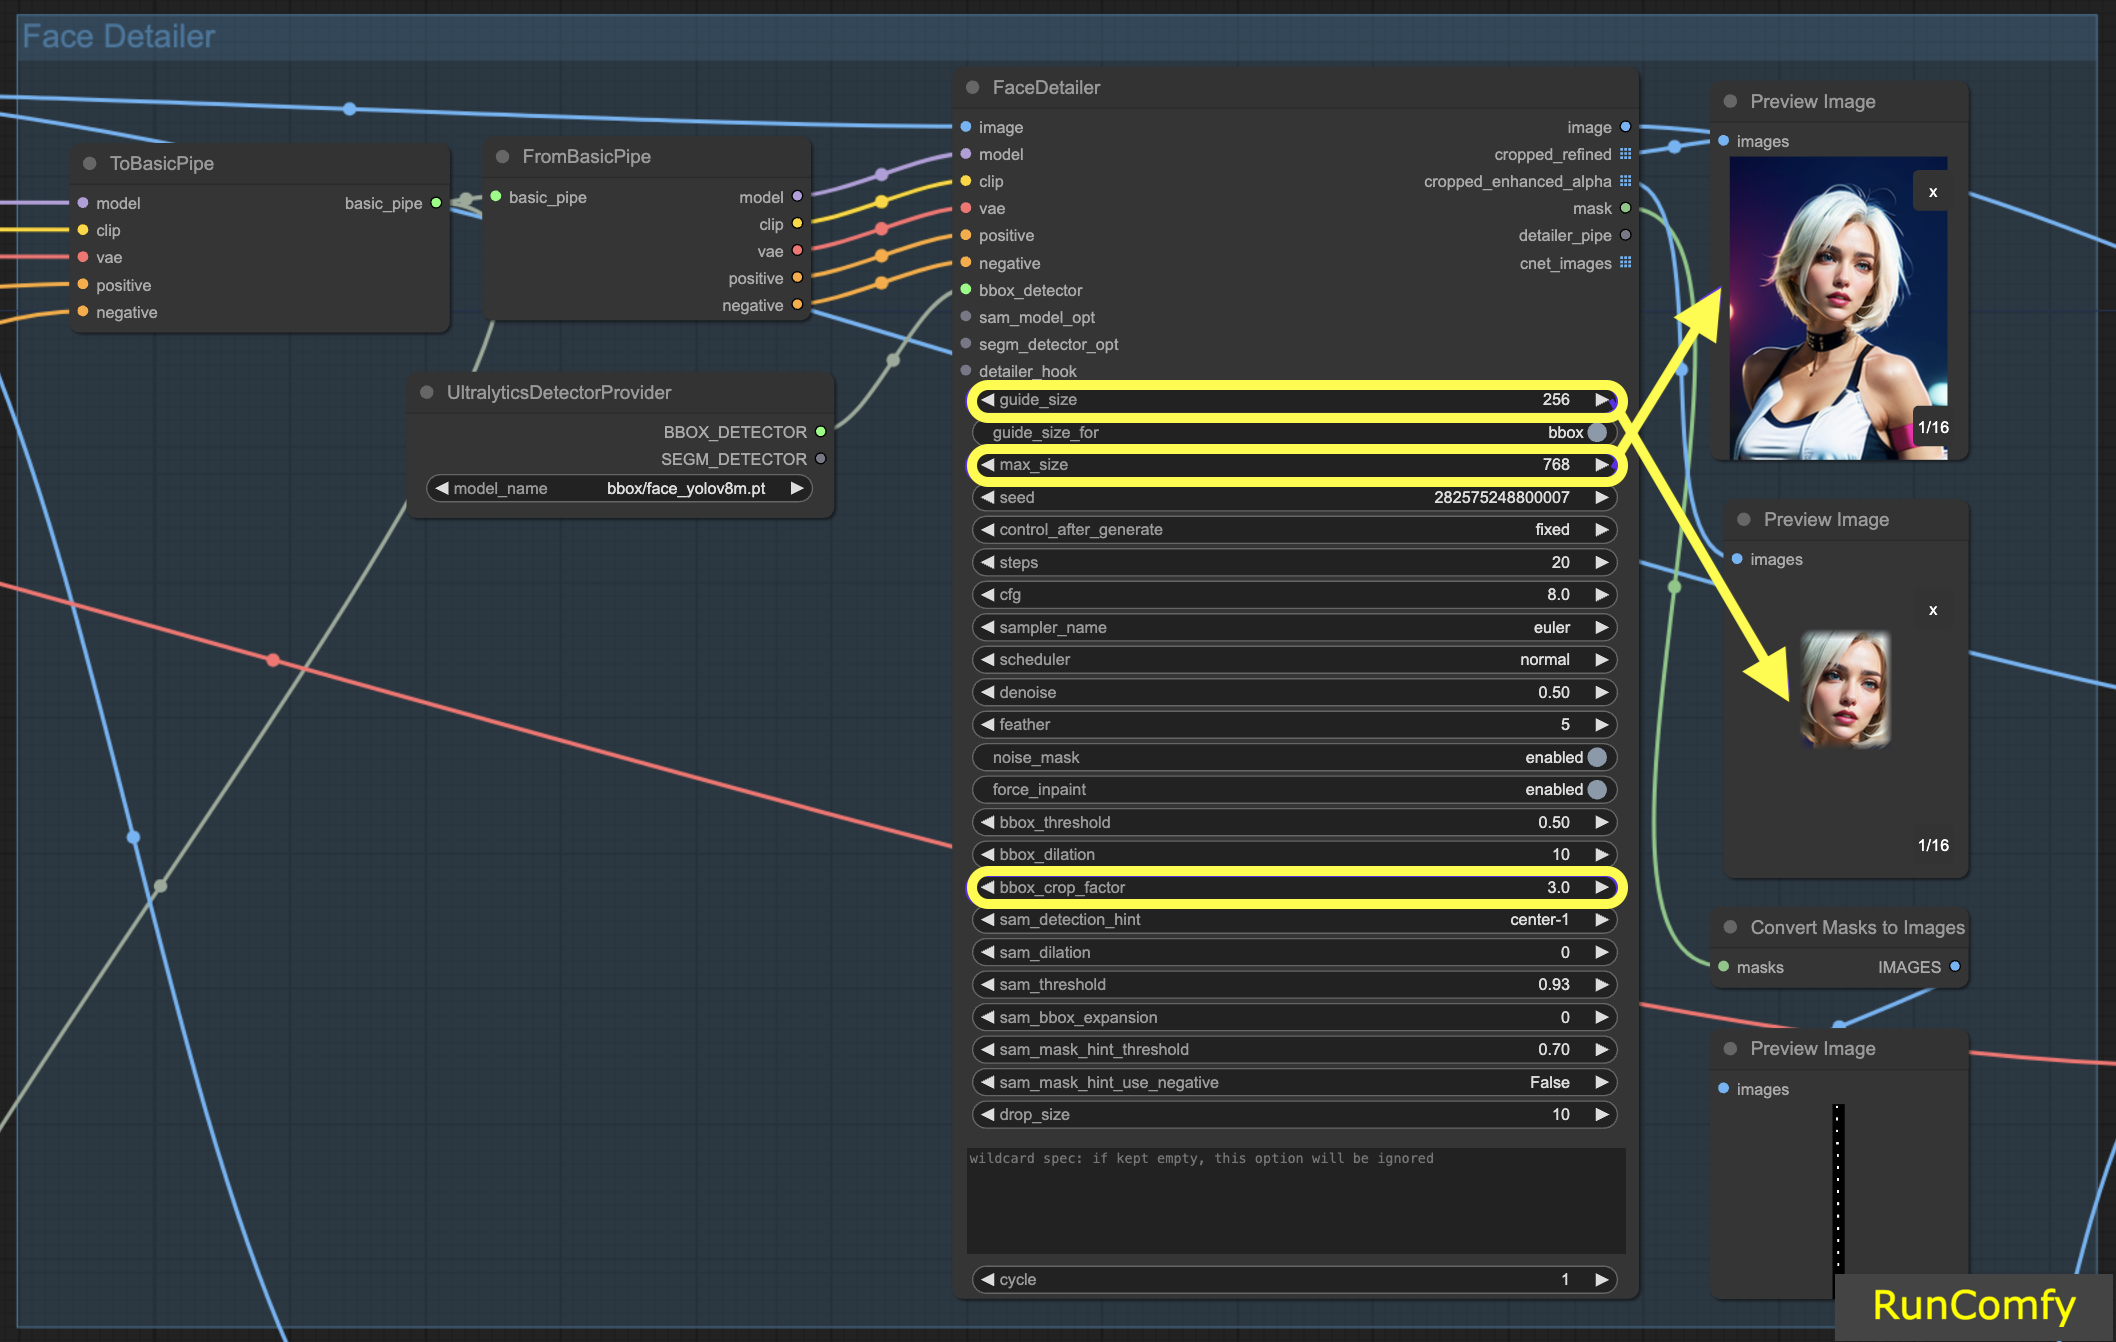
5.1 Face Detailer - Guide Size, Guide Size For, Max Size and BBX Crop Factor#
Guide Size: The guide size for BBX focuses the image's face detailer on the bounding box face area (as shown in the preview of the cropped enhanced image). Set by default at 256, this means that if the bounding box face area is less than 256 pixels, the system automatically upscales it to a minimum of 256 pixels.
Max Size: The max size establishes the upper boundary for how large the cropped area can be (as shown in the preview of the cropped refined image). This cap is to prevent the area from becoming too large, which could lead to other problems. The default max size is 768 pixels.
Maintaining an Optimal Range: By setting these parameters, we keep the image size within a 256 to 768-pixel range, ideal for the SD 1.5 Checkpoint. However, if you switch to the SDXL Checkpoint model, known for better performance with larger images, adjusting the guide size to 512 and the max size to 1024 might be advantageous. This adjustment is worth experimenting with.
Guide Size for: Under the guide size, there is an option labeled "guide size for bbox". This allows you to shift the focus to the crop region, which is a larger area than bounding box face area.
BBX Crop Factor: The BBX crop factor is currently set at 3. Reducing the crop factor to 1.0 means a smaller crop area, equal to the face area. When set at 3, it indicates the crop area is 3 times larger than the face area.
The essence of adjusting the crop factor lies in striking a balance between providing adequate focus for the face detailer and allowing enough space for contextual blending. Setting it at 3 means the crop area includes slightly more of the surrounding context, which is generally beneficial. However, you should also take into account the size of the face in the image when deciding on the appropriate setting.
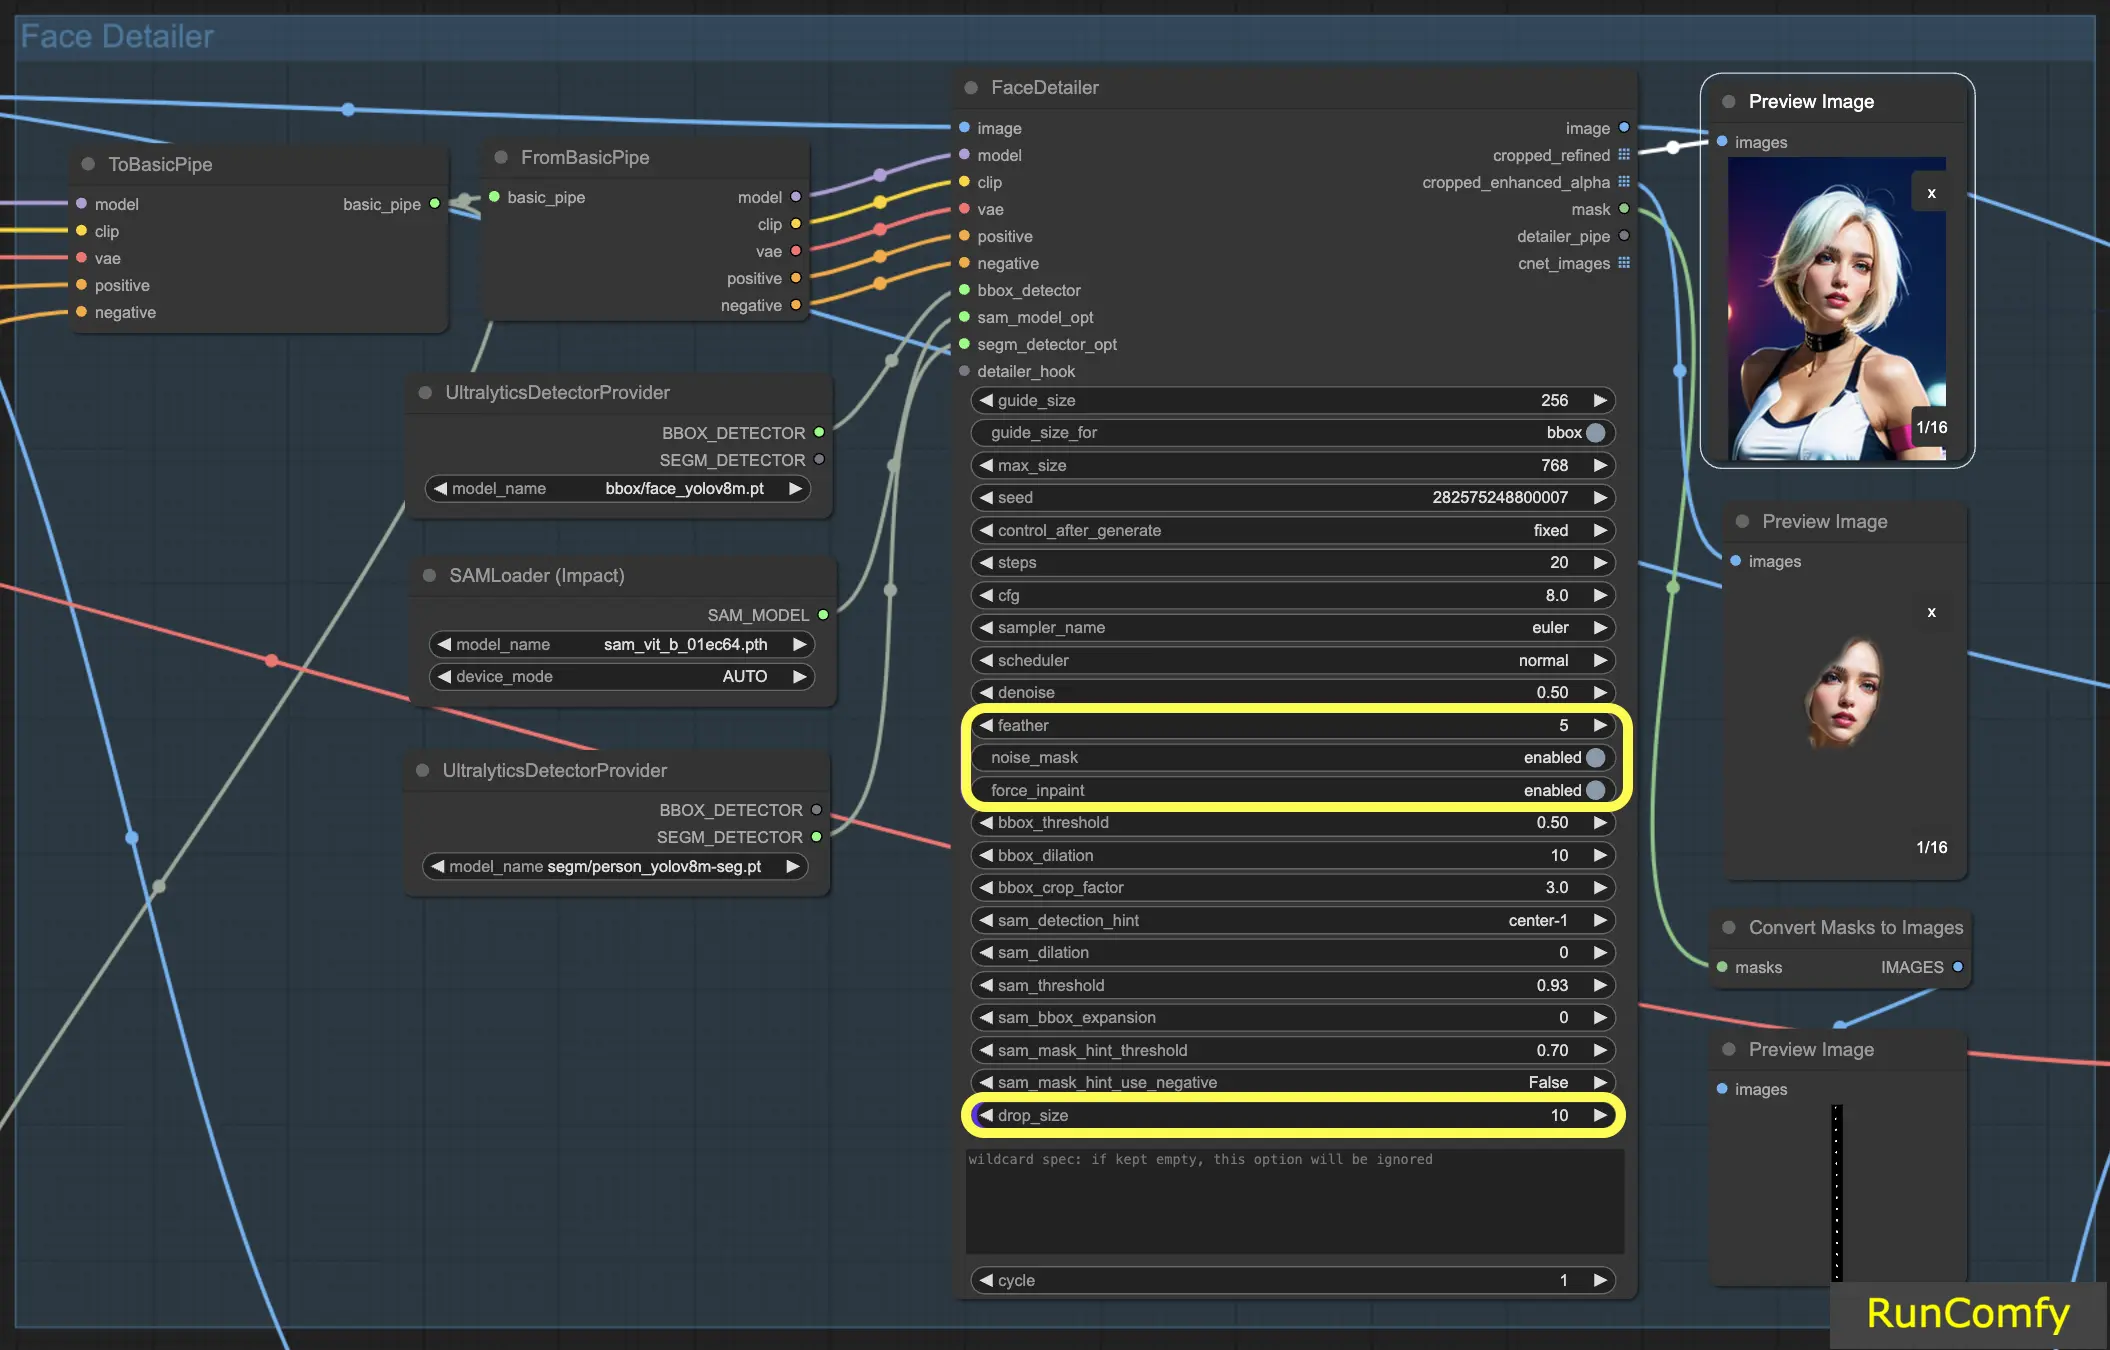
5.2 Face Detailer - Feather#
The Feather setting determines the extent to which the image edges or inpainted areas blend seamlessly with the rest of the image. I typically set it at five, which works well for most cases. However, if you notice that the inpainting in your images has particularly harsh edges, you might consider increasing this value. Since we don't observe any harsh edges in this example, there's no immediate need to adjust it.
5.3 Face Detailer - Noise Mask#
Activating the Noise Mask effectively directs the model to focus its noise and denoise operations exclusively on the masked area. This transforms the bounding box into a mask, which precisely indicates the areas where noise is applied and subsequently refined. This functionality is especially important when working with Segm detectors and Sam models.
5.4 Face Detailer - Force Inpainting#
Force Inpaint functions as a specialized tool for enhancing specific areas of an image with additional detail. Often we focus on the faces in images. There are times when the automatic system may not add sufficient detail to these faces, mistakenly assuming they are already adequately detailed. This is the perfect scenario to utilize Force Inpaint.
In essence, Force Inpaint is ideal for augmenting details in certain areas of your image, particularly when the automatic settings fall short.
5.5 Face Detailer - Drop Size#
Particularly useful in multi-face replacement scenarios, the drop size setting instructs the model to ignore masks smaller than a specified size, like 10 pixels. This feature is invaluable in crowded scenes where the focus is on larger faces.
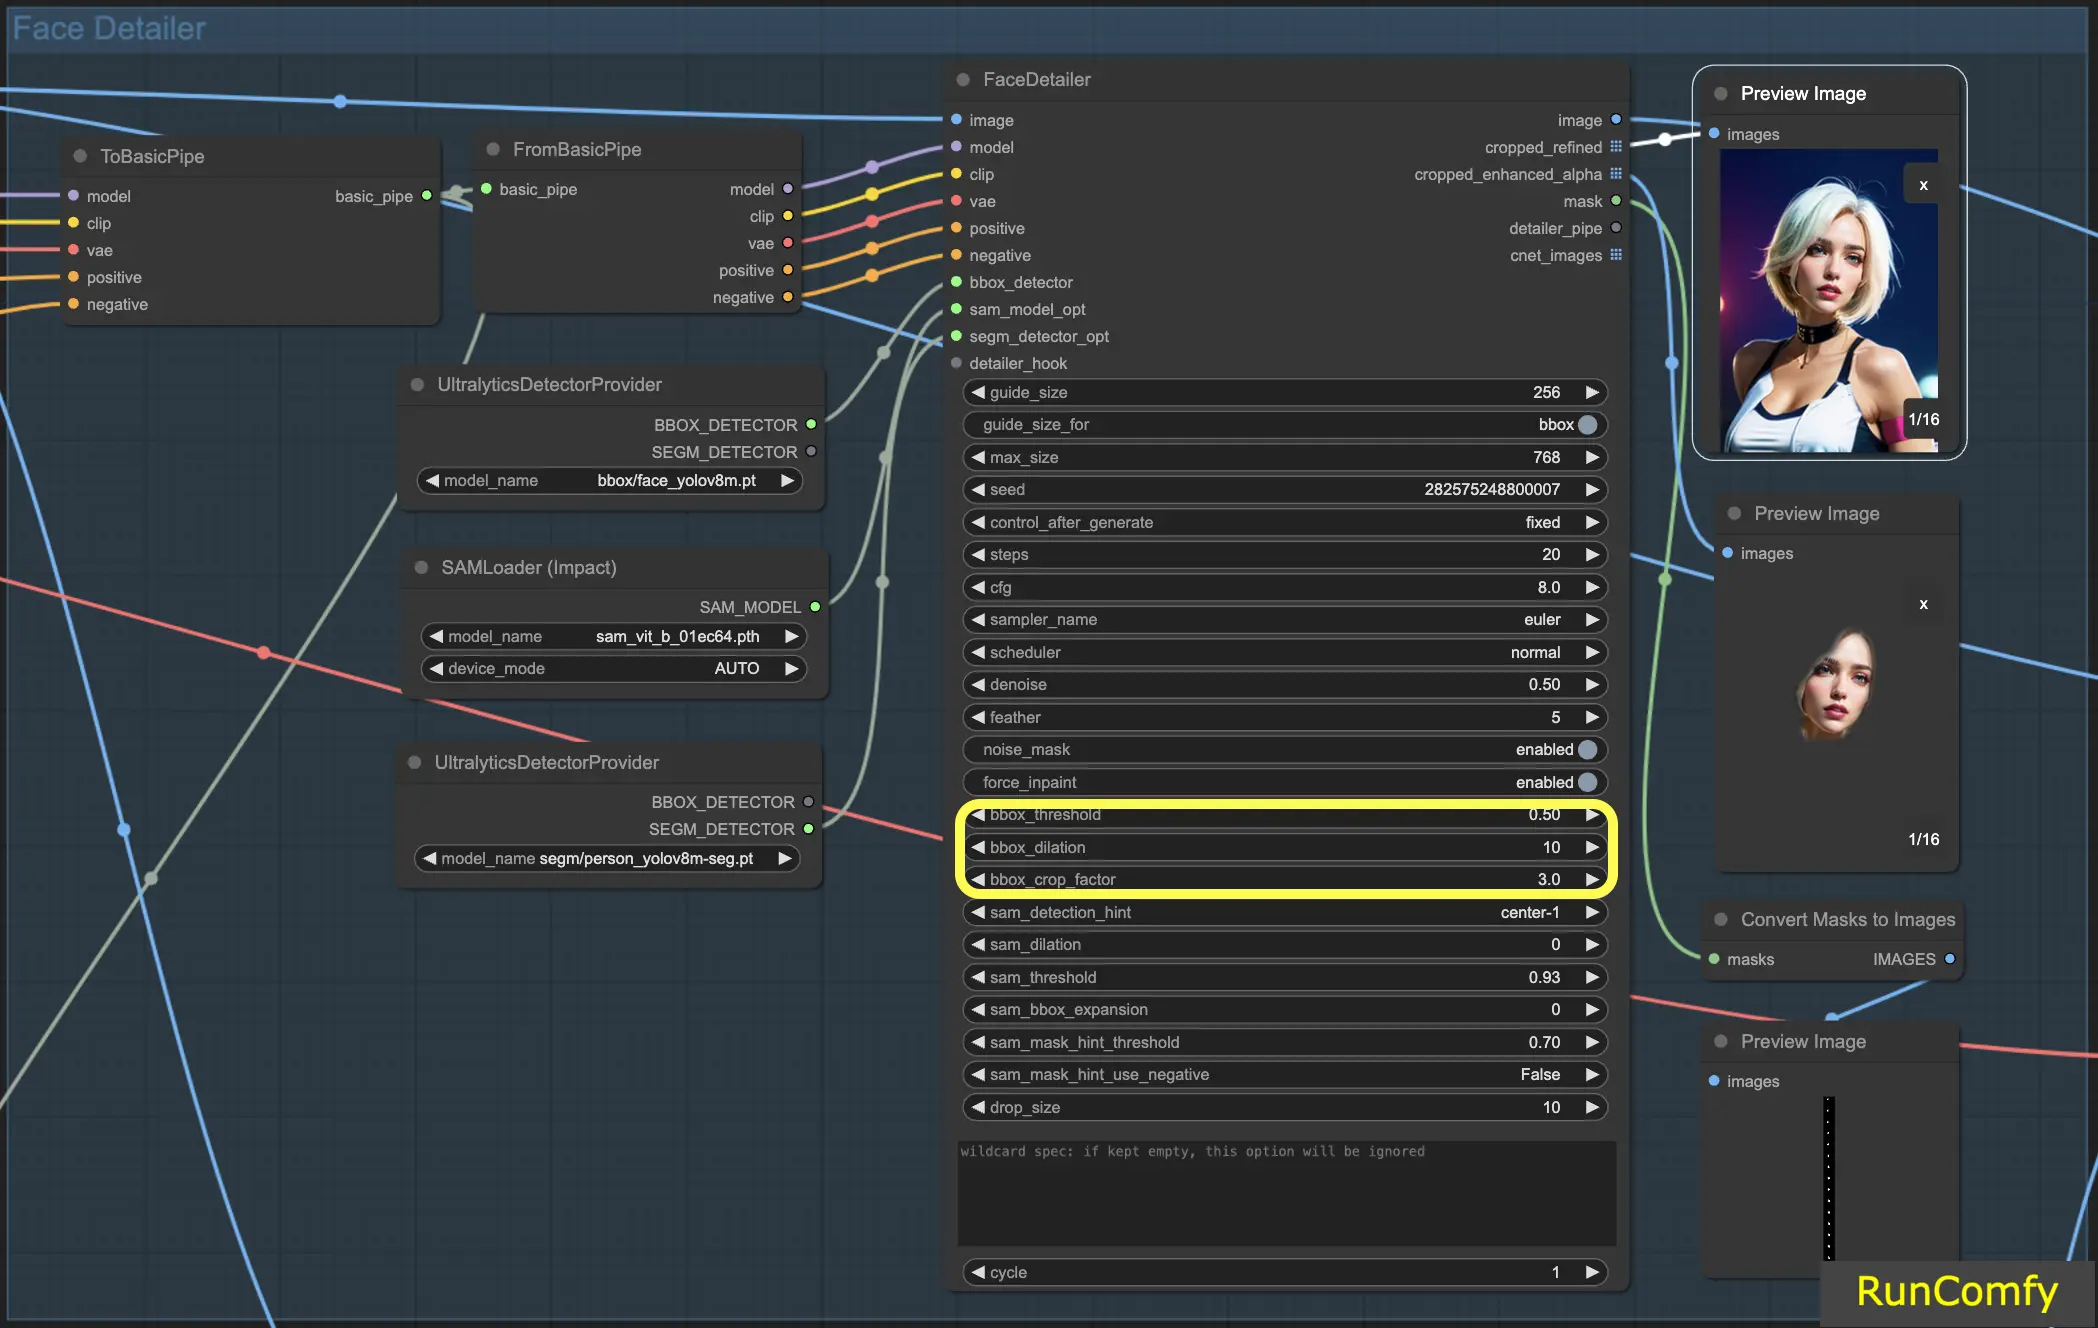
5.6 Face Detailer - BBox Related Features#
BBox Threshold: The bbox threshold is pivotal in fine-tuning the face detection model. Opting for a lower number means a more forgiving detection process. The model evaluates the image, assigning confidence percentages to potential faces. Altering the threshold modifies the confidence level required for the model to acknowledge and replace a face.
Consider an image featuring masks in the background with a person in the foreground. The model might confuse the masks for faces. In such instances, you might increase the threshold to ensure it recognizes and focuses on the clearly defined face, rather than the masks. Conversely, to replace multiple faces in a crowd, where faces are less distinct, lowering the bbox threshold can aid in identifying these less obvious faces.
BBox Dilation: The bbox dilation setting enables expansion beyond the initial cropping area, typically limited to the face. When you increase the dilation, more areas surrounding the face are included in the replacement process. However, these changes are often nuanced and might necessitate tweaking the crop factor for more noticeable results.
BBX Crop Factor: Already mentioned in 4.1
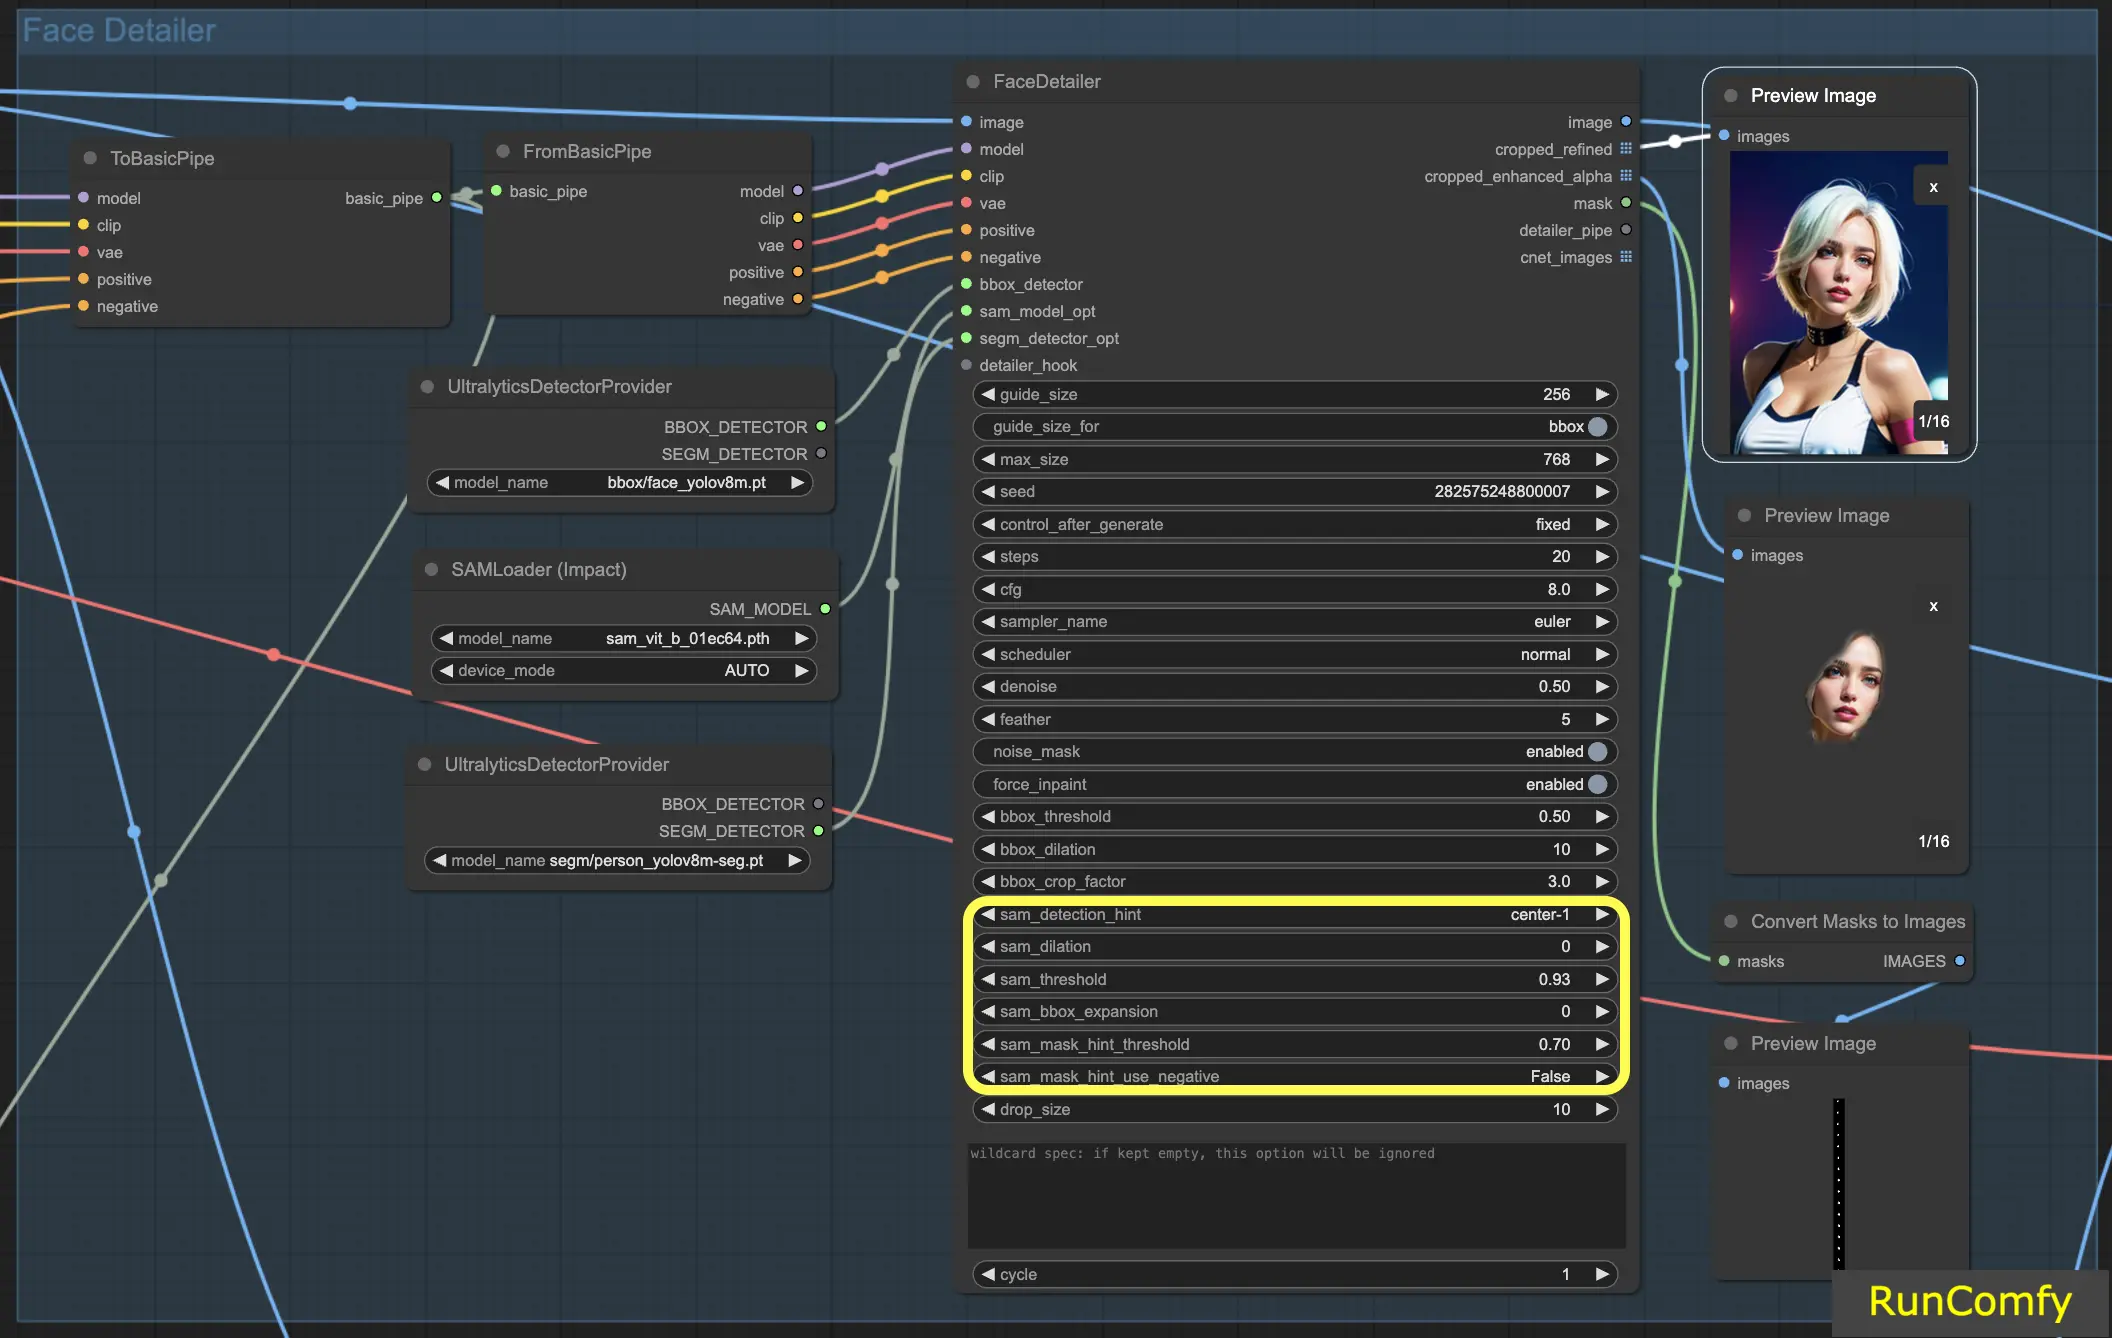
5.7 Face Detailer - Segm/Sam Related Features#
Segm/Sam refines the conventional bounding box into a more precise mask, enhancing the accuracy of face replacement. This precision is particularly useful in scenarios where the bounding box overlaps with hair, and you prefer not to alter the hair. By using the Sam model, you can concentrate the replacement solely on the face.
Sam Detection Hint: The Sam detection hint is a critical setting. It guides the model on where to focus when identifying faces. You have several options, including Center, Horizontal (one or two faces), Vertical (two faces), and arrangements for four faces in either rectangular or diamond formations.
Sam Dilation: Similar to the bounding box dilation, the Sam dilation setting adjusts the area outside the mask or focal point that the model will replace. Increasing this dilation re-expands the mask area back towards a box shape.
Sam Threshold: Set at a high 93%, the Sam threshold functions like its bounding box counterpart but demands a higher confidence level due to the model's precision.
Sam Box Expansion: This setting fine-tunes the initial bounding box, further defining the facial area. Increasing the box expansion is beneficial when the initial bounding box is too restrictive, allowing the model to capture more of the face.
Sam Mask Hint Threshold: Working in tandem with the Sam detection hint, this setting determines the aggressiveness of the model in responding to the hint. The default setting is 0.7.
With this information, you should have a much deeper understanding of how the face detailer works.
6. Other Improvements#
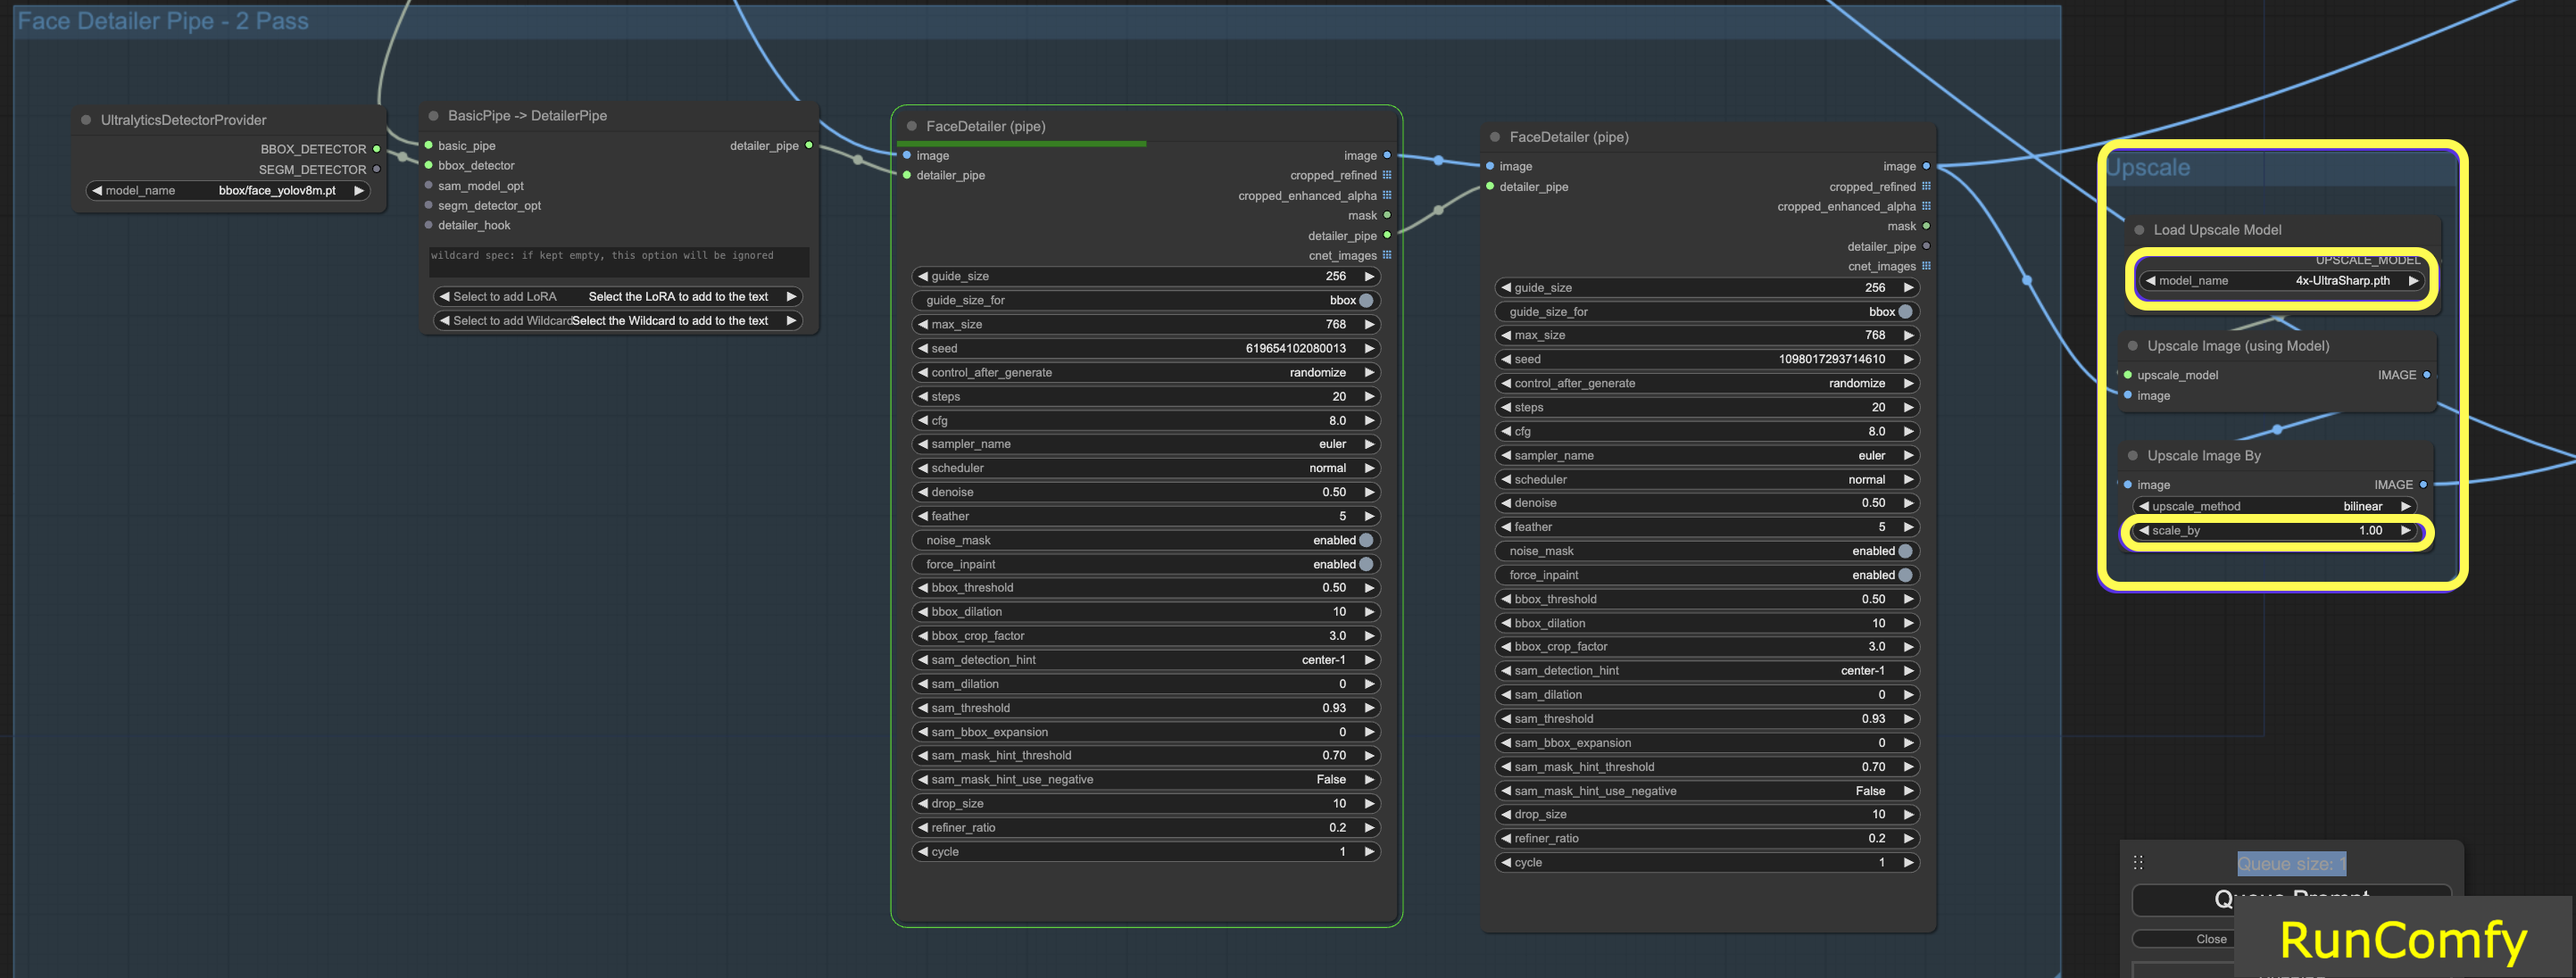
6.1 Two Pass Refine with Face Detailer(Pipe)#
Integrating two FaceDetailers for a dual-pass setup is feasible; simply transfer the Face Detailer to the FaceDetailerPipe.
In a single-pass (1pass) configuration, the focus is primarily on restoring a basic outline. This requires using a moderate resolution with minimal options. However, expanding the dilation here can be advantageous, as it not only covers facial features but also extends to surrounding areas. This technique is particularly beneficial when reshaping extends beyond just the facial part. You can experiment as needed.

6.2 Upscale Video using 4x-UltraSharp#
To achieve even better results, we can use the ultra sharp node for upscaling. By resizing the image and selecting the appropriate upscaler, you can enhance the image quality significantly.
7. Run Face Detailer ComfyUI Workflow for Free#
Here we go! With Face Detailer ComfyUI Workflow, you can now fix faces in any video and animation!
Eager to try out the Face Detailer ComfyUI Workflow we've discussed? Definitely consider using RunComfy, a cloud environment equipped with a powerful GPU. It's fully prepared and includes everything related to the ComfyUI Impact Pack - Face Detailer, from models to custom nodes. No manual setup is required! It's your playground to unleash that creative spark.
Author: RunComfy Editors
Our team of editors had been working with AI for more than 15 years, starting with NLP/Vision in the age of RNN/CNN. We had amassed tremendous amount of experiences on AI Chatbot/Art/Animation, such as BERT/GAN/Transformer, etc. Talk to us if you need help on AI art, animation and video.