
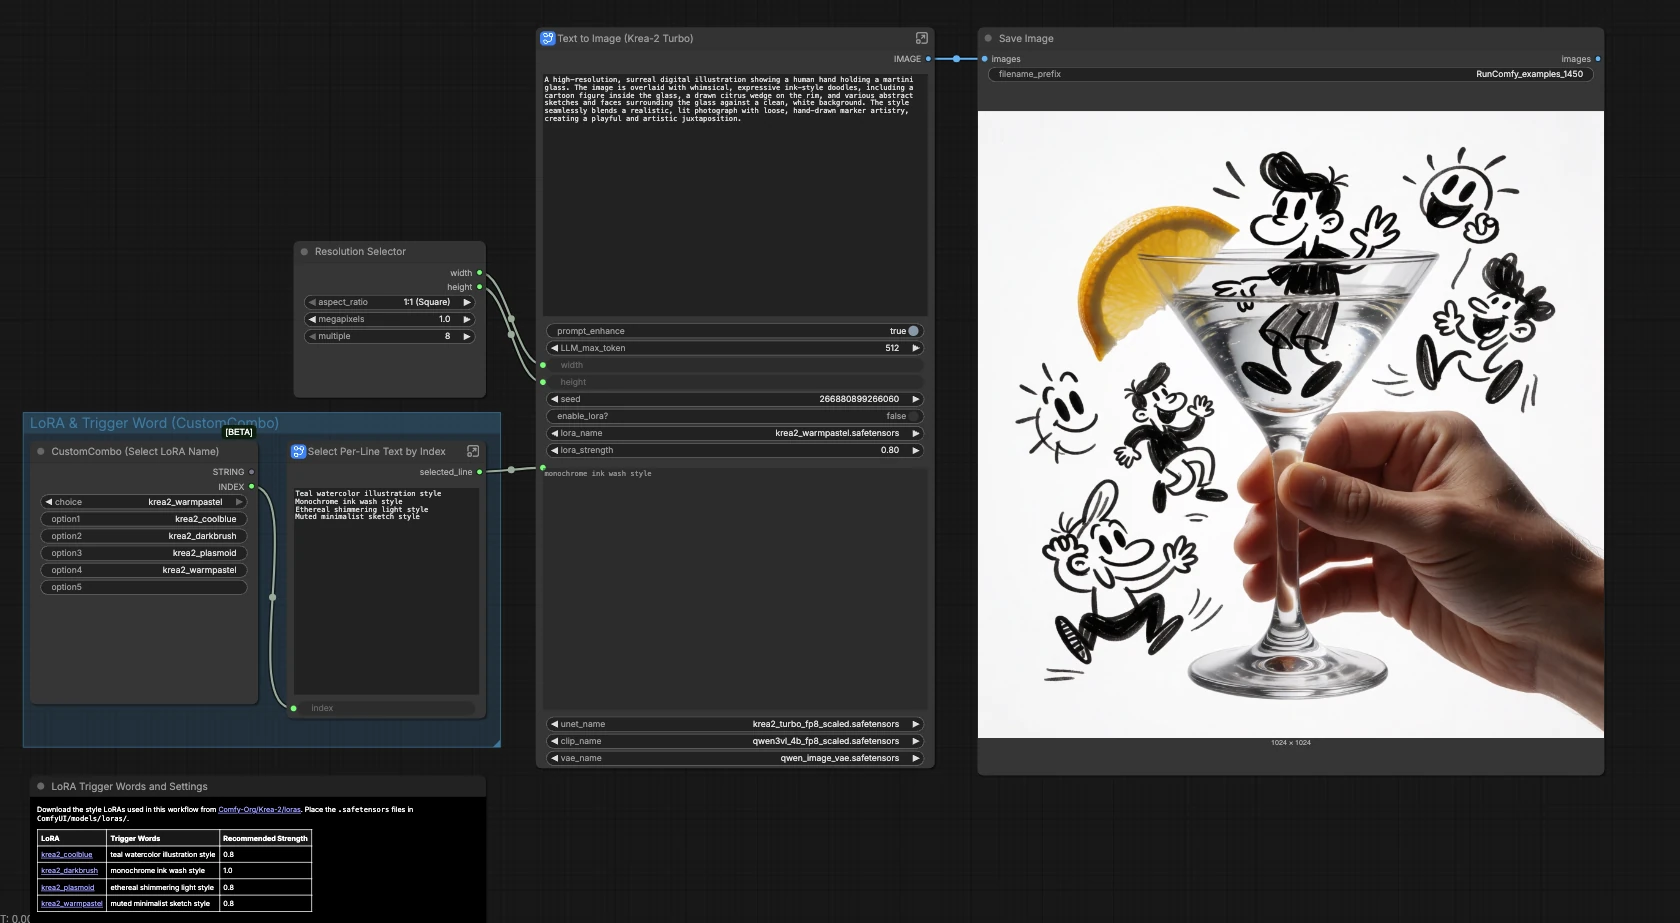


Krea 2 Turbo ComfyUI workflow: fast text-to-image with prompt enhancement and style LoRAs#
This Krea 2 Turbo ComfyUI workflow is a compact, high-speed text-to-image pipeline that runs the open-weight Krea 2 Turbo checkpoint directly inside ComfyUI. It pairs the Krea 2 Turbo FP8 diffusion model with the Qwen3-VL text encoder and the Qwen Image VAE to deliver quick, clean results, with prompt enhancement built into the graph to polish your input automatically.
Designed for creators who want open Krea 2 generation inside a reusable ComfyUI graph, it adds one-click style options via Krea 2 LoRAs and simple toggles for refinement. If you use RunComfy or a compatible ComfyUI environment, this Krea 2 Turbo ComfyUI workflow is ready to iterate rapidly and reproducibly.
Key models in Comfyui Krea 2 Turbo ComfyUI workflow#
- Krea-2 Turbo (FP8 scaled). The distilled text-to-image diffusion backbone used for fast, high-quality synthesis. Official weights: Krea-2-Turbo. ComfyUI-ready variants and updates: Comfy-Org/Krea-2.
- Qwen3-VL 4B text encoder (FP8 scaled). Encodes your prompt into conditioning that guides the diffusion process. Provided in the Comfy-Org Krea 2 package: text_encoders.
- Qwen Image VAE. Decodes latent samples to final RGB images while preserving detail and color fidelity. Available at vae.
- Krea 2 style LoRAs. Optional adapters that infuse distinct visual styles without retraining the base model. Browse loras.
How to use Comfyui Krea 2 Turbo ComfyUI workflow#
The main canvas gives you resolution, style selection, and image saving. The core generation happens inside the subgraph named Text to Image (Krea-2 Turbo). Double-click the subgraph to see groups for Models, Prompt, Prompt Enhancement, Size, Feature Switch, and Image Generation working together to produce the final image.
Resolution & output (main canvas)#
Choose your aspect ratio and size in ResolutionSelector (#49). The selection is passed into the subgraph to set the latent canvas. Generated images flow back to SaveImage (#29), which writes files to your configured output directory. Use smaller sizes for quick drafts, then scale up once you like the composition. Keep a consistent size if you plan to compare variations reliably.
LoRA & trigger word (main canvas)#
Pick a style LoRA name in the “CustomCombo (Select LoRA Name)” panel. Your choice feeds a small helper that selects the matching trigger phrase and sends it into the subgraph automatically, so you do not have to remember exact wording. Pair this with the in-subgraph LoRA toggle to activate the adapter when you want stylistic control. Ensure the LoRA file you load in the subgraph matches the name you pick here.
Models (inside the subgraph)#
The Models group loads Krea-2 Turbo in UNETLoader (#10), the Qwen3-VL text encoder in CLIPLoader (#11), and the Qwen Image VAE in VAELoader (#12). When you want a style applied, LoraLoaderModelOnly (#15) merges the selected LoRA onto the base model. A ComfySwitchNode titled Switch (Model) (#22) chooses between the base model and the LoRA-applied model, controlled by a single toggle.
Prompt enhancement#
Type your idea in Text String (User Prompt) (#19). A built-in system prompt (Text String (System Prompt) (#18)) steers TextGenerate (#16) to expand or lightly polish your text for better image guidance. Use the “Refine Prompt?” switch to choose between the raw prompt and the enhanced version; the selected text is previewed before encoding. If a LoRA is enabled, the workflow appends the appropriate style trigger via Concatenate Text (LoRA Trigger Word) (#27) so you do not need to modify your wording.
Prompt encoding#
CLIPTextEncode (#6) converts the final prompt string into conditioning for the diffusion model. The negative branch is simplified by ConditioningZeroOut (#13), which keeps this template beginner friendly. You can still experiment with alternative negative conditioning later by inserting your own node in this spot.
Size#
EmptyLatentImage (#5) sets the latent dimensions from your earlier resolution choice. This determines composition and detail density for the Krea-2 Turbo sampler. Adjust size thoughtfully to balance speed, memory use, and the level of fine detail you expect.
Image generation#
KSampler (#3) performs the diffusion steps and VAEDecode (#8) converts latents to an image. For reproducible results, set a fixed seed; for ideation, keep randomization on to explore options. Most users will leave the sampler method and schedule as configured by the template and tune them only after they have a prompt and style they like.
Key nodes in Comfyui Krea 2 Turbo ComfyUI workflow#
KSampler(#3). The sampler drives the denoising trajectory that turns noise into an image. Set a fixedseedto make results repeatable, or randomize for variety. If you need more detail, increase steps moderately; if you need speed, reduce them and rely on prompt quality and LoRA style.TextGenerate(#16). Expands or polishes your input based on a guiding system prompt. Usemax_lengthif you want more verbose prompts, or turn off refinement when you require precise, literal adherence to your words.LoraLoaderModelOnly(#15). Applies the chosen Krea 2 LoRA to the base model. Tunelora_strengthto balance fidelity to your subject with stylization, and confirm the loaded LoRA matches the style name you selected on the main canvas.Switch (Model)(#22). A simple route that decides whether the sampler receives the base Krea-2 Turbo model or the LoRA-modified model. Control it with the “Enable LoRA?” toggle to compare styled and unstyled results from the same prompt.Concatenate Text (LoRA Trigger Word)(#27). Automatically appends the correct style phrase to the prompt when a LoRA is active, keeping your manual prompts clean. This helps style adapters engage without forcing you to memorize trigger wording.
Optional extras#
- Weights and adapters are hosted in Comfy-Org/Krea-2. Use FP8 for speed on modern GPUs; consider BF16 or NVFP4 variants when experimenting with quality or hardware compatibility.
- Popular style LoRAs and their trigger phrases: krea2_coolblue → “teal watercolor illustration style”, krea2_darkbrush → “monochrome ink wash style”, krea2_plasmoid → “ethereal shimmering light style”, krea2_warmpastel → “muted minimalist sketch style”. Browse more in loras.
- For exact textual control, disable prompt refinement; for creative lift, enable it and raise the token limit when needed.
- Start at a moderate square resolution for ideation, then increase size once composition locks in. Fix the seed to A/B test LoRA on/off with the same prompt.
- This template tracks the official reference layout from the community repository: workflow_templates.
Acknowledgements#
This workflow implements and builds upon the following works and resources. We gratefully acknowledge Krea AI for the Krea 2 and Krea 2 Turbo models, Comfy-Org for the Krea 2 ComfyUI weights, LoRAs, and workflow templates, and Comfy-Org for the Krea 2 announcement and documentation for their contributions and maintenance. For authoritative details, please refer to the original documentation and repositories linked below.
Resources#
- Comfy-Org/Krea 2 announcement
- Docs / Release Notes: ComfyUI Krea 2 announcement
- Krea AI/Krea 2 official repository
- GitHub: krea-ai/krea-2
- Hugging Face: krea/Krea-2-Turbo
- Krea AI/Krea 2 Turbo model
- Hugging Face: krea/Krea-2-Turbo
- GitHub: krea-ai/krea-2
- Comfy-Org/Krea 2 ComfyUI weights and LoRAs
- Hugging Face: Comfy-Org/Krea-2
- GitHub: Comfy-Org/workflow_templates
- Comfy-Org/Krea 2 Turbo ComfyUI template
- GitHub: Comfy-Org/workflow_templates
- Hugging Face: Comfy-Org/Krea-2
Note: Use of the referenced models, datasets, and code is subject to the respective licenses and terms provided by their authors and maintainers.

