

1. What is the ComfyUI ICEdit Workflow?#
The ComfyUI ICEdit-Nunchaku workflow integrates the innovative In-Context Edit (ICEdit) framework with Nunchaku optimization for ultra-fast image editing. Developed by researchers from Zhejiang University and Harvard University, ICEdit enables high-quality instructional image editing with remarkable efficiency. Built on the FLUX diffusion transformer and leveraging ICEdit's in-context learning principles, this workflow preserves identity features while allowing flexible modifications based on natural language instructions. The ICEdit workflow represents an optimal solution for AI image editing, delivering precise results with minimal GPU resources.
2. Benefits of ComfyUI ICEdit:#
- Exceptional Efficiency: ICEdit achieves good-quality editing using just 0.5% of training data and 1% of parameters required by previous methods.
- Ultra-Fast Performance: The ICEdit-Nunchaku integration enables high-speed editing even on systems with only 4GB VRAM.
- Identity Preservation: ICEdit maintains subject identity even through significant style or attribute modifications.
- Natural Language Instructions: Edit images using simple text prompts with ICEdit's intuitive instruction system.
- Multi-turn Editing: ICEdit supports sequential editing operations on the same image for complex transformations.
- High-Resolution Output: The ICEdit workflow includes three different upscaling methods for high-quality results.
3. Using ICEdit for Image Editing#
Getting Started:
- Image Input:
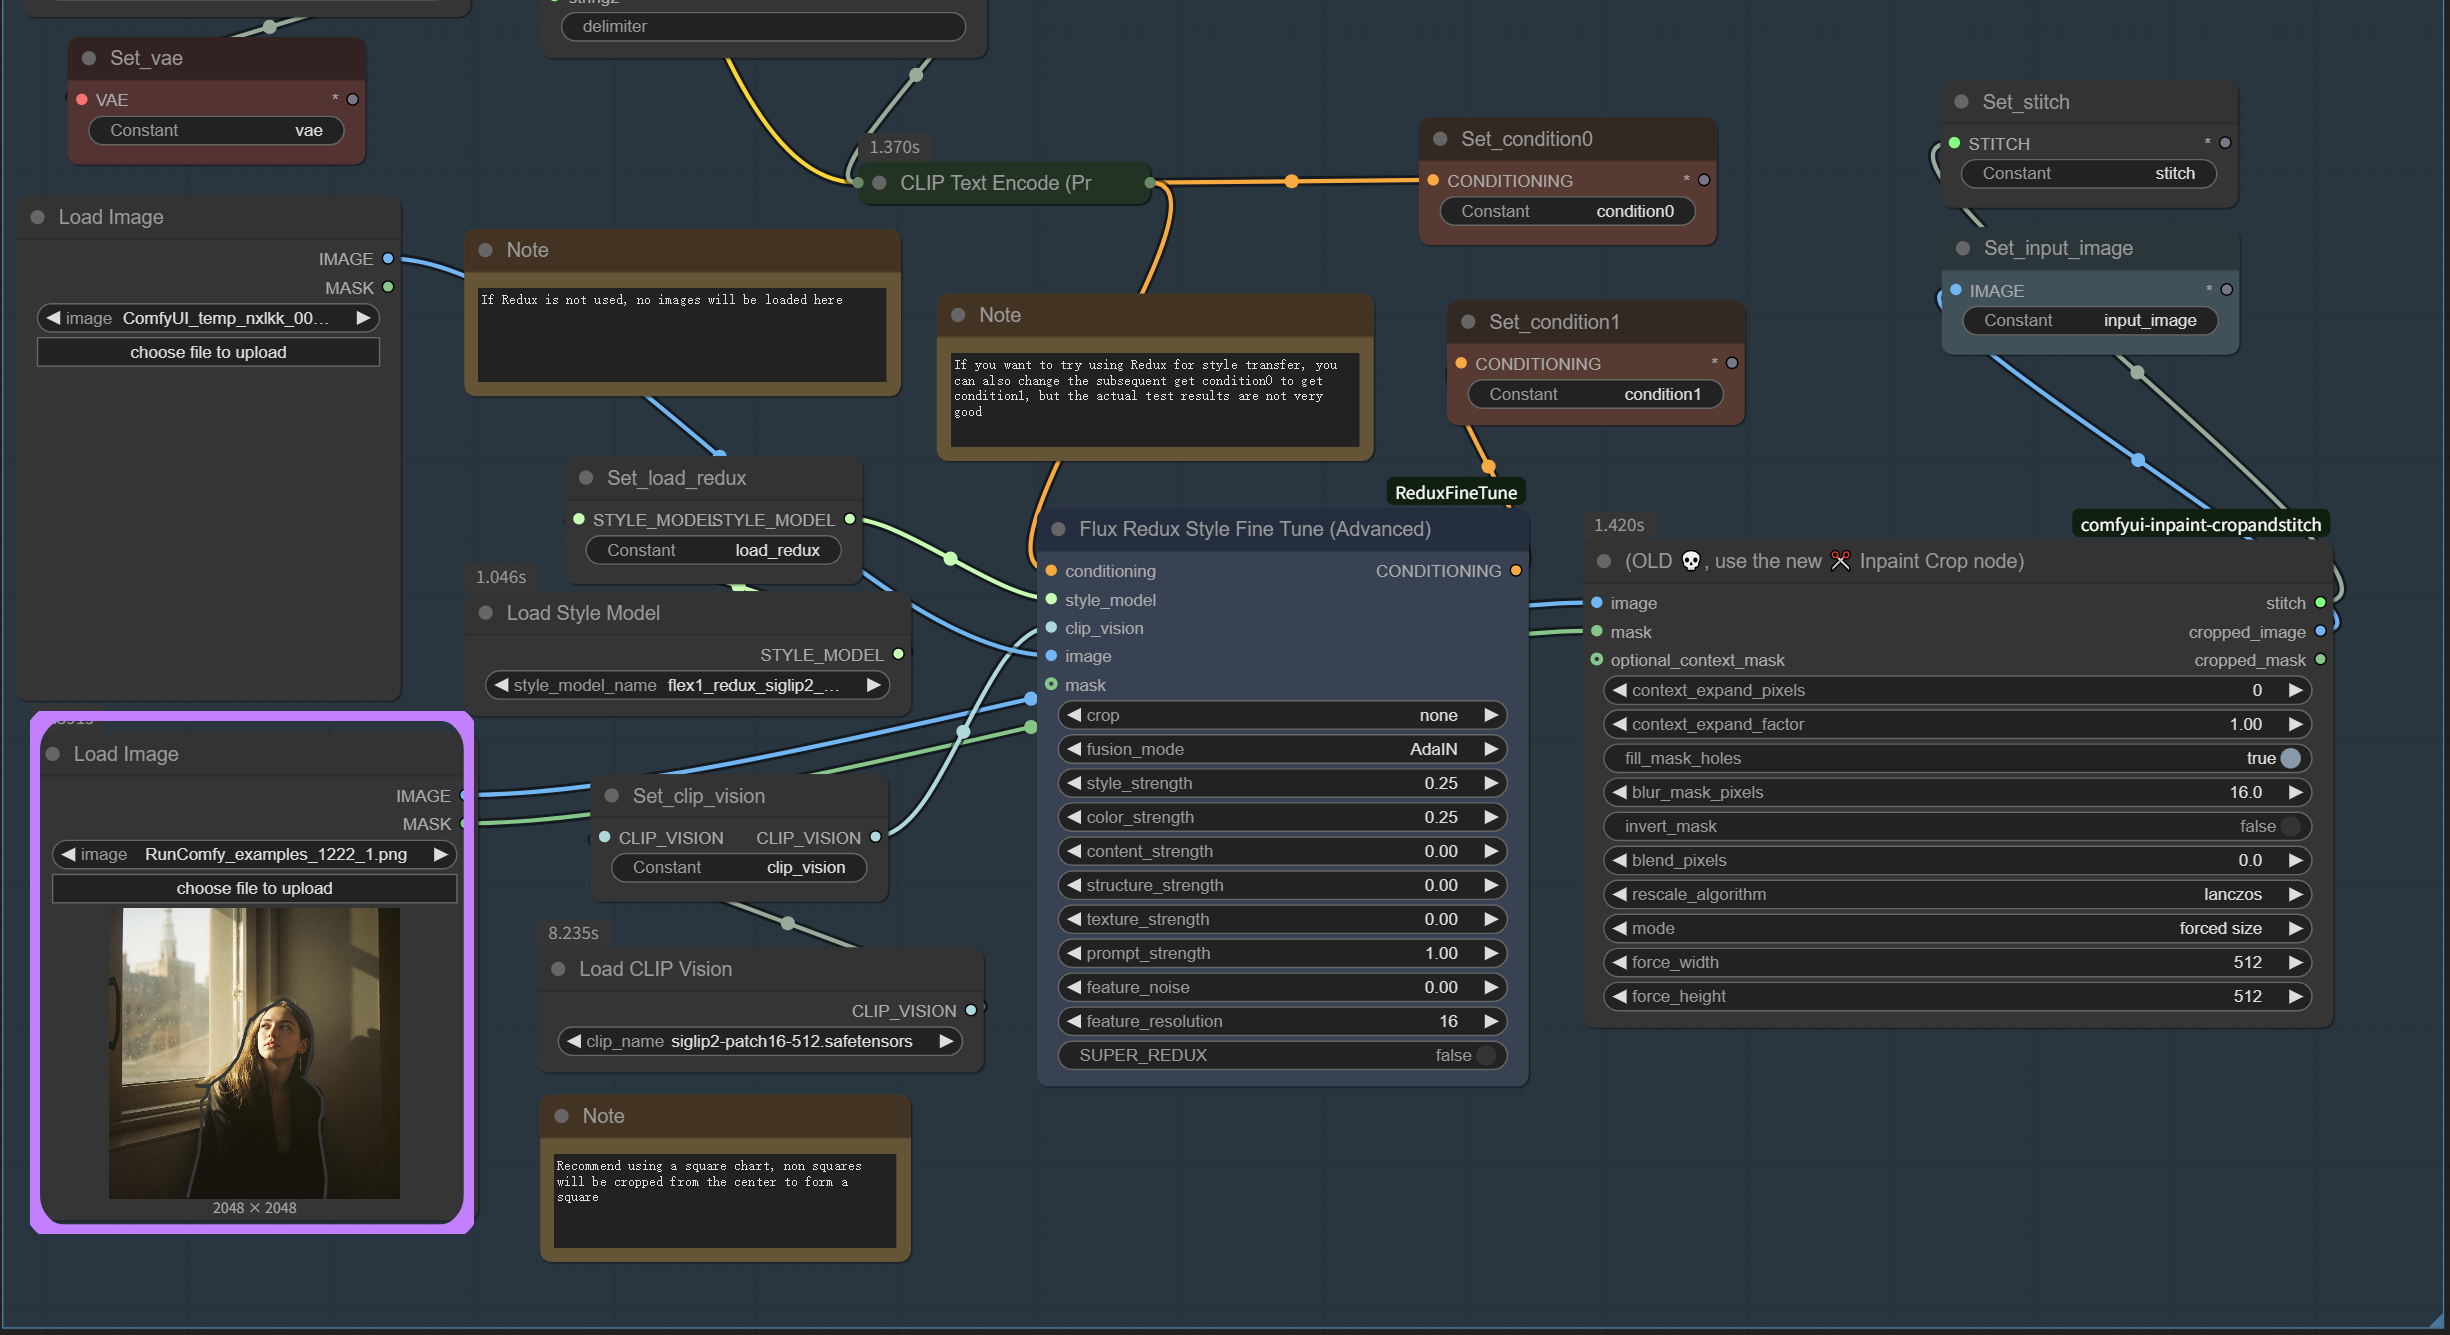
- Upload your source image using the main Load Image node located in the lower left corner of the ICEdit workflow
- This is the primary input for the image you want to edit with ICEdit
- The ICEdit workflow will automatically process your image to the required dimensions (512px width)
- For best ICEdit results, use square images when possible, as non-square images may be center-cropped during processing
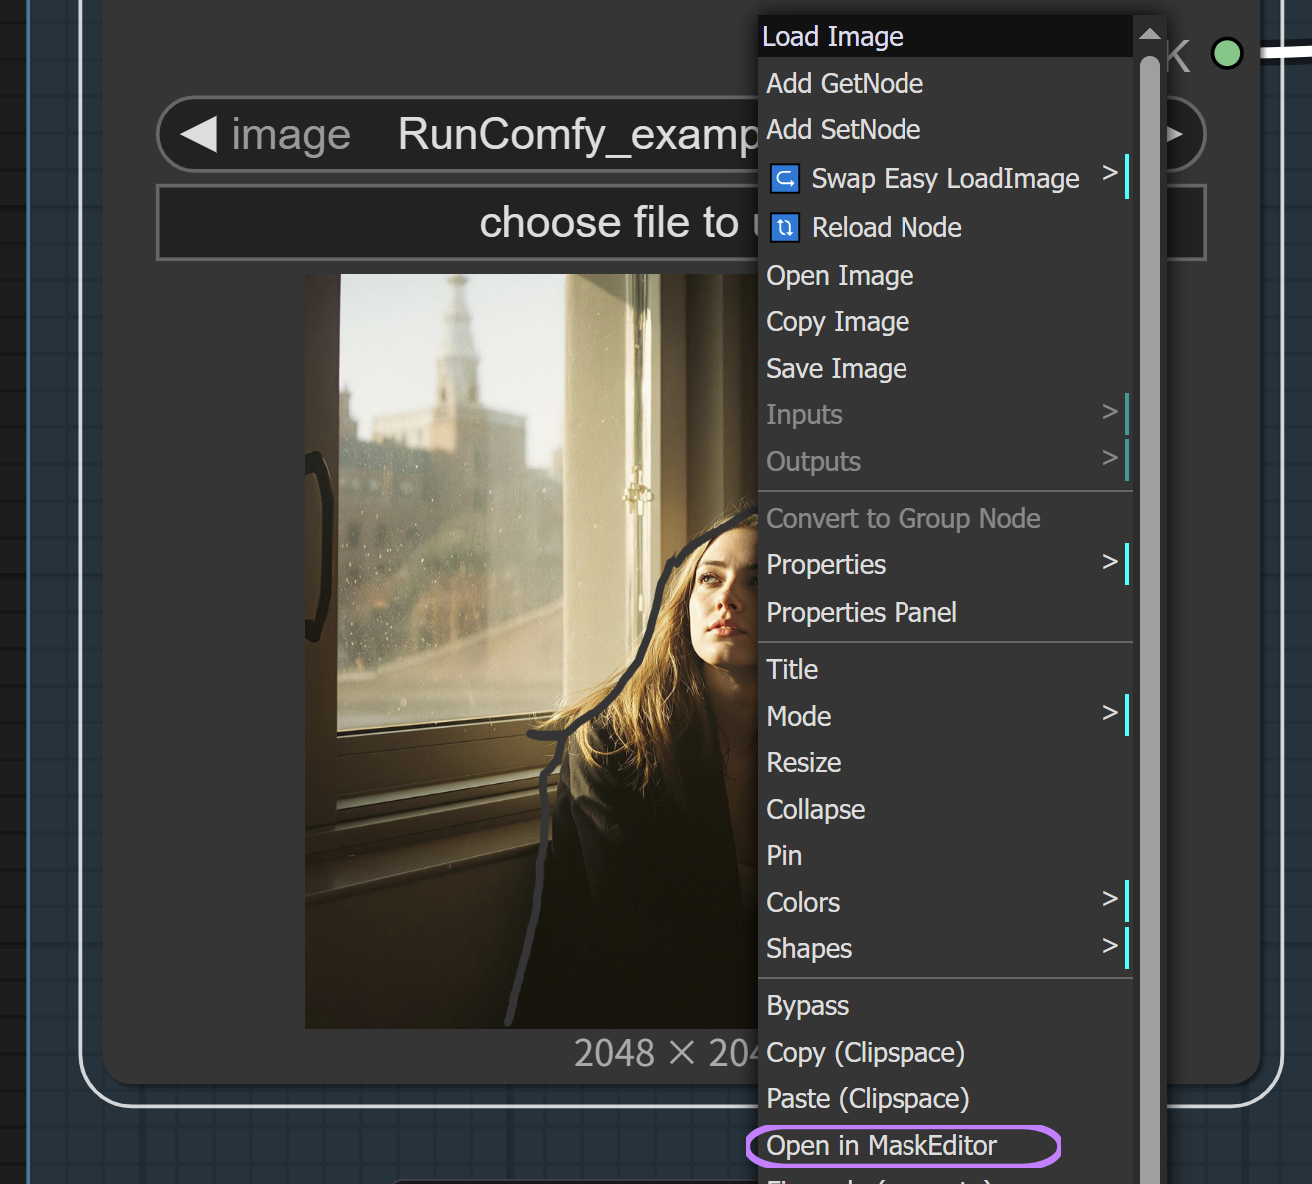
- Pro Tip: For higher ICEdit success rates, right-click on the Load Image node and select "Open in MaskEditor" to manually create a mask around the area you want to edit
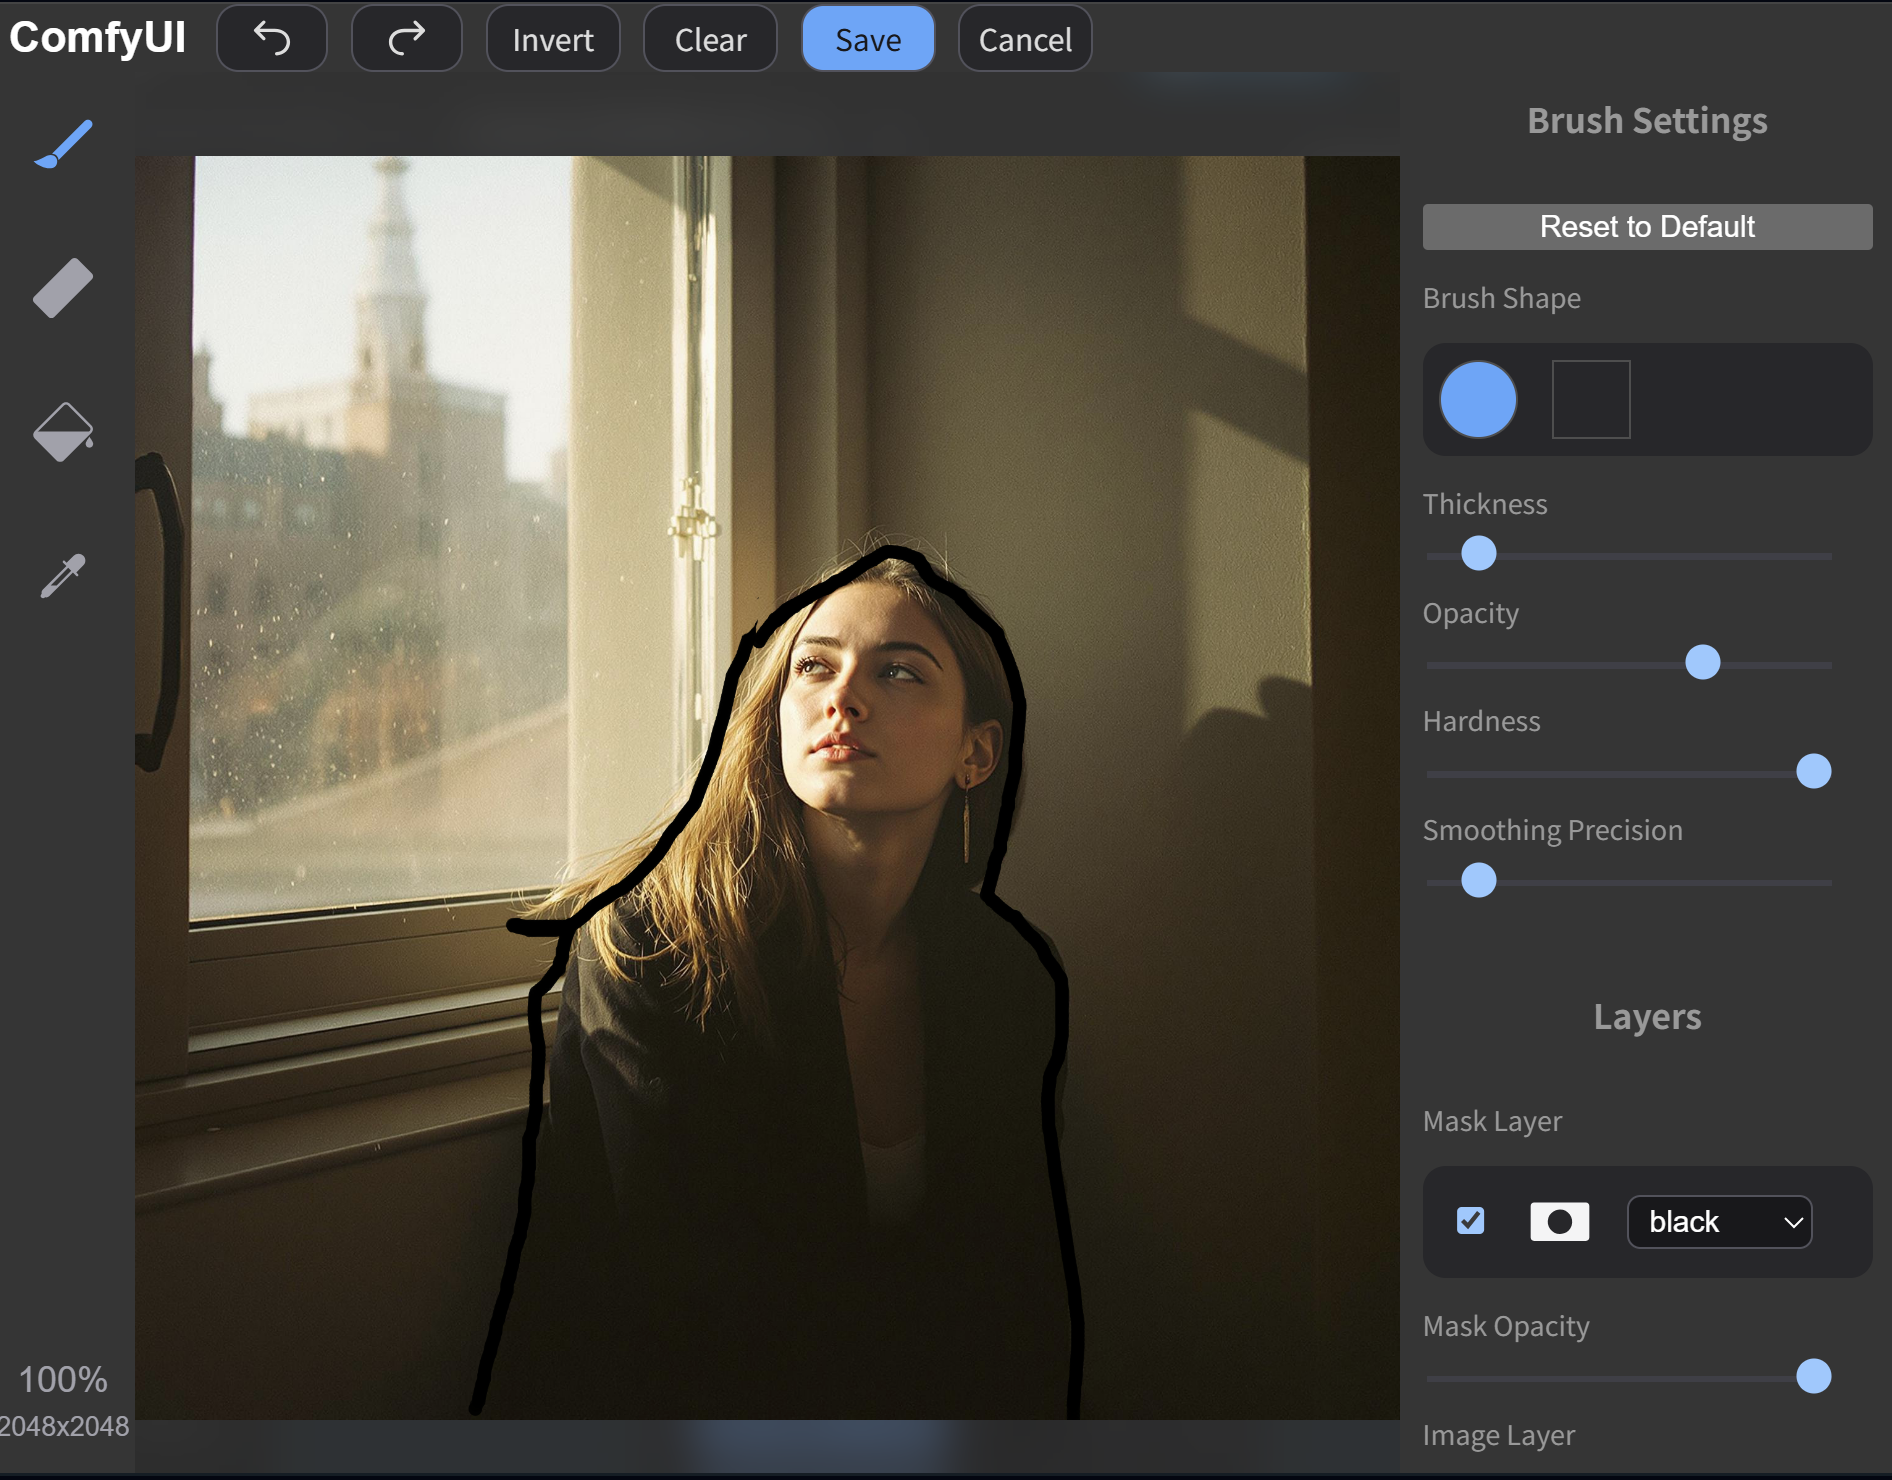
- Using the Mask Editor with ICEdit (Optional but Recommended):
- In the MaskEditor, use the brush tools to draw a mask around the specific area you want to modify with ICEdit
- This helps direct ICEdit's attention to the relevant parts of the image
- Use different brush settings (thickness, opacity, hardness) for precise control
- Click "Save" when finished to apply your custom mask to the ICEdit workflow
- This step significantly improves ICEdit's success rates for detailed or specific changes
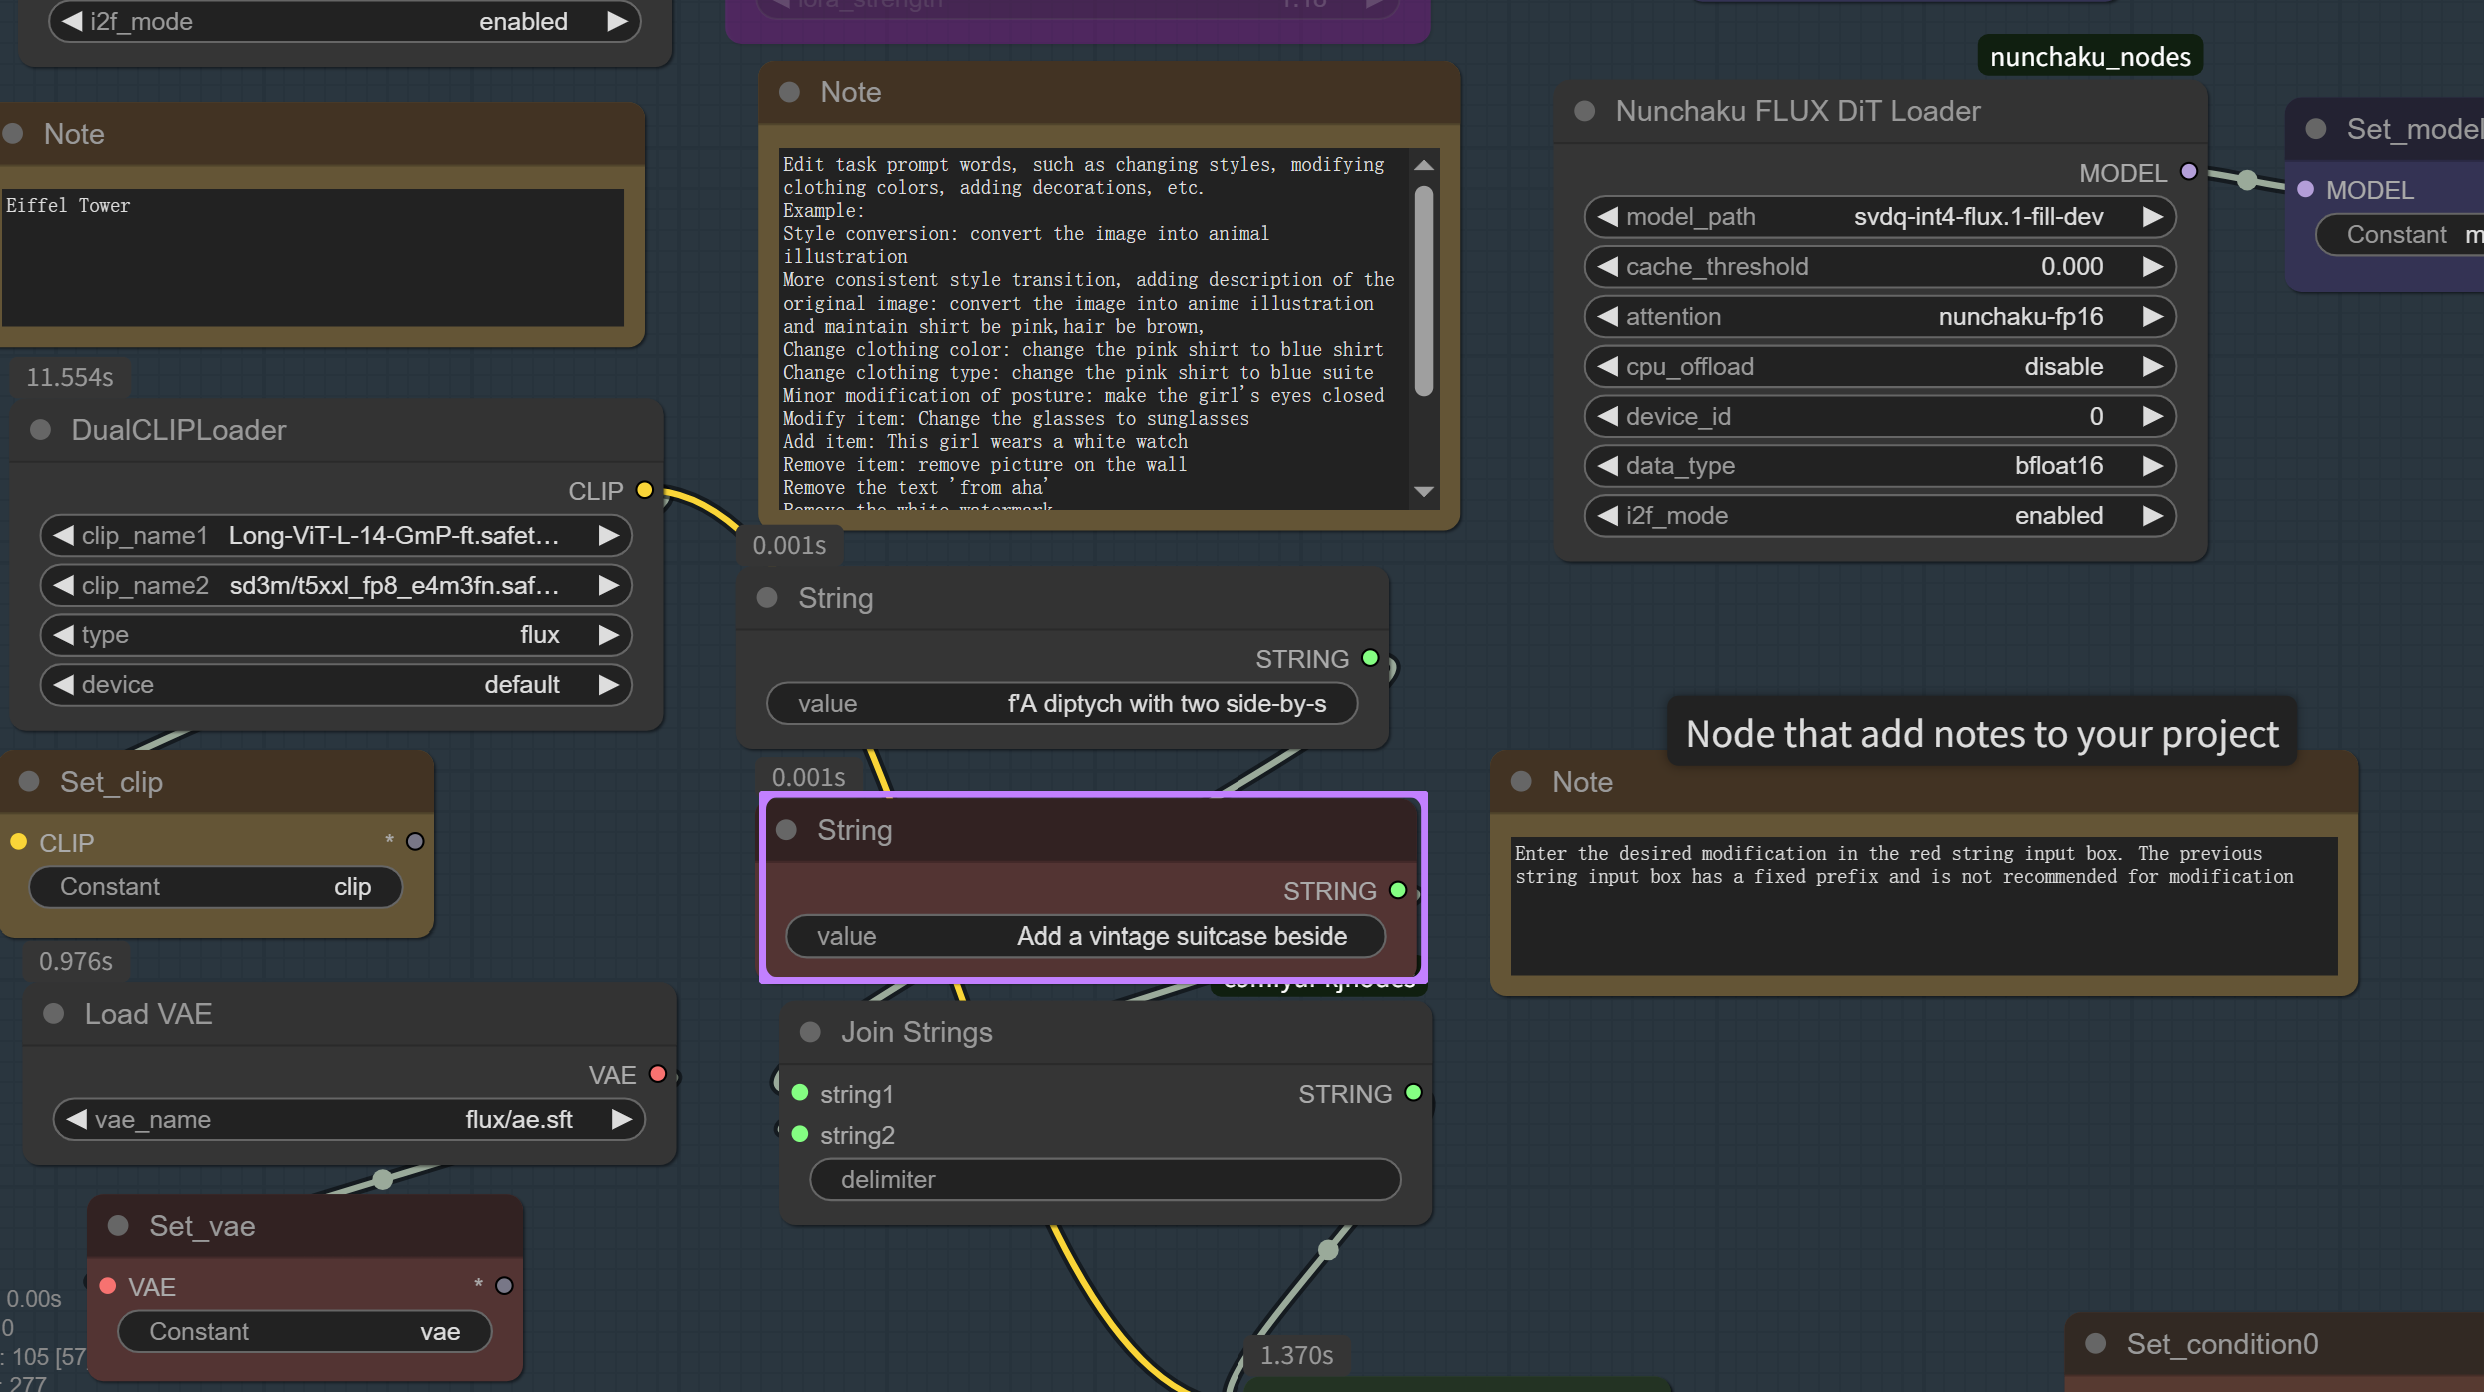
- Entering Your ICEdit Instructions:
- Find the String input node with the red highlight in the center of the ICEdit workflow
- Type your desired ICEdit instruction in this field
- For style transfers, simply type instructions like "Convert the image into Ghibli style" or "Convert to anime illustration and maintain shirt be pink, hair be brown"
- Leave the other String node with the fixed prefix unchanged - this contains the required context that makes ICEdit work properly
- The workflow will automatically combine your instruction with the required prefix for optimal ICEdit processing
- Running the ICEdit Workflow:
- After uploading your image and entering your edit instruction, click
runto start ICEdit processing - The ICEdit workflow will generate the edited image through several processing stages
- After uploading your image and entering your edit instruction, click
4. Parameter Reference for ICEdit#
ICEdit Parameter Settings:
- Nunchaku FLUX.1 LoRA Loader for ICEdit:
lora_strength: 1.00-1.18 (can be adjusted for ICEdit effect intensity, with 1.18 providing best overall results)
- ICEdit KSamplerAdvanced Settings:
- First KSampler: Default 30 steps, euler sampler, CFG 7
- Adjust CFG: Higher values (8-15) follow instructions more strictly, lower values (3-5) increase creativity
- Adjust steps: More steps improve detail but increase processing time
- Second KSampler: Default 25 steps for upscaling with beta scheduler
- Third KSampler: Default 30 steps, kl_optimal sampler for preserving facial details and texture
- These parameters can be adjusted based on your specific editing needs
- First KSampler: Default 30 steps, euler sampler, CFG 7
- ICEdit Upscaling Configuration:
- The ICEdit workflow includes three upscaling methods:
- Model-based upscaling using specialized models like 2xNomosUni
- ImageScaleBy for detail enhancement with lanczos scaling
- KL-optimal sampling for high-fidelity ICEdit restoration (helps preserve facial features)
- If using 4x magnification models, consider changing the scaling factor to 0.5 to prevent artifacts in large ICEdit results
- The ICEdit workflow includes three upscaling methods:
- FluxGuidance in ICEdit:
- The ICEdit workflow has multiple FluxGuidance nodes in different sections, controlling guidance strength
- Style Conversion FluxGuidance: Controls how closely the ICEdit style transfer follows your instructions
- Image Editing FluxGuidance: Right side shows a value of 4.0, balancing quality and ICEdit precision
- Higher values make ICEdit follow instructions more precisely but may affect image quality
- Lower values provide more creative freedom but may result in less precise ICEdit results
- Redux Integration with ICEdit (Optional):
- The ICEdit workflow includes Redux style fine-tuning capabilities, but it's optional
- When using Redux for ICEdit style transfer, you can change to get_condition1, though results may vary
5. Example ICEdit Editing Tasks#
ICEdit excels at a variety of editing operations, including:
- Style Transfers with ICEdit: "Convert the image into anime illustration"
- Color Changes using ICEdit: "Change the blue shirt to green"
- Clothing Modifications with ICEdit: "Change the blue shirt to denim jacket"
- Accessory Addition through ICEdit: "Add sunglasses", "This girl wears a white watch"
- Accessory Removal with ICEdit: "Remove picture on the wall"
- Background Alterations using ICEdit: "Girl is on the beach, colorful cloud in the sky"
- Object Manipulation via ICEdit: "Hand holding a durian"
- Text/Watermark Operations with ICEdit: "Add a blue watermark 'from me' on the wall", "Remove the text 'from aha'"
- Multi-element Editing through ICEdit: "Convert to Ghibli style"
6. Advanced Tips for Better ICEdit Results#
ICEdit Prompt Engineering:
- Be specific and concise in your ICEdit instructions
- For ICEdit style transfers, include details you want preserved
- Use clear descriptive language for best ICEdit results
- When changing backgrounds with ICEdit, be specific about placement
ICEdit Optimization Tips:
- If you encounter unsatisfactory ICEdit results, try changing the seed value (this is critical for success)
- For complex ICEdit edits, consider breaking them into multiple simpler edit steps
- Adjust lora_strength to control the intensity of ICEdit effects
Handling ICEdit Failures:
- ICEdit works best with realistic photographs; results may vary with non-photorealistic inputs
- Object removal tasks with ICEdit have lower success rates than additions or modifications
- If an ICEdit attempt fails, try rephrasing the instruction or using a different seed
7. Credits and Acknowledgements#
This workflow is powered by ICEdit, developed by Zechuan Zhang, Ji Xie, Yu Lu, Zongxin Yang, and Yi Yang from ReLER, CCAI, Zhejiang University and Harvard University. The ComfyUI integration of ICEdit is made possible through community contributions, with special thanks to judian17 for the Nunchaku-compatible version of ICEdit and optimization work.
The workflow uses a specially adapted version of ICEdit-MoE-LoRA where expert layers were weight-averaged for compatibility, enabling high-quality ICEdit processing with minimal computational resources.
For additional information about ICEdit, please visit:
- Project page: ICEdit GitHub
